Step by Step R12.2.6 EBS installation on Virtual Box
Oracle recently release VM template for R12.2.6 on Software delivery cloud. In this blogpost , we would be checking step by step how to build R12.2.6 with Virtual box on the Desktop or Laptop
1) First install VirtualBox on the Desktop or Laptop. Check below post on how to do the installation
Step by Step instructions for Oracle Virtual Box Installation
2) Now download the R12.2.6 VM appliance
To download the VM Virtual Appliance for Oracle E-Business Suite Release 12.2.6:
Go to https://edelivery.oracle.com/, and click the Sign In button.
You are now signed in to the Oracle Software Delivery Cloud.
On the Oracle Software Delivery Cloud page, perform the following tasks:
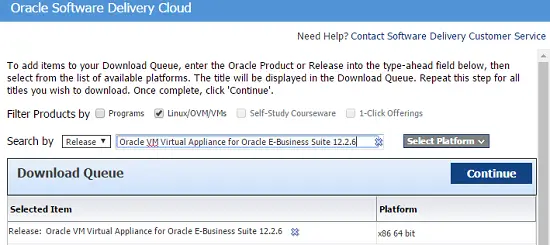
Filter Products By: Select the “Linux/OVM/VMs” check box.
Search by: Select “Release” from the drop-down list.
In the text field, enter “Oracle VM Virtual Appliance for Oracle E-Business Suite 12.2.6”.
Click the Continue button.
The Download Queue region displays the selected “Oracle VM Virtual Appliance for Oracle E-Business Suite 12.2.6” media pack and the platform information.
Click the Continue button again.
This retrieves the “Oracle VM Virtual Appliance for Oracle E-Business Suite 12.2.6” media pack.
Click the Continue button again, and accept the Oracle Standard Terms and Restrictions. You must do so before you can download the desired media pack.
The File Download window appears with your selected “Oracle VM Virtual Appliance for Oracle E-Business Suite (12.2.6) for x86 64 bit” media pack.
Download the package and thus the zip files which contain the associated appliance.
The Oracle VM Virtual Appliances for Oracle E-Business Suite 12.2.6.0.0 for x86 64bit is packaged in 19 files requiring 69.4 GB, so may take some considerable time to download depending upon your network / internet connection.
V861124-01 Oracle E-Business Suite Release 12.2.6 Single Node Vision Install X86 (64 bit) – (1 of 10) (Part 1 of 2) Linux x86-64
V861124-01 Oracle E-Business Suite Release 12.2.6 Single Node Vision Install X86 (64 bit) – (1 of 10) (Part 2 of 2) Linux x86-64
V861125-01 Oracle E-Business Suite Release 12.2.6 Single Node Vision Install X86 (64 bit) – (2 of 10) (Part 1 of 2) Linux x86-64
V861125-01 Oracle E-Business Suite Release 12.2.6 Single Node Vision Install X86 (64 bit) – (2 of 10) (Part 2 of 2) Linux x86-64
V861126-01 Oracle E-Business Suite Release 12.2.6 Single Node Vision Install X86 (64 bit) – (3 of 10) (Part 1 of 2) Linux x86-64
V861126-01 Oracle E-Business Suite Release 12.2.6 Single Node Vision Install X86 (64 bit) – (3 of 10) (Part 2 of 2) Linux x86-64
V861127-01 Oracle E-Business Suite Release 12.2.6 Single Node Vision Install X86 (64 bit) – (4 of 10) (Part 1 of 2) Linux x86-64
V861127-01 Oracle E-Business Suite Release 12.2.6 Single Node Vision Install X86 (64 bit) – (4 of 10) (Part 2 of 2) Linux x86-64
V861128-01 Oracle E-Business Suite Release 12.2.6 Single Node Vision Install X86 (64 bit) – (5 of 10) (Part 1 of 2) Linux x86-64
V861128-01 Oracle E-Business Suite Release 12.2.6 Single Node Vision Install X86 (64 bit) – (5 of 10) (Part 2 of 2) Linux x86-64
V861129-01 Oracle E-Business Suite Release 12.2.6 Single Node Vision Install X86 (64 bit) – (6 of 10) (Part 1 of 2) Linux x86-64
V861129-01 Oracle E-Business Suite Release 12.2.6 Single Node Vision Install X86 (64 bit) – (6 of 10) (Part 2 of 2) Linux x86-64
V861130-01 Oracle E-Business Suite Release 12.2.6 Single Node Vision Install X86 (64 bit) – (7 of 10) (Part 1 of 2) Linux x86-64
V861130-01 Oracle E-Business Suite Release 12.2.6 Single Node Vision Install X86 (64 bit) – (7 of 10) (Part 2 of 2) Linux x86-64
V861131-01 Oracle E-Business Suite Release 12.2.6 Single Node Vision Install X86 (64 bit) – (8 of 10) (Part 1 of 2) Linux x86-64
V861131-01 Oracle E-Business Suite Release 12.2.6 Single Node Vision Install X86 (64 bit) – (8 of 10) (Part 2 of 2) Linux x86-64
V861132-01 Oracle E-Business Suite Release 12.2.6 Single Node Vision Install X86 (64 bit) – (9 of 10) (Part 1 of 2) Linux x86-64
V861132-01 Oracle E-Business Suite Release 12.2.6 Single Node Vision Install X86 (64 bit) – (9 of 10) (Part 2 of 2) Linux x86-64
V861133-01 Oracle E-Business Suite Release 12.2.6 Single Node Vision Install X86 (64 bit) – (10 of 10) (Part 1 of 1) Linux x86-64
You can Use Download Manager to download the file or wget option
The virtual appliance delivers the full software stack, including the Oracle Linux 6.9 (64-bit) operating system, Oracle E-Business Suite, and additional required technology components. The embedded technology components are listed below:
| Component | Version |
| RDBMS Oracle Home | 12.1.0.2 |
| Application Code Level | Oracle E-Business Suite 12.2.6 Release Update Pack (My Oracle Support Knowledge Document 2114016.1) + AD and TXK Delta 8 (My Oracle Support Knowledge Document 2159750.1) |
| Oracle Forms and Reports | 10.1.2.3 |
| WebLogic Server | 10.3.6 |
| Web Tier | 11.1.1.9 |
| JDK | JDK 1.7 build 1.7.0_121-b15 |
| Java Plugin | J2SE 1.7 |
| Critical Patch Update (CPU) | October 2016 |
3) Reconstructing and Staging the Downloaded Appliance
Now we need to Unzip these 19 Zips and Concatenate the 19 files to create the final file
a) Unzip all the 19 files
You will need additional 75G space for storing the Unzipped files
For Unix, we can use below command also to unzip
for i in *.zip
do
unzip $i
done
b) Assemble the 19 files
Assemble the files using the command below on Windows
type Oracle-E-Business-Suite-12.2.6_VISION_INSTALL.ova.00 Oracle-E-Business-Suite-12.2.6_VISION_INSTALL.ova.01 Oracle-E-Business-Suite-12.2.6_VISION_INSTALL.ova.02 Oracle-E-Business-Suite-12.2.6_VISION_INSTALL.ova.03 Oracle-E-Business-Suite-12.2.6_VISION_INSTALL.ova.04 Oracle-E-Business-Suite-12.2.6_VISION_INSTALL.ova.05 Oracle-E-Business-Suite-12.2.6_VISION_INSTALL.ova.06 Oracle-E-Business-Suite-12.2.6_VISION_INSTALL.ova.07 Oracle-E-Business-Suite-12.2.6_VISION_INSTALL.ova.08 Oracle-E-Business-Suite-12.2.6_VISION_INSTALL.ova.09 Oracle-E-Business-Suite-12.2.6_VISION_INSTALL.ova.10 Oracle-E-Business-Suite-12.2.6_VISION_INSTALL.ova.11 Oracle-E-Business-Suite-12.2.6_VISION_INSTALL.ova.12 Oracle-E-Business-Suite-12.2.6_VISION_INSTALL.ova.13 Oracle-E-Business-Suite-12.2.6_VISION_INSTALL.ova.14 Oracle-E-Business-Suite-12.2.6_VISION_INSTALL.ova.15 Oracle-E-Business-Suite-12.2.6_VISION_INSTALL.ova.16 Oracle-E-Business-Suite-12.2.6_VISION_INSTALL.ova.17 Oracle-E-Business-Suite-12.2.6_VISION_INSTALL.ova.18 > Oracle-E-Business-Suite-12.2.6_VISION_INSTALL.ova
On Unix, following can be used
cat Oracle-E-Business-Suite-12.2.6_VISION_INSTALL.ova.00 \
Oracle-E-Business-Suite-12.2.6_VISION_INSTALL.ova.01 \
Oracle-E-Business-Suite-12.2.6_VISION_INSTALL.ova.02 \
Oracle-E-Business-Suite-12.2.6_VISION_INSTALL.ova.03 \
Oracle-E-Business-Suite-12.2.6_VISION_INSTALL.ova.04 \
Oracle-E-Business-Suite-12.2.6_VISION_INSTALL.ova.05 \
Oracle-E-Business-Suite-12.2.6_VISION_INSTALL.ova.06 \
Oracle-E-Business-Suite-12.2.6_VISION_INSTALL.ova.07 \
Oracle-E-Business-Suite-12.2.6_VISION_INSTALL.ova.08 \
Oracle-E-Business-Suite-12.2.6_VISION_INSTALL.ova.09 \
Oracle-E-Business-Suite-12.2.6_VISION_INSTALL.ova.10 \
Oracle-E-Business-Suite-12.2.6_VISION_INSTALL.ova.11 \
Oracle-E-Business-Suite-12.2.6_VISION_INSTALL.ova.12 \
Oracle-E-Business-Suite-12.2.6_VISION_INSTALL.ova.13 \
Oracle-E-Business-Suite-12.2.6_VISION_INSTALL.ova.14 \
Oracle-E-Business-Suite-12.2.6_VISION_INSTALL.ova.15 \
Oracle-E-Business-Suite-12.2.6_VISION_INSTALL.ova.16 \
Oracle-E-Business-Suite-12.2.6_VISION_INSTALL.ova.17 \
Oracle-E-Business-Suite-12.2.6_VISION_INSTALL.ova.18 > Oracle-E-Business-Suite-12.2.6_VISION_INSTALL.ova
You will need additional 75G space for creating the final file
Now we are ready with the Final ova to import into Virtual Box
Check below post to read further steps
Step by Step R12.2.6 EBS installation on Virtual Box Part -2
Related Articles
---------------------------------------------------------------------------------------------------
Easy Step-by-Step Install of Oracle EBS 12.2.3 with Non-DBA skills
The latest Oracle E-Business Suite Applications Release running in your laptop in less than 1 hour.
Caveat
- This #Oracle_EBS instance will be running on a virtual machine hosted by #Oracle Virtual Box It will be a Single Node install which means only one VM is required.
- You will not need to install Oracle VM Server and Oracle VM Manager.
- You will need some IT basic skills but you don’t need to be a DBA or super technical
- I used Metalink’s Doc ID 1620448.1 as a reference.
Basic Systems Requirements
- A 64-bit Desktop or Laptop running Oracle Virtual Box (I tested it with a beefed-up desktop running Windows Server 2012)
- At least 6 GB RAM (That’s what the appliance requires, I updated to 8 GB before importing in in Virtual Box)
- Hard Drive (built-in or external) 500 GB minimum (My VM was 261 GB when I was done but the Virtual Box appliances comes with 500 GB by default, which you can update before importing it)
- One static IP address will be ideal if you want to connect to Oracle EBS outside your local PC. You will also need additional network information such as Network Mask, Default Gateway, DNS Server, host name and Domain.
Step 1 — Download the install files
I will be showing how to install a Single Node Vision instance on a Virtual Machine. This means both database and application servers will be under the same IP address and a typical Vision instance will be created. This instance will run within Virtual Box.
a) Log in to Oracle Software Delivery Cloud (a.k.a eDelivery) and search for the Oracle VM Virtual Appliances for Oracle E-Business Suite (12.2.3) Media Pack for x86 64 bit
b) Select and download all the files for Oracle E-Business Suite Release 12.2.3 Single Node Vision Install X86 (64 bit)
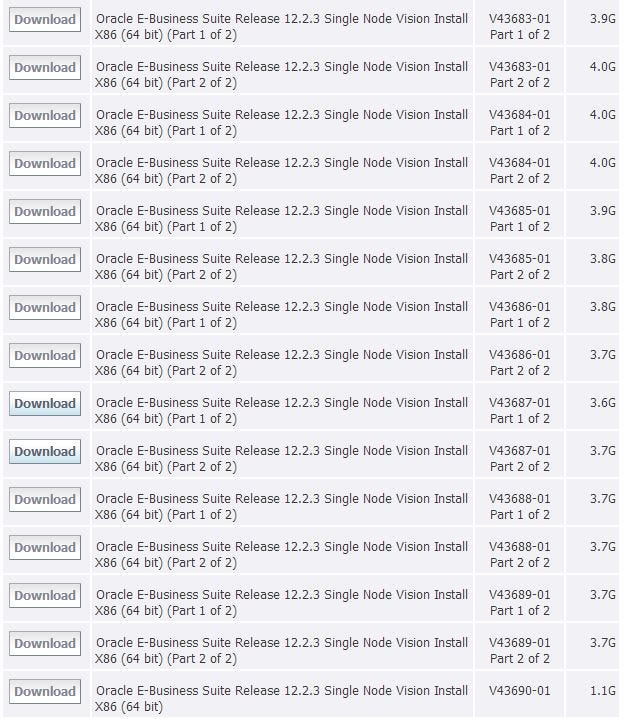
Step 2 — Unzip Files and concatenate into a single .ova file
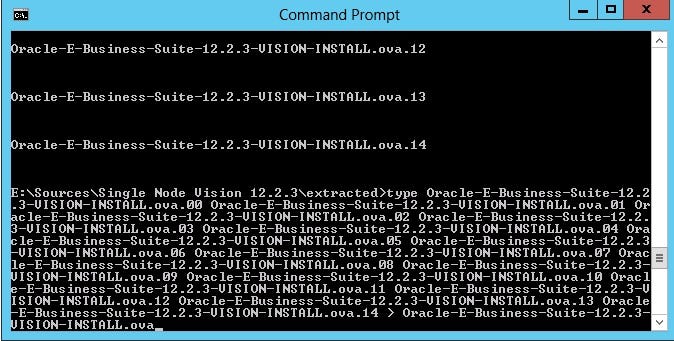
You will end up with the .ova file that you need to import to Virtual Box
Step 3 — Double click .ova file to import into Virtual Box.

Step 4 — Change Network preferences and settings for the imported appliance
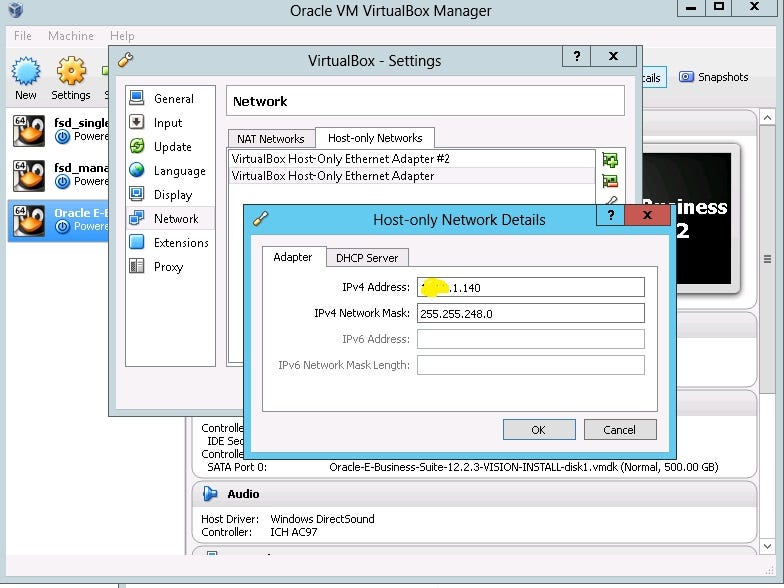
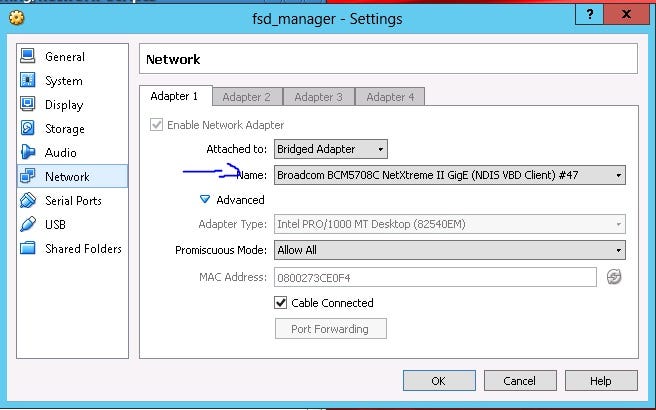
Step 5 — Start up your VM
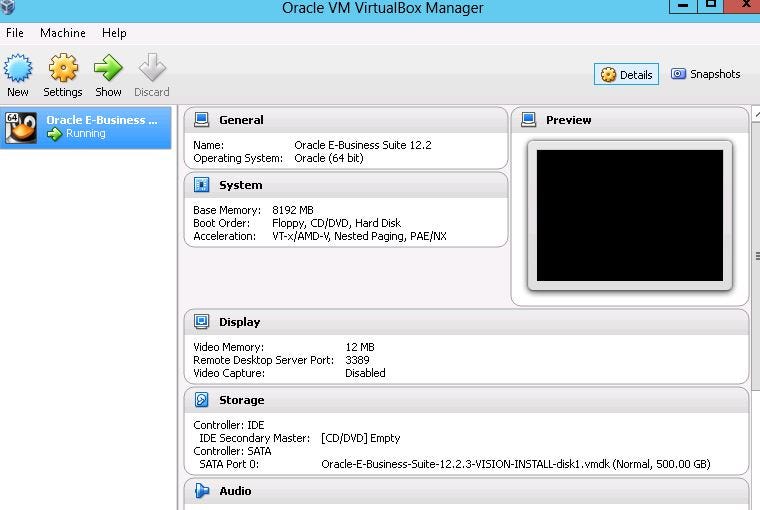
During the process you will be asked to change the password for the following users: root, oracle and applmgr
Step 6— After completing the initial install of the VM choose to install VISION

Step 7— Configure Static IP

In case you missed or skipped this step during the install you can go back to these setting by running the following script from /u01/install/scripts:
ovm_configure_network
Step 8— Configure Database Tier

- Run script visiondbconfig.sh from /u01/install/VISION/scripts
- Add your SID or Database Name (i.e.: VIS1223)
Step 9— Configure Applications Tier
- Run visionappsconfig.sh from /u01/install/VISION/scripts
- Indicate Host Name (just host without the domain), Domain Name, Database SID, and Port Number
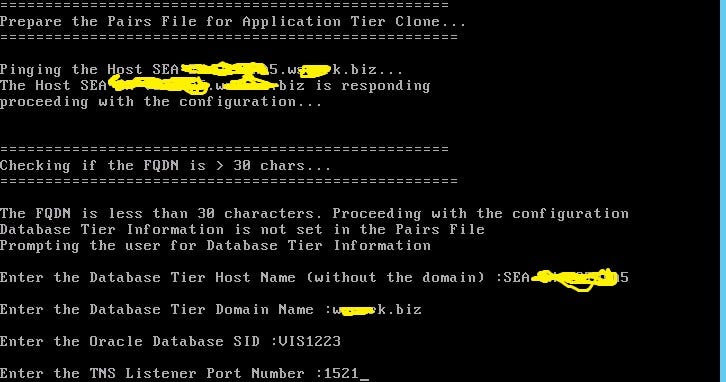
Step 10— Check the Installation Summary
Hopefully when the process of setting up the Applications tier is completed the installation summary information will be displayed on your screen.

Write down your Oracle EBS Login Page but don’t launch it right now:
http://<your-server>.<your-domain>:8000/OA_HTML/AppsLogin
Step 11— Edit host file in your desktop
Go to C:\Windows\System32\drivers\etc\hosts and add an entry with the IP address and host name of the server from where your are running your new instance.
Step 12 — Change your Java Security Level
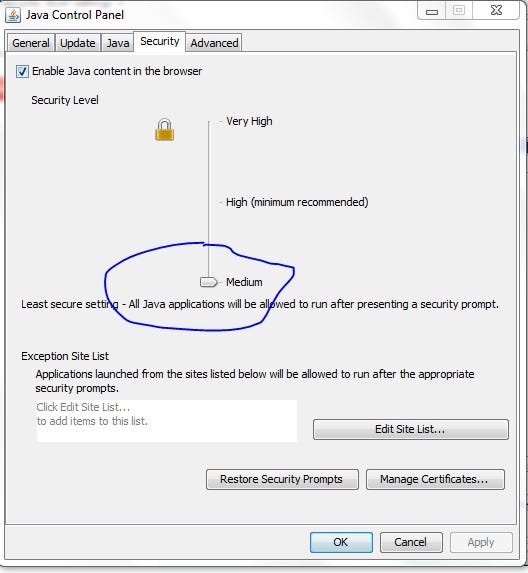
Go to the Java Control Panel and update your Java Security Level to Medium
Step 13 (Final Step!) — Open your Browser and navigate to the Oracle EBS 12.2.3 Login Page
http://<your-server>.<your-domain>:8000/OA_HTML/AppsLogin
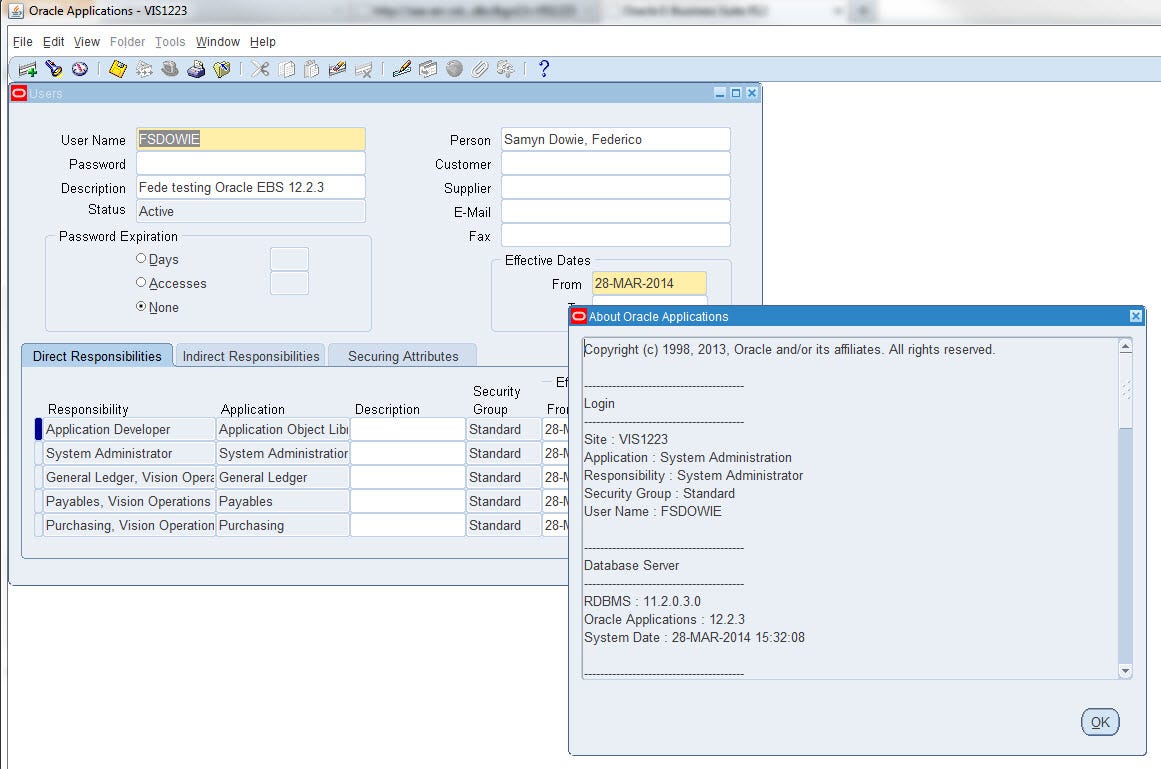
Useful scripts:
SCRIPTS BASE_DIR: /u01/install/VISION/scripts/
START SCRIPT FOR DB: /u01/install/VISION/scripts/startvisiondb.sh
STOP SCRIPT FOR DB: /u01/install/VISION/scripts/stopvisiondb.sh
START SCRIPT FOR APPS: /u01/install/VISION/scripts/startvisionapps.sh
STOP SCRIPT FOR APPS: /u01/install/VISION/scripts/stopvisionapps.sh
DB RE-CONFIG SCRIPT: /u01/install/VISION/scripts/visiondbconfig.sh
APPS RE-CONFIG SCRIPT: /u01/install/VISION/scripts/visionappsconfig.sh
DB CLEANUP SCRIPT: /u01/install/VISION/scripts/visiondbcleanup.sh
APPS CLEANUP SCRIPT: /u01/install/VISION/scripts/visionappscleanup.sh
CONFIGURE A NEW WEB ENTRY POINT: /u01/install/scripts/configwebentry.sh


Tidak ada komentar:
Posting Komentar