Minggu, 30 Juli 2023

WIFI EXTENDED-edimax


10 Cara Pasang Repeater Wifi Indihome di Rumah & Manfaatnya

Cara Pasang Repeater Wifi Indihome – Sebagai pelanggan Indihome, pastinya kalian bakal dijelaskan mengenai batas maksimal area jangkauan sinyal Indihome. Hal tersebut di hitung dari lokasi Router atau Modem Indihome di rumah.

Jadi, ketika perangkat yang tersambung ke Wifi Indihome tapi berada di lokasi yang jauh dari lokasi Router, maka sinyal yang diperoleh juga sedikit. Dengan begitu, koneksi internet yang dimiliki juga akan lebih lambat alias lemot.

Daftar Isi

Oleh karena itu, beberapa pelanggan Indihome memilih pasang Repeater Wifi. Belum tahu apa itu Repeater Wifi dan fungsinya bagi pelanggan Indihome? Simak terus artikel ini sampai akhir, karena kami bakal menjelaskannya secara lengkap.

Sebelum itu penting diketahui bahwa untuk pasang Repeater Wifi Indihome berlaku beberapa syarat dan ketentuan yang harus dipenuhi. Baiklah, supaya lebih jelas langsung saja simak ulasan selengkapnya dibawah ini mengenai syarat hingga tata cara pasang Repeater Wifi Indihome.

Apa Itu Repeater Wifi Indihome

Diatas kami sempat menyinggung soal jarak maksimal jangkauan sinyal Wifi Indihome. Jadi, bagi yang belum tahu sinyal Wifi Indihome saat ini hanya mampu menjangkau perangkat yang berada kurang lebih 10 sampai 15 meter dari titik Router.

Dengan begitu, ketika perangkat kalian sudah tersambung ke Wifi Indihome tapi kemudian menjauh sampai melebihi batas maksimal jangkauan, maka sinyal Wifi akan melemah atau bahkan koneksi terputus. Tapi jangkauan sinyal Wifi Indihome masih bisa diperluas dan diperpanjang menggunakan alat bantu bernama Repeater Wifi.

Bagi yang belum tahu, Repeater Wifi merupakan sebuah perangkat yang berguna sebagai perantara sinyal Wifi. Dengan cara pasang alat ini, maka jangkauan sinyal Indihome di rumah kalian bakal lebih luas, sehingga ketika mengakses Wifi Indihome di ruangan yang jauh dari Router, koneksi nya masih tetap stabil.

Lalu apakah Indihome menawarkan perangkat tersebut? Dari pihak Indihome tidak menyediakan perangkat Repeater Wifi, jadi kalian perlu membeli sendiri perangkat tersebut. Tapi khusus untuk para pelanggan Indihome, kami merekomendasikan Repeater Wifi merk Edimax Extender.

Alat ini bentuknya seperti kepala Charger smartphone yang bisa kalian gunakan. Pada alat tersebut juga tersedia slot untuk kabel Ethernet atau kabel LAN. Jadi, nantinya kalian bisa menghubungkan Repeater Wifi ke Modem Indihome melalui kabel LAN. Harga Repeater Wifi Edimax berada di kisaran Rp. 100.000 sampai Rp. 150.000 di eCommerce Tokopedia, Bukalapak, Shopee dan Lazada.

Cara Pasang Repeater Wifi Indihome

Cara Pasang Repeater Wifi Indihome

Setelah menyimak sedikit penjelasan diatas mengenai apa itu Repeater Wifi, sekarang mari kita lanjut ke cara pasang Repeater Wifi Indihome. Untuk rekomendasi Repeater Wifi yang cocok untuk pelanggan Indihome juga telah kami sebutkan diatas, yaitu Repeater Wifi Edimax.

Kemudian sebelum kami jelaskan lebih lanjut, perlu diketahui bahwa untuk pasang alat tersebut kalian bisa mengaktifkan Port LAN pada Modem Indihome terlebih dahulu. Cara ini berlaku apabila kalian ingin menghubungkan Repeater dengan Modem supaya koneksi yang diberikan lebih stabil.

Apabila belum membuka Port LAN juga tidak masalah, sebab Repeater Edimax ini bisa menjadi Wifi Extender. Artinya alat tersebut bisa tetap menjadi perantara sinyal Wifi Indihome tanpa menggunakan kabel LAN. Baiklah, daripada penasaran silahkan simak tata cara pasang Repeater Wifi Indihome dibawah ini :

1. Pasang Repeater Wifi

Pasang Repeater Wifi

Langkah pertama silahkan pasang Repeater Wifi ke Stop Kontak (Colokan Listrik). Usahakan Repeater Wifi berada di tengah-tengah antara lokasi Router dan titik jarak maksimal jangkauan Wifi Indihome di rumah kalian.

2. Connect Perangkat ke Repeater Wifi

Connect Perangkat ke Repeater Wifi

Jika sudah, sekarang buka PC atau Laptop lalu hubungkan perangkat ke Repeater Wifi.

3. Input Alamat IP

Input Alamat IP

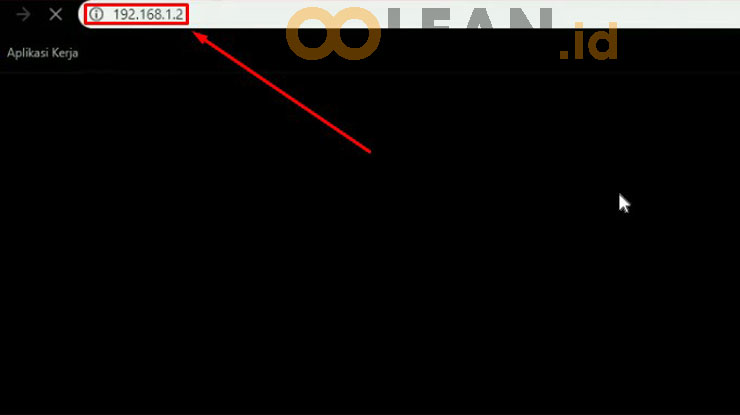
Setelah berhasil connect, silahkan buka Browser dan masukkan alamat IP 192.168.1.2 lalu tekan Enter.

4. Pilih Wifi Extender

Pilih Wifi Extender

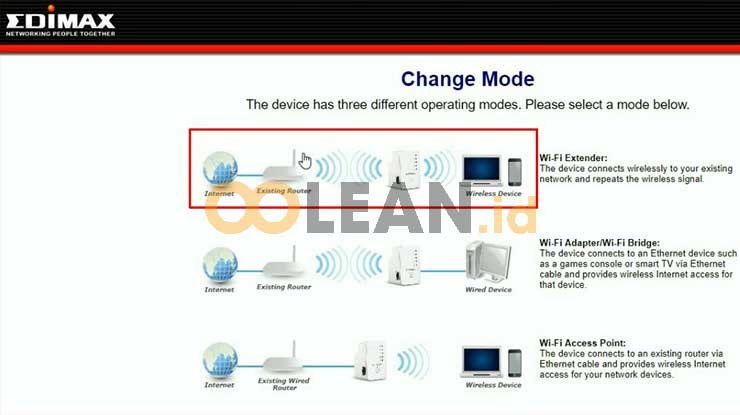
Pada halaman berikutnya akan muncul 3 (tiga) pilihan mode Repeater, disini langsung saja pilih mode Wifi Extender.

5. Klik Next

Klik Next

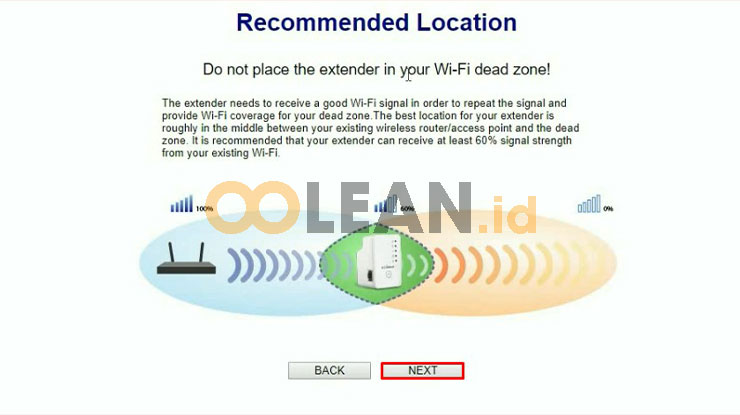
Selanjutnya kalian juga akan diberi penjelasan mengenai jarak rekomendasi lokasi Repeater Wifi dengan Modem Indihome sebagai sumber koneksi internet. Silahkan pahami keterangan tersebut jika sudah klik Next.

6. Klik Wifi Sumber

Klik Wifi Sumber

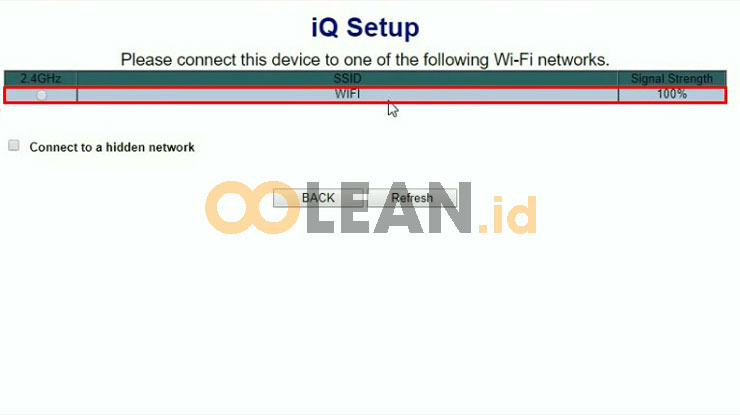
Kemudian sistem Repeater akan mencari sumber Wifi terdekat. Disini pasti akan muncul SSID Wifi Indihome di rumah kalian. Silahkan pilih SSID Wifi tersebut.

7. Buat Nama Wifi & Input Password

Buat Nama Wifi Input Password

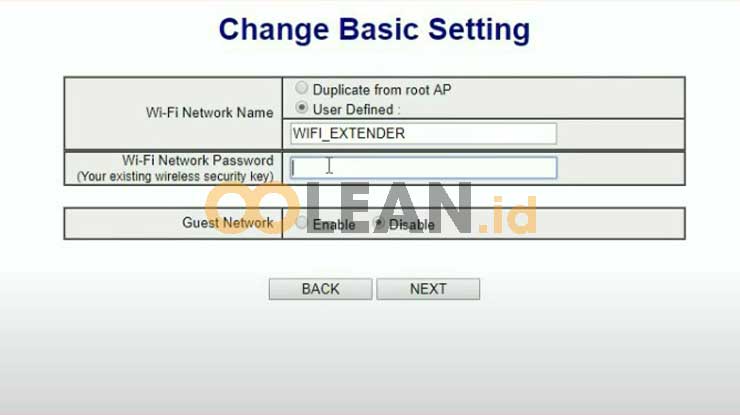
Pada halaman Change Basic kalian bisa membuat nama Repeater Wifi baru atau klik Duplicate from root AP untuk menyamakan SSID Repeater dengan SSID Wifi Indihome yang digunakan. Jika sudah, pada kolom Wi-Fi Network Password kalian masukkan kata sandi Wifi Indihome yang digunakan. Setelah itu klik Next.

8. Klik Apply

Klik Apply

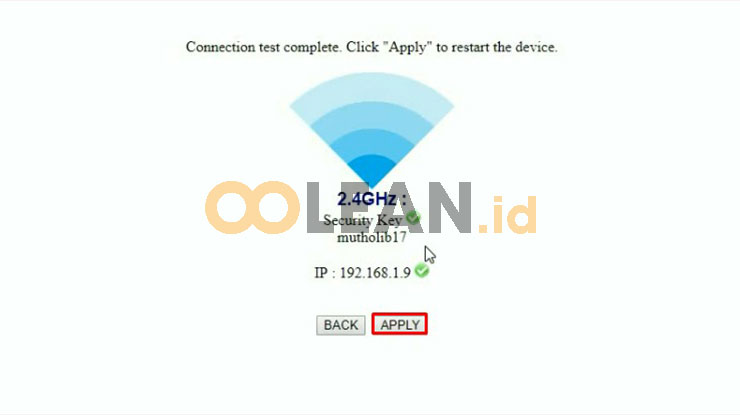
Klik Apply untuk menerapkan settingan tersebut.

9. Tunggu Proses Restart

Tunggu Proses Restart

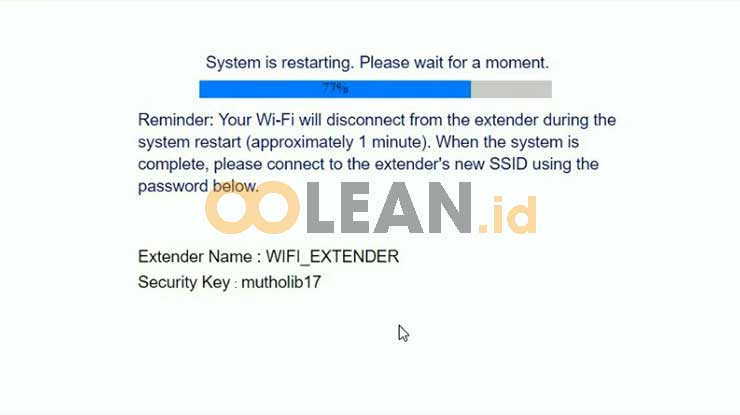
Selanjutnya tunggu sistem melakukan restart Repeater. Proses ini memakan waktu kurang lebih 1 menit.

10. Berhasil Pasang Repeater Wifi Indihome

Berhasil Pasang Repeater Wifi Indihome

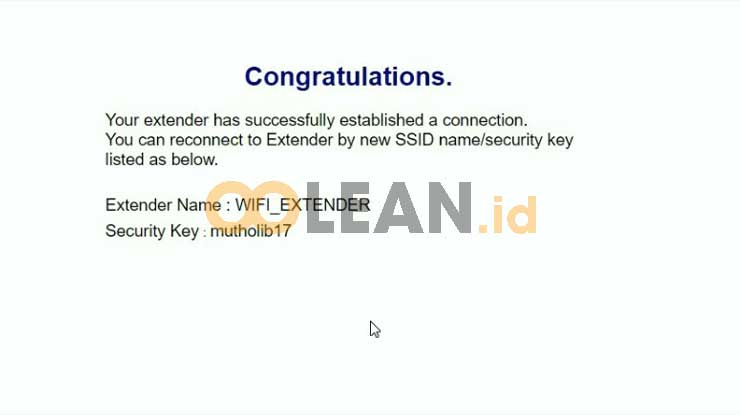
Sampai disini kalian sudah berhasil pasang Repeater Wifi Indihome.

Manfaat Menggunakan Repeater Wifi Indihome

Manfaat Menggunakan Repeater Wifi Indihome

Sebenarnya untuk manfaat dari pasang Repeater Wifi secara tidak langsung telah kami jelaskan diatas. Jadi, melalui alat diatas kalian bisa memperluas jaringan internet Indihome dirumah. Dengan begitu, kalian tetap bisa mendapatkan koneksi internet stabil meskipun perangkat berada jauh dari lokasi Modem.

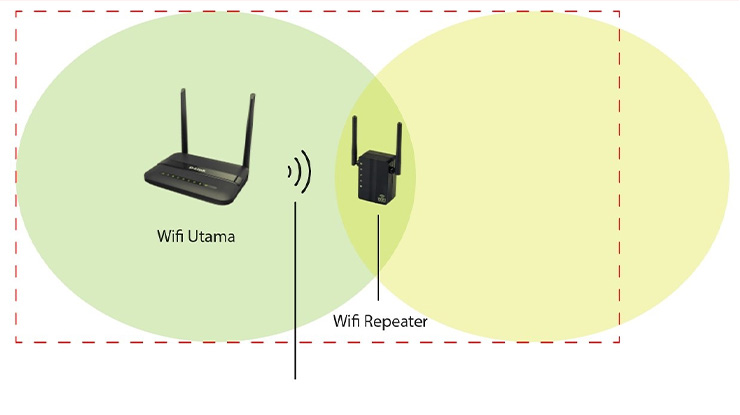
Selain itu, pastikan kalian pasang Repeater Wifi pada lokasi yang berada di tengah-tengah antara Modem dan perangkat (Client). Misal, Modem atau Router Indihome terletak di ruang tamu dan perangkat PC, Smartphone atau Laptop berada halaman belakang.

Jarak antara ruang tamu dan halaman belakang kurang lebih 13 meter, maka kalian pasang Repeater Wifi dengan jarak 6 meter dari Modem dan 6 meter dari Client. Nantinya alat tersebut bakal menghantarkan sinyal Wifi pada perangkat tersambung atau Client.

Bahkan cara ini juga bermanfaat untuk kalian jika ingin membantu tetangga yang belum bisa berlangganan Indihome karena ODP penuh. Setelah mengajukan jaringan baru Indihome tapi belum di konfirmasi, sementara kalian bisa membagikan sinyal Wifi ke lokasi tersebut melalui Repeater.

KESIMPULAN

Demikianlah penjelasan dari Oolean.id mengenai cara pasang Repeater Wifi Indihome. Diatas kami juga memberikan rekomendasi Repeater Wifi terbaik untuk pelanggan Indihome. Nantinya setelah menambahkan Repeater Wifi, sinyal internet Indihome bakal meluas ke seluruh ruangan bahkan sampai ke Dead Zone (lokasi yang sebelumnya tidak terjangkau sinyal Wif

Jumat, 28 Juli 2023

POSTGRESQL-ha setup


Setting up PostgreSQL Streaming Replication for High Availability and Backup

TutorialAug 20, 2022

https://narasimmantech.com/setting-up-postgresql-streaming-replication-for-high-availability-and-backup/ 

Keep your database running smoothly with PostgreSQL streaming replication.

Introduction

Setting up PostgreSQL streaming replication is an important step in ensuring high availability and backup for your data. PostgreSQL is a powerful open source relational database management system that offers many features for high availability and backup.

There are a few steps involved in setting up streaming replication.

  1. Choose a master and standby server.
  2. Configure the master server.
  3. Configure the standby server.
  4. Start the replication.

In this article, we will cover how to set up PostgreSQL streaming replication synchronously for high availability and backup.

What is Streaming Replication?

Streaming replication is a method of replicating data between two or more servers. Standby servers can be kept current by reading a stream of write-ahead log (WAL) records from the Primary Server. This can be synchronous or asynchronous.

A standby server tracks changes made to a primary server, and can be promoted to a primary server if needed. A hot standby server can accept connections and serve read-only queries.

It is a popular method for ensuring high availability and backup because it allows for near-real-time replication of data. This means that if one server goes down, the data can be quickly and easily replicated to the other servers.

Getting Started

Requirements:

  • Some familiarity with PostgreSQL and basic database concepts is helpful, but not required.
  • At least two servers running preferably ubuntu, one as the Primary database cluster and another one as Standby.

Now that we have an understanding of the components required for PostgreSQL streaming replication, we will cover how to set it up.

Installing Postgres on Ubuntu

Ubuntu ships with a specific version of PostgreSQL that is then supported throughout the lifetime of that Ubuntu version. Other versions of PostgreSQL are available through the PostgreSQL apt repository.

If the version included in your version of Ubuntu is not the one you want, you can use the PostgreSQL Apt Repository. This repository will integrate with your normal systems and patch management, and provide automatic updates for all supported versions of PostgreSQL throughout the support lifetime of PostgreSQL.

This tutorial uses Postgres version 14. To use the apt repository, follow these steps:

sudo sh -c 'echo "deb http://apt.postgresql.org/pub/repos/apt $(lsb_release -cs)-pgdg main" > /etc/apt/sources.list.d/pgdg.list'

wget --quiet -O - https://www.postgresql.org/media/keys/ACCC4CF8.asc | sudo apt-key add -

sudo apt-get update

sudo apt-get -y install postgresql-14

The path can be exported or added to the .zshrc or .bzshrc file for automatic inclusion.

export PATH=$PATH:/usr/lib/postgresql/14/bin/

Configuring Streaming Replication

Synchronous streaming replication ensures that all data is replicated to the standby server before commit. Let’s configure the primary and standby nodes.

Primary Node

After you install Postgres, a new postgres user is automatically created. You need to log in as the postgres user to access the database.

sudo -i -u postgres

Create a user called 'repuser' with the replication role, and set a password for the user.

  • --replication - The new user will have the REPLICATION privilege.
  • -P or --pwprompt - Will issue a prompt for the password of the new user.
createuser repuser --replication -P
Output:

Enter password for new role: # Enter any password
Enter it again:

You have successfully created a replication user. Now it's time to add some configurations by logging in as the root user.

exit

sudo -i

Open the postgresql database configuration file using your favourite editor.

vim /etc/postgresql/14/main/postgresql.conf

Add the following configurations to your postgresql.conf file:

listen_addresses = '192.168.64.23'

wal_level = replica

max_wal_senders = 10

wal_keep_size = 32

synchronous_commit = remote_apply

synchronous_standby_names = '*'
  • listen_addresses - Specifies the hostname or IP address(es) on which the postgreSQL server should listen for connections from client applications.
  • wal_level - Wal level is the level of logging for the write-ahead log. This must be set to replica or higher to allow connections from standby servers.
  • max_wal_sender - This parameter specifies the maximum number of concurrent connections from standby servers or streaming base backup clients. The default is 10. The value 0 means replication is disabled.
  • wal_keel_size - Specifies the minimum size of past log file segments kept in the pg_wal directory, in case a standby server needs to fetch them for streaming replication.
  • synchronous_commit - Synchronous commit is a database transaction property that guarantees that once a transaction is committed, it will be visible to any subsequent transaction. It determines how much write-ahead logging (WAL) must be completed before the database server returns a “success” indication to the client. This is required if you want a synchronous replication!
  • synchronous_standby_names - Specifies a list of standby servers that can support synchronous replication.

For some additional parameters and for more information about the parameters mentioned above, consult the official documentation.

Now, open a new file called pg_hba.conf stored in the database cluster's data directory. HBA stands for host-based authentication. This is the PostgreSQL client authentication configuration file. This file controls which hosts are allowed to connect to the server and how clients are authenticated.

vim /etc/postgresql/14/main/pg_hba.conf

Though a record can have several formats, here’s a simple format that we are going to use for our setup.

[record]    [client_username]    [client_database]    [hostname/IPaddress]    [client_authentication_method]

Add the authentication details for the standby server to allow the connection to the primary server. If you have more than one standby server, you can add them in the next line sequentially.

You can use this example as a template, but you will need to change the IP address of the standby server to match your own network configuration.

If you are using this database as a failover, the next line in the file allows connection from all clients with any IP, for any users, and any databases. If you are only using the server as a backup, you can skip this line.

host    replication     repuser         192.168.64.22/32        scram-sha-256

host    all             all             0.0.0.0/0               scram-sha-256

To learn more about the pbhba.conf file, refer to the official documentation.

Finally, restart the Postgres database by running the following command,

systemctl restart postgresql

Ok, next, let's set up the standby server.

Standby Node

Log in as the root user to avoid using sudo.

sudo -i

Before continuing to the next step, stop the database by running the following command.

systemctl stop postgresql

We need to delete the initial default database cluster that was created when we install the PostgreSQL database, which located in the '/var/lib/postgresql/14/' directory. Make sure you are in the right server, or this will delete your existing database.

In this step, instead of deleting the default database cluster, I’m backing up the data directory by renaming it.

mv /var/lib/postgresql/14/main /var/lib/postgresql/14/main_old

Log into the postgres user to sync the replica database files from the primary node.

su - postgres

We will use the pg_basebackup command to create a base backup of a PostgreSQL database cluster. This command will transfer the data from the primary database server using the PostgreSQL streaming replication protocol. This includes the WAL files, which are needed to reconstruct the database cluster. The backup will be stored in the ‘/var/lib/postgresql/14/main’ directory. This backup is taken without affecting other clients of the primary cluster database.

We will authenticate with the primary database cluster on the primary node using the 'repuser' and password.

pg_basebackup -R -h 192.168.64.23 -U repuser -D /var/lib/postgresql/14/main -P
Output:

Password: # Enter password for the 'repuser'
  • -R or --write-recovery-conf - Creates a standby.signal file and appends connection settings to the ‘postgresql.auto.conf’ file, easing the process of setting up a standby server.
  • h or --host= - This specifies the hostname/IP of the server you want to connect to.
  • -D directory or --pgdata= - Sets the target directory to write the output to, and it must be empty. This option is required.
  • -U or --username= - Specifies the username to connect as.
  • -P or --progress - This enables progress reporting.

For some additional parameters and for more information about the parameters mentioned above, take a look at the official documentation.

Exit the postgres user and return to the root user.

exit

It's time to edit the 'postgresql.conf' on the standby server!

vim /etc/postgresql/14/main/postgresql.conf

Update the following settings in your config file.

Don’t forget to change the following values,

  • listen_addresses: change the IP address to your own
  • host=: change the IP address to your primary node.
listen_addresses = '192.168.64.22'

hot_standby = on

primary_conninfo = 'host=192.168.64.23 port=5432 user=repuser'
  • hot_standby - This option means that the postgres configuration allows for a standby server to be used in case of failure of the primary server.
  • primary_conninfo - This option specifies the connection string used to connect to the primary server in a streaming replication setup.

Start the postgres database by running the following command.

systemctl start postgresql

Hurray! The streaming replication set up is now complete, and the data should begin streaming from the primary database cluster to the standby database cluster.

To check if everything is working, log in as the postgres user on the ‘primary server’ and run the following command:

psql -c "select usename, application_name, client_addr, state, sync_priority, sync_state from pg_stat_replication;"
Output:

 usename | application_name |  client_addr  |   state   | sync_priority | sync_state
---------+------------------+---------------+-----------+---------------+------------
 repuser | 14/main          | 192.168.64.22 | streaming |             1 | sync
(1 row)

Manual Failover

If the primary server/database fails, you will need to promote the standby server as the new primary server to accept read/write connections from the clients. This can be done by using the pg_ctlcluster command as ‘sudo’ or ‘postgres’ user.

Syntax:

 pg_ctlcluster [options] cluster-version cluster-name action

Example:

pg_ctlcluster 14 main promote

In the command above, "14" is the database cluster version and "main" is the database cluster name.

[Optional] Automatic failover:

This article will not cover how to set up automatic failover, but a separate article will be written on how to set up a load balancer and automatically failover to the standby server in the event of primary server/database failure.

But if you're desperately looking to set up automatic failover, you can check out my GitHub for a quick and temporary solution.

Conclusion

In conclusion, setting up PostgreSQL streaming replication is an effective way to ensure high availability and backup for your data. By following the steps outlined in this article, you can easily set up your own replication system.

There are several methods of replicating data, but streaming replication is often seen as the best option for high availability and backup. This is because it offers the best combination of speed, flexibility, and security.


Additional Resources and References: