Ketika saya mencari konfigurasi sendmail pada ubuntu saya din't mendapatkan jawaban yang jelas, masing-masing dari mereka menganggap aku tahu apa yang mereka bicarakan,
Aku hanya ingin konfigurasi dasar untuk mengaktifkan pengiriman email, pada dasarnya aku akan menggunakannya dengan google app engine untuk mengaktifkan pengiriman e-mail dari dev server.
Saya sudah melakukan ini:
sudo apt-get install sendmail
kemudian
sudo sendmailconfig
tapi aku don't tahu apa yang terakhir benar-benar melakukannya.
Anda dapat menguji sendmail untuk melihat jika itu adalah dikonfigurasi dengan benar dan setup dengan mengetik perintah berikut ke command line:
$ echo "My test email being sent from sendmail" | /usr/sbin/sendmail myemail@domain.com
Berikut ini akan memungkinkan anda untuk menambahkan smtp relay untuk sendmail:
#Change to your mail config directory:
cd /etc/mail

#Make a auth subdirectory
mkdir auth
chmod 700 auth

#Create a file with your auth information to the smtp server
cd auth
touch client-info

#In the file, put the following, matching up to your smtp server:
AuthInfo:your.isp.net "U:root" "I:user" "P:password"

#Generate the Authentication database, make both files readable only by root
makemap hash client-info < client-info
chmod 600 client-info
cd ..
Tambahkan baris berikut untuk sendmail.mc, tapi sebelumMAILERDEFINITIONS. Pastikan anda memperbarui anda smtp server.
As computing devices quickly surpass the requirements of operating systems, it has increasingly become more efficient for organizations to invest/migrate to virtualized systems. Operating system virtualization technologies aren’t anything new but over the last several years they have become more and more popular as data centers look to provide more functionality in the same or less amounts of physical space. By simply leveraging un-used resources on powerful servers/workstations companies can effectively run multiple logical servers on one or several physical servers.
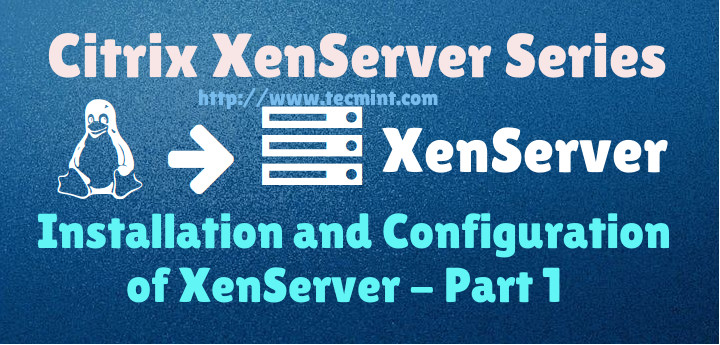
XenServer Installation and Configuration Guide – Part 1
Citrix offers such a solution, known as XenServer, which utilizes the popular Linux Xen hypervisor. The Xen hypervisor is referred to as a “bare-metal hypervisor” meaning that it is installed to the physical server and acts as a resource manager for all of the virtualized server instances that will be run on top of Xen.
This contrasts to systems such as Virtualbox which require a Linux/Mac/Windows operating system to be installed and then virtual machines created within the Virtualbox application. This type of hypervisor is generally referred to as a hosted hypervisor. Both types of hypervisors have their place and benefits but this particular article is going to look at the bare-metal hypervisor in XenServer.
In this 5-article Citrix Xenserver series, we will going to cover the following topics:
Part 1: Installation and Configuring XenServer 6.5
This first article will walk through the process of installing and configuring Citrix XenServer. Future additions to this article will walk through adding virtual machine storage repositories, XenServer pooling, creating virtual machines on the XenServer, as well as managing XenServers with XenCenter and Xen Orchestra as discussed above series.
Many systems will work even if not listed but results may vary, use at your own risk.
Minimum 2GB ram; 4GB or more recommended to run virtual machines
Mimimum 1 64bit 1.5GHz cpu; 2GHz or more and multiple CPUs are suggested
Harddrive space of at least 16GB; more required if virtual machines will be saved locally
At least a 100mbps network card; multiple gigabit suggested
Test System Configuration
1 IBM X3850
4 hexcore 2.66 GHz CPUs
64gb ram
4 gigabit NIC cards
4 300GB SAS drives (overkill but it was all that was available)
24TB Dell PE5500E for storage of the virtual machine disks (Not necessary if enough local space exists on the XenServer)
All in all this server is primed to be a stellar XenServer so let’s begin the installation process.
Installation of Citrix Xenserver 6.5 Guide
1. The first step in the installation is to download the XenServer ISO file. This can easily be accomplished by visiting the link above or using the ‘wget‘ utility on a Linux system.
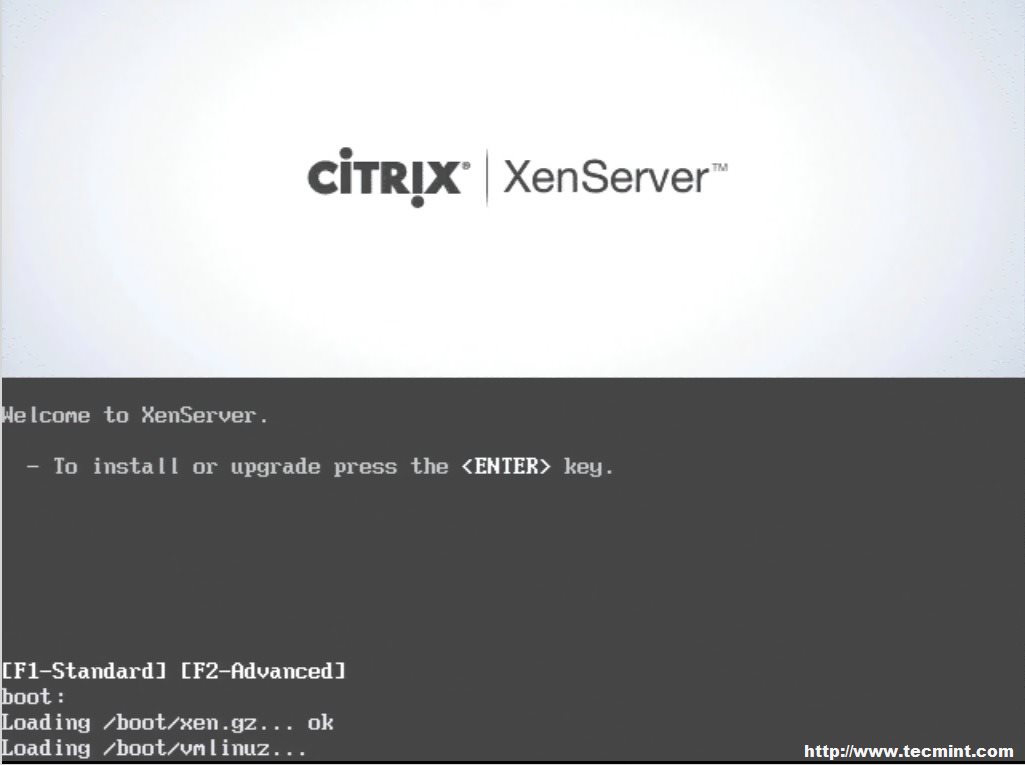
2. Now place the media into the system that XenServer will be installed and boot to that media. Upon successful boot the user should be greeted by the wonderful Citrix XenServer boot splash.
XenServer Boot Menu
3. At this point simply press enter to begin the booting process. This will boot the user into the XenServer installer. The first screen will ask the user to provide a language selection.
Select XenServer Installation Language
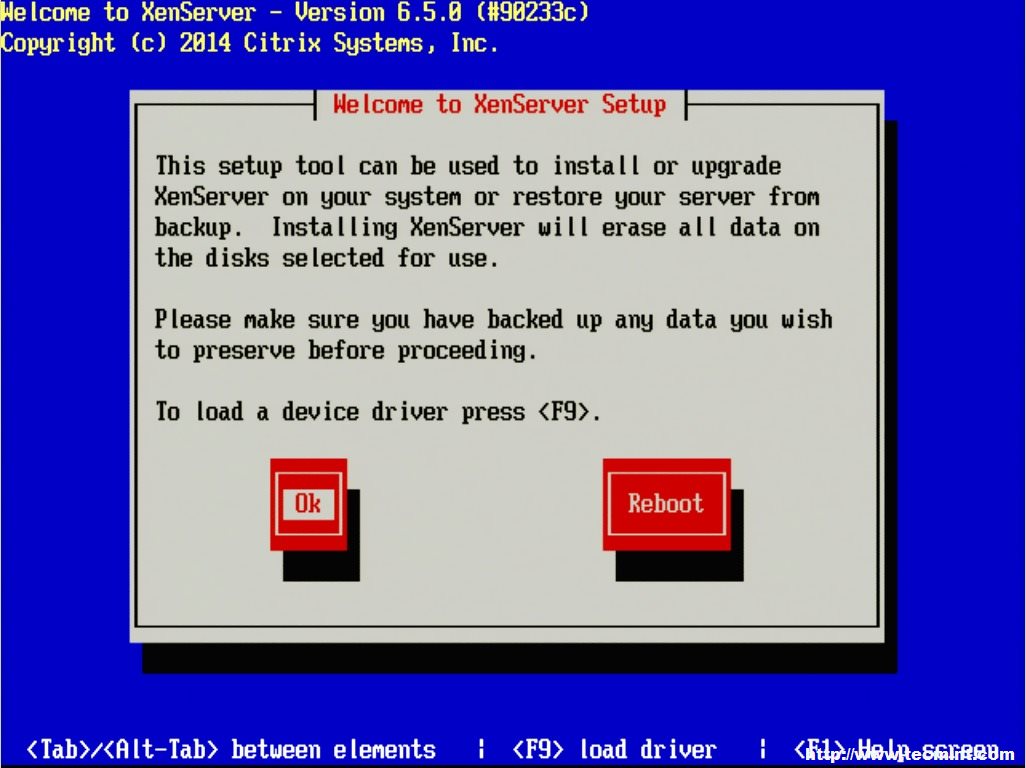
4. The next screen asks the user to confirm the reason for booting to this media as well as provide the option to load extra hardware drivers if needed. In this particular case, it is to install XenServer to the machine so it is safe to click “OK”.
Load XenServer Device Driver
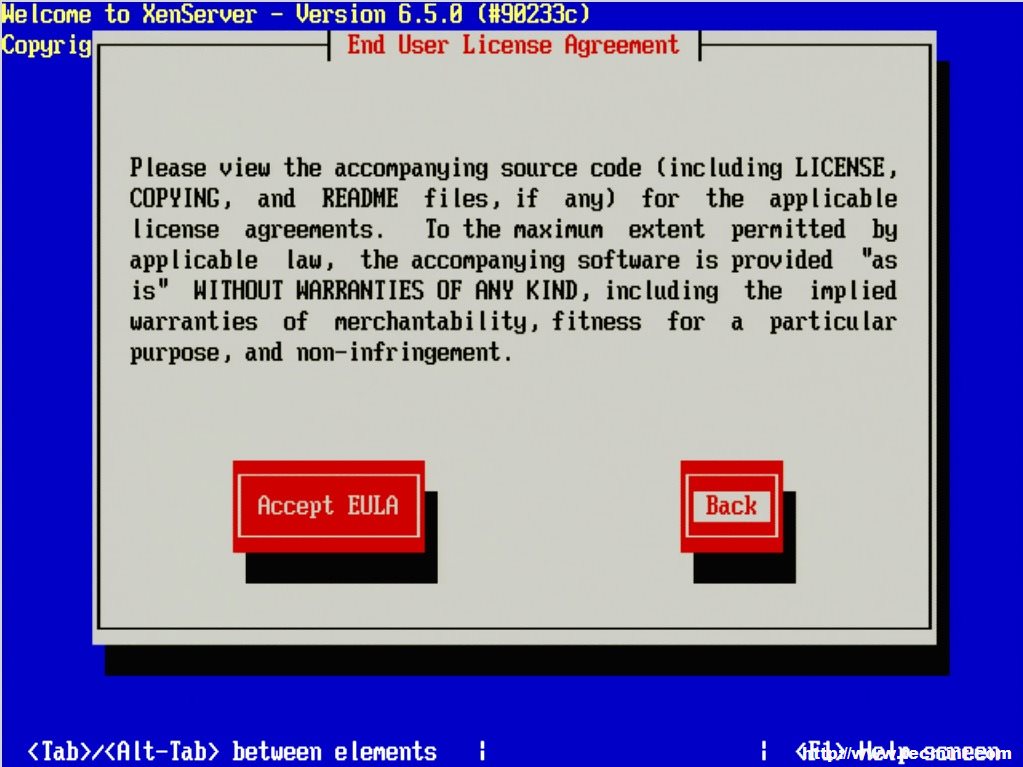
5. The next prompt is the obligatory EULA (End User License Agreement). Feel free to read the whole thing, as your supposed to anyways right, otherwise using the keyboard arrows move the cursor over to the “Accept EULA” button and hit enter.
Accept License Agreement
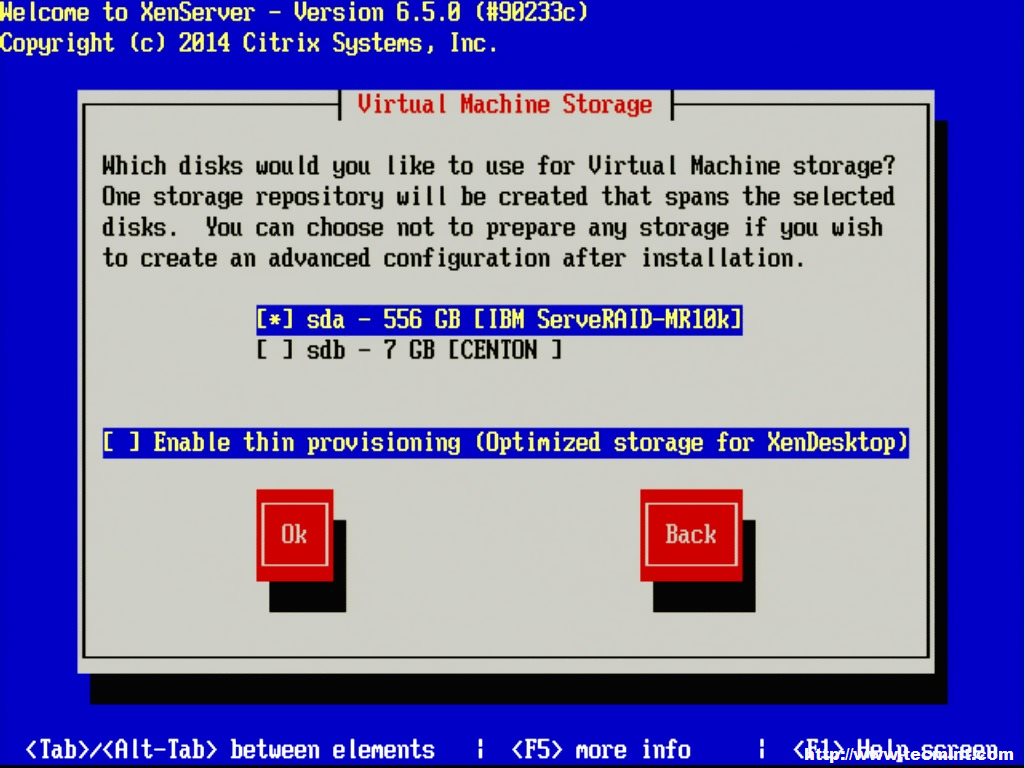
6. The next screen requests the installation device. In this example the RAID setup on the server is where XenServer will be installed.
The RAID system is reflected as “sda – 556 GB [IBM ServeRAID-MR10k]” For this guide, thin provisioning is not necessary. Make sure the the asterisk ( * ) character is next to the hard drive selection to install XenServer and tab to the “OK” button.
Select XenServer Virtual Machine Storage
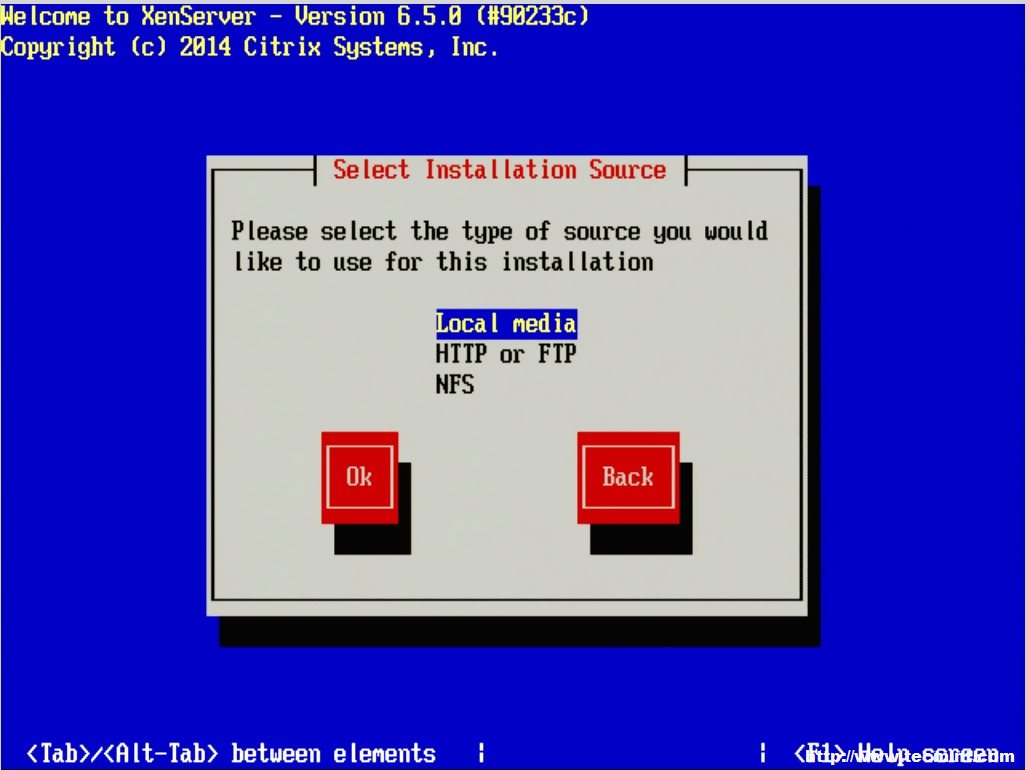
7. The next screen will prompt the user for the location of the installation files. Since the installer was boot locally with a CD/DVD/USB, make sure to select the “Local Media” option.
Select XenServer Installation Source
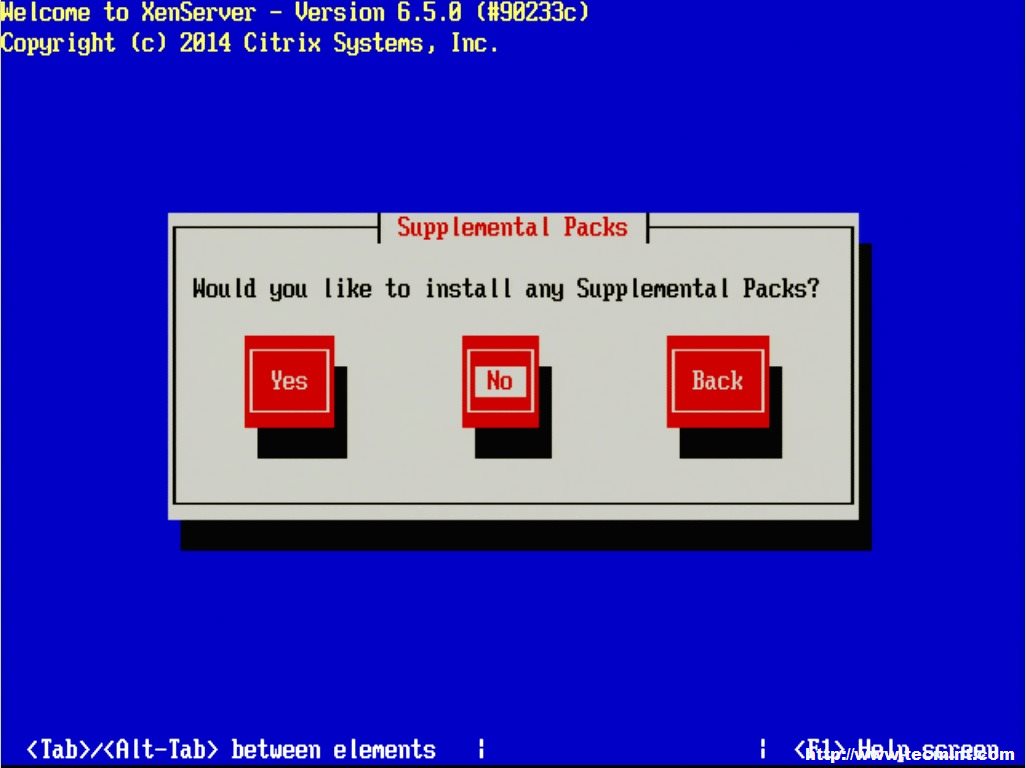
8. The next step allows for the installation of Supplemental Packs (SP) at the time of install. For this guide, none of the supplemental packs available will be installed at this point but will be covered later once XenServer is up and running.
Select Supplemental Packs
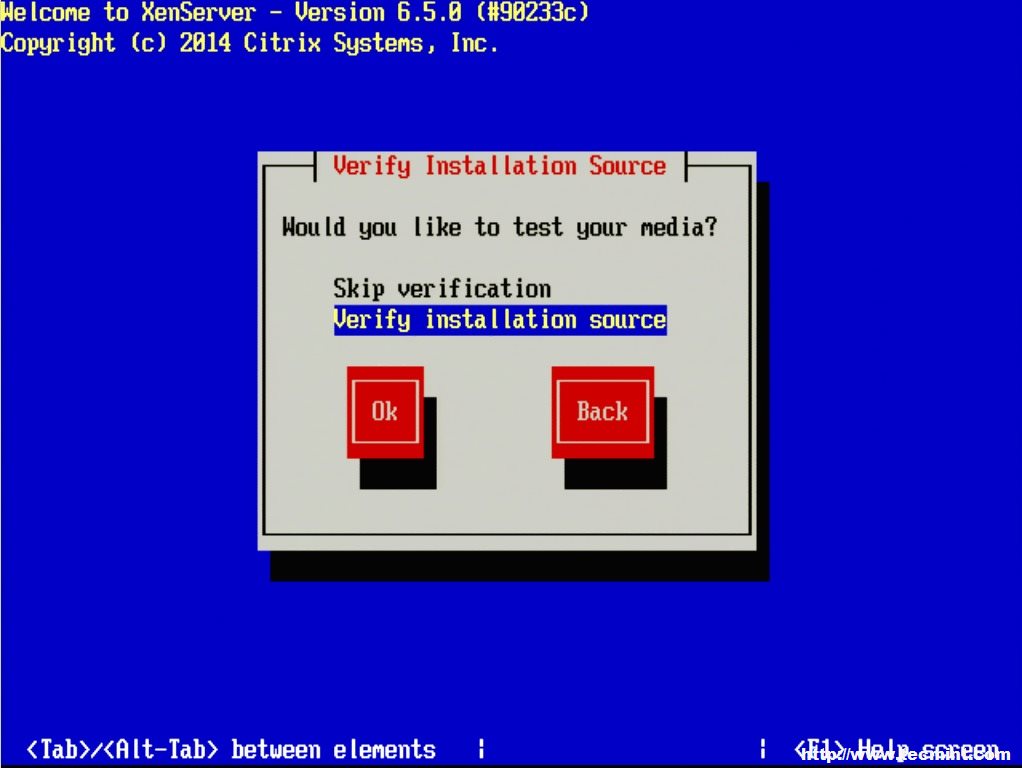
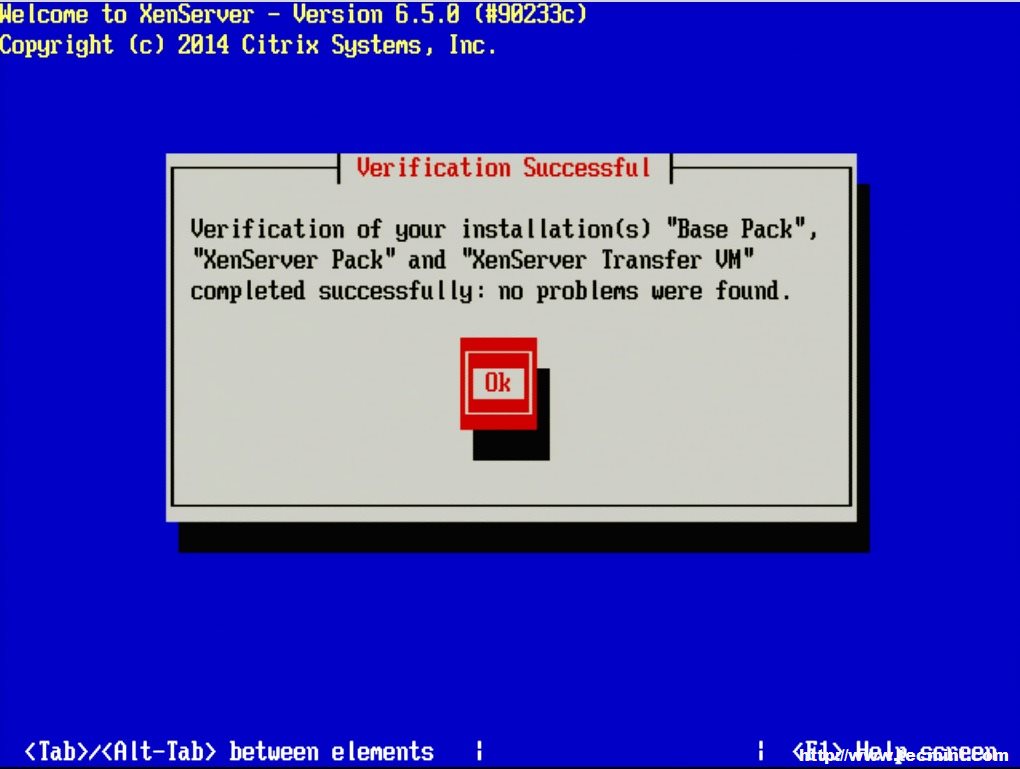
9. The next screen will ask if the user wishes to verify that the installer media is not corrupt. Generally this is a good idea but is a personal choice. All in all the verification on this test server took about 3 minutes from a CD.
Verify XenServer Installation MediaChecking Base PackVerification Successful
Kernel-based Virtual Machine (KVM in short) is an open-source and de facto standard virtualization solution that is tightly integrated into Linux. It is a loadable kernel module that turns Linux into a type-1 (bare-metal) hypervisor that creates a virtual operating platform used to run virtual machines (VMs).
Under KVM, each VM is a Linux process that is scheduled and managed by the kernel and has private virtualized hardware (i.e CPU, network card, disk, etc.). It also supports nested virtualization, which allows you to run a VM inside another VM.
Some of its key features include support for a wide range of Linux-supported hardware platforms (x86 hardware with virtualization extensions (Intel VT or AMD-V)), it provides enhanced VM security and isolation using both SELinux and secure virtualization (sVirt), it inherits kernel memory management features, and it supports both offline and real-time migration (migration of a running VM between physical hosts).
In this article, you will learn how to install KVM virtualization, create and manage Virtual Machines in CentOS 8 and RHEL 8 Linux.
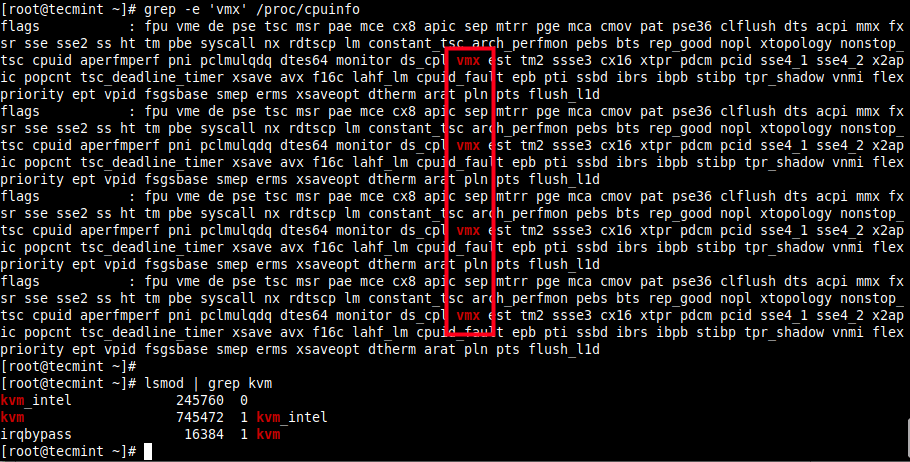
Additionally, make sure that your hardware platform supports virtualization by running the following command.
# grep -e 'vmx' /proc/cpuinfo  #Intel systems
# grep -e 'svm' /proc/cpuinfo  #AMD systems
Also, confirm that KVM modules are loaded in the kernel (they should be, by default).
# lsmod | grep kvm
Here is sample output on the test system which is Intel-based:
Check Virtualization Support on CentOS 8
In a previous series of KVM guides, we showed how to create virtual machines in Linux using KVM (Kernel-based Virtual Machine) where we demonstrated how to create and manage VMs using virt-manager GUI tool (which is now deprecated according to the RHEL 8 documentation). For this guide, we will take a different approach, we will use the Cockpit web console.
Step 1: Setup Cockpit Web Console on CentOS 8
1. The cockpit is an easy-to-use, integrated and extendable web-based interface to administer a Linux server in a web browser. It enables you to perform system tasks such as configuring networks, administering storage, creating VMs, and inspecting logs with a mouse. It uses your system’s normal user logins and privileges, but other authentication methods are supported as well.
It comes pre-installed and enabled on freshly installed CentOS 8 and RHEL 8 system, if you don’t have it installed, install it using the following dnf command. The cockpit-machines extension should be installed to manage VMs based on Libvirt.
# dnf install cockpit cockpit-machines
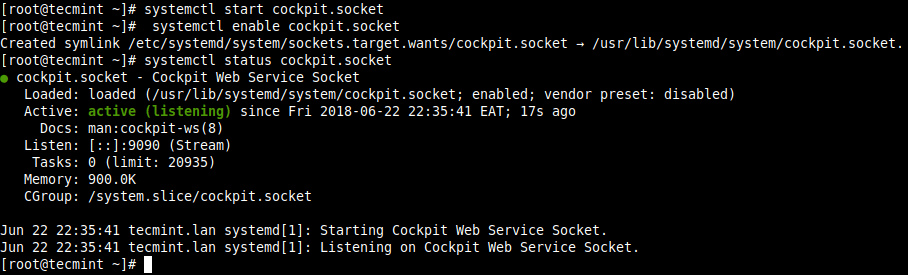
2. When the package installation is complete, start the cockpit socket, enable it to auto-start at system boot and check its status to confirm that it is up and running.
3. Next, add the cockpit service in the system firewall which is enabled by default, using the firewall-cmd command and reload the firewall configuration to apply the new changes.
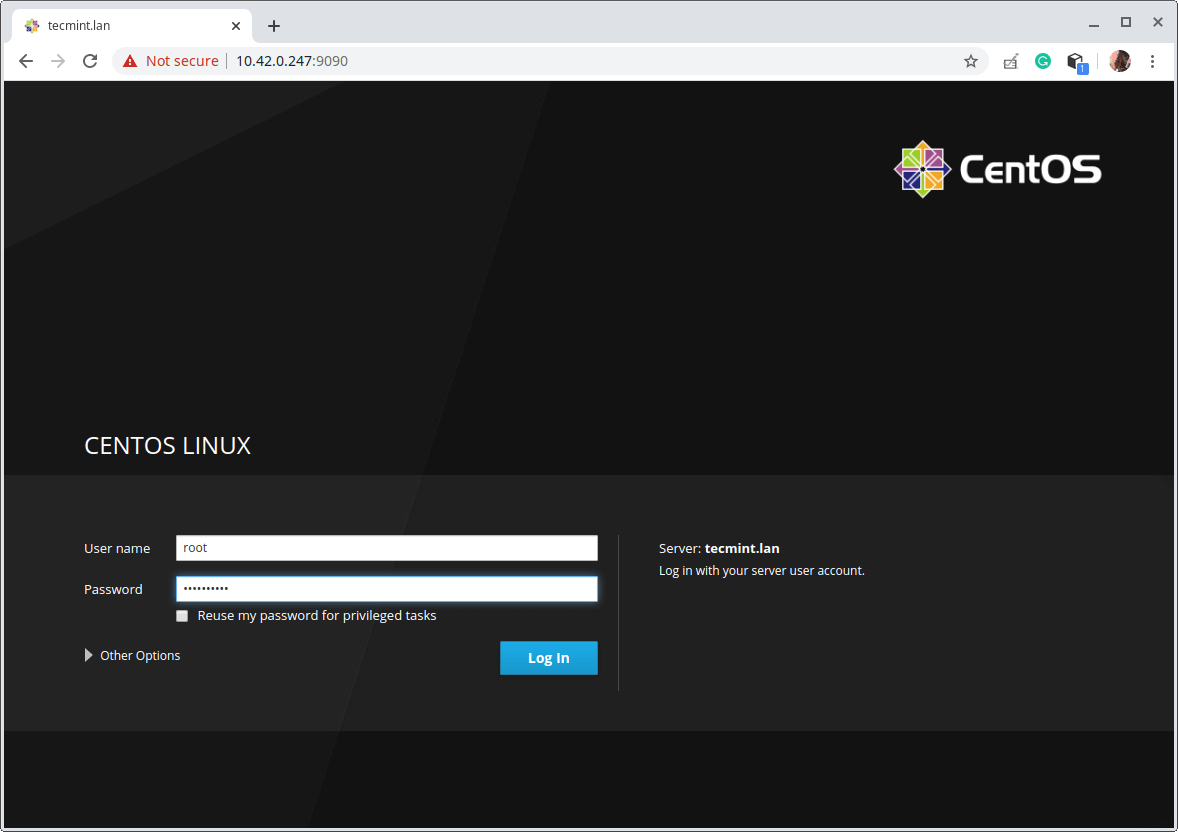
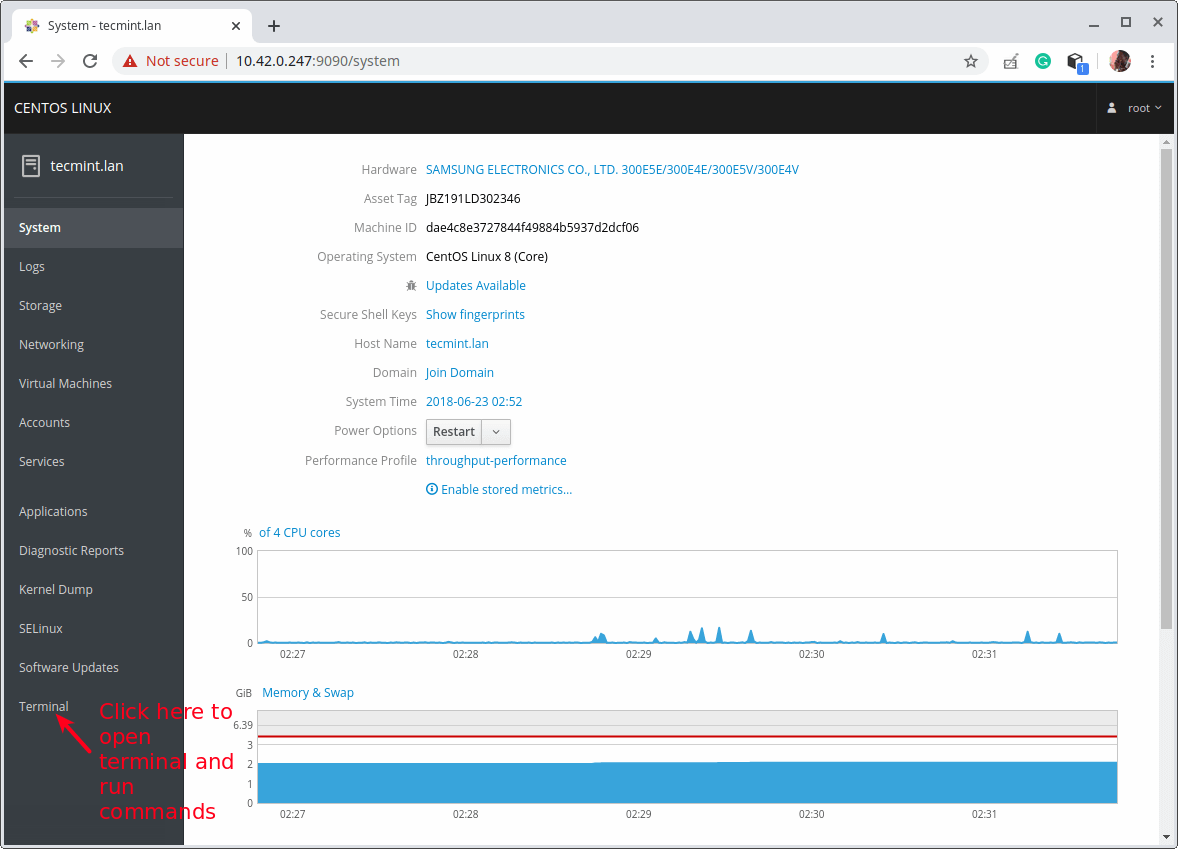
4. To access the cockpit web console, open a web browser and use the following URL to navigate.
https://FQDN:9090/
OR
https://SERVER_IP:9090/
The cockpit uses a self-signed certificate to enable HTTPS, simply proceed with the connection when you get a warning from the browser. At the login page, use your server user account credentials.
Cockpit LoginCockpit Dashboard
Step 2: Installing KVM Virtualization CentOS 8
5. Next, install the virtualization module and other virtualization packages as follows. The virt-install package provides a tool for installing virtual machines from the command-line interface, and a virt-viewer is used to view virtual machines.
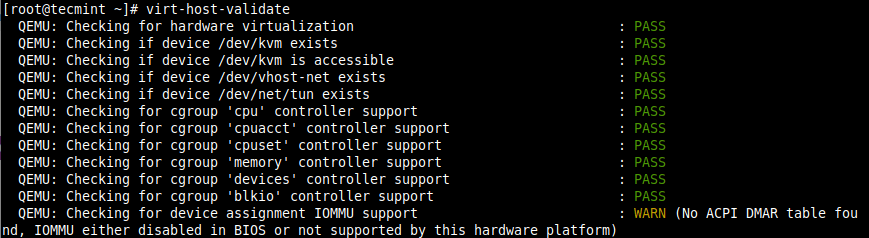
6. Next, run the virt-host-validate command to validate if the host machine is set up to run libvirt hypervisor drivers.
# virt-host-validate
validate host virtualization setup
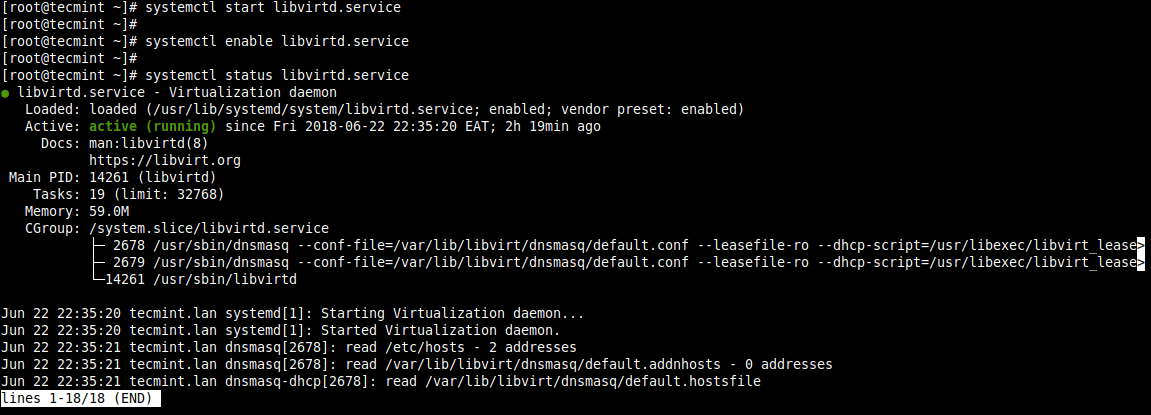
7. Next, start the libvirtd daemon (libvirtd) and enable it to start automatically on each boot. Then check its status to confirm that it is up and running.
Step 3: Set Up Network Bridge (Virtual Network Switch) via Cockpit
8. Now create a network bridge (virtual network switch) to integrate virtual machines to the same network as the host. By default, once libvirtd daemon is started, it activates the default network interface virbr0 that represents the virtual network switch which operates in NAT mode.
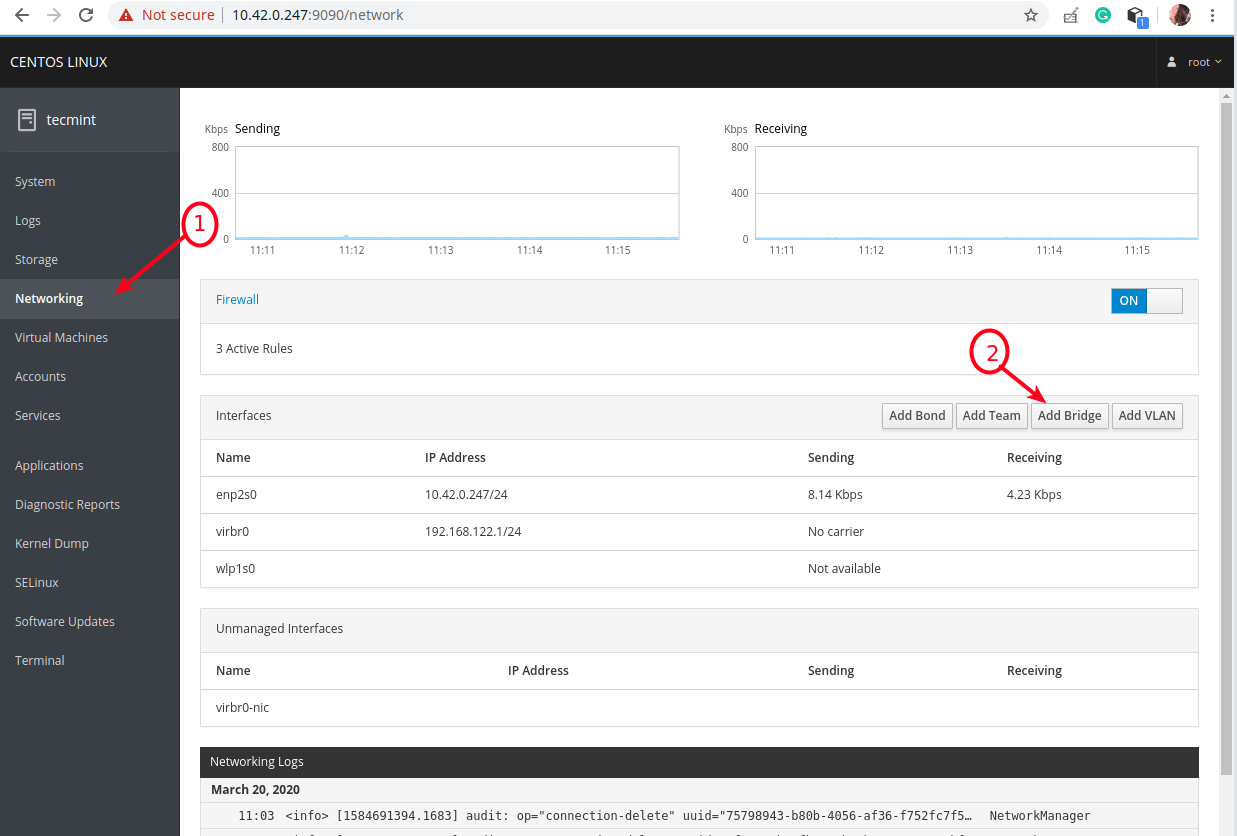
For this guide, we will create a network interface in a bridged mode called br0. This will enable virtual machines to be accessible on the host networks.
From the cockpit main interface, click on Networking, then click Add Bridge as indicated in the following screenshot.
Add Bridge Network
9. From the pop-up window, enter the bridge name and select the bridge slaves or port devices (e.g enp2s0 representing the Ethernet interface) as shown in the following screenshot. Then click Apply.
Enter Network Bridge Settings
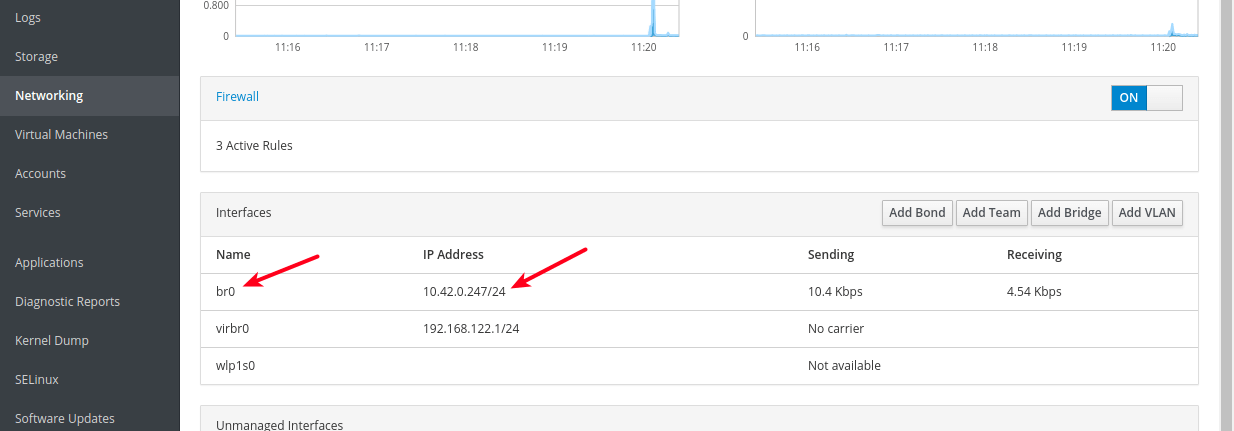
10. Now when you look at the list of Interfaces, the new bridge should appear there and after a few seconds, the Ethernet interface should be disabled (taken down).
Verify New Network Bridge
Step 4: Creating and Managing Virtual Machines via Cockpit Web Console
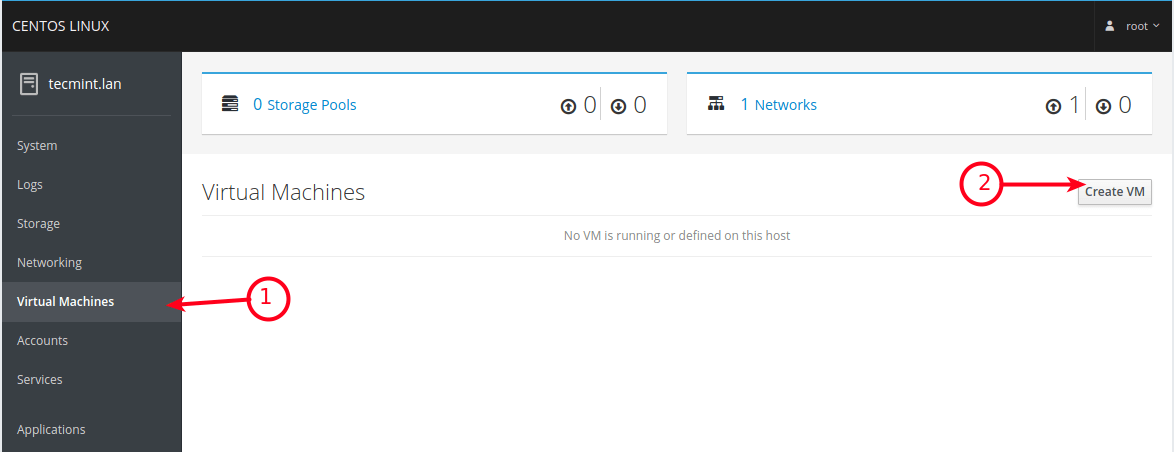
11. From the cockpit main interface, click on the Virtual Machines option as highlighted in the following screenshot. From the Virtual Machines page, click on Create VM.
Create a New Virtual Machine
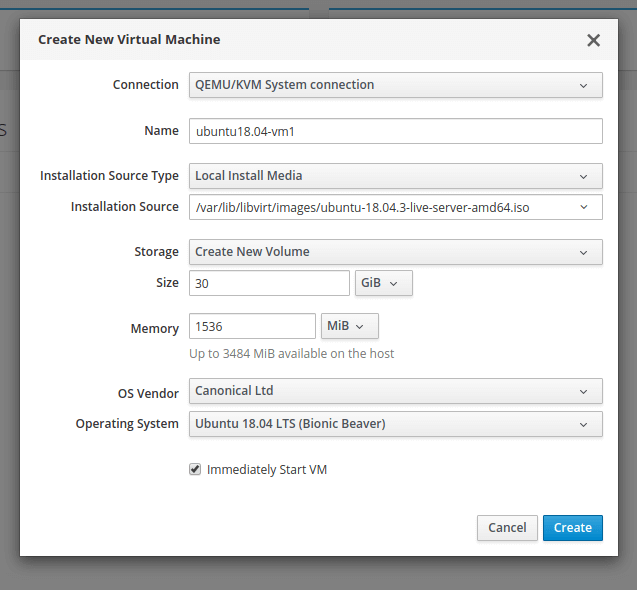
12. A window with options to create a new VM will display. Enter the Connection, Name (e,g ubuntu18.04), Installation Source Type (on the test system, we have stored ISO images under the storage pool i.e /var/lib/libvirt/images/), Installation Source, Storage, Size, Memory as shown in the following image. The OS Vendor and Operating System should be picked automatically after entering Installation Source.
Also check the option to immediately start the VM, then click Create.
Add New Virtual Machine in KVM
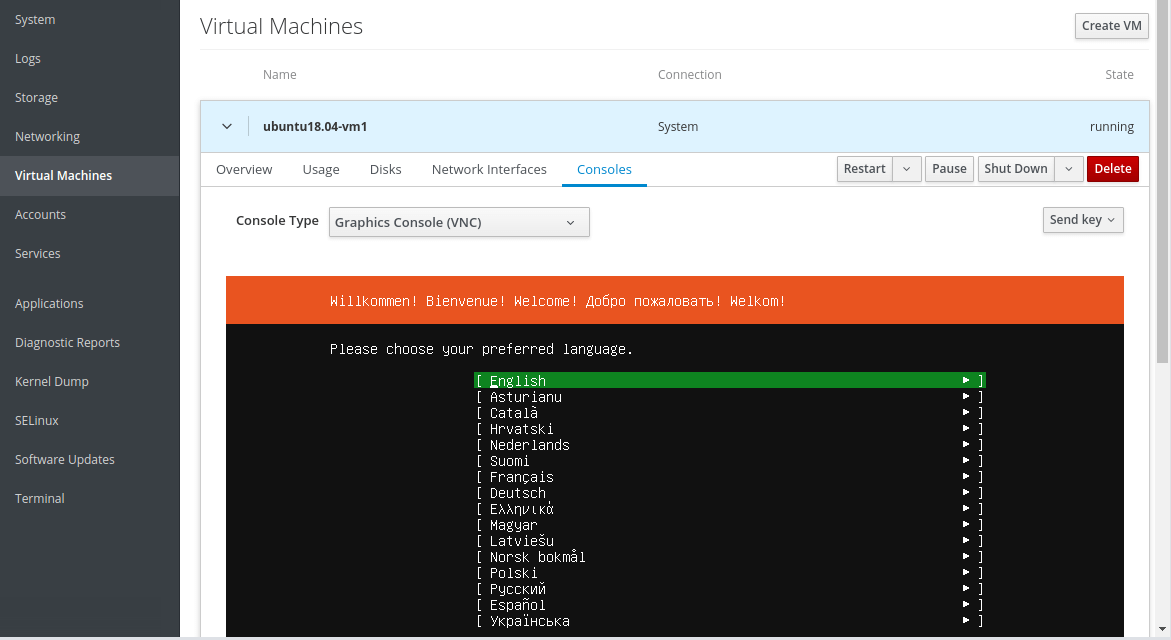
13. After clicking Create from the previous step, the VM should be automatically started and it should boot using the ISO image provided. Proceed to install the guest operating system (Ubuntu 18.04 in our case).
Install Guest OS on KVM
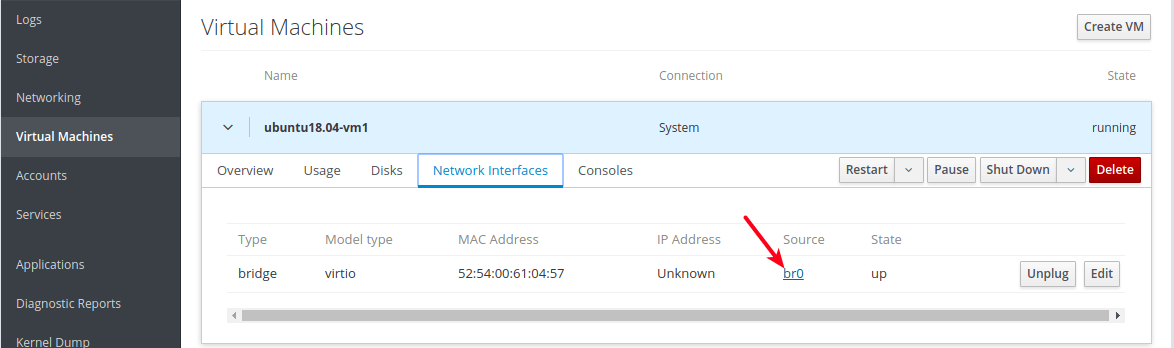
If you click on Network Interfaces of the VM, the network source should indicate the newly created bridge network interface.
Network Bridge of VM
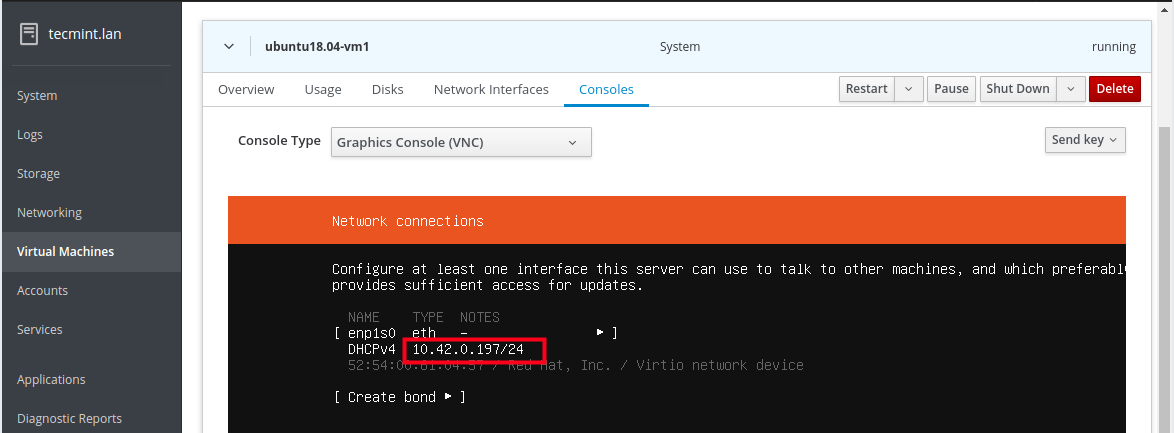
And during the installation, at the step of configuring a network interface, you should be able to notice that the VMs Ethernet interface receives an IP address from the DHCP server of the host network.
IP Address of VM
Note that you need to install the OpenSSH package to access the guest OS via SSH from any machine on the host network, as described in the last section.
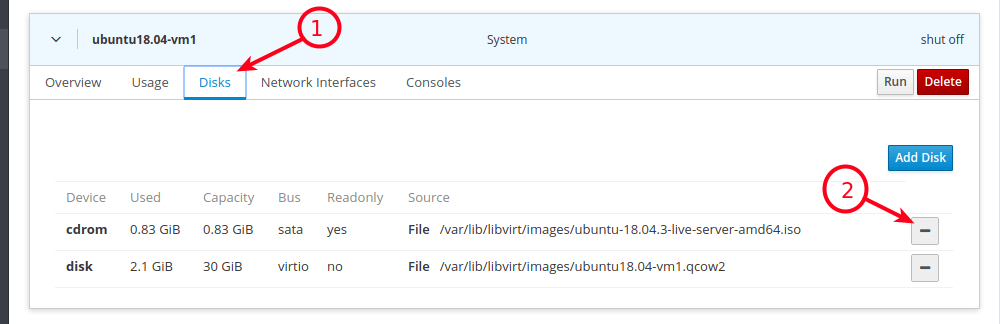
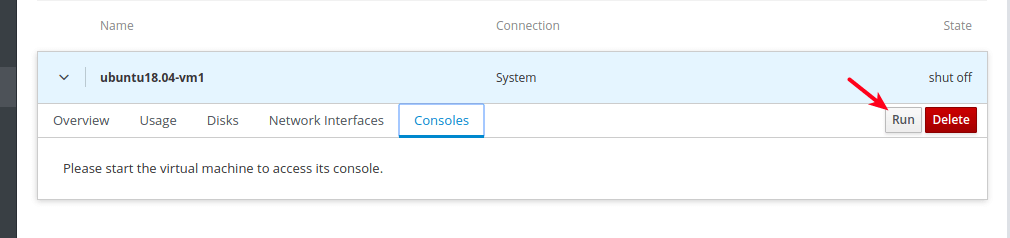
14. When the guest OS installation is complete, reboot the VM, then go to Disks and detach/remove the cdrom device under the VMs disks. Then click Run to start the VM.
Detach Cdrom After VM InstallationRun VM Console
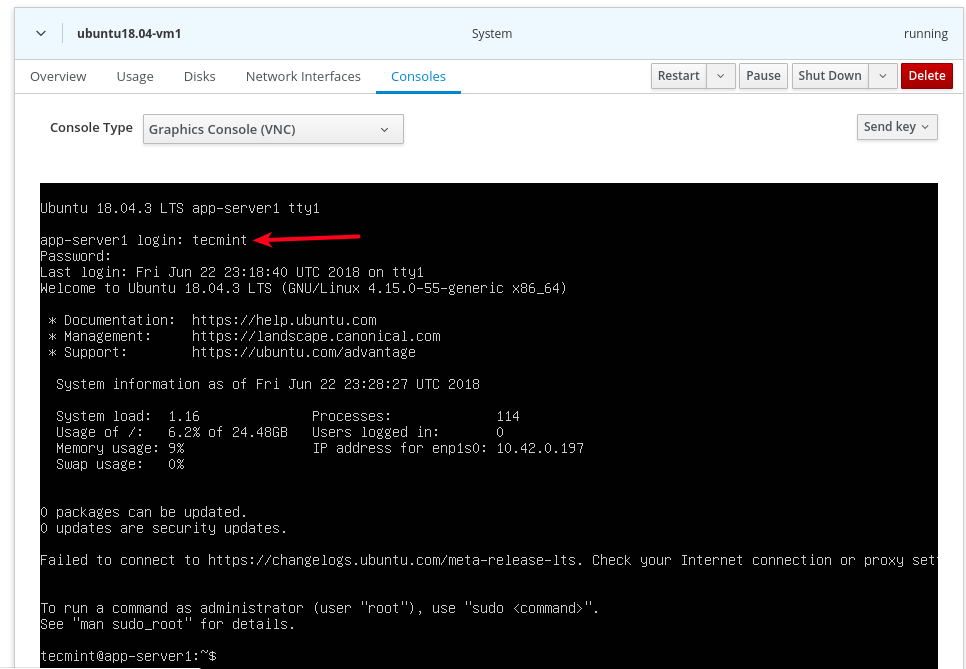
15. Now under Consoles, you can log into the guest OS using a user account you created during the installation of the OS.
VM Login
Step 5: Accessing a Virtual Machine Guest OS via SSH
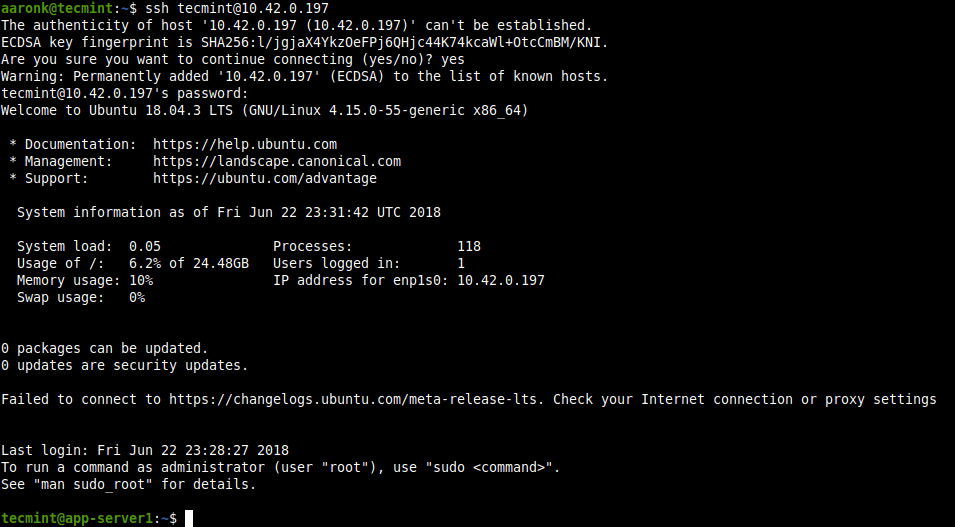
16. To access the newly installed guest OS from the host network via SSH, run the following command (replace 10.42.0.197 with your guest’s IP address).
$ ssh tecmint@10.42.0.197
Guest VM SSH Login
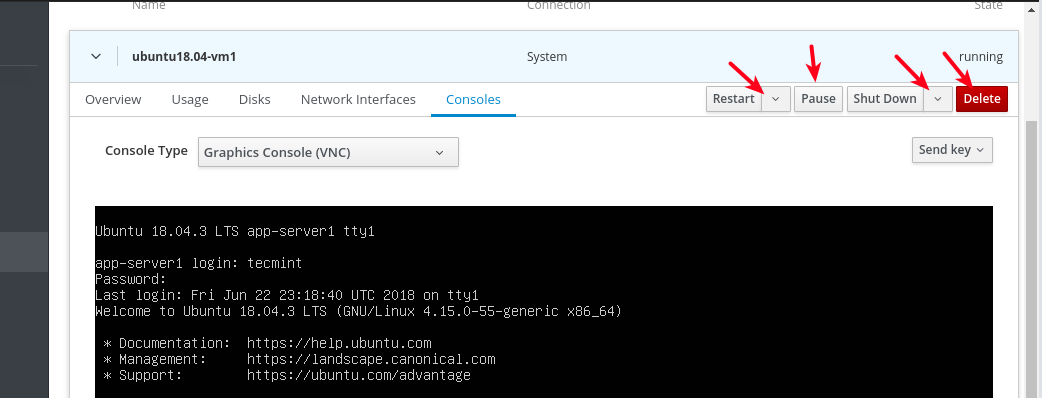
17. To shut down, restart or delete a VM, click on it from the list of VMs, then use the buttons highlighted in the following screenshot.
Delete Guest VM from KVM
That’s all for now! In this guide, we have shown how to install KVM virtualization packages, and create and manage VMs via the cockpit web console. For more detail, see: Getting started with virtualization in RHEL 8.