Rabu, 28 September 2016

Auto refresh browser

Download Aplikasi Auto Refresh untuk Browser Mozilla, Chrome dan Opera

Salam Blogger para Pemirsa...

Kali ini saya ingin share sesuatu kalo dilihat-lihat butuh ngk butuh sih aplikasi ini.. Saya sendiri juga baru tau ada aplikasi ini sewaktu ide saya keluar setelah melihat kerjaan saya di kantor. Waktu itu saya berfikir bagaimana yaa cara refresh Browser secara otomatis tanpa saya harus bolak-balik ke ruang Dashboard. Refresh ulang saya butuhkan karena koneksi internet di kantor sangat kecil dan dibagi-bagi banyak Client.
Awal mula search di Mbah Google dan setelah cari-cari dapat juga aplikasinya yaitu Auto Refresh, aplikasi ini bisa digunakan di Mozilla firefox, Google chrome dan Opera. Aplikasi ini tidak mendownload tetapi langsung terapin di browser kalian istilahnya Add-ons. Sesuadah diterapkan alhasil berhasil juga lumaya memperingan kerjaan saya hehehehe...
link dapat diakses disini : https://addons.mozilla.org/en-US/firefox/addon/auto-refresh/


Langsung saja kalian pilih Add to Firefox dan ikutin perintah selanjutnya (seperti instal biasa Next saja)

Setelah selesai instal close firefox dan buka kembali kemudian Klik kanan muncul :


Pilih yang saya kotak in dan bisa langsung disetting waktu Refresh nya ada mulai dari 1 second - 1 Jam


Selesai deehhh Browser kalian akan otomatis Refresh sendiri dengan waktu yang and tentukan secara otomatis. Nggak ribet kan Soob... Satu hal yang penting Pengaturan ini tidak bisa di save yaa jadi kalau browser kalian Klose ya harus setting lagi. hehehehe...

Sekian dari Saya semoga Bermanfaat bagi kalian semua... Wassallam...

Minggu, 25 September 2016

Virtualisasi

How to install and configure oVirt 4.0 on CentOS 7 / RHEL 7

http://www.linuxtechi.com/install-configure-ovirt-4-0-on-centos7-rhel7/


oVirt is a free and open source virtualization software used in Linux like operating systems such as Fedora,  CentOS and RHEL. In other words we can say oVirt is the alternate of VMware vSphere in Linux. Ovirt community is founded and supported by Red Hat and it is considered as upstream project for Red Hat Enterprise Virtualization (RHEV).
oVirt consists of two main components :
  • oVirt Engine
  • oVirt Node
oVirt Engine is a graphical user interface or we can say it is a Web administrator portal from where we can manage virtual machines, compute, network and storage resources.
oVirt Node is either a RHEL / CentOS or Fedora Server on which vdsm service is up and running. Ovirt node will act as Hypervisor (KVM) on which all the Virtual machines will be created.
In this article we will install the latest version oVirt 4.0.3 on CentOS 7 / RHEL 7 . We will be using two servers one will act as ovirt engine and other will act as ovirt node.  Below are the details :
oVirt Engine : ovirtengine.example.com (192.168.1.30 )
oVirt Node : ovirtnode.example.com (192.168.1.40)
Update the below  entries in /etc/hosts file in case you don’t have your local dns server.
192.168.1.30  ovirtengine.example.com
192.168.1.40  ovirtnode.example.com

Installation Steps of oVirt Engine on CentOS 7 / RHEL 7

Following are minimal requirements for ovirt-engine :
  •  Minimal OS ( CentOS 7.x / RHEL 7.x )
  •  Dual core server
  •  4 GB RAM
  • 25 GB Disk Space
  • 1-Gbps Lan Card
Perform the following steps one after the another to install ovirt engine.

Step:1 Update the server using yum command

Install latest update on server using beneath yum command.
[root@ovirtengine ~]# yum update -y
Once the updates are installed reboot the sever.

Step:2 Enable oVirt 4.0.3 Repository

ovirt engine packages are not available in CentOS and RHEL yum repositories. Run below command to set and enable ovirt 4.0 repertory
[root@ovirtengine ~]# yum install http://resources.ovirt.org/pub/yum-repo/ovirt-release40.rpm

Step:3 Install oVirt Engine Package using yum command

Execute the following yum command to install ovirt engine.
[root@ovirtengine ~]# yum install ovirt-engine -y

Step:4 Start the ovirt engine installer

Run the command ‘engine-setup’ from the console, it will start the ovirt engine installer and will interactively ask series of question during the installation and will save all the answers to a answer file. Answer file can be reused in order to automate the installation.
[root@ovirtengine ~]# engine-setup --generate-answer=/root/answer.txt
[ INFO ] Stage: Initializing
[ INFO ] Stage: Environment setup
 Configuration files: ['/etc/ovirt-engine-setup.conf.d/10-packaging-jboss.conf', '/etc/ovirt-engine-setup.conf.d/10-packaging.conf']
 Log file: /var/log/ovirt-engine/setup/ovirt-engine-setup-20160918040600-2gbi6m.log
 Version: otopi-1.5.2 (otopi-1.5.2-1.el7.centos)
[ INFO ] Stage: Environment packages setup
[ INFO ] Yum Downloading: base/7/x86_64 (0%)
[ INFO ] Yum Downloading: updates/7/x86_64 (0%)
[ INFO ] Stage: Programs detection
[ INFO ] Stage: Environment setup
[ INFO ] Stage: Environment customization
 
 --== PRODUCT OPTIONS ==--
 
 Configure Engine on this host (Yes, No) [Yes]: Yes
 Configure Image I/O Proxy on this host? (Yes, No) [Yes]: Yes
 Configure WebSocket Proxy on this host (Yes, No) [Yes]: Yes
 Please note: Data Warehouse is required for the engine. If you choose to not configure it on this host, you have to configure it on a remote host, and then configure the engine on this host so that it can access the database of the remote Data Warehouse host.
 Configure Data Warehouse on this host (Yes, No) [Yes]: Yes
 Configure VM Console Proxy on this host (Yes, No) [Yes]: Yes
 
 --== PACKAGES ==--
 
[ INFO ] Checking for product updates...
[ INFO ] No product updates found
 
 --== NETWORK CONFIGURATION ==--
 
 Host fully qualified DNS name of this server [ovirtengine.example.com]: ovirtengine.example.com
[WARNING] Failed to resolve ovirtengine.example.com using DNS, it can be resolved only locally
 Setup can automatically configure the firewall on this system.
 Note: automatic configuration of the firewall may overwrite current settings.
 Do you want Setup to configure the firewall? (Yes, No) [Yes]: No

 --== DATABASE CONFIGURATION ==--
 
 Where is the DWH database located? (Local, Remote) [Local]: Local
 Setup can configure the local postgresql server automatically for the DWH to run. This may conflict with existing applications.
 Would you like Setup to automatically configure postgresql and create DWH database, or prefer to perform that manually? (Automatic, Manual) [Automatic]: Automatic
 Where is the Engine database located? (Local, Remote) [Local]: Local
 Setup can configure the local postgresql server automatically for the engine to run. This may conflict with existing applications.
 Would you like Setup to automatically configure postgresql and create Engine database, or prefer to perform that manually? (Automatic, Manual) [Automatic]: Automatic
 
 --== OVIRT ENGINE CONFIGURATION ==--
 
 Engine admin password: 
 Confirm engine admin password: 
[WARNING] Password is weak: it is too simplistic/systematic
 Use weak password? (Yes, No) [No]: Yes
 Application mode (Virt, Gluster, Both) [Both]: Both
 
 --== STORAGE CONFIGURATION ==--
 
 Default SAN wipe after delete (Yes, No) [No]: No
 
 --== PKI CONFIGURATION ==--
 
 Organization name for certificate [example.com]: example.com

 --== APACHE CONFIGURATION ==--
 
 Setup can configure the default page of the web server to present the application home page. This may conflict with existing applications.
 Do you wish to set the application as the default page of the web server? (Yes, No) [Yes]: Yes
 Setup can configure apache to use SSL using a certificate issued from the internal CA.
 Do you wish Setup to configure that, or prefer to perform that manually? (Automatic, Manual) [Automatic]: Automatic
 
 --== SYSTEM CONFIGURATION ==--
 
 Configure an NFS share on this server to be used as an ISO Domain? (Yes, No) [No]: No
 
 --== MISC CONFIGURATION ==--
 
 Please choose Data Warehouse sampling scale:
 (1) Basic
 (2) Full
 (1, 2)[1]: 1
 
 --== END OF CONFIGURATION ==--
 
[ INFO ] Stage: Setup validation
[WARNING] Warning: Not enough memory is available on the host. Minimum requirement is 4096MB, and 16384MB is recommended.
 Do you want Setup to continue, with amount of memory less than recommended? (Yes, No) [No]: Yes
 
 --== CONFIGURATION PREVIEW ==--
 
 Application mode : both
 Default SAN wipe after delete : False
 Update Firewall : False
 Host FQDN : ovirtengine.example.com
 Engine database secured connection : False
 Engine database host : localhost
 Engine database user name : engine
 Engine database name : engine
 Engine database port : 5432
 Engine database host name validation : False
 DWH database secured connection : False
 DWH database host : localhost
 DWH database user name : ovirt_engine_history
 DWH database name : ovirt_engine_history
 DWH database port : 5432
 DWH database host name validation : False
 Engine installation : True
 PKI organization : example.com
 Configure local Engine database : True
 Set application as default page : True
 Configure Apache SSL : True
 DWH installation : True
 Configure local DWH database : True
 Engine Host FQDN : ovirtengine.example.com
 Configure Image I/O Proxy : True
 Configure VMConsole Proxy : True
 Configure WebSocket Proxy : True
 
 Please confirm installation settings (OK, Cancel) [OK]: OK

[ INFO ] Stage: Transaction setup
[ INFO ] Stopping engine service
[ INFO ] Stopping ovirt-fence-kdump-listener service
[ INFO ] Stopping dwh service
[ INFO ] Stopping Image I/O Proxy service
[ INFO ] Stopping websocket-proxy service
[ INFO ] Stage: Misc configuration
[ INFO ] Stage: Package installation
[ INFO ] Stage: Misc configuration
[ INFO ] Upgrading CA
[ INFO ] Initializing PostgreSQL
[ INFO ] Creating PostgreSQL 'engine' database
[ INFO ] Configuring PostgreSQL
[ INFO ] Creating PostgreSQL 'ovirt_engine_history' database
[ INFO ] Configuring PostgreSQL
[ INFO ] Creating CA
[ INFO ] Creating/refreshing Engine database schema
[ INFO ] Creating/refreshing DWH database schema
[ INFO ] Configuring Image I/O Proxy
[ INFO ] Setting up ovirt-vmconsole proxy helper PKI artifacts
[ INFO ] Setting up ovirt-vmconsole SSH PKI artifacts
[ INFO ] Configuring WebSocket Proxy
[ INFO ] Creating/refreshing Engine 'internal' domain database schema
[ INFO ] Generating post install configuration file '/etc/ovirt-engine-setup.conf.d/20-setup-ovirt-post.conf'
[ INFO ] Stage: Transaction commit
[ INFO ] Stage: Closing up
[ INFO ] Starting engine service
[ INFO ] Starting dwh service
[ INFO ] Restarting ovirt-vmconsole proxy service
 
 --== SUMMARY ==--
 
[ INFO ] Restarting httpd
 In order to configure firewalld, copy the files from
 /etc/ovirt-engine/firewalld to /etc/firewalld/services
 and execute the following commands:
 firewall-cmd --permanent --add-service ovirt-postgres
 firewall-cmd --permanent --add-service ovirt-https
 firewall-cmd --permanent --add-service ovirt-fence-kdump-listener
 firewall-cmd --permanent --add-service ovirt-imageio-proxy
 firewall-cmd --permanent --add-service ovirt-websocket-proxy
 firewall-cmd --permanent --add-service ovirt-http
 firewall-cmd --permanent --add-service ovirt-vmconsole-proxy
 firewall-cmd --reload
 The following network ports should be opened:
 tcp:2222
 tcp:443
 tcp:5432
 tcp:54323
 tcp:6100
 tcp:80
 udp:7410
 An example of the required configuration for iptables can be found at:
 /etc/ovirt-engine/iptables.example
 Please use the user 'admin@internal' and password specified in order to login
 Web access is enabled at:
 http://ovirtengine.example.com:80/ovirt-engine
 https://ovirtengine.example.com:443/ovirt-engine
 Internal CA E2:96:0B:A0:6C:1E:B5:0D:BB:7B:B5:29:4D:88:92:5A:DA:1E:95:BC
 SSH fingerprint: 1f:7b:59:12:01:8c:b5:d7:21:49:3b:e9:e4:d1:72:da
[WARNING] Warning: Not enough memory is available on the host. Minimum requirement is 4096MB, and 16384MB is recommended.
 
 --== END OF SUMMARY ==--
 
[ INFO ] Stage: Clean up
 Log file is located at /var/log/ovirt-engine/setup/ovirt-engine-setup-20160918040600-2gbi6m.log
[ INFO ] Generating answer file '/var/lib/ovirt-engine/setup/answers/20160918041930-setup.conf'
[ INFO ] Generating answer file '/root/answer.txt'
[ INFO ] Stage: Pre-termination
[ INFO ] Stage: Termination
[ INFO ] Execution of setup completed successfully
[root@ovirtengine ~]#
In Case firewall is enabled on your server , then execute steps mentioned in above output.

Step:5 Access oVirt Engine Web Administrator portal.

Open the web browser and type URL :
https://ovirtengine.example.com
or
https://IP_Address
Replace the domain name or IP address as per your setup.
ovirt-engine-welcome-page
Click on Administrator Portal.
Enter the user name as ‘admin‘ and password that we mentioned during installation and Profile as internal.
ovirt-engine-log-in-screen
ovirt-engine-web-administration-portal-centos7
At this point ovirt engine installation is completed, now install ovirt node.

Installation Steps of oVirt Node (Hypervisor)

oVirt Node can be configure in two different methods , First method is that we can download the hypervisor or ovirt-node iso file from its official web site and install the server from the downloaded iso file.
Second method  is that we can make existing CentOS , RHEL and Fedora server as ovirt node by installing vdsm package on it and then we will add that host or server manually from ovirt engine administrator portal.
Minimum requirements for oVirt Node is :
  • Dual-core System
  • 10 GB Physical RAM
  • 10 GB Disk Space
  • 1-Gbps Lan Card
In this tutorial i am going with first method, I have already downloaded the oVirt 4.0 Node iso file. Burn the downloaded iso file either into DVD or USB drive and Boot the boot the server with DVD/USB follow the Screen instructions.
install-ovirt-node-4
Select the first option ‘Install oVirt Node 4.0.3
select-language-during-ovirt4-node-installation
Select the Language and Click on Continue …
In the Next Step perform the following steps :
  • Configure Networking
  •  Set Hostname
  •  Select disk for OS installation
  • Date and Time as per setup
  • Keyboard Layout
In my Case Hostname is “ovirtnode.example.com” and IP address is 192.168.1.40
installation-summary-ovirt4-node
Click on Begin Installation
Set root password and click on done
set-root-password-ovirt4-node
oVirt 4.0.3 Node installation is in progress.
ovirt4-node-installation-progress
Once the installation is completed reboot your server.
ovirt4-node-installation-completed
Add oVirt Node (ovirtnode.example) in ovirt engine from Web Administrator Portal.
Login to Administrator Portal  , Go to Hosts Tab —> click on New
Specify the ovirt node details.
adding-host-ovirt-engine-web-administration
Once done with the entries, click on OK.
skip-power-management-during-hosts-addition-ovirt-engine
As i am doing this setup in my lab so i am not going to “Configure Power Management“. Click on OK
As we can see below that ovirt engine is installing the software on ovirt node. In Case host does not get activated after installing the software, then select Host and Click on Activate
installing-software-ovirt-node-from-ovirt-engine
As we can see Host is activated now.
host-activated-ovirt-engine
That’s all. Hope you like the installation and Configuration steps of oVirt 4.0.3.In the coming article we will discuss how to create data centers, cluster and Virtual machines

Openstack centos7 full


Multiple Node OpenStack ‘Liberty’ Installation on CentOS 7.x

OpenStack is an open source cloud software which provides infrastructure-as-a-service (IaaS). It can be installed on single and multiple nodes.
In this article we will deploy openStack on three nodes ( compute + controller + network ) on CentOS 7.x using RDO repository and packstack utility. For Single Node OpenStack Installation refer the below :
In article i am using three virtual machines hosted on VirtualBox and each VM has a single LAN interface. Below are architecture details :

Controller Node Details :

  • Hostname = controller.example.com
  • IP Address = 192.168.1.30
  • OS = CentOS 7.x
  • DNS = 192.168.1.11
Following OpenStack Components will installed on controller node :
  1. Keystone
  2. Glance
  3. swift
  4. Cinder
  5. Horizon
  6. Neutron
  7. Nova novncproxy
  8. Novnc
  9. Nova api
  10. Nova Scheduler
  11. Nova-conductor

Compute Node Details :

  • Hostname = compute.example.com
  • IP Address = 192.168.1.31
  • OS = CentOS 7.X
  • DNS = 192.168.1.11
Following OpenStack Components will installed on compute node :
  1. Nova Compute
  2. Neutron – Openvswitch Agent

Network Node Details :

  • Hostname = network.example.com
  • IP Address = 192.168.1.32
  • OS = CentOS 7.x
  • DNS = 192.168.1.11
Following OpenStack Components will installed on network node :
  1. Neutron Server
  2. Neturon DHCP agent
  3. Neutron- Openswitch agent
  4. Neutron L3 agent

Perform the Following Steps for Installation :

Step:1 Update the nodes using below command.

Use the below command on all three nodes to update all installed packages.
# yum -y update ; reboot

Step:2 Update /etc/hosts file and Hostname

Set the hostname on all the three nodes using below command , in case it is not set.
# hostnamectl set-hostname 'new_hostname'
Update the /etc/hosts file if you don’t have your local DNS configured.
192.168.1.30 controller.example.com controller
192.168.1.31 compute.example.com    compute
192.168.1.32 network.example.com    network

Step:3 Disable SELinux and Network Manager on all three nodes.

Use below command to disable SELinux on all three nodes.
# setenforce 0
Disabled SELinux permanently by the changing the parameter ‘SELINUX=disabled’ in the file ‘/etc/sysconfig/selinux
Use below commands to disable Network Manager on all three nodes.
# systemctl stop NetworkManager
# systemctl disable NetworkManager
# reboot

Step:4 Set Passwordless authentication from Controller node to Compute & Network Node.

Run the below commands from Controller node.
[root@controller ~]# ssh-keygen
[root@controller ~]# ssh-copy-id -i /root/.ssh/id_rsa.pub root@192.168.1.31
[root@controller ~]# ssh-copy-id -i /root/.ssh/id_rsa.pub root@192.168.1.32
Now check :
[root@controller ~]# ssh compute 
Last login: Sun Apr 3 00:03:44 2016 from controller.example.com
[root@compute ~]# hostname
compute.example.com
[root@compute ~]#

[root@controller ~]# ssh network
Last login: Sun Apr 3 00:04:20 2016 from controller.example.com
[root@network ~]# hostname
network.example.com
[root@network ~]#

Step:5 Enable RDO repository and install packstack utility

Use below yum command to enable RDO repository and install packstack utility only on controller node.
[root@controller ~]# yum install -y https://www.rdoproject.org/repos/rdo-release.rpm
[root@controller ~]# yum install -y openstack-packstack

Step:6 Generate and customize answer file

Use below command to generate answer file.
[root@controller ~]# packstack --gen-answer-file=/root/answer.txt
[root@controller ~]#
Edit the answer file and Specify the ip address of controller, compute and network node. Apart from this also specify the passwords of different services and disable the components like Demo version and Ceilometer.
[root@controller ~]# vi /root/answer.txt
........................................
CONFIG_CONTROLLER_HOST=192.168.1.30
CONFIG_COMPUTE_HOSTS=192.168.1.31
CONFIG_NETWORK_HOSTS=192.168.1.32
CONFIG_PROVISION_DEMO=n
CONFIG_CEILOMETER_INSTALL=n
CONFIG_HORIZON_SSL=y
CONFIG_NTP_SERVERS=<Specify NTP Server IP >
CONFIG_KEYSTONE_ADMIN_PW=<Specify New_Password>
..........................................
Note : In case if you have don’t NTP server then you can leave NTP parameter as it is, but it is highly recommended that we should use ntp server for time syncing.

Step:7 Start Installation using packstack command.

Now we are good to start the openstack installation using packstack command. Run the below command from Controller node.
[root@controller ~]# packstack --answer-file=/root/answer.txt
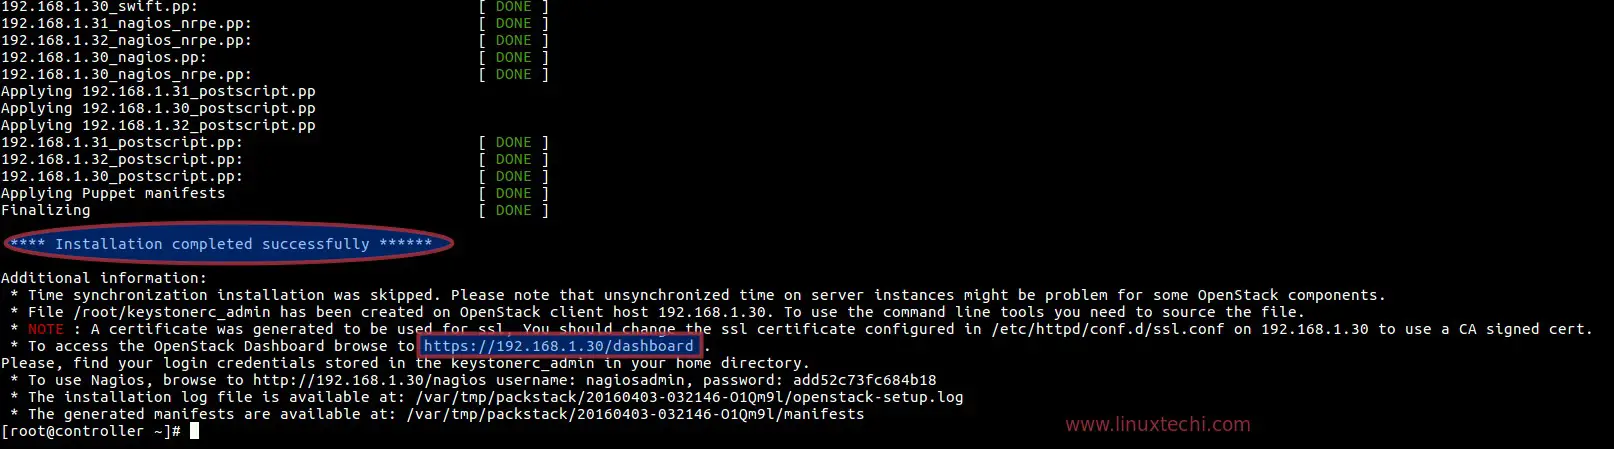
Once the installation is completed successfully we will get below:
liberty-openstack-installation-successfull-message
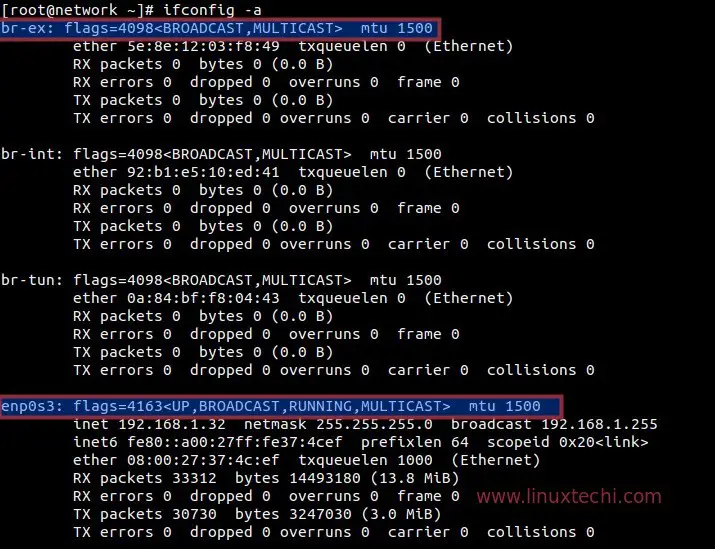
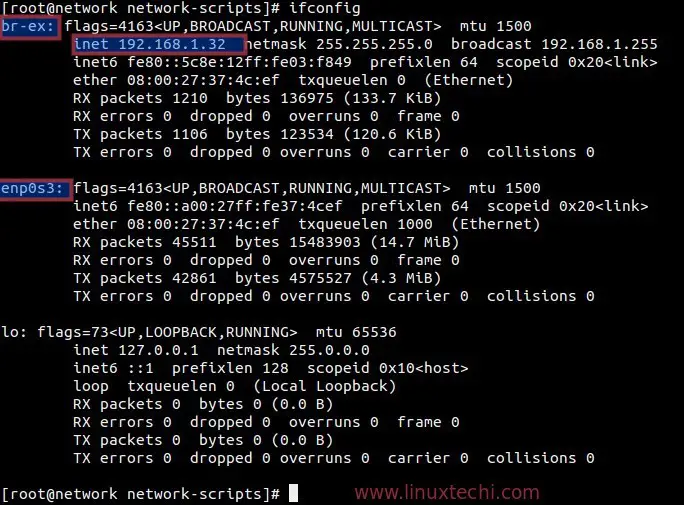
After the installation, a new interface ‘br-ex‘ will created in the network node. Add network interface (enp0s3 or eth0 or may be other name ) to the Open vSwitch ‘br-ex’ bridge as a port and assign the ip address of ‘ enp0s3’ to ‘ br-ex’
br-ex-interface-network-node
[root@network ~]# cd /etc/sysconfig/network-scripts/
[root@network network-scripts]# cp ifcfg-enp0s3 ifcfg-br-ex
[root@network network-scripts]# vi ifcfg-enp0s3
DEVICE=enp0s3
HWADDR=08:00:27:37:4C:EF
TYPE=OVSPort
DEVICETYPE=ovs
OVS_BRIDGE=br-ex
ONBOOT=yes

[root@network network-scripts]# vi ifcfg-br-ex
DEVICE=br-ex
DEVICETYPE=ovs
TYPE=OVSBridge
BOOTPROTO=static
IPADDR=192.168.1.32
NETMASK=255.255.255.0
GATEWAY=192.168.1.1
DNS1=192.168.1.11
ONBOOT=yes
Restart the Network service using below command.
[root@network network-scripts]# systemctl restart network
[root@network network-scripts]#
configure-br-ex-network-node

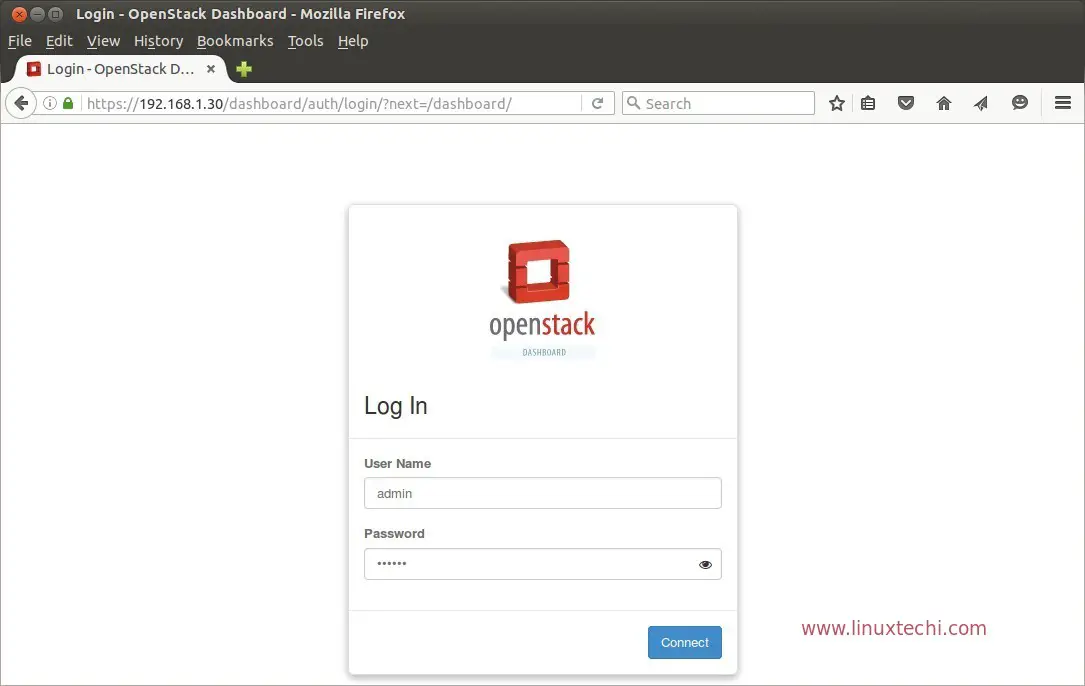
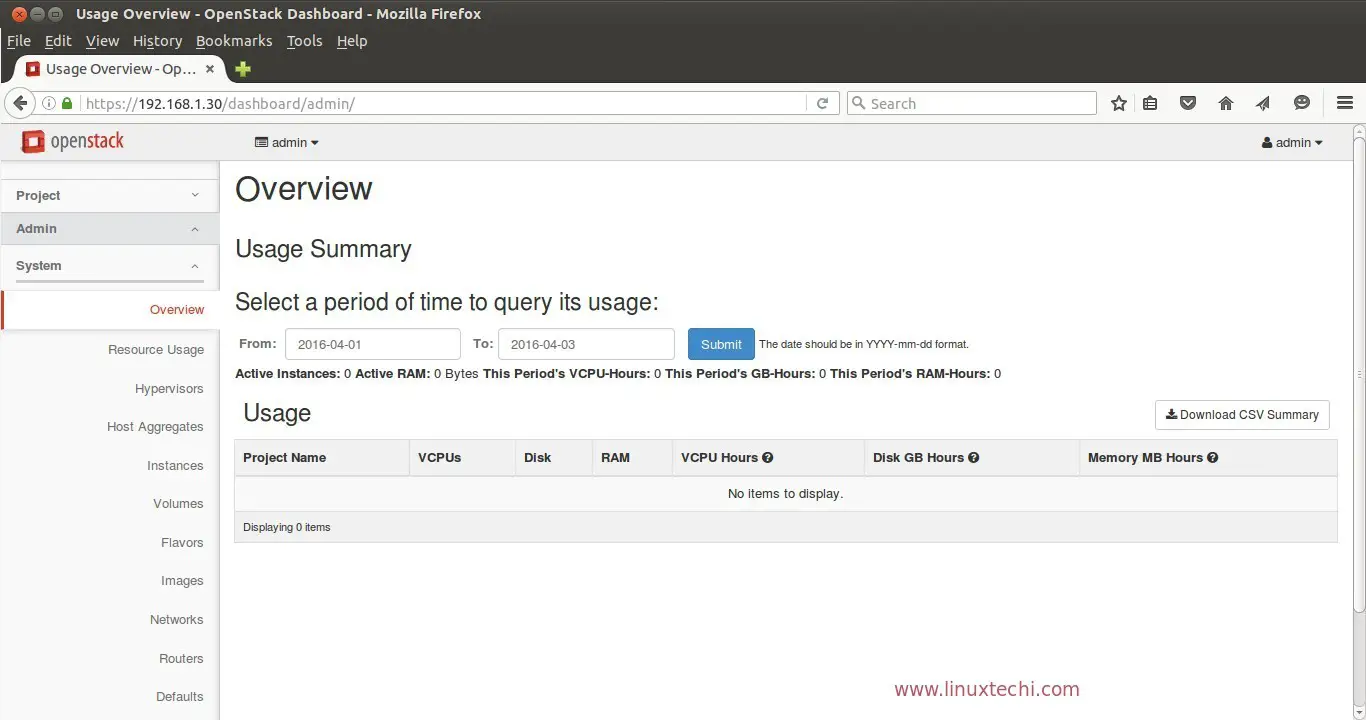
Step:8 Access Openstack Dashboard.

Now try to access the openstack dashboard from the browser using below.
https://192.168.1.30/dashboard
Use user name as ‘admin’ and password that you specify in the answer.txt file.
Login-OpenStack-Liberty- Dashboard
Click on ‘Connect’
Usage-Overview-OpenStack-Dashboard
Note : In case you are getting ‘Error: Unable to retrieve volume limit information’ in the dashboard, this can be fixed by adding the following in the cinder.conf file on the controller node.
[root@controller ~]# vi /etc/cinder/cinder.conf
....................................
[keystone_authtoken]
auth_uri = http://<Controller_IP>:5000
auth_url = http://<Controller_IP>:35357
auth_plugin = password
project_domain_id = default 
user_domain_id = default 
project_name = services 
username = cinder 
password = <Cinder_Password> {Search CONFIG_CINDER_KS_PW in answer file}
.....................................
Restart the Cinder Service.
[root@controller ~]# systemctl restart  openstack-cinder-api.service
[root@controller ~]# systemctl restart  openstack-cinder-backup.service
[root@controller ~]# systemctl restart  openstack-cinder-scheduler.service
[root@controller ~]# systemctl restart  openstack-cinder-volume.service
As we are able to login in the dashboard, so we can say that Installation part is completed. Now the next task is to launch an instance, for that we need to perform following tasks .
  • Create Project and Users
  • Assign Users to the Project.
  • Create image and flavors
  • Define Internal and external network
  • Create Router
  • Create Security Rules for Virtual Machine or instance.
To accomplish above task refer the below URL :


18 Responses

  1. Mani
    Nice blog I have installed 3 node with out any issues.
    Few questions.
    object storage is —containers ?
    Block storage is — Volumes?
    • Thanks Mani for the comments. Below is the answer to your question:
      Object storage – Swift Service provides the object storage, yes containers are object storage
      Block Storage – Cinder Service provide block storage, yes volumes are block storage
  2. Sourav
    Hi, Could you please let me know why after restart 3 node I cant open the dashboard.
    All the 3 node have internet connection and reachable from one another.
    [root@network ~]# ifconfig
    br-ex: flags=4163 mtu 1500
    inet 192.168.0.130 netmask 255.255.255.0 broadcast 192.168.0.255
    inet6 fe80::a00:27ff:fecf:c042 prefixlen 64 scopeid 0x20
    ether 08:00:27:cf:c0:42 txqueuelen 0 (Ethernet)
    RX packets 3614 bytes 293226 (286.3 KiB)
    RX errors 0 dropped 0 overruns 0 frame 0
    TX packets 3369 bytes 280514 (273.9 KiB)
    TX errors 0 dropped 0 overruns 0 carrier 0 collisions 0
    enp0s3: flags=4163 mtu 1500
    inet6 fe80::a00:27ff:fecf:c042 prefixlen 64 scopeid 0x20
    ether 08:00:27:cf:c0:42 txqueuelen 1000 (Ethernet)
    RX packets 11537 bytes 1609837 (1.5 MiB)
    RX errors 0 dropped 0 overruns 0 frame 0
    TX packets 3370 bytes 293443 (286.5 KiB)
    TX errors 0 dropped 0 overruns 0 carrier 0 collisions 0
    lo: flags=73 mtu 65536
    inet 127.0.0.1 netmask 255.0.0.0
    inet6 ::1 prefixlen 128 scopeid 0x10
    loop txqueuelen 0 (Local Loopback)
    RX packets 2 bytes 190 (190.0 B)
    RX errors 0 dropped 0 overruns 0 frame 0
    TX packets 2 bytes 190 (190.0 B)
    TX errors 0 dropped 0 overruns 0 carrier 0 collisions 0
    virbr0: flags=4099 mtu 1500
    inet 192.168.122.1 netmask 255.255.255.0 broadcast 192.168.122.255
    ether 52:54:00:73:4b:e7 txqueuelen 0 (Ethernet)
    RX packets 0 bytes 0 (0.0 B)
    RX errors 0 dropped 0 overruns 0 frame 0
    TX packets 0 bytes 0 (0.0 B)
    TX errors 0 dropped 0 overruns 0 carrier 0 collisions 0
    [root@network ~]#
  3. Sourav , Check whether openstack services are running on each node or not.
    # openstack-status
  4. Aun
    will this method work fine if i install these components (Controller, Compute, Network) on bare-metal hosts (Physical servers) instead of virtual machines? Will there be any changes required for this?
    • Aun ,
      Same steps will work for the physical servers as well. You should think over the ML2 network drivers type depending on your setup and update the same in the answer file.
  5. AJ
    I have different managment network(on nic1) and external network(nic2) for multinode openstack deployment. what is the procedure I need to follow.
    Controller Node: nic1 Manament
    nic2 External
    Compute Node: nic1 Manament
    nic2 External
    • AJ ,
      Ideally you should have three nics, nic1 for management, nic2 for vmdata and nic3 for external.
      • AJ
        Thanks for your reply, If I have 3 nics is the procedure is same as above? do I need to give the external CIDR in answer file?
        • Pradeep
          Yes Procedure will be same, in the answer file you need to specify Controller, Compute and Network IP . You can use mgmt VLAN(nic1) for these nodes and vmdata VLAN (nic2)for tunneling.
          There is no need to specify external CIDR in the answer file.
  6. Shailendra Kumar
    Hi ,
    If I want to have more than 1 compute nodes then how can I do this ? What all changes I need to do in answer file ?
    • In the answer file you have to mentioned ip address of computes nodes separated by comma like below :
      CONFIG_COMPUTE_HOSTS=192.168.1.31,192.168.1.51,192.168.1.151
      If you want to add additional compute nodes after the installation then you need to edit answer file and update the below parameters.
      EXCLUDE_SERVERS=’ip_address_of_servers_on -Which_installation_has_been_already_done’
      CONFIG_COMPUTE_HOSTS=’ip_address_of_new_compute_node’
      Once you are done with changes , re-run the packstack command with updated answer file.
  7. jlan421
    I wanted to use 2 NICs (eth0 – Floating IP network and eth1 – Openstack internal network) using vxlan, what will be the changes in the answers file? Thanks.
  8. yves
    please i can’t run this command : yum install -y https://www.rdoproject.org/repos/rdo-release.rpm
  9. ahmad
    followed your instruction and it was going good until just after the begin of installation. preparing servers, i got error and every thing was in red color update and failed. do you know any point where to fix the issue
  10. ahmad
    hi, i tried hard and overcome most of the issues but now when i turn off the network manager my connectivity is no longer there with the network. all three nodes are not connected each other anymore please need some help.
    • Hi Ahmad ,
      Network Manager needs to be stop and disable before starting the installation. Also make sure firewalld service is disabled. If still you are unable to install Openstack, please do let me know i will help you.

Leave a Reply