Minggu, 30 November 2014

Attendance Management System

Free and Open source SCM Attendance Management System is a complete system for any organization to take attendance of its staff. It is written in PHP and released as an open source project under GPL v3. This software is web based and easier to setup. First install and set up WAMP or LAMP depending upon the operating system you are using. Then create a database ‘attendance’ and import the attendance.sql file into that database. This will create all the tables and required initial data into the database. Now copy attendance folder and paste it in your web servers root folder. Root folder for WAMP will be c:/wamp/www while for LAMP it will be /var/www/html. Now open your web browser and navigate to the attendance folder on your localhost. At the moment, there no index.html file in this software. You can create your own index.html file and link any URL like Login.php to this index.html page.
Please click on the link to download from sourceforge.net. [Download]

Vote for Us

Like our script? Rate it atHotScripts > Hot Scripts


Features:
  • Attendance Report
  • Fine calculation
  • News of the day Rotator
  • Admin interface
  • Change password
  • Calendar
  • Monthly attendance report
  • User detail

23 Responses to attendance management system

  1. chancellor says:
    Thanks for sharing information. Attendance Management Software is very accurate and powerful. It handle all the records of monthly attendance record, fine record etc.
  2. […] Visit publisher site: Attendance Management Software – Free and Open source […]
  3. Cedric Suarez says:
    Fatal error: Call to undefined function session_is_registered() in C:\xampp\htdocs\attendance\include\checksession.php on line 2
    there’s an error. What should I do?
    Can you help me?
    • Anonymous says:
      this error due to the old php version used in this system. you can using wampserver, and download addon php 5.2
  4. joko says:
    kasih tutorial yang lengkap dong gan.. biar kita2 yang gaptek bisa ikut belajar..
  5. amaar says:
    please need help when aim give any one holady its not working :( but when give all its working i need give one name only what can i do?
  6. ponraj says:
    it is working fine in my local machine but when i tried to host it in ubuntu server i am unable to login in .database connection is fine but dono y m unable to login
  7. me says:
    I have exactly the same problem.
  8. Ehmad Imtiaz says:
    You have to check the file path of the config file ‘include\config.php’ changed to ‘include/config.php’.
    i have changed From :
    include_once(“include\config.php”);
    To :
    include_once(“include/config.php”);
    And now its working fine !
    Check the path in every file !
    Hope this will help you.
  9. Ben Lim says:
    Why am I getting Session Expired! even though the users default is entered correctly, admin and password admin123
    • Ehmad Imtiaz says:
      Maybe it is not fetching data from database , have you created and installed database in mysql ??
      check database !
  10. guruprasad says:
    i want a complete project plse send me immediately………….
  11. Usman says:
    Fatal error: Call to undefined function session_is_registered() in C:\wamp\www\attendance\include\checksession.php on line 2
    Hello ..This error is comming when i enter the user id and pw. Can any one please help me out to fix this issue. I have tried many things but i am unable to solve this issue.
    Thank you
  12. A Debnath says:
    geting rerror
    Call to undefined function session_is_registered() in C:\wamp\www\attendance\include\checksession.php on line 2
    Plz help
    thank u in advance
  13. Hi there to every one, the contents existing at
    this site are actually amazing for people knowledge, well, keep up the nice work fellows.
  14. Taha says:
    The login time is always 10 – 15 minutes when i log a user in… can make a help guide on actually how to use it??? Everything is simple to set up but nothing on how to use it.
  15. ton says:
    what is the username and password to login
  16. Kunal says:
    It is not working.
    I uploaded the files to file manager and sql code to phpmyadmin on Cpanel.
    When I try to open login.php it says
    Internal Server Error
    The server encountered an internal error or misconfiguration and was unable to complete your request.
  17. i can’t log in. i don’t know what is the “username” and “password” used. please help me..
  18. Anonymous says:
    I have tried Useranme admin and password admin123 it showing blank page (http://192.168.2.2/html/attendance/admin.php?uid=28)
    Please help me
  19. Giri says:
    I have tried Useranme admin and password admin123 showing blank page
    http://192.168.2.2/html/attendance/admin.php?uid=28
  20. Anonym says:
    Hallo All.
    In /include/config.php at line with mysql_select_db($dbname); is missing the reference path. In this case selectDB instruction is
    redirected to blachHole. Add $conn to select_db.
    Must be : mysql_select_db($dbname, $conn);

http://sourcecodemania.com/attendance-management-system/#comment-194

Web-based School Information And Management System

SchoolTool: A Web-based School Information And Management System


Introduction

SchoolTool is a free, open source, web-based student information system for a single school, including student enrollment and demographics, grading and grade reporting, tracking student achievement of skills, competencies or outcomes, attendance, calendars and intervention tracking. It is also a framework for building customized applications and configurations for individual schools or states.
SchoolTool is created by the most popular man of the Linux world Mr.Mark Shuttleworth, the founder of Canonical and Ubuntu. It is now maintained by Mr.Tom Hoffman and dozens of active contributors. It is written in Python language using the Zope 3 framework, and is licensed under GNU GPL2. SchoolTool is a complete stack web application that means it comes with a own web server and a database. Right now, It is available only for Ubuntu, and It is highly recommended to use it only on Ubuntu LTS versions such as Ubuntu 14.04 or Ubuntu 12.04 etc. Be mindful that SchoolTool is not a learning management system like Moodle, and it doesn’t include any subject materials or contents.

Features

  • Customizable student and teacher demographics and other personal data;
  • Contact management for teachers, students, and their guardians;
  • Teacher gradebooks;
  • Skill and outcomes based assessment;
  • Schoolwide assessment data collection and report card generation;
  • Class attendance and daily participation grades;
  • Calendars for the school, groups, individuals, and resource booking;
  • Tracking and management of student interventions;
  • And many.

Installation

SchoolTool is available on Ubuntu default repositories. So, you can simply install it using the following commands:
sudo apt-get update && sudo apt-get install schooltool -y
However, the SchoolTool might be bit outdated in the default repositories. If you want to use most recent version, add the following PPA and install SchoolTool as shown below.
sudo add-apt-repository ppa:schooltool-owners/2.8
sudo apt-get update && sudo apt-get install schooltool -y
By default, a newly installed SchoolTool server is not accessible from the remote computers.
To allow access to SchoolTool from other computers:
Edit file /etc/schooltool/standard/paste.ini:
sudo vi /etc/schooltool/standard/paste.ini
Change the host to 0.0.0.0 or to any IP address that you want to give permission to access the SchoolTool Web console.
host = 0.0.0.0
And restart SchoolTool:
sudo service schooltool restart
If you want to access the SchoolTool Dashboard only from the local system where it is installed, then set host=127.0.0.1.

Configuration

After installing it, you can access the SchoolTool dashboard by navigating to the URLhttp://ip-address:7080 from your web browser.
You should see a screen like below.
Your School » Today - Mozilla Firefox_001

Change Manager Password:

The first thing you should after installing SchoolTool is to change the default user“manager” password. Using the user manager, you can do all administrative related stuffs such as configure SchoolTool, enter student data, and completely set up and maintain the system etc.
To change the manager password, click on the link that says: Log in on the top right corner.
Enter the default administrative user name: manager, and it’s default password isschooltool.
Log In - Mozilla Firefox_002
Click on the Home button on the top menu bar.
Default Manager - Mozilla Firefox_003
Then, click the Password link button under the settings on the left side bar. Enter the current password, and new password twice and click Apply.
Default Manager » Password - Mozilla Firefox_004

Setting Up Outgoing Mail:

SchoolTool doesn’t act as a email server like Sendmail or Postfix. It will send  mails like email clients such as Thunderbird, Evolution.
To enable mail function in SchoolTool, login to manager account and goto Server tab. Click on the Outgoing Email link.
Server - Mozilla Firefox_005
Then, Click on the yellow colored pencil icon to change the email settings.
Server » Outgoing Email - Mozilla Firefox_006
Fill up the smtp, Email and password details and click apply.
Server » Outgoing Email Settings - Mozilla Firefox_007

Setting Up Calendars:

It is very important to setup the calendar as per your regional location. To do that, click on the Calendar tab on the Server section. Select your Time zone, for me it’s Asia/Kolkatta.
Server » Calendar Settings - Mozilla Firefox_008
Go to the rest of the links such as Errors, Tabs and Pack Database. Most of them are self-explanatory. Read and change the settings as per your requirements.

Setting Up Schools

Here, we’ve come to the comprehensive part that needs more time and attention to get things done. We can’t cover all the things in one article. So i recommend you to visit theofficial documentation page of the SchoolTool, and go through the sections one by one and setup your school accordingly. It will take some hours or even days to setup the whole school setup. Don’t be afraid, I guess it is not that a difficult task. SchoolTool team has a well prepared self-help documentation with screenshots in their website. Just read and start to manage your schools easily and effectively.
Cheers!!
Reference:
For questions please refer to our Q/A forum at : http://ask.unixmen.com/

Jumat, 28 November 2014

DAFTAR PERINTAH COMMAND PROMPT ATAU CMD


Daftar Perintah/Command yang ada di CMD/Command Prompt

  Cyberzimp (Yogha) ^_^
Halow ceman-ceman temuah, kali inie saya akan posting tentang daftar perintah-perintah yang ada di dalam Command Prompt atau biasa di sebut juga dengan CMD, apa itu CMD dan mahluk apakah itu? cmd.exe adalah baris perintah penerjemah pada OS/2, Windows CE dan Windows NT berbasis sistem operasi (termasuk Windows 2000, Windows XP, Windows Vista, Windows Server 2003 dan Windows Server 2008). Ini merupakan analog dari COMMAND.COM dalam MS-DOS dan sistem Windows 9x atau dari Unix shell yang digunakan pada sistem Unix-like. (WikiPedia)

okelah berikut merupakan beberapa (banyak tapi) perintah yang ada di CMD beserta fungsinya


ADDUSERS – Memasukkan/ menambah user ke/dari file CSV.
ARP – Address Resolution Protocol
ASSOC Change – file extension associations
ASSOCIAT – One step file association
AT Schedule – Perintah untuk membuat shedule program (utk dijalankan kemudian waktu)
ATTRIB – Mengganti atribut file
BOOTCFG – Edit boot setting windows
BROWSTAT – Mencari info domain,browser dan PDC
CACLS – Mengganti/mengubah file permissions
CALL – Memanggil sebuah program batch
CD – Memindahkan ke sebuah folder tertentu.
CHANGE – Mengubah Properties pada Terminal Server
CHKDSK – Memeriksa dan memperbaiki file system
CHKNTFS – Memeriksa NTFS file system
CHOICE – Menerima input keyboard ke dalam sebuah batch file
CIPHER – Encrypt-Decrypt files/folders
CleanMgr – Membersihkan secara otomatis Temporary files, recycle bin
CLEARMEM – Membersihkan memory
CLIP – meng-Copy STDIN ke Windows clipboard.
CLS – Membersihkan layar CMD
CLUSTER – Windows Clustering
CMD – Membuka layar CMD/ command prompt
COLOR – Mengganti warna pada window CMD
COMP – Membandingkan isi dari 2 atau lebih file
COMPACT – kompres file/folder di dalam partisi NTFS
COMPRESS – kompres file individu di dalam partisi NTFS
CON2PRT – Connect atau disconnect sebuah Printer
CONVERT – Convert FAT drive menjadi NTFS.
COPY – Copy 1 atau lebih file ke lokasi tertentu
CSVDE – Import/Export Active Directory data
DATE – Menampilkan/mengatur tanggal
Dcomcnfg – DCOM Configuration Utility
DEFRAG – Defragment hard drive
DEL – Menghapus 1 atau lebih file
DELPROF – Menghapus User Profile NT
DELTREE – Menghapus sebuah folder beserta subfolder
DevCon – Device Manager Command Line Utility
DIR – Menampilkan daftar file/folder dari sebuah drive
DIRUSE – Menampilkan disk usage/kapasitas disk
DISKCOMP – Membandingkan isi dari 2 buah floppy disk
DISKCOPY – Copy isi dari sebuah floppy disk ke floppy disk lainnya
DNSSTAT – DNS Statistics
DOSKEY – Mengedit command line,recall commands,dan create macros
DSADD – Menambah user (computer, group..) ke dalam active directory
DSQUERY – Menambah item ke dalam active directory
DSMOD – Modify user (computer, group..) di dalam active directory
ECHO – Menampilkan message pada monitor
ERASE – Menghapus satu atau lebih file
EXIT – keluar dari window CMD
EXPAND – Uncompress file
EXTRACT – Uncompress CAB files
FC – Membandingkan 2 buah file
FDISK – Disk Format dan partition
FIND – Mencari sebuah text string di dalam sebuah file
FINDSTR – Mencari strings di dalam files
FOR /F -Loop command: untuk beberapa files sekaligus
FOR – Loop command: all options Files, Directory, List
FORFILES – Batch process multiple files
FORMAT – Memformat sebuah disk
FREEDISK – Menampilkan free disk space (dalam bytes)
FSUTIL – File and Volume utilities
FTP – File Transfer Protocol
FTYPE – Menampilkan/mengubah file types yg digunakan dalam file extension
GLOBAL – Menampilkan daftar anggota dalam global groups
GOTO – Mengarahkan sebuah program batch untuk melompat ke labelled line
HELP – Online Help
HFNETCHK – Network Security Hotfix Checker
IF – Conditionally perform a command (perintah bersyarat)
IPCONFIG – Configure IP
KILL – Menghapus program dari memory
LABEL – Memberi/mengubah label disk
LOCAL – Menampilkan daftar anggota local groups
LOGEVENT – Menulis text ke dalam NT event viewer.
LOGOFF – Keluar dari system / Mengeluarkan user dari system
LOGTIME – mencatat tanggal dan waktu dalam sebuah file
MAPISEND – Mengirim e-mail dari command line
MEM – Menampilkan memory usage
MD – Create new folders
MODE – Configure a system device
MOUNTVOL – Mengatur Mount point dalam sebuah volume
MOVE – Memindahkan file dari sebuah folder ke folder lain
MOVEUSER – Menindahkan user dari sebuah domain ke domain lain
MSG – Mengirim message
MSIEXEC – Microsoft Windows Installer
MSINFO – Windows NT diagnostics
MSTSC – Terminal Server Connection (Remote Desktop Protocol)
MUNGE – Mencari dan Menganti text di dalam sebuah file (find & replace)
MV – Meng-copy file yang sedang/sementara digunakan
NET – Mengatur network resources
NETDOM – Domain Manager
NETSH – Configure network protocols
NETSVC – Command-line Service Controller
NBTSTAT – Menampilkan networking statistics (NetBIOS over TCP/IP)
NETSTAT – Menampilkan networking statistics (TCP/IP)
NOW – Menampilkan current Date and Time
NSLOOKUP – Name server lookup
NTBACKUP – Backup folders
NTRIGHTS – Edit user account rights (wilayah akses yg diizinkan oleh admin)
PATH – Menampilkan atau mengatur search path untuk executable files
PATHPING – Melacak route plus network latency dan packet loss
PAUSE – Menahan proses sebuah batch file and menampilkan message
PERMS – Menampilkan permissions (wilayah akses) user
PERFMON – Performance Monitor
PING – Menguji (test) network connection
POPD – Restore previous value dari sebuah directory yang di-save oleh PUSHD
PORTQRY – Menampilkan status ports dan service
PRINT – Print text file
PRNCNFG – Menampilkan, mengatur, atau mengubah nama printer
PRNMNGR – Menampilkan, menghapus, atau menambah daftar printer; set default printer
PROMPT – Mengubah command prompt
PsExec – Menjalankan proses jarak jauh (remote)
PsFile – Menunjukkan file2 yang dibuka dari jarak jauh
PsGetSid – Menampilkan SID sebuah computer atau user
PsInfo – Menampilkan informasi dari sebuah system
PsKill – Menghentikan proses melalui process ID
PsList – Menampilkan detail informasi dari sebuah proses
PsLoggedOn – Who’s logged on (mengecek secara lokal atau melalui resource sharing)
PsLogList – Event log records
PsPasswd – Mengubah account password
PsService – Menampilkan dan mengubah services
PsShutdown – Shutdown atau reboot computer
PsSuspend – Suspend/menahan proces
PUSHD – Menyimpan/Save dan mengganti current directory
QGREP – Mencari kata/kalimat di dalam file yg sesuai dgn pola/line yg ditentukan.
RASDIAL – Mengatur RAS connections
RASPHONE – Mengatur RAS connections
RECOVER – Memulihkan/Recover damaged file dari sebuah disk defective (rusak).
REG – Membaca, mengatur, atau menghapus registry keys dan values
REGEDIT – Mengimport/mengeksport registry settings
REGSVR32 – Register/unregister file DLL atau ocx
REGINI – Mengubah Registry Permissions
REM – Merekam/mencatat comments (remarks) di dalam sebuah batch file
REN – mengubah nama file
REPLACE – Mengganti/Replace atau meng-update sebuah file dengan file line
RD – Delete folder
RDISK – Create Recovery Disk
RMTSHARE – Share folder atau printer
ROUTE – Memanipulasi network routing tables
RUNAS – Menjalankan sebuah program dgn menggunakan user account lain.
RUNDLL32 – Menjalankan sebuah DLL command (add/remove print connections)
SC – Service Control
SCHTASKS – Create or Edit Scheduled Tasks
SCLIST – Display NT Services
ScriptIt – Control GUI applications
SET – Display, set, atau remove environment variables
SETX – Set environment variables secara permanent
SHARE – Mendaftar atau edit sebuah file share atau print share
SHORTCUT – Create windows shortcut (.LNK file)
SHOWGRPS – Menampilkan daftar NT Workgroups atau user yang telah joined
SHOWMBRS – Menampilkan daftar Users yg merupakan member dari sebuah Workgroup
SHUTDOWN – Shutdown computer
SLEEP – Menunggu selama beberapa saat
SOON – Menjadwal(schedule) sebuah command untuk beberapa waktu kemudian
SORT – Sort input
START – membuka sebuah window baru, untuk menjalankan program atau command tertentu
SU – Switch User
SUBINACL – Edit file & folder Permissions, Ownership serta Domain
SUBST – Menyesuaikan sebuah path dengan drive letter
SYSTEMINFO – Menampilkan daftar system configuration
TASKLIST – Menampilkan daftar aplikasi dan service yang sedang berjalan
TIME – Menampilkan atau mengubah waktu pada system
TIMEOUT – Delay processing sebuah batch file
TITLE – Menentukan judul window untuk sebuah session CMD.EXE
TOUCH – mengubah timestamps sebuah file
TRACERT – Melacak route ke sebuah remote host
TREE – Tampilan grafis dari struktur folder
TYPE – Menampilkan isi dari sebuah text file
USRSTAT – Menampilkan daftar domain usernames dan last login
VER – Menampilkan version information
VERIFY – Memeriksa apakah files telah ter-save
VOL – Menampilkan disk label
WHERE – Mencari dan menampilkan files di dalam sebuah directory tree
WHOAMI – Menampilkan current UserName dan current domain
WINDIFF – Membandingkan isi dari dua atau lebih file.
WINMSD – Windows system diagnostics
WINMSDP – Windows system diagnostics II
WMIC – WMI Commands
XCACLS – Mengubah file permissions (hak akses)
XCOPY – Copy files dan folders


CMD singkatan dari Command , sebuah aplikasi yang digunakan untuk menjalankan perintah dalam operasi jaringan komputer, Dulu istilah ini dikenal dengan Program DOS . Ternyata para pengguna komputer tidak semua nya tahu, perintah perintah apa yang terdapat pada CMD Prompt ini.
Sampai Windows 7, Command Prompt tetap disertakan, ini menandakan bahwa fitur ini masih sangat penting.


Perintah command prompt yang disediakan mulai windws 9x sampai windows 7 pun semakin bertambah, mulai dari yang sederhana sampai perintah kompleks untuk administrator dalam mengatasi dan menganalisa berbagai masalah. Berikut beberapa perintah dasar command prompt yang sebaiknya kita ketahui karena cukup bermanfaat.

Untuk menjalankan command prompt, bisa melalui start Menu (All Programs) > Accessories kemudian pilih Command Prompt. Selain itu bisa juga dengan cara yang lebih cepat melalui menu RUN di start menu ketikkan CMD dan tekan enter.

DIR

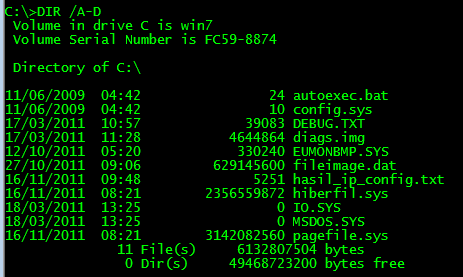
Perintah ini untuk menampilkan daftar file dan directory di lokasi folder yang sedang di akses di command prompt. Untuk menampilkan file dan folder yang tersembunyi, tambahkan opsi atau parameter /A setelah perintah DIR. Pastikan sebelum garis miring ada spasi, contohnya
DIR /A

Untuk mengetahui parameter atau opsi lainnya, silahkan ketikkan DIR /?

CD atau CHDIR

Perintah ini berguna untuk berpindah directory. CD dan CHDIR mempunyai fitur hampir sama, hanya saja untuk CHDIR kita bisa menuliskan lokasi folder atau file yang ada spasinya tanpa tanda petik dua. Berikut beberapa contoh perintah dan fungsinya :
  • CD D: untuk berpindah ke drive D:
  • CD.. untuk berpindah ke directory diatasnya
  • CD\ atau CD/ untuk berpindah ke root directory (untuk windows 7/Vista). Misalnya di command prompt kita ada di C:\User\Aku>, untuk berpindah ke C:, kita bisa mengetikkan CD.. sebanyak 2 kali. Lebih singkatnya kita bisa mengetikkan CD/
Selain penggunaan seperti itu, kita juga bisa memanfaatkan fitur autocomplete nama file atau folder. Setelah mengetikkan CD kemudian di ikuti spasi dan huruf tertentu, bisa kita tekan tombol Tab (bisa berkali-kali) untuk mendapatkan fitur auto complete nama folder atau file.

IPCONFIG

Sangat bermanfaat dalam hal koneksi internet atau jaringan. Dengan mengetikkan perintah IPCONFIG kemudian di tekan enter, akan ditampilkan alamat IP komputer kita dengan beberapa informasi tambahan seperti Gateway, SubnetMask dan lainnya. Untuk informasi lebih lengkap kita bisa mengetikkan IPCONFIG /ALL.
Tambahan /ALL tersebut merupakan options atau parameter. Selain /ALL, terdapat beberapa parameter lainnya yang cukup bermanfaat. Untuk daftar parameter selengkapnya, silahkan ketikkan IPCONFIG /?

PING

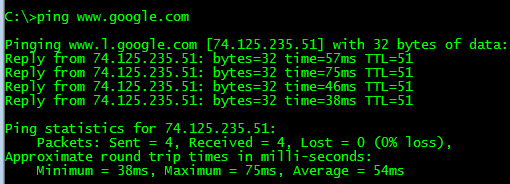
Seringkali ketika internet atau jaringan tidak bisa terkoneksi. Untuk mengetest koneksi internet atau jaringan, kita bisa menggunakan perintah PING dan di ikuti nama website atau alamat IP yang dituju. Misalnya sebagai berikut:
PING www.google.com
PING 74.125.235.51


Jika hasilnya Reply from…., maka koneksi jaringan atau internet bisa dikatakan OK, tetapi jika muncul tampilan Request time out, ada beberapa kemungkinan, seperti tidak ada koneksi, kabel atau jaringan bermasalah atau alamat yang dituju tidak ada atau tidak ditemukan dan lainnya.

ATTRIB

Virus atau worm yang menyerang komputer biasanya menyembunyikan file atau folder yang ada di komputer atau flashdisk. Jika hal ini terjadi, kita bisa menggunakan perintah ATTRIB untuk menampilkan file tersebut ( termasuk untuk menyembunyikan file-filenya). Perintah berikut akan menampilkan semua file dan folder yang ada di folder yang sedang di akses di command prompt.
ATTRIB *.* -S -H -R /S /D


Beberapa Tips Tambahan

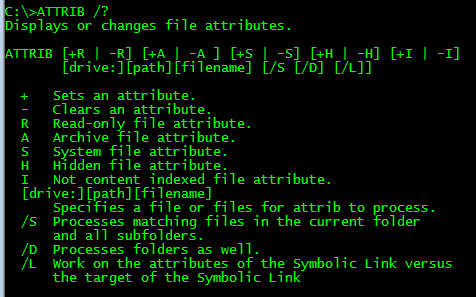
Semua perintah command prompt biasanya menyertakan banyak parameter yang bisa digunakan. Untuk mengetahui parameter apa saja yang disediakan, tambahkan spasi dan /? setelah perintah yang ingin diketahui. misalnyaATTRIB /?PING /?. Setiap menambahkan parameter, sebelum tanda garis miring (/) jangan lupa beri spasi.
Jika kita ingin hasil perintah yang kita tuliskan bisa disimpan dalam text, disetiap akhir perintah bisa kita tambahkan tanda “>” dan di ikuti nama file. Misalnya perintah berikut:
IPCONFIG /all > D:\hasil_cmd_config.txt
Maka hasilnya tidak akan tampil di command prompt, tetapi tersimpan dalam file “hasil_in_config.txt ” yang ada di drive D:. Jika nama folder atau file mengandung spasi, maka harus kita beri tanda petik dua diawal dan akhirnya. Misalnya sebagai berikut :
IPCONFIG /all > "D:\hasil cmd config.txt"
Untuk membersihkan tampilan layar, gunakan perintah CLS. Setelah selesai, untuk keluar selain klik tombol X dipojok, bisa juga kita ketikkan perintah EXIT.

Berikut ini list perintah-perintah CMD lain yang sering di gunakan pada jaringan komputer:

1. ipconfig /all
Menampilkan informasi konfigurasi koneksi, misalnya Host Name, Primary DNS Type, Ethernet Adapter LAN.
2. ipconfig /flushdns
Menghapus DNS Cache
3. ipconfig /release
“Menghapus” semua koneksi IP Address.
4. ipconfig /renew
Membuat IP Address baru untuk adapter tertentu.
5. ipconfig /displaydns
Menampilkan DNS Cache.
6. ipconfig /registerdns
Melakukan refresh DNS dan meregister kembali koneksi DNS.
7. ipconfig /showclassid
Menampilkan informasi DHCP Class.
8. ipconfig /setclassid
Mengubah DHCP Class ID
9. control netconnections
Menampilkan Network Connection.
10. nslookup
Mengetahui alamat ip address dari nama domain yang di tuliskan
11. netstat
Menampilkan informasi koneksi TCP/IP yang sedang aktif.
12. route
Menampilkan local route.
13. hostname
Menampilkan nama komputer.
14. ping
Contoh: ping cookies.web.id
Melakukan test koneksi ke situs cookies.web.id
Semakin sedikit % loss-nya maka semakin baik koneksinya.
15. tracert
Menampilkan informasi IP Address route.
nah mungkin sekian dulu dari saya, maaf-maaf jika dalam pembahasaan saya sedikit alay, itu semua hanya di maksudkan agar semuanya menjadi lebih unyu XD

Assalamualaikum Wr. Wb.