Senin, 26 Juni 2023

MYSQL-max-connection

 https://ubiq.co/database-blog/how-to-increase-max-connections-in-mysql/

increase max connections in mysql

How to Increase Max Connections in MySQL

Sometimes MySQL server may give “Too many connections” error message when you try to connect to a MySQL database. Here’s how to increase max connections in MySQL to fix this problem.


What causes MySQL Too Many Connections?

If you get “Too many connections” error message while connecting to MySQL database it means all available connections have been used by the various clients and your MySQL Server cannot open any new connections until any of the existing connections is closed.

Bonus Read : How to Store UTF8 Characters in MySQL

How Many Connections can MySQL handle?

By default, MySQL 5.5+ can handle up to 151 connections. This number is stored in server variable called max_connections. You can update max_connections variable to increase maximum supported connections in MySQL, provided your server has enough RAM to support the increased connections.

Bonus Read : How to Rank Over Partition in MySQL

How to Increase Max Connections in MySQL

Here are the steps to increase max connections in MySQL.


1. Check the default max connections

Log into MySQL command line tool and run the following command to get the current default max connections supported by your database server.

mysql> show variables like "max_connections";

You will see the following output.

+-----------------+-------+
| Variable_name   | Value |
+-----------------+-------+
| max_connections | 100   |
+-----------------+-------+

Bonus Read : How to Change MySQL Timezone in Query

2. Increase Max Connections

There are two ways to increase MySQL connections. Here’s the command to update max connections to 200 via MySQL command line tool without restart.

mysql> set global max_connections = 200;

The above command will increase max connections without restart but once the server is restarted, the changes will be gone. This method is useful to increase available connections in a production system such as a website/app, without having to restart your database server.

To permanently increase max connections, open my.cnf file,

$ sudo vi /etc/my.cnf

Depending on your Linux distribution and type of installation, my.cnf file may be located at any of the following locations.

  • /etc/my.cnf
  • /etc/mysql/my.cnf
  • $MYSQL_HOME/my.cnf
  • ~/.my.cnf

Add the following line under [mysqld] section.

max_connections = 200

Now if you restart MySQL server, the changes will persist.


3. Restart MySQL Server

Restart MySQL Server to apply changes

$ sudo service mysql restart

Hopefully, the above tutorial will help you increase max connections in MySQL.

Ubiq makes it easy to visualize data in minutes, and monitor in real-time dashboards. Try it for free!
Minggu, 25 Juni 2023

PYTHON-pos code


Django POS with Source Code

This POS Django created based on python, Django, and SQLITE3 Database. Point of Sale System Project created using Python Django Framework on the backend and HTML, CSS, and JavaScript on the frontend. It has Admin side which allows extra features like manage product, category, order, users, and inventory.

Moving on, a point of sale system, Keeps track of all of the inventory information and data. We’ve created all of the inventory, product, and orders crud (create, read, update, and delete) operations. This is a role-based module in which the admin can perform any operation on the data.

However, to start creating a Point of Sale Management System Project in Python Django, makes sure that you have PyCharm Professional IDE Installed in your computer.

Anyway, This Point of Sale Management System in Django Framework, Also includes a Download Source Code for free, just find the downloadable source code below and click download now.

Also, visit or read the other interesting languages used in point of sale system.

About Point of Sale Project

In order to use the features and functions of this Grocery Point of Sale System Project, users must log in with their registered system user credentials. The list of product categories, categories, and sales transactions can be managed by the user. These features have CRUD operations, which stand for Create, Read, Update, and Delete.

These operations are carried out using Ajax requests in jQuery. The application also creates a receipt for the transaction that is ready to print. After the user saves a transaction, the receipt will be displayed, and the user can also reprint the receipt from the Sales List Page.

When the record is saved, the system automatically creates a transaction code. On the Home/Dashboard Page, the system also shows a summary or a count of all the data. The total number of transactions and the total amount of all transactions are also shown on that page.

Project Information and Recommended Tools Used

About ProjectProject Details
Project NamePoint of Sale System in Django with Source Code
Python version (Recommended)3.8 Version
Programming Language UsedPython Django Language
IDE Tool (Recommended)Sublime, Visual Studio, PyCharm
Project TypeWeb Based Application
DatabaseSQLite
Point of Sale System in Django Overview

Admin Features

  • Manage Product– For the product, The admin can view, add, edit, and delete product information.
  • Users Management – For the users, The admin can see the list of users details. Admin can update and delete the record of the users details.
  • Manage Category– For the category, The admin can see the list of category details. Admin can update and delete the record of the category information.
  • Manage Order– For the order, The admin can add, edit, and delete order information.
  • Login – By default the admin need to login first to enable to access the system.
  • Manage Inventory– For the inventory, The admin can add, edit, and delete inventory information.

Point of Sale System in Django Steps on How to Create a Project

Time needed: 5 minutes.

Here are the step’s on how to create a Django POS.

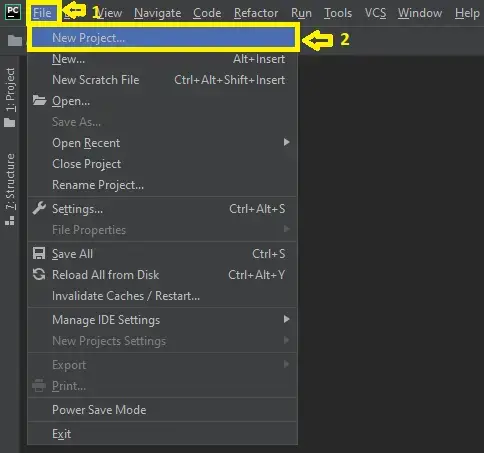
  • Step 1: Open file.

    First , open “pycharm professional” after that click “file” and click “new project“.
    Create new Project for Loan Management System Project in Django with Source Code

  • Step 2: Choose Django.

    Next, after click “new project“, choose “Django” and click.
    choose django for Loan Management System Project in Django with Source Code

  • Step 3: Select file location.

    Then, select a file location wherever you want.
    Create location name for Loan Management System Project in Django with Source Code

  • Step 4: Create application name.

    After that, name your application.

  • Step 5: Click create.

    Lastly, finish creating project by clicking “create” button.
    Finish creating project name for Loan Management System Project in Django with Source CodeFinish creating project name for Loan Management System Project in Django with Source Code

  • Step 6: Start Coding.

    Finally, we will now start adding functionality to our Django Framework by adding some functional codes.

Downloadable Source Code Below.

Anyway, if you want to level up your programming knowledge, especially in Python, try this new article I’ve made for you: Best Python Projects with Source Code for Beginners. But if you’re going to focus on web development using Django, you can download here from our list of Best Django Projects with source code based on real-world projects.

How To Run The Point of Sale System in Django?

  • Step 1: Extract/unzip the file
  • Step 2: Go inside the project folder, open command prompt and type the following commands to install Django Framework and run the webserver:
  • pip install -r requirements.txt
  • python manage.py migrate
  • python manage.py runserver
  • Step 3: Finally, open the browser and go to http://127.0.0.1:8000/

For admin panel:

  • Username: admin
  • Password: adminl12345

Summary

In summary, this POS Django with Source Code can be useful to students or professional who wants to learn python programming language. This project can also be modified to fit your personal requirements. Hope this project will help you to improve your skills. Happy Coding!

Inquiries

If you have any questions or suggestions about Django POS system with Source Code, please feel free to leave a comment below.