Jumat, 31 Mei 2019

IOT dgn thingsboard

Membuat Aplikasi Monitoring Suhu dan Kelembaban


Membuat Aplikasi Monitoring Suhu dan Kelembaban


Halo sahabat kodingindonesia, kali ini kita akan membuat device IoT sederhana menggunakan thinger.io sebagai platform Internet of Things tempat kita menyimpan dan juga menampilkan data via internet dan NodeMCU sebagai perangkat utama yang kita program untuk menerima data suhu dan kelembaban dari sensor DHT11Berikut skema sedehana mengenai device IoT yang akan dibuat:


Persiapan Perangkat dan Alat

Untuk dapat mengikuti tutorial ini, sahabat harus mempersiapkan beberapa perangkat berikut:
Penulis juga memberikan link untuk membeli perangkat tersebut secara online (Karena menurut pengalaman penulis  harga di toko online lebih murah, tetapi sahabat harus lebih teliti dan hati-hati mencari toko onlinenya ya hehehe)
  • NodeMCU, board wifi kecil berbasis ESP8266. ESP8266 dikenal sebagai modul wifi yang handal dan ekonomis. ESP8266 inilah yang menghubungkan perangkat kita dengan internet via WiFi. https://goo.gl/w6Ov4r
  • DHT11, sensor bertipe keluaran digital yang dapat mengukur suhu dan kelembaban secara bersamaan. Sensor ini dapat mengukur suhu 0 – 50 °C dan mengukur kelembaban 20 – 90 % RH. https://goo.gl/xjhJID
  • Breadboard https://goo.gl/SGeae4
  • Kabel jumper https://goo.gl/N3Lxkw
Selain perangkat-perangkat diatas, sahabat juga memerlukan Wifi Access Point yang terhubung ke internet. Namun jika sahabat tidak memiliki Wifi Access Point, sahabat  dapat menggunakan smartphone untuk dijadikan hotspot yang nantinya akan digunakan oleh NodeMCU untuk terkoneksi ke internet.

Selanjutnya kita akan melihat rangkaian dan program sensor.


Silahkan klik Next Step di bawah ini untuk melanjutkan belajar.

Kamis, 30 Mei 2019

Install thingsboard raspberry

Install thingsboard on raspberry Pi

Here we will see, how to install thingsboard on raspberry Pi. In similar way, you can install thingsbord on Linux system.
1)Open terminal on Raspberry Pi
2)Execute following command to update the existing package
sudo apt-get update
3)To use or install thingsboard on Raspberry Pi , you need to install a  java on thingsboard. To install java execute the following command
sudo apt-get install default-jre


4)Execute the following command to check java version. If it is showing version 1.8.0_181 or higher version means java is installed successfully.
java -version
5)Execute the following command to download the thingsboard.
sudo wget https://github.com/thingsboard/thingsboard/releases/download/v2.2/thingsboard-2.2.deb
6)downloaded thingsboard file is in deb format. Execute the following command to unpack .deb file
sudo dpkg -i thingsboard-2.2.deb
7)Execute the following command to install  the thinsgboard.
sudo /usr/share/thingsboard/bin/install/install.sh –loadDemo

After executing the above command , you should get message Thingsboard installed successfully. if you get  message Thingsboard installed successfully  means Thingsboard installed successfully on raspberry Pi.


8)Execute the following command to start the thingsboard service
sudo service thingsboard start
9)after starting thingsboard service wait for 2 minutes and then execute the following command . Thingsboard uses port 1883 and 8080. Execute the following command to check ports open on raspberry Pi. If it is showing port 1883 and 8080 means thingsboard ports are open. please see the below image
netstat -lptn

If ports 1883 and 8080 are not open on thingsboard then only follow the following steps. If ports are opened on thingsboard then directly start from step 14
10)To open port on raspberry Pi you need to install firewall configuration. Execute the following command to install firewall configuration.
sudo apt-get install ufw
11)Execute the following commands to open port 8080 and 1883
sudo ufw allow 8080
sudo ufw allow 1883
12)Execute the following command to enable firewall rules
sudo ufw enable
13)Execute the following command to check opened ports on thingsboard. If it is showing port 8080 and 1883 means ports are opened successfully.
netstat -lptn


14) Open any browser on raspberry Pi and enter following URL to access thingsboard
localhost:8080

Congrats you have successfully installed thingsboard on raspberry Pi.

YOU MAY ALSO LIKE...

Selasa, 28 Mei 2019

Thingsboards


Interfacing with ThingsBoard IoT platform

https://www.jemrf.com/pages/interfacing-with-thingsboard-iot-platform
Firstly, we are not associated with ThingsBoard in any way. We have written this tutorial to explain how to interface our sensors with ThingsBoard.
ThingsBoard is an IoT platform that can do data visualization but also has a rules engine so you can raise alarms and create alerts. We will focus on mainly the data visualization aspects of ThingsBoard in this tutorial. 
ThingsBoard is an opensource platform that can be downloaded to your computer, or run from their online service thingsboard.io. 
They have some of the best dashboard widgets we've seen so you can create visually appealing dashboards in high resolution. 
We have tested ThingsBoard on a Raspberry Pi and find it works well, other than it takes few minutes to initially start the TingsBoard service. After it has started we found it very responsive and well suited to this platform. 

Installing ThingsBoard on Raspberry Pi

In this tutorial we will install ThingsBoard on the same Raspberry Pi where you have installed a wireless base station.
You can find the ThingsBoard documentation for installation on Raspberry Pi here:
https://thingsboard.io/docs/user-guide/install/rpi/
Make sure you have the full version of Raspberry Pi Raspbian distro installed (not the light version), because ThingsBoard needs Java (which is not installed on the light version). To get up and running quickly I would suggest you skip the Postgres database install and go with the standard internal database shipped with ThingsBoard.
Open up a terminal window on your Raspberry Pi and start by checking your Java version by typing:
java -version
which will return something like this:

java version "1.8.0_65"
Java(TM) SE Runtime Environment (build 1.8.0_65-b17)
Java HotSpot(TM) Client VM (build 25.65-b01, mixed mode)
Any version greater than 1.8 is fine.
Next download and install the package using the next four commands:
wget https://github.com/thingsboard/thingsboard/releases/download/v1.4/thingsboard-1.4.deb
sudo dpkg -i thingsboard-1.4.deb
export JAVA_OPTS="$JAVA_OPTS -Dplatform=rpi -Xms256M -Xmx256M"
sudo /usr/share/thingsboard/bin/install/install.sh --loadDemo

Then start the service by typing:
sudo service thingsboard start

It will take about 5 minutes to start. You can open a browser and browse to 
the IP address of your Raspberry Pi on port 8080. E.g. http://192.168.2.19:8080

Once the service has started you will see a login panel like this:

 The default user and password is:
  • login - sysadmin@thingsboard.org.
  • password - sysadmin.
Add your own account by clicking on Tennants, then click on the blank Tanant and click on Manage Tenant Admin and then add a new user.

Interfacing RF Sensors with ThingsBoard using Node.js

Our ThingsBoard interface examples can be found at:
https://github.com/JemRF/ThingsBoard

Raspberry Pi Node.js Tutorial

What you will need:
  1. Any model Raspberry Pi with preferably the full Raspbian distro 
  2. Wireless Base Station for Raspberry Pi or Flex RF Module
  3. Any wireless sensor
What you need to know beforehand:
  1. How to operate a Raspberry Pi
  2. You have already set up your wireless base station and tested your sensor
  3. Some JavaScript programming knowledge is preferable but not mandatory as we provide you with the source code
Login into the ThingsBoard website on your Raspberry Pi and create a new device and enter a new device name.
 
Now select your new device and copy the access token for this device:
Open up a terminal session on your Raspberry Pi and download the JemRF ThnigsBoard library from github:
git clone https://github.com/JemRF/ThingsBoard
cd ThingsBoard
Edit the test tool:
sudo nano demo-tool.js
Paste the token into the code:
Press ctrl-x and enter to save.
Run the test tool by typing:
node demo-tool.js
The test tool should connect to your local instance of ThingsBoard (on 127.0.0.1) and send random temperature and humidity sensor readings.
 
Now click on the Latest Telemetry tab of your Raspberry Pi device in ThingsBoard and you should see the latest data as shown below.
 
Now you are ready to interface your RF Sensors with ThingsBoard. The base station for Rapsberry Pi uses the serial port to interface. Since this is a Node.js tutorial we will be using the SerialPort library. Install this by typing:
npm install serialport

We have supplied two sample interface applications. The one names serial.js will send all sensor
 readings to one ThingsBoard device. The other application (serial2.js) will send reading from 
RF sensors to unique ThingsBoard devices. We will be using serial.js in this tutorial because 
it's the easiest way to interface and you won't need to create individual devices in ThingsBoard 
for all your RF Sensors.

Edit serial.js:

sudo nano serial.js

Press ctrl-x and then enmter to exit and save.

Run it by typing:

node serial.js

All wireless messages will get printed to the screen like this:

61AWAKE---

61TMPA18.60
{'61TMP':65.48}
Connecting to: 127.0.0.1 using access token: eLP2bSJBBv6BENEc4sV0

61SLEEPING-
{'61SLEEPING':}
Connecting to: 127.0.0.1 using access token: eLP2bSJBBv6BENEc4sV0

Now got back to the Latest Telemetry for the RaspberryPi ThingsBoard 
device and you will see your RF sensor readings start to appear.

Now creating dashboards is a fairly trivial task. Select the Latest Telemetry tab
and select the check box next to the sensor you want to ad to the dashboard
and then click the Show on Widget button.


Then select the type of gauge you want to use and click add to dashboard. You will then be prompted to either create a new dashboard
or add to an existing dashboard.

 Here are some examples of different widgets you can choose. There is quite an extensive list of options you can choose from.
 

Dashboard thingsboard

Facilities Monitoring System Prototype Using Thingsboard

Connecting your workspace might not be as difficult as it sounds. Use MQTT so your devices can talk, then the Thingsboard platform will help visualize your data.

      · IoT Zone · Tutorial
 
 Comment (4)
 
Save
 
 10.96k Views
Environmental controls in the office are very important, as the loss of HVAC can result in significant loss to servers, network gear, employee productivity, etc. A few days ago, we decided to prototype a facilities monitoring system that will be able to cover following use cases:
  • Monitoring temperature and humidity in different zones of the office building.
  • Processing collected telemetry with various alert rules based on zone type: workspace, meeting, and server rooms.
  • Distribution of collected alarms to assigned facility managers.
  • Visualization of real-time and historical values on the configurable web dashboards.
This article describes the development and configuration steps we took in order to build the PoC. The prototype is open-source and is also based on open-source technologies, so you are able to use it for building commercial products.
Thingboard data flow

Data flow diagram

Devices and Connectivity

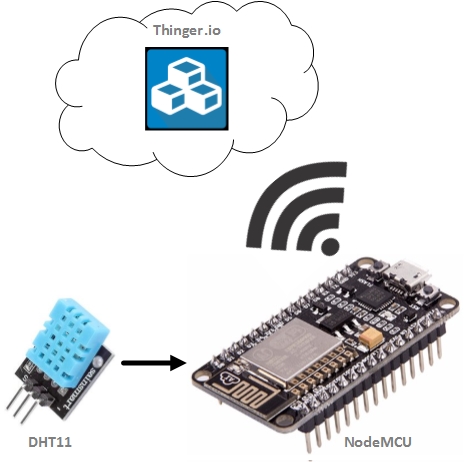
We decided to use cheap hardware based on the ESP8266 and DHT22 sensor.
The total cost of each device that includes sensor and connectivity module is approximately $5. Because this is a prototype, we decided to use MQTT over Wi-Fi and have not discussed other connectivity options.

Server-Side Infrastructure

The server-side part of the solution will be based on the Thingsboard IoT platform, which is 100% open-source and can be deployed both in the cloud, on-premises, or even on the Raspberry Pi 3. The collected data is stored in a Cassandra database due to the built-in fault-tolerance and scalability. We have recently launched a Live Demo instance to simplify the getting-started process, so we will use this instance in the tutorial.

Development and Configuration Steps

Step 1. Device provisioning

The initial step of the PoC was to provision several devices and their attributes. We’ve decided to support three types of zones: work area, meeting, and server rooms. We have registered three buildings with four rooms each. During registration, we have populated the Zone Id, Zone Type, and server-side attributes. Note that the server-side device attributes may be used by the processing rules but are not visible to the device itself.
server side attributes

Step 2. Flushing the Devices

During this step, we flushed the firmware update with individual device credentials built into the firmware. The firmware code and corresponding instructions are available in the links at the end of the article. We have used code from our previous article without modification, since all the logic is on the server side.
Please note that steps 1 and 2 may be automated — we’ve developed a simple Java-based application that performs provisioning of the devices and other entities using a REST API and also emulates this device for live demo purposes.

Step 3. Processing Rules

During this step, we have provisioned rules that analyze temperature and humidity against configurable thresholds based on zone type. For example, the acceptable humidity range in the server room is between 40% and 60%, but the humidity range for a work zone is from 30% to 70%.
The rules are basically set of logical expressions written using a JavaScript syntax. For example, the rule for a server room consists of two parts: attribute and telemetry filter. These filters may be combined, but we decided to separate them to simplify the PoC.

Attributes filter body example:
typeof ss.ZoneType !== 'undefined' && ss.ZoneType === 'Server Room'

Telemetry filter body example:
(
    typeof temperature !== 'undefined' 
    && (temperature <= 10 || temperature >= 25)
)
|| 
(
    typeof humidity !== 'undefined' 
    && (humidity <= 40 || humidity >= 60)
)

You may notice “null” checks in the filter body. This is basically a good practice because you may use the same server for multiple device applications. Some of them report humidity and temperature, whereas some of them upload other sensor readings, and this should not affect rules processing.

Step 4. Alarms Distribution

Now we configure an email plugin to distribute data using the SendGrid mail service and a provisioned rule action to send data to the configured mail address. The rule action consists of several templates that allow flexible configuration of the email topic, body, and address list based on substitution of device attributes and telemetry values. For example, following email body template:
[$date.get('yyyy-MM-dd HH:mm:ss')] $ss.get('ZoneId') HVAC malfunction detected. 
Temperature - $temperature.valueAsString (°C). 
Humidity - $humidity.valueAsString (%)!

Will be evaluated to the following email body:
[2016-12-22 15:06:09] Server Room C HVAC malfunction detected. 
Temperature – 45.0 (°C).
Humidity – 70.0 (%)!

The evaluation and template syntax is based on the Velocity engine.

Step 5. Data visualization

Now we provisioned several dashboards to visualize the data. We will describe them below.

Map Dashboard

This dashboard shows multiple buildings on the map with their short status available in the tooltip. You can use links in the tooltips to navigate to the Floor Plan and Historical Data dashboards.
Map Dashboard

Floor Plan Dashboard

This dashboard uses a static background image with the floor plan. We have placed widgets that show temperature and humidity in each room being monitored.
Floor Plan

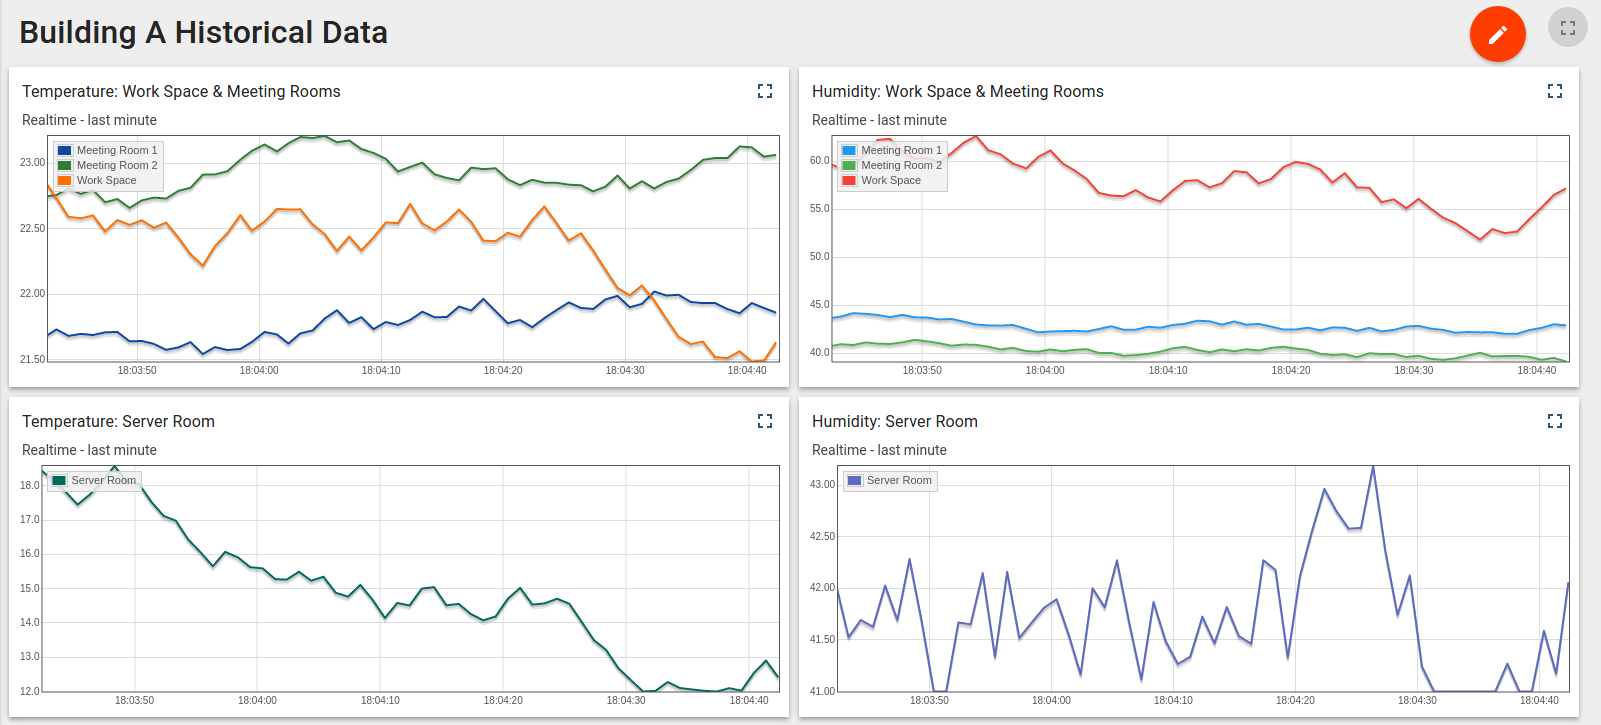
Historical Dashboard

This dashboard shows last minute of sensor readings that are reported each second.
Image title

Live Demo

In order to demonstrate this PoC in action, you need to follow two simple steps:
  1. Sign-up or login to the live demo instance and save your login and password.
  2. Download and launch a device emulator using this link.
java -jar facilities-monitoring.jar demo.thingsboard.io

Once started, the emulator will ask you for your live demo login and password. This information will be used to get the JWT token and execute REST API calls in order to:
  1. Provision demo devices.
  2. Create rules and dashboards.
  3. Start emulation of the temperature and humidity sensor data for provisioned devices using MQTT.

Conclusion

This prototype was written by two engineers literally in one day. Most of the time was spent on the client-side code (Lua script for real device and emulator). The server-side part of the prototype has zero coding and was all about configuring the rules, plugins, and dashboards.
This demonstrates how easy is to prototype and build IoT solutions using Thingsboard. Of course, there is certain learning curve that you need to pass, but we hope that this article and other docs will help you to do just that.
If you found this article interesting, please leave your feedback, questions or feature requests in the comments section and “star” our project on the GitHub in order to stay tuned for new releases and tutorials.

Links