Selasa, 30 Mei 2023

FREEFILESYNC-linux dan wind


How to Install FreeFileSync on Ubuntu 22.04

FreeFileSync is an open-source file synchronization & backup tool that helps in synchronizing files across folders and various devices and keeping your data updated. It’s a multi-platform tool that is available for Windows, Linux, and Mac.

In this tutorial, we will cover how to install FreeFileSync on Ubuntu 22.04 step-by-step.

Prerequisites

  • Pre-Installed Ubuntu 22.04 LTS system
  • Sudo User with admin rights
  • Stable Internet connectivity

1. Update Package Lists

To get started, log into your Ubuntu 22.04 workstation and update the package lists:

$ sudo apt update

Once the update is complete, proceed to the next step to install FreeFileSync.

2. Download the FreeFileSync Setup file

FreeFileSync is not included in the official Ubuntu repositories at the time of writing this guide. The only way of installing it is by downloading the binary file from the official site and then running the installation file.

Therefore, visit the official FreeFileSync download page and download the tarball file for Linux by clicking on it as shown below.

Download-FreeFileSync-Ubuntu-Linux

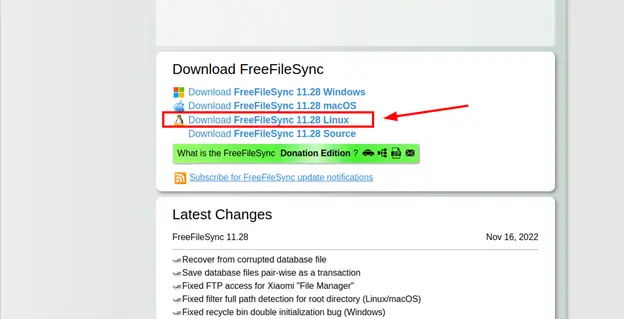
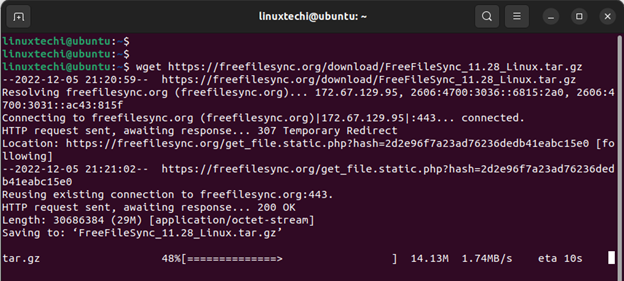
Alternatively, you can copy the link and download it using the wget command as follows. Take note that the version number is likely to be different at the time you are referring to this guide and, therefore, replace the version number to correspond to the latest version.

$ wget https://freefilesync.org/download/FreeFileSync_11.28_Linux.tar.gz

Wget-Command-Download-freefilesync-ubuntu

3. Extract the downloaded Setup File

Once the download is complete, navigate to the file location and extract it using below tar command.

$ tar -xvf FreeFileSync_11.28_Linux.tar.gz

Extract-Freefilesync-tar-file-ubuntu

The installer file comes already with execute permissions, and therefore, you do not need to assign execute permissions.

4. Install FreeFileSync on Ubuntu 22.04

To install FreeFile Sync, simply run the installer file as shown.

$ sudo ./FreeFileSync_11.28_Install.run

Type ‘y’ and press ENTER to accept the License Terms.

Accept-FreeFileSync-License-Terms-Ubuntu-Linux

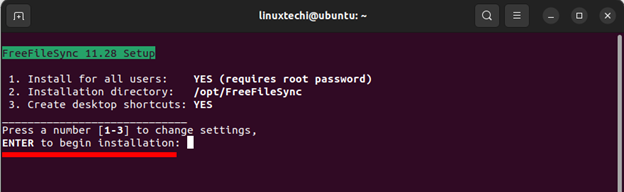
Next, the following output will be displayed on the terminal. Just leave the default settings the way they appear and hit ENTER to proceed with the installation.

Press-enter-to-Proceed-FreeFilesync-Ubuntu-Linux

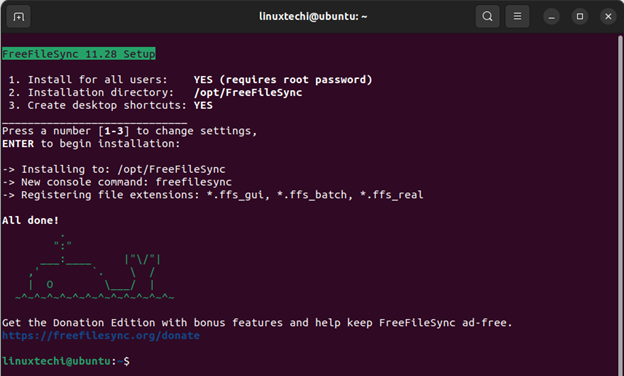
In just a matter of seconds, the installation will be complete, and you will get the following output as confirmation.

Successfull-installation-freefilesync-ubuntu

Upon completion of the installation, you will get two icons at the bottom right of your Ubuntu desktop as shown.

FreeFileSync-Desktop-Icons-Ubuntu-Linux

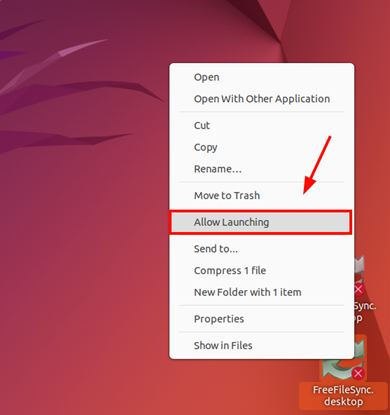
To activate the FreeFileSync desktop icon, right-click on it and select ‘Allow Launching’.

Activate-FreeFileSync-Ubuntu-Desktop

The icon now turns green as shown. To launch FreeFileSync, simply double-click the icon.

FreeFileSync-Activated-Icon-Ubuntu-Linux

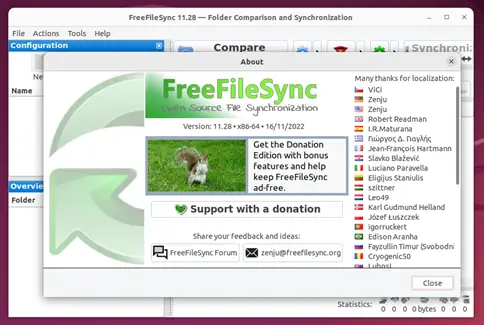
The FreeFileSync desktop application will pop open. The ‘About’ pop-up displays the version of FreeFileSync installed and contributors to the project.

To access the dashboard, click the ‘Close’ button

About-Screen-FreeFileSync-Ubuntu-Linux

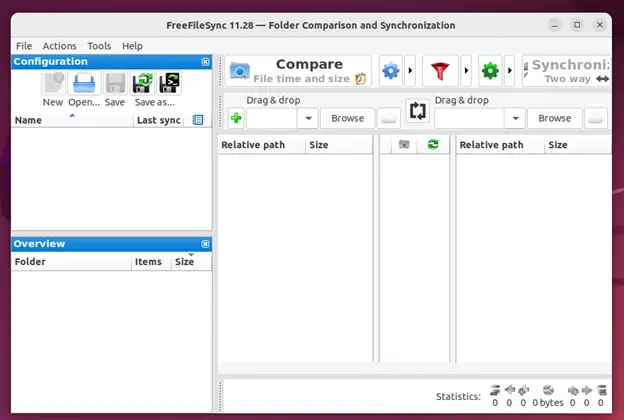
This is what the dashboard looks like.

Dashboard-FreeFileSync-Ubuntu-Linux

5. Synchronize files using FreeFileSync

In this section, we are going to demonstrate how to synchronize files from one folder to another. This is our directory setup

  • Source folder :                /home/linuxtechi/data
  • Destination folder :         /home/linuxtechi/Documents

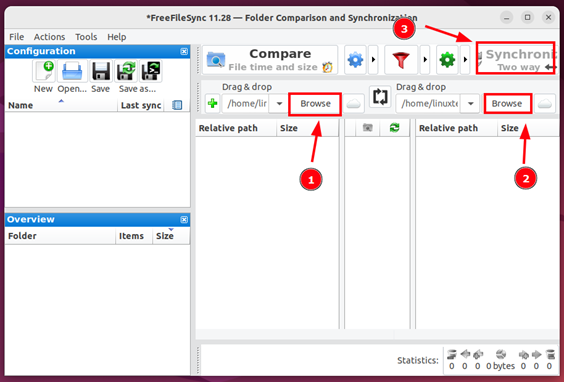
First, click the ‘Browse’ button in the first section and select the source folder. Similarly, click the ‘Browse’ button in the second section to select the destination directory in which the synchronization is going to occur.

Finally. Click the ‘Synchronize’ button.

Synchronize-Folders-using-FreefileSync-Ubuntu-Linux

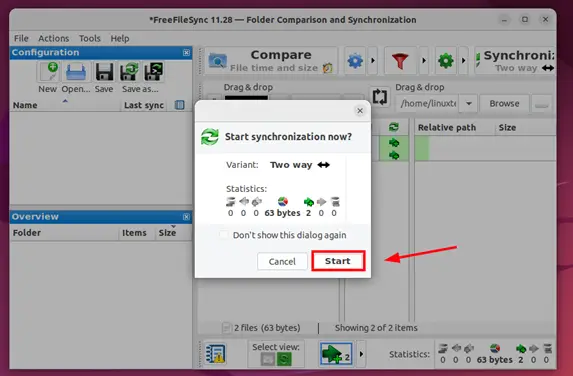
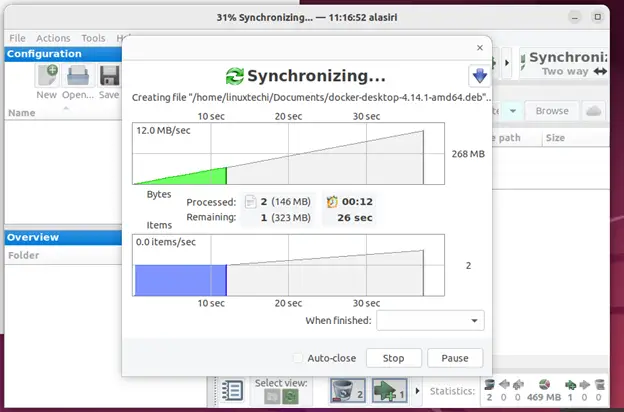
Next, click ‘Start’ to start the file synchronization process

Click-Start-Begin-Synchronization-Ubuntu-Linux

This can take a while depending on the size of the files being synchronized. You should see a progress chart indicating how the synchronization is going on.

Sync-Progress-FreeFileSync-Ubuntu-Linux

Once done, confirm that the source and destination folders have the same files

Conclusion

This brings down the curtains on this guide. In this tutorial, we have installed FreeFileSync on Ubuntu 22.04 and demonstrated how you can use it to synchronize files between folders.

Kamis, 25 Mei 2023

PASS NGINX-basic auth


myyogya


root@ubuntu#sudo sh -c "echo -n ‘myyogya:’ >> /etc/nginx/.htpasswd"
root@ubuntu#sudo sh -c "openssl passwd -apr1 >> /etc/nginx/.htpasswd"
root@ubuntu#nano myyogya.com.conf
root@ubuntu:/etc/nginx/sites-enabled# cat myyogya.com.conf  
server {
   listen 80;
   listen [::]:80;

   root /home/deployer/www/myyogya-registrasi/web/current/public;
   index index.php index.html index.htm;

   server_name myyogya-web.yogya.com myyogya.com;

   location / {
       auth_basic            "Basic Auth";
       auth_basic_user_file  "/etc/nginx/.htpasswd";

       try_files $uri $uri/ /index.php?$query_string;
   }

   error_page 404 /404.html;
   error_page 500 502 503 504 /50x.html;
   location = /50x.html {
       root /home/deployer/www/myyogya-registrasi/web/current/public;
   }

   location ~ \.php$ {
       try_files $uri /index.php =404;
       fastcgi_split_path_info ^(.+\.php)(/.+)$;
       fastcgi_pass unix:/var/run/php/php7.2-fpm.sock;
       fastcgi_index index.php;
       #fastcgi_param SCRIPT_FILENAME $document_root$fastcgi_script_name;
       fastcgi_param SCRIPT_FILENAME $realpath_root$fastcgi_script_name;
       fastcgi_param DOCUMENT_ROOT $realpath_root;
       include fastcgi_params;
   }
}


root@ubuntu:/etc/nginx/sites-enabled# 
service nginx restart

===================================

https://www.digitalocean.com/community/tutorials/how-to-set-up-password-authentication-with-nginx-on-ubuntu-14-04


How To Set Up Password Authentication with Nginx on Ubuntu 14.04

Published on August 11, 2015
How To Set Up Password Authentication with Nginx on Ubuntu 14.04
Not using Ubuntu 14.04?Choose a different version or distribution.
Ubuntu 14.04

Introduction

When setting up a web server, there are often sections of the site that you wish to restrict access to. Web applications often provide their own authentication and authorization methods, but the web server itself can be used to restrict access if these are inadequate or unavailable.

In this guide, we’ll demonstrate how to password protect assets on an Nginx web server running on Ubuntu 14.04.

Prerequisites

To get started, you will need access to an Ubuntu 14.04 server environment. You will need a non-root user with sudo privileges in order to perform administrative tasks. To learn how to create such a user, follow our Ubuntu 14.04 initial server setup guide.

If you haven’t done so already, install Nginx on your machine by typing:

  1. sudo apt-get update
  2. sudo apt-get install nginx

Create the Password File

To start out, we need to create the file that will hold our username and password combinations. You can do this by using the OpenSSL utilities that may already be available on your server. Alternatively, you can use the purpose-made htpasswd utility included in the apache2-utils package (Nginx password files use the same format as Apache). Choose the method below that you like best.

Create the Password File Using the OpenSSL Utilities

If you have OpenSSL installed on your server, you can create a password file with no additional packages. We will create a hidden file called .htpasswd in the /etc/nginx configuration directory to store our username and password combinations.

You can add a username to the file using this command. We are using sammy as our username, but you can use whatever name you’d like:

  1. sudo sh -c "echo -n 'sammy:' >> /etc/nginx/.htpasswd"

Next, add an encrypted password entry for the username by typing:

  1. sudo sh -c "openssl passwd -apr1 >> /etc/nginx/.htpasswd"

You can repeat this process for additional usernames. You can see how the usernames and encrypted passwords are stored within the file by typing:

  1. cat /etc/nginx/.htpasswd
Output
sammy:$apr1$wI1/T0nB$jEKuTJHkTOOWkopnXqC1d1

Create the Password File Using Apache Utilities

While OpenSSL can encrypt passwords for Nginx authentication, many users find it easier to use a purpose-built utility. The htpasswd utility, found in the apache2-utils package, serves this function well.

Install the apache2-utils package on your server by typing:

  1. sudo apt-get update
  2. sudo apt-get install apache2-utils

Now, you have access to the htpasswd command. We can use this to create a password file that Nginx can use to authenticate users. We will create a hidden file for this purpose called .htpasswd within our /etc/nginx configuration directory.

The first time we use this utility, we need to add the -c option to create the specified file. We specify a username (sammy in this example) at the end of the command to create a new entry within the file:

  1. sudo htpasswd -c /etc/nginx/.htpasswd sammy

You will be asked to supply and confirm a password for the user.

Leave out the -c argument for any additional users you wish to add:

  1. sudo htpasswd /etc/nginx/.htpasswd another_user

If we view the contents of the file, we can see the username and the encrypted password for each record:

  1. cat /etc/nginx/.htpasswd
Output
sammy:$apr1$lzxsIfXG$tmCvCfb49vpPFwKGVsuYz. another_user:$apr1$p1E9MeAf$kiAhneUwr.MhAE2kKGYHK.

Configure Nginx Password Authentication

Now that we have a file with our users and passwords in a format that Nginx can read, we need to configure Nginx to check this file before serving our protected content.

Begin by opening up the server block configuration file that you wish to add a restriction to. For our example, we’ll be using the default server block file installed through Ubuntu’s Nginx package:

  1. sudo nano /etc/nginx/sites-enabled/default

Inside, with the comments stripped, the file should look similar to this:

/etc/nginx/sites-enabled/default
server {
    listen 80 default_server;
    listen [::]:80 default_server ipv6only=on;

    root /usr/share/nginx/html;
    index index.html index.htm;

    server_name localhost;

    location / {
        try_files $uri $uri/ =404;
    }
}

To set up authentication, you need to decide on the context to restrict. Among other choices, Nginx allows you to set restrictions on the server level or inside a specific location. In our example, we’ll restrict the entire document root with a location block, but you can modify this listing to only target a specific directory within the web space:

Within this location block, use the auth_basic directive to turn on authentication and to choose a realm name to be displayed to the user when prompting for credentials. We will use the auth_basic_user_file directive to point Nginx to the password file we created:

/etc/nginx/sites-enabled/default
server {
    listen 80 default_server;
    listen [::]:80 default_server ipv6only=on;

    root /usr/share/nginx/html;
    index index.html index.htm;

    server_name localhost;

    location / {
        try_files $uri $uri/ =404;
        auth_basic "Restricted Content";
        auth_basic_user_file /etc/nginx/.htpasswd;
    }
}

Save and close the file when you are finished. Restart Nginx to implement your password policy:

  1. sudo service nginx restart

The directory you specified should now be password protected.

Confirm the Password Authentication

To confirm that your content is protected, try to access your restricted content in a web browser. You should be presented with a username and password prompt that looks like this:

Nginx password prompt

If you enter the correct credentials, you will be allowed to access the content. If you enter the wrong credentials or hit “Cancel”, you will see the “Authorization Required” error page:

Minggu, 14 Mei 2023

ERROR ADD REPO-sertifikat

 In my case it was my company's man-in-the-middle fake SSL certificate that caused this misleading error. If you are on corporate internet, you may need to install your company's SSL cert at /usr/local/share/ca-certificates/yourcompany.crt and run sudo apt-get update && sudo apt-get install ca-certificates -y && sudo update-ca-certificates

===================

ubuntu@ubuntu:~$ sudo -E add-apt-repository ppa:mapopa/firebird3.0
Traceback (most recent call last):
 File "/usr/lib/python3.5/urllib/request.py", line 1261, in do_open
   h.request(req.get_method(), req.selector, req.data, headers)
 File "/usr/lib/python3.5/http/client.py", line 1151, in request
   self._send_request(method, url, body, headers)
 File "/usr/lib/python3.5/http/client.py", line 1196, in _send_request
   self.endheaders(body)
 File "/usr/lib/python3.5/http/client.py", line 1147, in endheaders
   self._send_output(message_body)
 File "/usr/lib/python3.5/http/client.py", line 950, in _send_output
   self.send(msg)
 File "/usr/lib/python3.5/http/client.py", line 893, in send
   self.connect()
 File "/usr/lib/python3.5/http/client.py", line 1305, in connect
   server_hostname=server_hostname)
 File "/usr/lib/python3.5/ssl.py", line 377, in wrap_socket
   _context=self)
 File "/usr/lib/python3.5/ssl.py", line 752, in __init__
   self.do_handshake()
 File "/usr/lib/python3.5/ssl.py", line 988, in do_handshake
   self._sslobj.do_handshake()
 File "/usr/lib/python3.5/ssl.py", line 633, in do_handshake
   self._sslobj.do_handshake()
ssl.SSLError: [SSL: CERTIFICATE_VERIFY_FAILED] certificate verify failed (_ssl.c:645)
ubuntu@ubuntu:~$ sudo apt-get update && sudo apt-get install ca-certificates -y && sudo update-ca-certificates
Hit:1 http://id.archive.ubuntu.com/ubuntu xenial InRelease
Hit:2 http://id.archive.ubuntu.com/ubuntu xenial-updates InRelease                                      
Hit:3 http://id.archive.ubuntu.com/ubuntu xenial-backports InRelease                                    
Get:4 http://security.ubuntu.com/ubuntu xenial-security InRelease [99.8 kB]
Fetched 99.8 kB in 1s (95.6 kB/s)                               
Reading package lists... Done
Building dependency tree        
Reading state information... Done
The following packages will be upgraded:
 ca-certificates
1 upgraded, 0 newly installed, 0 to remove and 237 not upgraded.
Need to get 148 kB of archives.
After this operation, 108 kB disk space will be freed.
Get:1 http://id.archive.ubuntu.com/ubuntu xenial-updates/main i386 ca-certificates all 20210119~16.04.1 [148 kB]
Fetched 148 kB in 0s (876 kB/s)           
Preconfiguring packages ...
(Reading database ... 67242 files and directories currently installed.)
Preparing to unpack .../ca-certificates_20210119~16.04.1_all.deb ...
Unpacking ca-certificates (20210119~16.04.1) over (20160104ubuntu1) ...
Processing triggers for man-db (2.7.5-1) ...
Setting up ca-certificates (20210119~16.04.1) ...
Processing triggers for ca-certificates (20210119~16.04.1) ...
Updating certificates in /etc/ssl/certs...
42 added, 86 removed; done.
Running hooks in /etc/ca-certificates/update.d...
done.
Updating certificates in /etc/ssl/certs...
0 added, 0 removed; done.
Running hooks in /etc/ca-certificates/update.d...
done.
ubuntu@ubuntu:~$ sudo add-apt-repository ppa:mapopa/firebird3.0                                                
This is the ppa for Firebird 3.0 uploaded from debian archive  
http://packages.qa.debian.org/f/firebird3.0.html

Here is the guide for using it
https://help.ubuntu.com/community/Firebird3.0


More info: https://launchpad.net/~mapopa/+archive/ubuntu/firebird3.0
Press [ENTER] to continue or ctrl-c to cancel adding it

gpg: keyring `/tmp/tmpkkdi7sx9/secring.gpg' created
gpg: keyring `/tmp/tmpkkdi7sx9/pubring.gpg' created
gpg: requesting key EF648708 from hkp server keyserver.ubuntu.com
gpg: /tmp/tmpkkdi7sx9/trustdb.gpg: trustdb created
gpg: key EF648708: public key "Launchpad PPA for Mariuz" imported
gpg: Total number processed: 1
gpg:               imported: 1  (RSA: 1)
OK
ubuntu@ubuntu:~$

Jumat, 12 Mei 2023

LSYNCD-redhat7


How to Install and use Lsyncd on CentOS 7 / RHEL 7

Lsyncd stands for “Live Syncing Daemon“, as the name suggest lsyncd is used to sync or replicate files & directories locally and remotely after a specific time of interval. It uses rsync & ssh in the backend.

Lsyncd works on Master and Slave architecture where it monitors the directory on the master server, if any changes or modification are done then lsyncd will replicate the same on its slave servers after specific interval of time.

In this article we will discuss how to install and use lsyncd on CentOS 7 & RHEL 7.

Scenario : Suppose want to sync the folder “/var/www/html” from Master server to Slave server

  • Master Server’s IP = 192.168.1.14
  • Slave Server’s IP = 192.168.1.15
  • Directory to be Sync = /var/www/html
First Enable Key based authentication between Master and Slave Server.

Login to Master server & generate the public and Private keys using ssh-keygen command.

lsyncd-ssh-keygen

Now Copy the public key using ssh-copy-id command to slave server

[root@linuxtechi ~]# ssh-copy-id -i /root/.ssh/id_rsa.pub root@192.168.1.15
Step:1 Login to Master Server and Install Lsyncd Package

Install the lsyncd dependency packages using below yum command.

[root@linuxtechi ~]# yum install lua lua-devel pkgconfig gcc asciidoc

To install lsyncd package using yum command , first enable the EPEL repo as lsyncd rpm is not available in the default repos.

[root@linuxtechi ~]# rpm -iUvh http://dl.fedoraproject.org/pub/epel/7/x86_64/e/epel-release-7-5.noarch.rpm
[root@linuxtechi ~]# yum install lsyncd
Step:2 Set up Configuration File of Lsyncd

Copy the sample Configuration to /etc/lsyncd.conf

[[email protected] ~]# cp /usr/share/doc/lsyncd-2.1.5/examples/lrsync.lua /etc/lsyncd.conf

Add the following Lines to the config file.

[[email protected] ~]# cat /etc/lsyncd.conf 
----
-- User configuration file for lsyncd.
--
-- Simple example for default rsync.
--
settings = {
 logfile = "/var/log/lsyncd.log",
 statusFile = "/var/log/lsyncd.stat",
 statusInterval = 2,
}
sync{
 default.rsync,
 source="/var/www/html",
 target="192.168.1.15:/var/www/html",
 rsync={rsh ="/usr/bin/ssh -l root -i /root/.ssh/id_rsa",}
}
[[email protected] ~]#

lsyncd-conf

Step:3 Start the Service and enable it at reboot
[[email protected] ~]# systemctl start lsyncd
[[email protected] ~]# systemctl enable lsyncd
ln -s '/usr/lib/systemd/system/lsyncd.service' '/etc/systemd/system/multi-user.target.wants/lsyncd.service'
Step:4 Analyze the Replication and Logs Report.

As we can see that we are using “root” user for syncing data , as per your requirement you can change the user name.

In the log File we can see the status of replication whether the replication is completed or Not.

[[email protected] ~]# tail -10 /var/log/lsyncd.log
Sun Jul 26 12:53:04 2015 Normal: recursive startup rsync: /var/www/html/ -> 192.168.1.15:/var/www/html/
Sun Jul 26 12:53:56 2015 Normal: Startup of "/var/www/html/" finished.
[[email protected] ~]#

Using Stat file we view the lsyncd status Report. Sample Example is shown below

[[email protected] ~]# more /var/log/lsyncd.stat 

Lsyncd status report at Sun Jul 26 12:53:58 2015
Sync1 source=/var/www/html/
There are 0 delays
Excluding:
 nothing.

Inotify watching 849 directories
 1: /var/www/html/
 2: /var/www/html/catalog/
 3: /var/www/html/catalog/controller/
 4: /var/www/html/catalog/controller/module/
 5: /var/www/html/catalog/controller/checkout/
 6: /var/www/html/catalog/controller/api/
 7: /var/www/html/catalog/controller/payment/
 8: /var/www/html/catalog/controller/tool/
 9: /var/www/html/catalog/controller/product/
 ---------------------
 848: /var/www/html/system/library/db/
 849: /var/www/html/system/modification/
[[email protected] ~]#