myyogya
server {
listen 80;
listen [::]:80;
root /home/deployer/www/myyogya-registrasi/web/current/public;
index index.php index.html index.htm;
server_name myyogya-web.yogya.com myyogya.com;
location / {
auth_basic "Basic Auth";
auth_basic_user_file "/etc/nginx/.htpasswd";
try_files $uri $uri/ /index.php?$query_string;
}
error_page 404 /404.html;
error_page 500 502 503 504 /50x.html;
location = /50x.html {
root /home/deployer/www/myyogya-registrasi/web/current/public;
}
location ~ \.php$ {
try_files $uri /index.php =404;
fastcgi_split_path_info ^(.+\.php)(/.+)$;
fastcgi_pass unix:/var/run/php/php7.2-fpm.sock;
fastcgi_index index.php;
#fastcgi_param SCRIPT_FILENAME $document_root$fastcgi_script_name;
fastcgi_param SCRIPT_FILENAME $realpath_root$fastcgi_script_name;
fastcgi_param DOCUMENT_ROOT $realpath_root;
include fastcgi_params;
}
}
root@ubuntu:/etc/nginx/sites-enabled# service nginx restart
===================================
How To Set Up Password Authentication with Nginx on Ubuntu 14.04

Not using Ubuntu 14.04?Choose a different version or distribution.
Introduction
When setting up a web server, there are often sections of the site that you wish to restrict access to. Web applications often provide their own authentication and authorization methods, but the web server itself can be used to restrict access if these are inadequate or unavailable.
In this guide, we’ll demonstrate how to password protect assets on an Nginx web server running on Ubuntu 14.04.
Prerequisites
To get started, you will need access to an Ubuntu 14.04 server environment. You will need a non-root user with sudo privileges in order to perform administrative tasks. To learn how to create such a user, follow our Ubuntu 14.04 initial server setup guide.
If you haven’t done so already, install Nginx on your machine by typing:
Create the Password File
To start out, we need to create the file that will hold our username and password combinations. You can do this by using the OpenSSL utilities that may already be available on your server. Alternatively, you can use the purpose-made htpasswd utility included in the apache2-utils package (Nginx password files use the same format as Apache). Choose the method below that you like best.
Create the Password File Using the OpenSSL Utilities
If you have OpenSSL installed on your server, you can create a password file with no additional packages. We will create a hidden file called .htpasswd in the /etc/nginx configuration directory to store our username and password combinations.
You can add a username to the file using this command. We are using sammy as our username, but you can use whatever name you’d like:
Next, add an encrypted password entry for the username by typing:
You can repeat this process for additional usernames. You can see how the usernames and encrypted passwords are stored within the file by typing:
Outputsammy:$apr1$wI1/T0nB$jEKuTJHkTOOWkopnXqC1d1
Create the Password File Using Apache Utilities
While OpenSSL can encrypt passwords for Nginx authentication, many users find it easier to use a purpose-built utility. The htpasswd utility, found in the apache2-utils package, serves this function well.
Install the apache2-utils package on your server by typing:
Now, you have access to the htpasswd command. We can use this to create a password file that Nginx can use to authenticate users. We will create a hidden file for this purpose called .htpasswd within our /etc/nginx configuration directory.
The first time we use this utility, we need to add the -c option to create the specified file. We specify a username (sammy in this example) at the end of the command to create a new entry within the file:
You will be asked to supply and confirm a password for the user.
Leave out the -c argument for any additional users you wish to add:
If we view the contents of the file, we can see the username and the encrypted password for each record:
Outputsammy:$apr1$lzxsIfXG$tmCvCfb49vpPFwKGVsuYz.
another_user:$apr1$p1E9MeAf$kiAhneUwr.MhAE2kKGYHK.
Configure Nginx Password Authentication
Now that we have a file with our users and passwords in a format that Nginx can read, we need to configure Nginx to check this file before serving our protected content.
Begin by opening up the server block configuration file that you wish to add a restriction to. For our example, we’ll be using the default server block file installed through Ubuntu’s Nginx package:
Inside, with the comments stripped, the file should look similar to this:
server {
    listen 80 default_server;
    listen [::]:80 default_server ipv6only=on;

    root /usr/share/nginx/html;
    index index.html index.htm;

    server_name localhost;

    location / {
        try_files $uri $uri/ =404;
    }
}
To set up authentication, you need to decide on the context to restrict. Among other choices, Nginx allows you to set restrictions on the server level or inside a specific location. In our example, we’ll restrict the entire document root with a location block, but you can modify this listing to only target a specific directory within the web space:
Within this location block, use the auth_basic directive to turn on authentication and to choose a realm name to be displayed to the user when prompting for credentials. We will use the auth_basic_user_file directive to point Nginx to the password file we created:
server {
    listen 80 default_server;
    listen [::]:80 default_server ipv6only=on;

    root /usr/share/nginx/html;
    index index.html index.htm;

    server_name localhost;

    location / {
        try_files $uri $uri/ =404;
        auth_basic "Restricted Content";
        auth_basic_user_file /etc/nginx/.htpasswd;
    }
}
Save and close the file when you are finished. Restart Nginx to implement your password policy:
The directory you specified should now be password protected.
Confirm the Password Authentication
To confirm that your content is protected, try to access your restricted content in a web browser. You should be presented with a username and password prompt that looks like this:
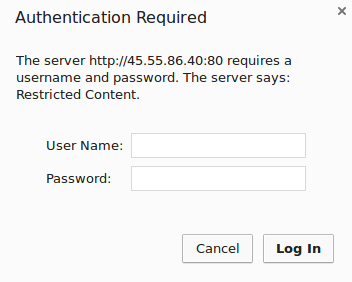
If you enter the correct credentials, you will be allowed to access the content. If you enter the wrong credentials or hit “Cancel”, you will see the “Authorization Required” error page:
Tidak ada komentar:
Posting Komentar