Selasa, 15 Februari 2022

BACKUP FREE-esxi


Backup Solutions for Free ESXi

VMware offers a free version of their vSphere Hypervisor with some limitations like the lack of vCenter support. Another limitation is that APIs are read-only, so it's not possible to use the Data Protection API aka. VADP to make Backups.

Creating backups of Virtual Machines is also important on standalone ESXi hosts. The API limitation makes it impossible to create incremental CBT aided backups, but it's not impossible to create full copies of virtual machines. The post explains the technique to create backups and takes a look at solution that use these techniques.

Poor Man's Backup (The Basics)

All Virtual Machines are just files on datastores. The most unsophisticated backup method would be to simply make a copy of all files. This method works not only with the ESXi Hypervisor, but also with VMware Workstation or older products like GSX or VMware Server. Many years ago, this was my first method of creating backups of running Virtual Machines. But wait - Can you just copy a running Virtual Machine? No! You can't copy the Virtual Disk file while it is mapped to the Virtual Machine mode:

"cp: can't open 'web01-flat.vmdk': Device or resource busy"

The challenge is to make the disk readonly while the Virtual Machine is running, without affecting the operating system running in the Virtual Machine. Here comes another technology in place: Snapshots. A snapshot is a preserved state of the virtual machine where you can return to later. A common misinterpretation is that when you create a snapshot the system copies the defined state to another location. This is not how a VMware snapshot works. When you create a snapshot, the original virtual disk file is transformed into readonly mode. To allow the virtual machine to work while the disk is in read only mode, all write IOs are stored in another file known as "Delta File".

The answer to the problem is: Create a snapshot, copy the virtual disk, delete the snapshot. Here is the full process of making working backups of running Virtual Machines:

  1. SSH to the ESXi Host
  2. Copy VM configuration files (.vmx, .nvram, .vmsd, .vmdk). The ".vmdk" is only the virtual disk descriptor file, so it's possible to make a copy. The actual disk is *-flat.vmdk. I'm copying all files to a nfs share mounted as datastore.
    cp /vmfs/volumes/datastore/web01/web01.vmx /vmfs/volumes/nfs/web01-backup/web01.vmx
    cp /vmfs/volumes/datastore/web01/web01.nvram /vmfs/volumes/nfs/web01-backup/web01.nvram
    cp /vmfs/volumes/datastore/web01/web01.vmsd /vmfs/volumes/nfs/web01-backup/web01.vmsd
    cp /vmfs/volumes/datastore/web01/web01.vmdk /vmfs/volumes/nfs/web01-backup/web01.vmdk
  3. Create a Snapshot with the vSphere Client or by command line (locate vmid with "vim-cmd vmsvc/getallvms" and make a snapshot with "vim-cmd vmsvc/snapshot.create [VmId] [snapshotName] [description] [includeMemory] [quiesced]")
    vim-cmd vmsvc/getallvms
    vim-cmd vmsvc/snapshot.create 2 backup poor-mans-backup 0 0
  4. Copy the virtual disk
    cp /vmfs/volumes/datastore/web01/web01-delta.vmdk /vmfs/volumes/nfs/web01-backup/web01-delta.vmdk
  5. Delete the Snapshot with the vSphere Client or by command line (vim-cmd vmsvc/snapshot.removeall [VmId])
    vim-cmd vmsvc/snapshot.removeall 2

The reason why I copy configuration files prior to make the snapshot is because the snapshot is documented in the configuration file and the Virtual Machine will not power on when the snapshot file is missing. This can be fixed in the configuration, but it's easier to simply copy the correct configuration.

Restore: To restore the Virtual Machine register it on the ESXi Host "Add to inventory" and power it on.
add-vm-to-inventory

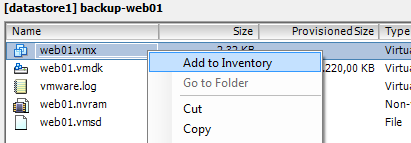
The Virtual Machine notices that it has been moved. If you want to restore the original VM, select "I Moved It" and it will preserve its UUID and MAC addresses. If you want to run both VMs on the same ESXi host, select "I Copied It", and you can run both at the same time.
vm-message-vm-moved-or-copied

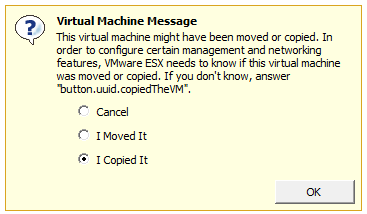
Poor Man's Backup 2.0 (The viable solution)

The copy process of the above method works everywhere, but it is very slow and can be optimized. The cp command simply copies the entire file, including the unused space of virtual disks which is represented as zeros. ESXi hosts have a tool that understands virtual disks and ignores unused blocks during copy processes. It also allows to change the output format to thin, which is great for backups:

vmkfstools -i [sourceDisk] [targetDisk] -d [diskformat]

The following script is a working example to backup a Virtual Machine on a Free ESXi host:

#!/bin/sh
mkdir -p /vmfs/volumes/datastore1/web01-backup/

cp /vmfs/volumes/datastore1/web01/web01.vmx /vmfs/volumes/datastore1/web01-backup/web01.vmx
cp /vmfs/volumes/datastore1/web01/web01.nvram /vmfs/volumes/datastore1/web01-backup/web01.nvram
cp /vmfs/volumes/datastore1/web01/web01.vmsd /vmfs/volumes/datastore1/web01-backup/web01.vmsd

vmid=$(vim-cmd vmsvc/getallvms | grep web01 | awk '{print $1}')
vim-cmd vmsvc/snapshot.create $vmid backup 'Snapshot created by Backup Script' 0 0

vmkfstools -i /vmfs/volumes/datastore1/web01/web01.vmdk /vmfs/volumes/datastore1/web01-backup/web01.vmdk -d thin

vim-cmd vmsvc/snapshot.removeall $vmid

The scipt is very basic, without error checking and static. It's intended to demonstrate the process.

ghettoVCB by William Lam

ghettoVCB is a long known backup solution that works from ESXi 3.5 until ESXi 6, created by VMware employee William Lam. It's a comprehensive script that runs on the ESXi host and creates backups using the method explained above. It does not use the VMware backup API, so it works with free ESXi.

Download ghettoVCB from GitHub (Press "Raw" to download the File) and install the .vib:

esxcli software vib install -v /vmfs/volumes/datastore1/vghetto-ghettoVCB.vib -f

ghettoVCB can be configured with configuration files. A full documentation can be found here: ghettoVCB Documentation. For this example, I've created a basic configuration and only changed the backup volume:

VM_BACKUP_VOLUME=/vmfs/volumes/datastore1/BACKUP

Start the Backup with the -a parameter, to backup all VMs on the host, and the ghettoVCB.conf:

/opt/ghettovcb/bin/ghettoVCB.sh -a -g ghettoVCB.conf

This will create a backup of all Virtual Machines running on the ESXi host to the backup directory. To restore, you can simply add the .vmx file to the ESXi inventroy.

Pro/Cons
+ Available as VIB package, easy installation
+ Mature solution with a large feature set
+ Good documentation. Easy to make cronjobs that are persistent through a reboot.
- Due to it's large feature set, the deployment is not self-explaining
- Requires basic shell skills

XSIBackup

XSIBackup is another free script that runs on the ESXi host and backups running virtual machines on free ESXi Hosts. Features:

  • Performs hot backups
  • Does not use VADP
  • Supports Cronjobs
  • Supports Rsync to mirror backups to a second ESXi

The tool can be downloaded here. Unzip it, make it executable and it its ready to run. No further configuration is required. To backup all VMs running on the ESXi host, just start the script with the following parameters:

./xsibackup --backup-point=/vmfs/volumes/datastore1/BACKUPS --backup-type=running

The full documentation is available here.

Pro/Cons
+ Large Feature Set
+ Very quick to setup (5 minutes to first backup)
- Download requires a (free) key
- Requires basic shell skills

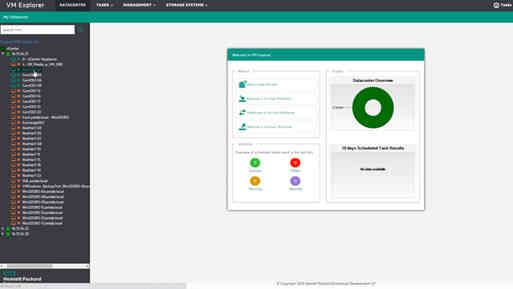
HPE VM Explorer (Trilead VM Explorer)

HPE VM Explorer is available as free edition here. The windows based software is configured and managed with a web interface and works with the free ESXi. If you want to create a backup of your standalone ESXi ot your Windows machine, this is your tool of choise. Of course it also supports backups to the local ESXi host.
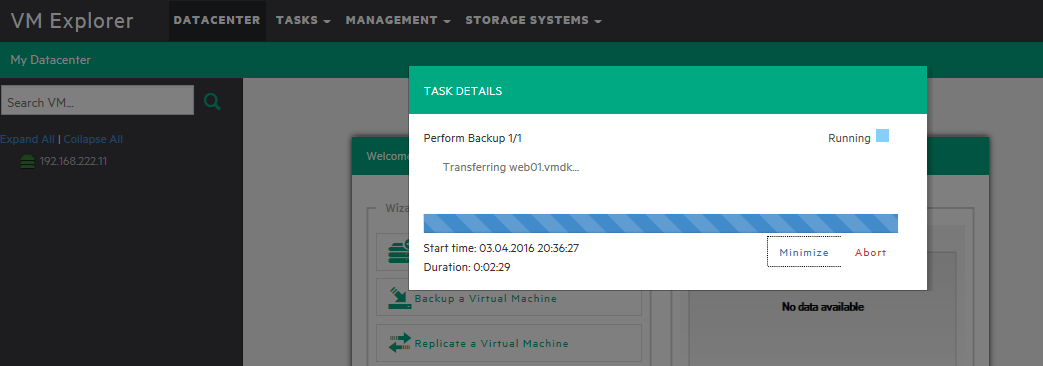
hpe-vm-explorer

Pro/Cons
+ Easy installation
+ Also supports vCenter and API based Backups
+ No shell skills required
- Requires an additional server for the application

Other Tools

The following tools are, according to their documentation, also capable of creating backups of Virtual Machines running on Free ESXi:

REPLIKASI VM-5 top


Top 5 VM Replication solutions

I so love being in IT in present time. What a difference in tools and technology compared to 10 years ago. One of the major changes happened in Backup technology. We have witnessed a fall of one of the major vendors that relied on old technology. One of the changes is also quality of the backup software which improved so much with the new vendors. What is also a significant change is that once storage specific technology called replication became a commodity as more and more backup vendors added the technology to their backup offerings.


Replication is not backup. Definition of replication is simple. Data replication: if the same data is stored on multiple storage devices. The replication itself should be transparent to an external user. Also, in a failure scenario, a failover of replicas is hidden as much as possible.

As opposed to back up where we store data which we need to retrieve in case of failure or resource deletions, replication can be used to failover to another data center or server/storage if the primary device fails. Compared to storage replication, in the event of a failure, there is usually a wider gap of data loss, but the solution is much more affordable and can also be used to replicate to another location datacenter as well. Backup software technology enables you that for a fraction of the price, you can set up a modern data center which in addition to backup, can replicate your data to another location (data center or cloud).

Top 5 VM Replication solutions

Nakivo Backup & Replication

Nakivo has been featured on ITSMDaily.com multiple times as it’s just amazing what these guys achieved. Nakivo Backup & Replication product can backup Hyper-V and VMware. It is so well designed that you can install it on multiple platforms like Windows, Linux, and even Amazon AWS. Also, vision these guys have helped create an edition for popular NAS devices from vendors – my favorite Synology, QNAP, WD and even Asus. That means that you can use your existing NAS to install Nakivo Backup and Replication and leverage the speed and simplicity of NAS. You can also use multiple NAS boxes, even at remote locations for a fraction of the price of the major players. Did I mention that you can use the same NAS boxes for Replication in addition to the backup? I can talk for ages about the great features but let me just mention a couple of deal breakers for Nakivo. 1. Price – Anything on the market can hardly match price point for the features you get. 2. WAN acceleration is essential for all companies using remote locations. You won’t go broke with Nakivo by selecting Enterprise edition. 3. Global deduplication is deduplication done right as it saves much more space compared to per job deduplication like other vendors have on the market. Besides, if you ever wished you had deduplication on the Synology for backup – with Nakvio installed you have that option now. The product is just fantastic. As for the many features, you get with the product, let me just mention some that also deserve mention. HTML interface, Self-Service, Multi-tenancy, Automatic Backup verification, Application and Database support, object recovery for MS AD, MS SQL, MS Exchange, Instant VM recovery utilizing Flash BOOT.

Veeam Backup and Replication

Veeam Backup and Replication is the product that started a backup revolution. It is also the product that kicked Symantec Backup out of enterprise for Virtual Infrastructure backup. In addition to Backup, Veeam also created a neat product called Veeam ONE which is part of Veeam Availability Suite. Veeam supports restoring objects directly for MS Exchange, MS Active Directory, MS Sharepoint and even Oracle. Veeam supports many storage vendors integrations so that you can backup snapshots and decrease backup and replication time. Users of Veeam backup swear by the product and would not change it. But, from version 5.5, Veeam vision for their target market were big enterprises, and so they increased their prices and they still do – year on year. Replication is part of their product from the start and is working great; it even saved me once. If you are looking at WAN Acceleration, you should note that it is only enabled on the most expensive edition. All things considered, Veeam is a great product, it was the first backup product for VMware that was reliable. Now Veeam supports also physical servers.

Vembu BDR Suite

Vembu BDR Suite is Backup and Disaster recovery suite for VMware and Hyper-V hypervisors. What makes Vembu special is support for Workstations, Physical Servers, G Suite and Office 365. A benefit is that you can use one product to protect your complete infrastructure. Vembu supports application-aware backup, has Near Continuous Data Protection, In-built Compression and Deduplication, Automated Backup Verification, WAN Acceleration, OffsiteDR Replication, Bandwidth Throttling. VM Replication is an essential part of its product. Just like Nakivo, it features a Web-based management console, which makes managing backup and replication much easier. Even though Vembu is not widely known, the product is reliable and has a long history in the backup arena. I have reviewed Vembu Backup & Disaster recovery suite not long ago.

Altaro VM Backup

Altaro is positioned in small to mid-market, but don’t think that their offering is bad because of that. They have an excellent option for managed service providers where companies can by using their solution monitor backups of their customers.  VM Backup is known for quick installation, great support, affordable price and reliable restore and recovery. VM Backup supports VMware and Hyper-V environments. In the latest version, it gained an option to cloud backup to Azure. You can replicate VMs to an offsite location for disaster recovery protection. You can replicate to your own offsite storage through the internet connection or MPLS by using optimized transfer speeds through WAN Acceleration, or you can enable drive swap rotation on selected drives. Altaro is unique due to the affordable pricing as you can license per host rather than per socket your infrastructure. You can read my review here.

VM Explorer

VM Explorer is a product which has the most frequent owner change. VM Explorer, once a Swiss-based company, is an excellent product. It first started as a classic Windows Application. When owners saw the trend, they re-wrote the core and transformed it into a modern web-based application. It got acquired by HP and renamed to HPE Virtual Machine Explorer. It didn’t take long, and the company changed the owner again, this time the product is called Micro Focus VM Explorer, owned by the Micro Focus company. Nevertheless, the product remains a solid and quality choice for backup and replication. It supports VMware and Hyper-V environments with the support for local disk, tape, and the cloud targets. It starts as one with the cheapest options but as soon as you require features like StoreOnce catalyst, StoreVirtual, encryption, Instant VM Recovery, Backup Navigator price bumps to $2,194.78 for six cockets.

Conclusion

Replication is no longer a myth or part of the storage options. Usually, it comes with the modern backup program. You can use it as an additional safety layer in case you datacenter fails or in case you don’t use shared storage with your servers. As you get replication as part of the backup product, it’s up to you how to use it. I was saved once. What about you?

NAKIVO- 2 lisensi install


Step by Step Installasi NAKIVO Backup And Replication solusi Disaster Recovery Platform Virtualisasi Server dengan VMWare vSphere

https://thinkxfree.wordpress.com/2014/04/29/step-by-step-installasi-nakivo-backup-and-replication-solusi-disaster-recovery-platform-virtualisasi-server-dengan-vmware-vsphere/


2 Votes


XPS-Nakivo-BR-Logo

Penulis Artikel : Nathan Gusti Ryan

Dalam artikel ini saya mendapatkan Free Software NAKIVO Backup And Replication karena terpilih mendapatkan predikat / penghargaan VMWare vExpert 2014. Tapi ternyata link khusus ini bisa diakses oleh siapa saja…

Konsep kerja NAKIVO Backup And Replication ini berfungsi sebagai Director yang mengendalikan proses Backup ( dari Host vSphere ke Local Disk Repository ) maupun proces Replikasi ( dari Host vSphere pertama ke Host vSphere kedua ). Perhatikan gambar dibawah ini dengan seksama :


Nakivo-026

Berikut ini adalah contoh desain & implementasi Nakivo Backup & Replication 4″ :

1-XPS-DRC-Server-with-Nakivo-BR-Design-27-Mei-2014

1. Siapkan Material Installer-nya, download dari :

http://nakivo.com/nfr_download.htm

Nakivo-BR-4-for-Windows-000

2. Setelah kita download, selanjutnya kita install. Installer disediakan untuk Platform Windows, Linux maupun Virtual Appliance. Dalam artikel ini kita akan melakukan installasi pada Platform Windows. Untuk OS-nya dapat mengunakan Windows 7, Windows Server 2003, Windows Server 2008, Windows Server 2012, dll.

Saat muncul tampilan End User Agreement dibawah ini, klik Accept.

Nakivo-BR-4-for-Windows-001

3. Tentukan jenis installasi ( Director & Transporter ataukah Transporter Only ). Lalu tentukan folder Repository, misalnya : D:\NAKIVO-REPO

Nakivo-BR-4-for-Windows-002

4. Tunggu hingga proses installasi selesai.

Nakivo-BR-4-for-Windows-003

5. Selanjutnya klik Finish.

Nakivo-BR-4-for-Windows-004

6. Selanjutnya jalankan aplikasi Nakivo BR.

Nakivo-BR-4-for-Windows-005

7. Selanjutnya kita lakukan Login. Pada Nakivo BR yang baru pertama kali di running dan belum ada password maka kita harus membuat password seperti gambar dibawah ini .

Nakivo-BR-4-for-Windows-006

8. Masukkan Username dan Password, lalu kita klik Next.

Nakivo-BR-4-for-Windows-007

9. Lalu kita akan melakukan First Time Configuration…

Nakivo-BR-4-for-Windows-008

10. Pada opsi Inventory, masukkan Username dan Password dari HOST vSphere kita.

Nakivo-BR-4-for-Windows-009

11. Selanjutnya System akan menemukan Host dan VM yang ada di dalannya.

Nakivo-BR-4-for-Windows-010

12. Selanjutnya pada Opsi Transporter, kita bisa koneksikan beberapa Transporter dengan Nakivo Director ini serta ada fitur untuk integrasi dengan Amazon Cloud. Klik Next untuk melanjutkan proses.

Nakivo-BR-4-for-Windows-011

13. Selanjutnya akan ditampilkan Local Repositories, kita bisa gunakan Local Disk ataupun NAS / SAN. Klik Next untuk melanjutkan proses.

Nakivo-BR-4-for-Windows-012

14. Selanjutnya akan tampil menu utama Nakivo Backup & Replication. Untuk membuat Job Backup maupun Job Replication, kita tinggal masuk ke menu Create.

Nakivo-BR-4-for-Windows-013

15. Ok, sekarang kita masuk ke menu Configuration. Ada beberapa pengaturan yang perlu kita setting. Diantaranya adalah User Account Admin, Email setting, Automatic Report dan Branding, dll.

Nakivo-BR-4-for-Windows-014

16. Pada menu Cloud Integration, dengan fitur kita bisa integrasikan untuk melakukan interkoneksi dengan Amazon Cloud.

Nakivo-BR-4-for-Windows-015

17. Selanjutnya pada menu License, kita bisa menampilkan Status License. Secara default, License Enterprise NFR ini ( Not For Resale ) adalah  License full fitur maksimal 2 Socket Processor. Hanya diijinkan untuk Testing / Trial / Lab saja, bukan untuk Production Server.

Nakivo-BR-4-for-Windows-016

18. NAKIVO Backup And Replication versi 4 ini disediakan fitur baru yang belum ada pada versi 3 yaitu untuk menganti Branding Logo dan kontak Entry Support.

Nakivo-BR-4-for-Windows-018

19. Ok, Untuk installasi dan konfigurasi cukup disini dulu artikelnya. Kita akan lanjutkan pada artikel berikutnya mengenai Pembuatan Job Backup dan Restore serta mengenai Pembuatan Job Replikasi

Nakivo-BR-4-for-Windows-019