How to configure vMotion using vCenter Server 6
How to configure vMotion using vCenter Server 6
In this post, we’ll learn the steps to configure vMotion using vCenter Server 6. VMotion is required to hot migrate (powered on) Virtual Machine from one ESXi Host to another. Vmotion is the best feature that Organizations are using during planned maintenance. Besides that it needs to be enabled if we want DRS or HA to be enabled for our environment.
However before we enable vMotion please ensure that you complete all the pre-requisites that are required for vMotion to work properly. All the pre-prerequisites are explained below for your reference. In the old post, we have learned the steps to configure vCenter Server and storage vMotion.
Pre-requisites to configure vMotion
1. Shared storage must be connected to all the VMWare ESXi hosts.
2. All the Virtual Machines are hosted on Shared Storage.
3. Virtual Machine should not be using direct resources of Host e.g. CD ROM, NIC Card, etc.
4. Enable vMotion on all the Hosts.
2. All the Virtual Machines are hosted on Shared Storage.
3. Virtual Machine should not be using direct resources of Host e.g. CD ROM, NIC Card, etc.
4. Enable vMotion on all the Hosts.
Steps to enable vMotion using vCenter Server 6
Step 1:
Select the ESXi host on which you want to enable vMotion.
On the right pane, select configuration tab.
Select Networking
Click on the properties of vSwitch0. VSwitch is the default virtual switch that gets created and all the newly created Virtual Machines by default host on this vSwitch 0.
Select the ESXi host on which you want to enable vMotion.
On the right pane, select configuration tab.
Select Networking
Click on the properties of vSwitch0. VSwitch is the default virtual switch that gets created and all the newly created Virtual Machines by default host on this vSwitch 0.
Step 2:
On the vSwitch0 properties, we can see that vMotion is disabled. By default it is disabled and we need to enable vMotion.
Select the Management Network Port-group
Click on Edit.
On the vSwitch0 properties, we can see that vMotion is disabled. By default it is disabled and we need to enable vMotion.
Select the Management Network Port-group
Click on Edit.
Step 3:
On the Management Network properties, on the general tab to enable vMotion.
Click on Ok to close the Management Network properties and then click on close to close the vSwitch0 properties.
On the Management Network properties, on the general tab to enable vMotion.
Click on Ok to close the Management Network properties and then click on close to close the vSwitch0 properties.
Step 4:
Follow the same steps on all the VMWare ESXi hosts. Please take a note that vMotion would not work if it’s enabled only on one ESXi server and not others. We need to enable it on all the Hypervisors on which we want to hot migrate our Virtual Machines.
Follow the same steps on all the VMWare ESXi hosts. Please take a note that vMotion would not work if it’s enabled only on one ESXi server and not others. We need to enable it on all the Hypervisors on which we want to hot migrate our Virtual Machines.
Migrate Virtual Machine from one VMWare ESXi Server to another Server
Step 1:
Select the Virtual Machine that you want to migrate.
Click on the Summary tab.
In this practical, we can see that this Virtual Machine is hosted on ESX01 server and using Shared Storage i.e. VOL1. We’ll migrate this Virtual Machine to another hypervisor i.e. ESX02.
It is must to host Virtual Machine on shared storage before we start the migration step.
Step 2:
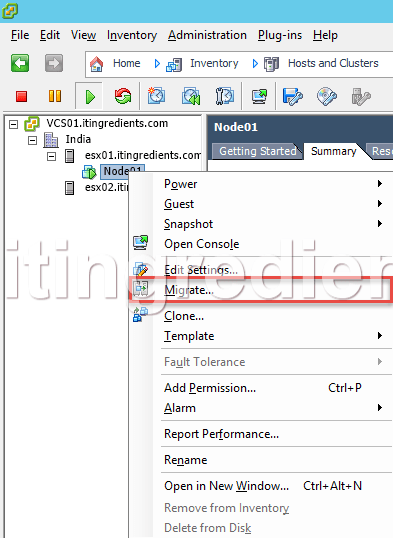
As we can see that our VM is in running state. Right click the VM which you want to migrate from one ESXi host to another ESXi host and click on Migrate.
As we can see that our VM is in running state. Right click the VM which you want to migrate from one ESXi host to another ESXi host and click on Migrate.
Step 3:
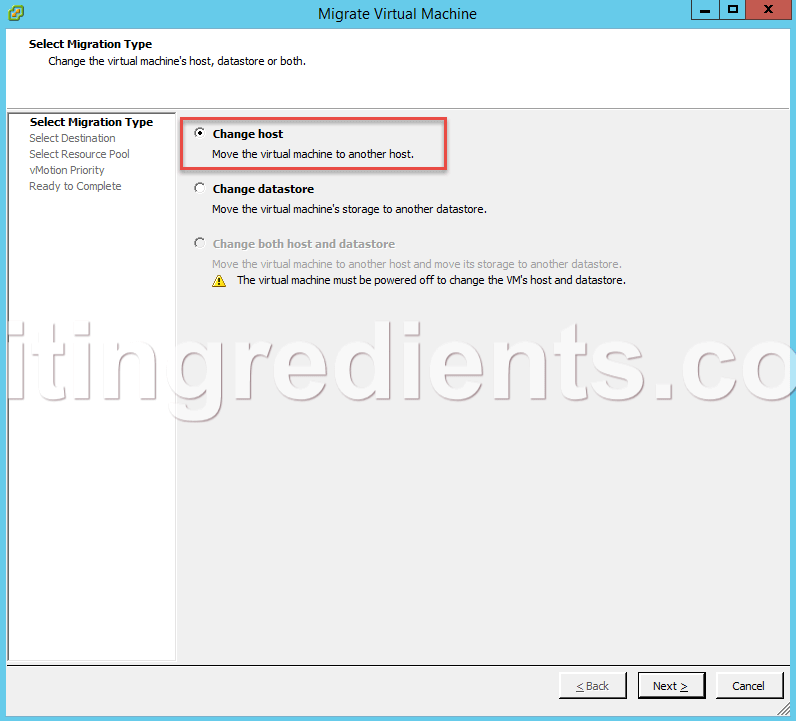
A wizard would be started. We can see two options that are enabled i.e. Change Host and Change Datastore and one option which is disabled i.e. Change both host and Datastore. Select the option of “Change Host” and click on next.
A wizard would be started. We can see two options that are enabled i.e. Change Host and Change Datastore and one option which is disabled i.e. Change both host and Datastore. Select the option of “Change Host” and click on next.
Step 4:
Select the destination server to which you want to migrate this VM.
For this practical, we’ll migrate this VM to ESX02.
Message “Validate Succeeded” under compatibility confirms that this VM can be migrated to ESX02.
Click on next to continue.
Select the destination server to which you want to migrate this VM.
For this practical, we’ll migrate this VM to ESX02.
Message “Validate Succeeded” under compatibility confirms that this VM can be migrated to ESX02.
Click on next to continue.
Step 5:
We can see two priority options i.e. High priority and Standard priority. Select the priority as per your requirements.
High priority is favoured over standard priority and are expected to perform better.
For this practical, we’ll select high priority.
We can see two priority options i.e. High priority and Standard priority. Select the priority as per your requirements.
High priority is favoured over standard priority and are expected to perform better.
For this practical, we’ll select high priority.
Step 6:
Verify all the options and click on Finish to migrate Virtual Machine to another ESXi Server.
Verify all the options and click on Finish to migrate Virtual Machine to another ESXi Server.
Step 7:
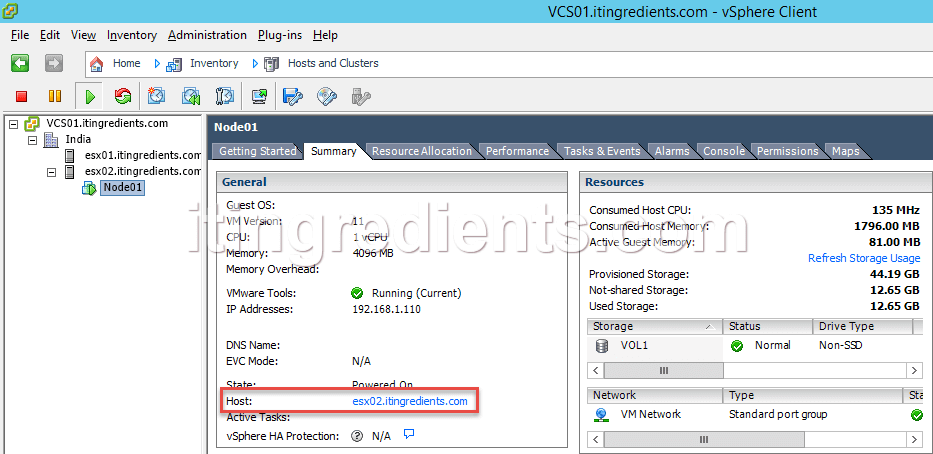
As we can see that our VM is successfully migrated to ESX02.
As we can see that our VM is successfully migrated to ESX02.
Hope you understood the steps listed in this article to configure and enable vMotion on VMWare ESXi Servers. Please feel free to leave your comments and suggestions in the below mentioned comment section.


Tidak ada komentar:
Posting Komentar