Installing Windows Server 2016 upgrades us once again from Windows Server 2012/R2 that provides the latest and the essential updates we need. As well as this time, it has includes lots of new and features. In this lesson, you will learn about installing Windows Server 2016 step by step. Also, before installing, make sure you have pre-planned for selecting which edition to install and what to do in it.
Before installing Windows Server 2016 you need to plan for the installation. Making plan means you should choose an appropriate edition of Windows server. You should think of Hyper-v server you need for your network. You must choose an edition which have enough the Hyper-v license. Also think of more licenses you may need in the future.
Every edition of Windows server may support limited number of users. Choose the edition that meets your needs. When we talk about limitations, we don’t talk about software limitations. If you want more license you should pay for. You can upgrade from one edition to another edition. And you can buy more license for physical and virtual servers also users.
Windows server 2016 editions
- Datacenter: Highly virtualized, enterprise network and cloud environment.
- Standard: Only different with Datacenter edition is the number of Virtual servers. Datacenter edition supports more virtual servers.
- Essential: For small business up to 25 users and 50 devices.
Hardware Requirements
- Processor: 1GHZ
- RAM memory: Minimum of 2GB
- Hard Drive Space: 20GB free space
Installing Windows Server 2016 on VMware
Like the previous versions (Windows Server 2012…), the Windows Server 2016 installation is simple, what’s new is the editions that you can choose them wisely during installation.
In order to install Windows Server 2016, first, you must have an ISO image file of it and also make sure you have pre-planned choosing which edition of Windows Server 2016 and have fulfilled the system requirements.
Download Now: Windows Server 2016
Create and Customize the Virtual Machine
1. Open VMware and click on the Create a New Virtual Machine(Ctrl+N) icon. If you don’t have VMware installed on your computer, click here to download one.

2. Now select Custom (Advanced) option to specify the virtual machine with advance options. If you want you can create virtual with less options, click on Typical option. When you are finished here, click on Next button.

3. Leave the Virtual Machine Hardware Compatibility settings as default. If you want you can select your VMware version. Then click Next button.

4. Here you should add an installer image into the virtual machine. Select the Installer disc image file (ISO) option and click on the Browse button. Specify .iso file path and import it. Then click on Next button.
Note: Make sure that you are using an ISO image file, otherwise unzipped file won’t boot.

5. Specify which operating system type you want to install on the virtual machine. Select Windows Server 2016 version from the dropdown menu and click on Next button.

6. Enter a name for the virtual machine and browse a place where you want to store the installation files. For the purpose click on Browse button and specify the place. When finished, click on Next button.

7. On the Processor Configuration specify then number of processors your server need to use and click on Next button. Also notice that it refers to your virtual machine speed that how much speed the server should be.

8. Specify the amount of the memory for the virtual machine (based on MB) and click on Next button.

9. Select Use Network Address Translation(NAT) or Use bridged networking to directly connect and use internet, as a network type. Then hit Next.

10. Let the I/O Controller types by default because you don’t have the option to change the SCSI type. just hit Next.

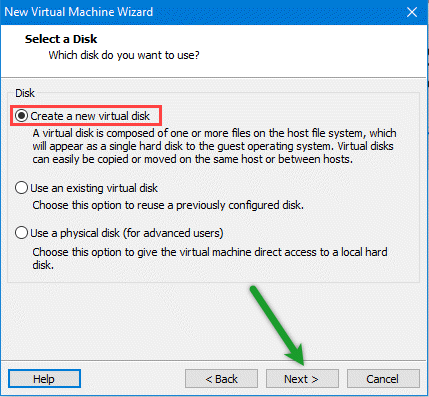
11. Now to create new virtual disk, select create a new virtual disk for the virtual machine.
12. Specify the disk amount by typing the disk size(Recommended 60 GB) and click on Next button.

13. At this point, just check out the settings you’ve done or you can customize if you want and click Next.

Step 2. Install Windows Server 2016
Now it’s time to boot up and start the virtual machine, just click on Power on this virtual machine then wait until it boots.
1. Open VMware Workstation on your host computer. Click on Power on this virtual machine in top left.

2. When the virtual machine powered on, specify the language, time zone and keyboard then click Next.

3. Install now to install the windows server 2016 on virtual machine.

4. Select one the Windows Server editions you’ve decided and click on Next button.

5. Put a mark in the box next to I accept the license terms, then click on the Next button.

6. Go on and click on the Custom: Install Windows only (Advanced) option for installing the server custom.

7. Select the disk, you want to install the widows on and select the disk, click on New, then specify the amount (based on MB) and click on Apply button then click on Next button.

8. Now the server copies all the files to the disk, amount the files from the windows image, install features, updates, so it will take time and when finished it will reboot.

9. After the reboot, type a complex password composed of (uppercase, lowercase, symbols and numbers) and click on Finish button.

10. When the customization finished, now you’ll need to sign in, but first click on the button that is composed of three buttons (ctrl+alt+del) shown in image below or simply press Ctrl+Alt+Del and sign in to Windows Server.

And that’s it, after you have signed in, your windows server installation is completed like the shot below.

Tidak ada komentar:
Posting Komentar