5 Best Free GUI Tools for Kubernetes
A GUI (graphical user interface) for Kubernetes is a visual tool that allows you to manage and monitor Kubernetes clusters through a user-friendly interface including windows, buttons, and icons. This is an alternative to using the command-line interface (CLI) like kubectl. GUIs provide a range of features to simplify Kubernetes management, from deploying applications to monitoring resources and troubleshooting issues. In this article, we’ll look at the top 5 free GUI tools for Kubernetes, their features, strengths, and weaknesses. We’ll also show you how to install one of them, Lens, and how to use it to connect to a Gcore Managed Kubernetes cluster.
How We Chose K8s GUIs
When choosing free GUIs for Kubernetes, we looked for tools that provide the essential features for managing a production-grade K8s cluster. These tools don’t need to match the extensive feature set of kubectl, as that could lead to a cluttered and overly complex interface. However, a GUI should visualize all major cluster components and allow users to perform key administrative operations such as editing manifests, retrieving logs, and troubleshooting.
Here’s our top five:
- Kubernetes Dashboard
- Lens
- Octant
- Skooner
- Kubevious
All these GUIs are compatible with Gcore Managed Kubernetes.
Let’s take a closer look at each tool, focusing on its key features, strengths, and weaknesses.
Kubernetes Dashboard
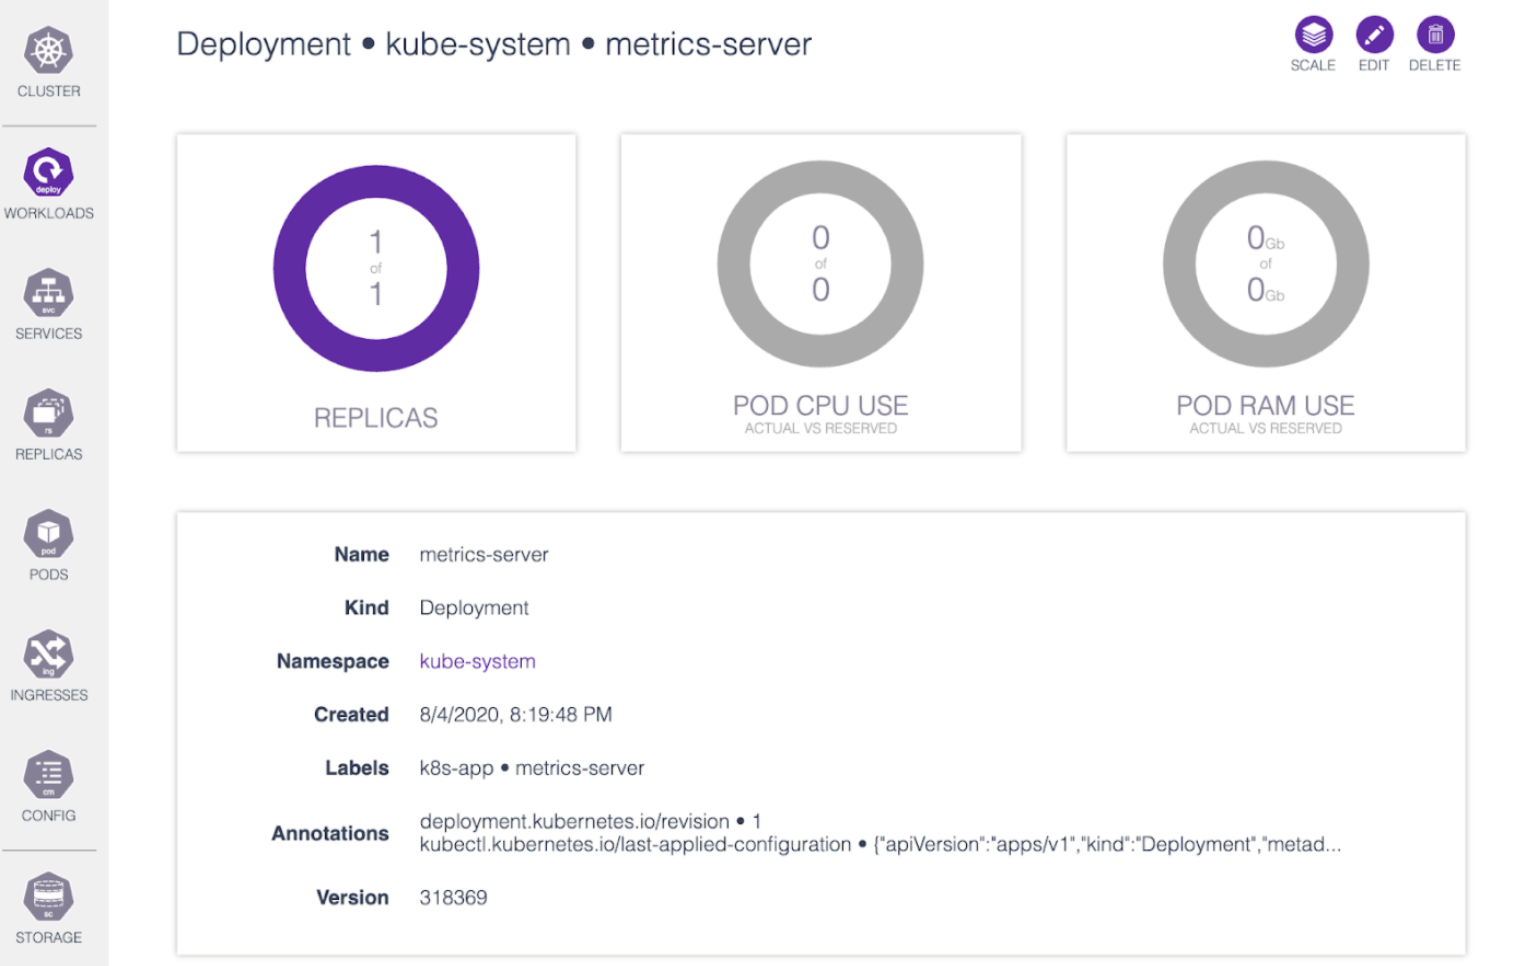
Kubernetes Dashboard is a popular GUI supported and developed by the Kubernetes community. It’s designed for the day-to-day operation and debugging of applications in the cluster.
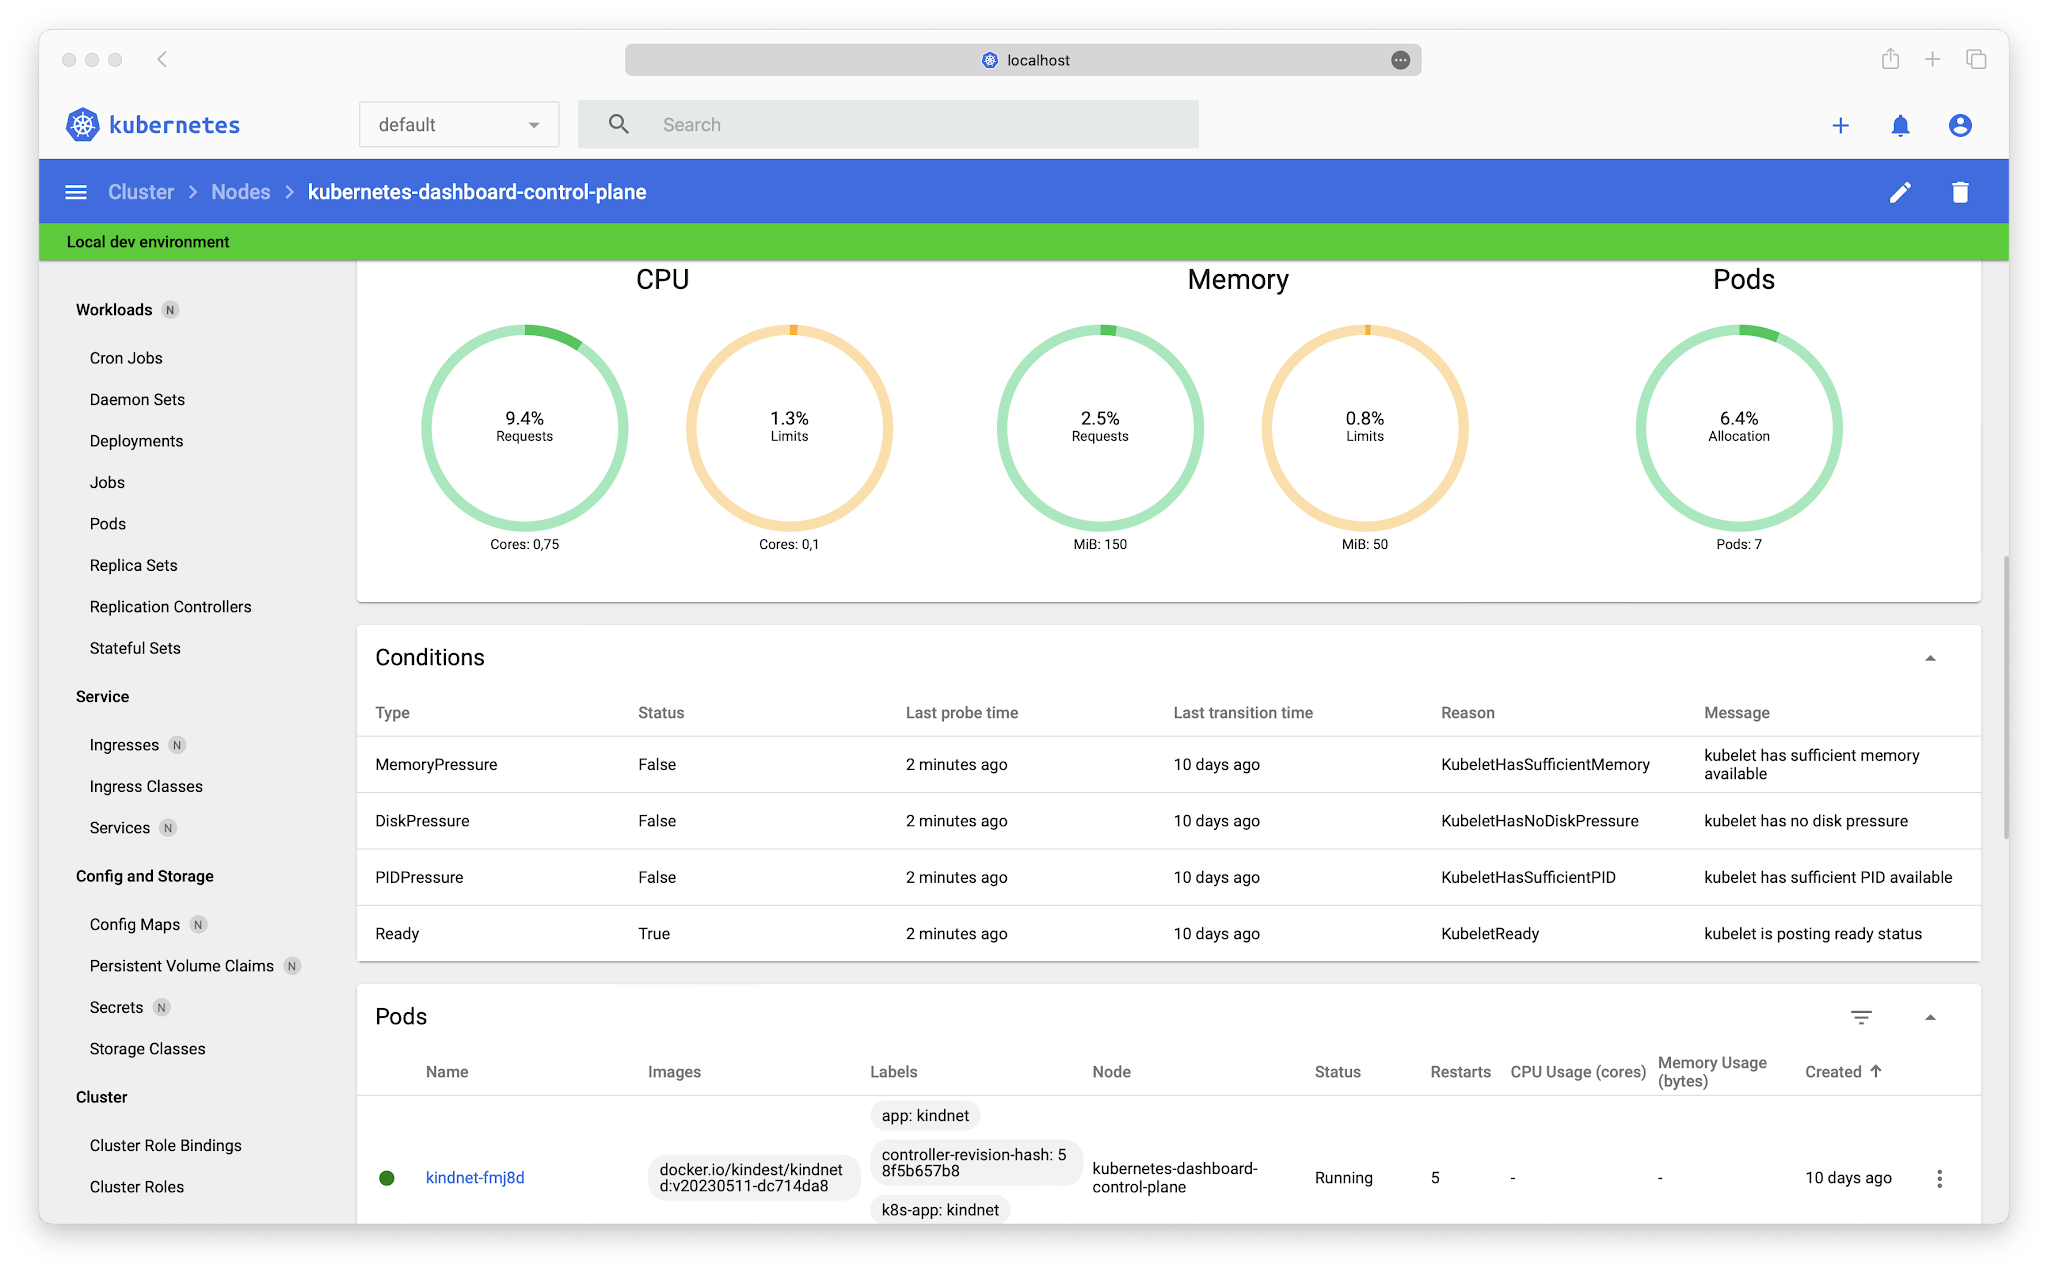
The Dashboard provides clear and convenient navigation across cluster namespaces, displaying all the defined objects, such as Deployments, Daemon Sets, and Services. With RBAC functionality, you can provide developers with minimal, yet sufficient, access to a cluster to perform the tasks they are authorized to perform. There is also a log viewer to drill down into the logs of a pod’s containers.
Kubernetes Dashboard allows you to create and run containerized applications as Deployments. To do this, you need to manually specify the details of your application or upload a YAML or JSON manifest with its configuration.
The main drawback of the Dashboard is the lack of multi-cluster support. If you have multiple K8s clusters, you need to configure separate dashboards for them.
Pros
- Intuitive navigation across all major objects in a cluster
- View of applications by type and interconnection
- View of Ingresses and Services, including their connections to pods
- View of Persistent Volumes and Persistent Volume Claims
- Editing ConfigMaps and Secrets
- Pod logs
Cons
- No multi-cluster support
- No support for Helm charts (pre-packaged applications for K8s)
- Limited customization
Useful links
Lens
Lens is positioned as a full-fledged IDE (integrated development environment) for Kubernetes, suitable for all user levels, from beginner to advanced. An IDE is a software application that provides comprehensive facilities to programmers for software development, including a code editor, debugger, and build automation tools. As a type of GUI, an IDE offers a visual approach to software development, making it easier to manage and navigate complex coding tasks. Unlike Kubernetes Dashboard, which is a web UI, Lens is a standalone application for macOS, Windows, and Linux.
Lens offers many useful features, including multi-cluster support, Helm chart deployment, and built-in Prometheus, which collects statistics on compute resource usage. It also provides command-line access to cluster nodes and containers. In terms of security, it supports RBAC and allows you to edit Secrets.
Another benefit of Lens is its integrated command line with preinstalled kubectl. This command line is automatically synchronized with the cluster’s Kubernetes API, eliminating the need to install multiple versions of kubectl on your machine to work with different clusters. With Lens, you have a single kubectl instance that works seamlessly across all your clusters.
Later in this article, we’ll use Lens to connect to a Gcore Managed Kubernetes cluster and examine the GUI more closely.
Pros
- Comprehensive set of management features
- Multi-cluster support
- Helm chart deployment with popular repositories preinstalled
- Prometheus integration
- Integrated CLI with preinstalled kubectl and Helm v3
Cons
- Limited security features in the free version
- Non-real-time pod logs updates
Useful links
Kubernetes Web View
Kubernetes Web View is a tool that aims to help an administrator respond to incidents and troubleshoot a K8s cluster. Its author, Henning Jacobs, calls it “a web version of kubectl.” Kubernetes Web View supports:
- Multi-cluster installations
- Availability of all kubectl read-only operations
- Creation of permanent links to K8s objects and deep links to specific sections of YAML manifests
Kubernetes Web View is a more low-level tool than, say, Kubernetes Dashboard; it has a less detailed visualization. But that’s okay, considering that its primary users are likely to be experienced K8s administrators.
Unfortunately, Kubernetes Web View doesn’t support application management via Deployments or Helm charts. Another limitation is that the GUI is developed only by Henning Jacobs and hasn’t been updated since 2021.
Pros
- Support for all Kubernetes objects
- Availability of all kubectl read-only operations
- Multi-cluster support
- Simple, reliable frontend based mostly on HTML with minimal JavaScript
- Permanent links to K8s objects
- Deep links to specific sections of YAML manifests
- Editing of resources as YAML manifests
Cons
- Limited visualization
- No application management
- Only one contributor
- Not actively developed
- No support for Helm charts
Useful links
Skooner (k8dash)
Skooner, formerly known as k8dash, is a web UI for real-time cluster management. It provides a wide range of features, from creating Kubernetes objects to metrics for controlling resource consumption. With Skooner, you can view a cluster’s health through live graphs and track poorly performing resources. It’s also the only mobile-optimized tool on this list, so you can manage your cluster using a phone or tablet.
Skooner’s main drawbacks are its lack of support for multi-cluster installations and CRDs (custom resource definitions). Also, the installation process can be tricky for those new to Kubernetes.
Pros
- Support for key K8s components, including namespaces, nodes, pods, deployments, Replica Sets, and storage
- RBAC support
- Editing resources as YAML manifests
- Real-time tracking of cluster health
- Open ID integration
- Responsive design
Cons
- No multi-cluster support
- No CRDs support
- No Helm charts support
Useful links
Kubevious
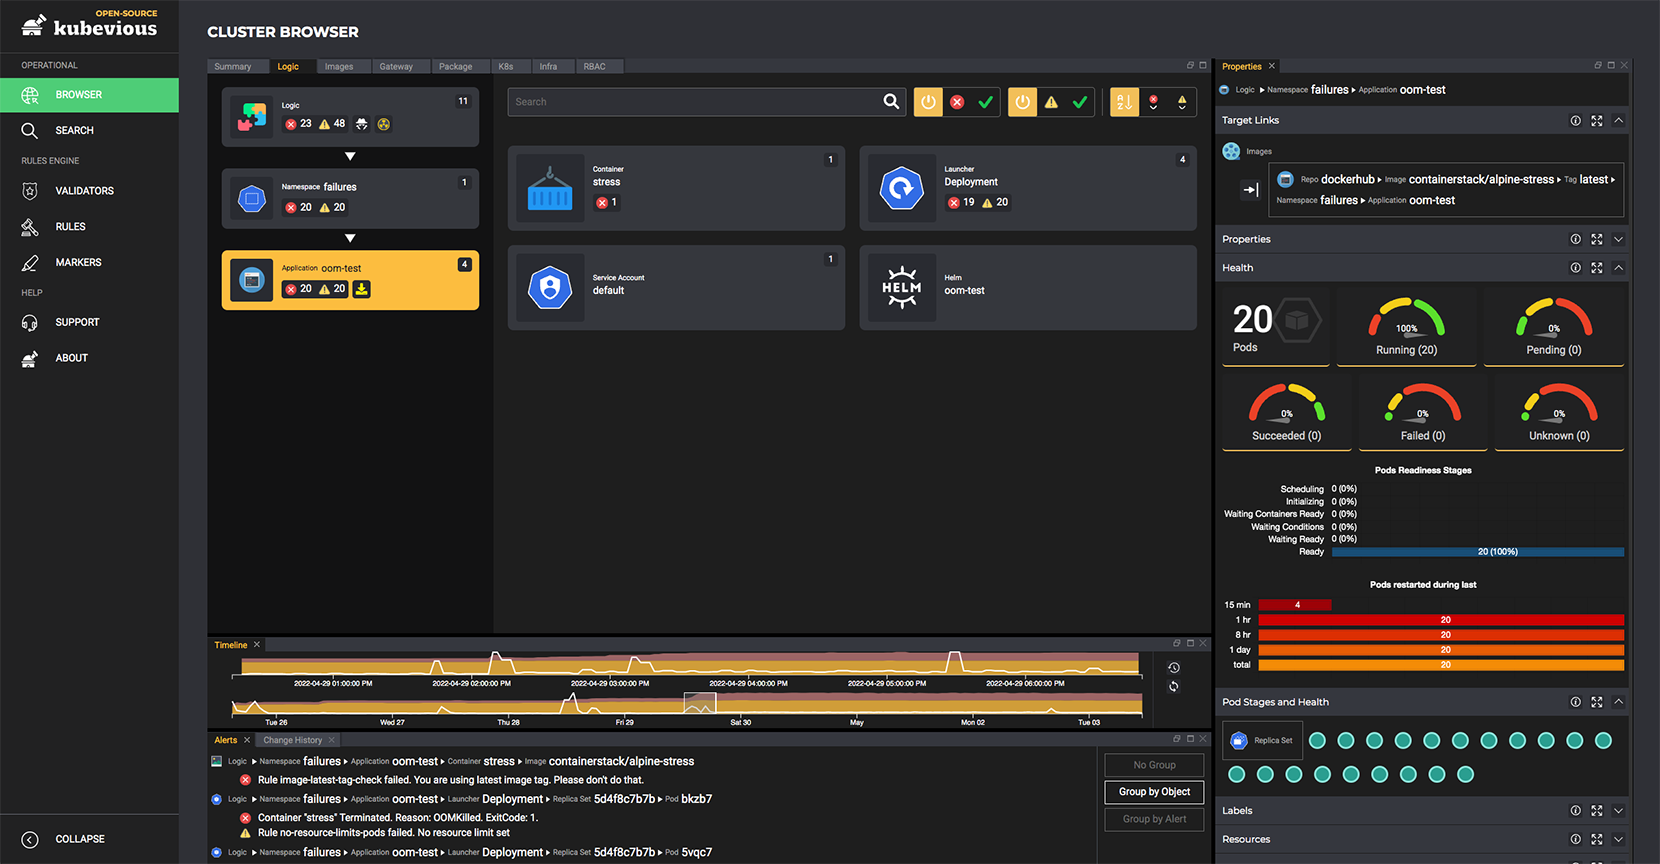
Kubevious is the only security-focused free GUI for Kubernetes on our list. Its main goal is to validate a cluster’s state and configuration, as well as application manifests. Kubevious can detect and prevent errors such as misconfigurations, conflicts, and even typos. It helps you follow best practices for configuring and managing Kubernetes. You can also manage RBAC (role-based access control) using a spreadsheet with linked Roles, Role Bindings, and Service Accounts.
Kubevious GUI displays Kubernetes objects in a tree structure, giving administrators a clear view of microservices, their connections, and dependencies. It also provides different “views” of a cluster from specific perspectives. For example, Logic View focuses on application components and dependencies, while Image View focuses on container images and their repositories used in a K8s cluster.
The main drawback of Kubevious is the lack of multi-cluster support. Also, the development process seems to be stagnant: The last update was in 2022.
Pros
- Powerful security and troubleshooting features
- Advanced RBAC support
- Original and clear representation of K8s objects’ structure
- Capacity planning and resource utilization optimization
- Built-in time machine to view previous cluster configurations
- Nudges to follow DevOps best practices
Cons
- No multi-cluster support
- Not actively developed
- No Helm chart support
Useful links
Final Comparison Table
After reviewing each free GUI tool for Kubernetes, let’s summarize their key capabilities in a comparison chart to see the overall feature differences.
| Kubernetes Dashboard | Lens | Kubernetes Web View | Skooner | Kubevious | |
| Installation type | K8s cluster | Desktop | Desktop, K8s cluster | K8s cluster | Desktop, K8s cluster |
| Visualization of the cluster state | ✅ | ✅ | ✅ | ✅ | ✅ |
| Finding objects | ✅ | ✅ | ✅ | ✅ | ✅ |
| Creating and editing objects | ✅ | ✅ | — | ✅ | — |
| Viewing the YAML configuration | ✅ | ✅ | ✅ | ✅ | ✅ |
| RBAC management | ✅ | ✅ | — | ✅ | — |
| Helm support | — | ✅ | — | — | — |
| Resource usage metrics | ✅ | ✅ | — | ✅ | ✅ |
| Multi-cluster support | — | ✅ | ✅ | — | — |
| Pod logs | ✅ | ✅ | ✅ | ✅ | — |
| Resource optimization recommendations | — | ✅ | ✅ | ✅ | — |
Summing Up the Decision-Making Process
Choosing the right GUI tool for Kubernetes depends on your project requirements. For example, if you have multiple clusters, you’ll probably avoid GUIs that don’t support multi-cluster installations, instead opting for Kubernetes Dashboard, Skooner, or Kubevious. If your main focus is security, you should consider Kubevious first, even though Lens seems to have the most comprehensive feature list—sometimes a specialized GUI will suit your project better than the one with the broadest features.
We recommend that you try at least three different GUIs to test their capabilities and see how well they meet your needs. This hands-on experience will help you understand their strengths and weaknesses in the context of your specific project requirements, allowing you to make a more informed decision.
How to Install Lens and Access Gcore Managed Kubernetes
Gcore Managed Kubernetes offers an easy and fast way to run a K8s cluster in the cloud. In 10–15 minutes, you’ll have a production-ready cluster. Then, you can install any free GUI you like to get all its functionality when operating with our Managed Kubernetes. We’ll show you how to do this using the Lens GUI as an example.
Here’s how to start using Lens with Gcore Managed Kubernetes:
- Create a Kubernetes cluster in the Gcore Edge Cloud.
- Download the Kubernetes configuration file.
- Install and activate Lens.
- Connect to your Kubernetes cluster.
We’ll also show you how to enable Lens Metrics so you can see how many compute resources your cluster is using.
1. Create a Kubernetes Cluster in Gcore Cloud
Log in to the Gcore Customer Portal. If you’re not yet registered, sign up free using your email, Google, or GitHub account.
From the left navigation menu, click Cloud, then Kubernetes. In the main tab, click Create Cluster.
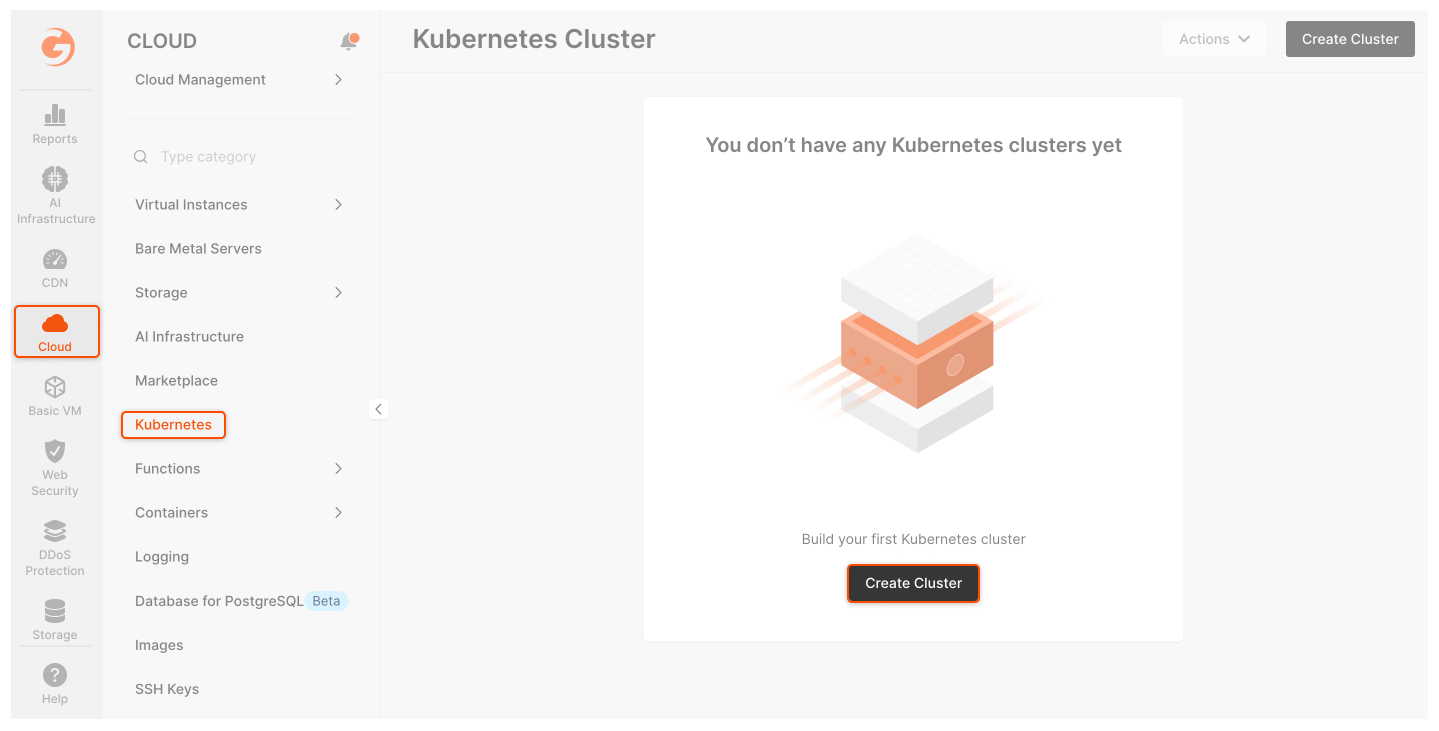
Configure your cluster as needed, or follow the minimum recommendations below, which are sufficient to test Lens and check if it’s right for you:
- Region: Your preferred Managed Kubernetes region
- Kubernetes cluster version: It’s better to choose the latest K8s version, which is currently 1.29.2
- Pool > Minimum / Maximum nodes: 1/1
- Instance type: Virtual instances, 2 vCPU / 4 GiB Memory is enough
- Volume type: High IOPS SSD 50 GiB
- Network settings: Add new network and subnetwork, or select existing ones
- SSH key: Choose your public SSH key or generate a new one
- Cluster name: cluster-1 (or whatever you want)
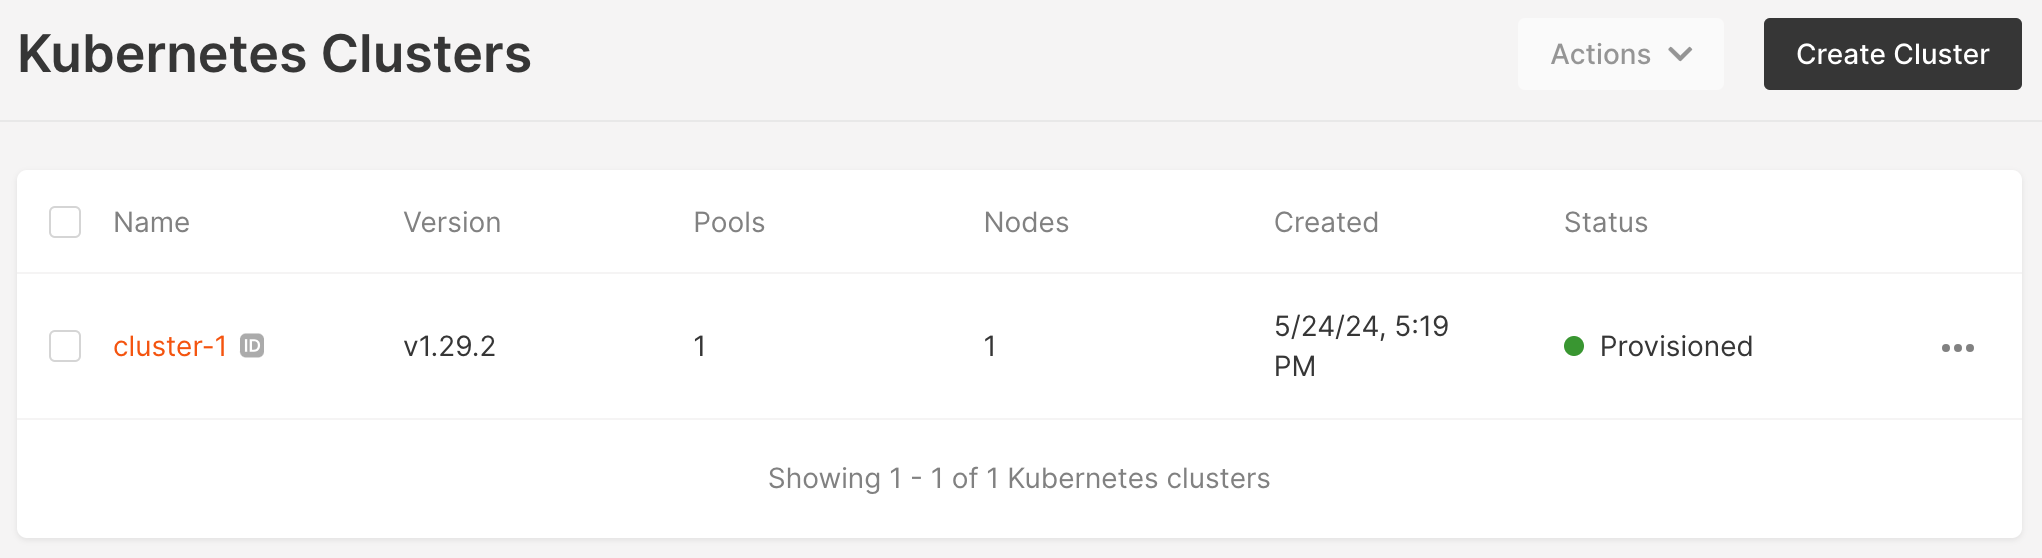
Now that you’ve completed the setup steps, click Create Cluster. The cluster will appear in the “Kubernetes Cluster” section. Wait a few minutes until its status changes from “Creating” to “Provisioned”.
2. Download the Kubernetes Configuration File
Run Terminal on your local machine and create a .kube folder:
In the Gcore Customer Portal, go to your cluster settings, click Kubernetes config, and download it to the .kube folder:

Rename this file from k8sConfig.yml to config and remove the .yml extension.
Now, Lens can access your cluster.
3. Install and Activate Lens
Download Lens Desktop for your operating system (OS) and run the package, following the Lens guides for a specific OS.
When you run it, you’ll be asked to register your Lens, even its free version. You can do this with a few clicks; we’ll skip those instructions here; please register Lens on your own.
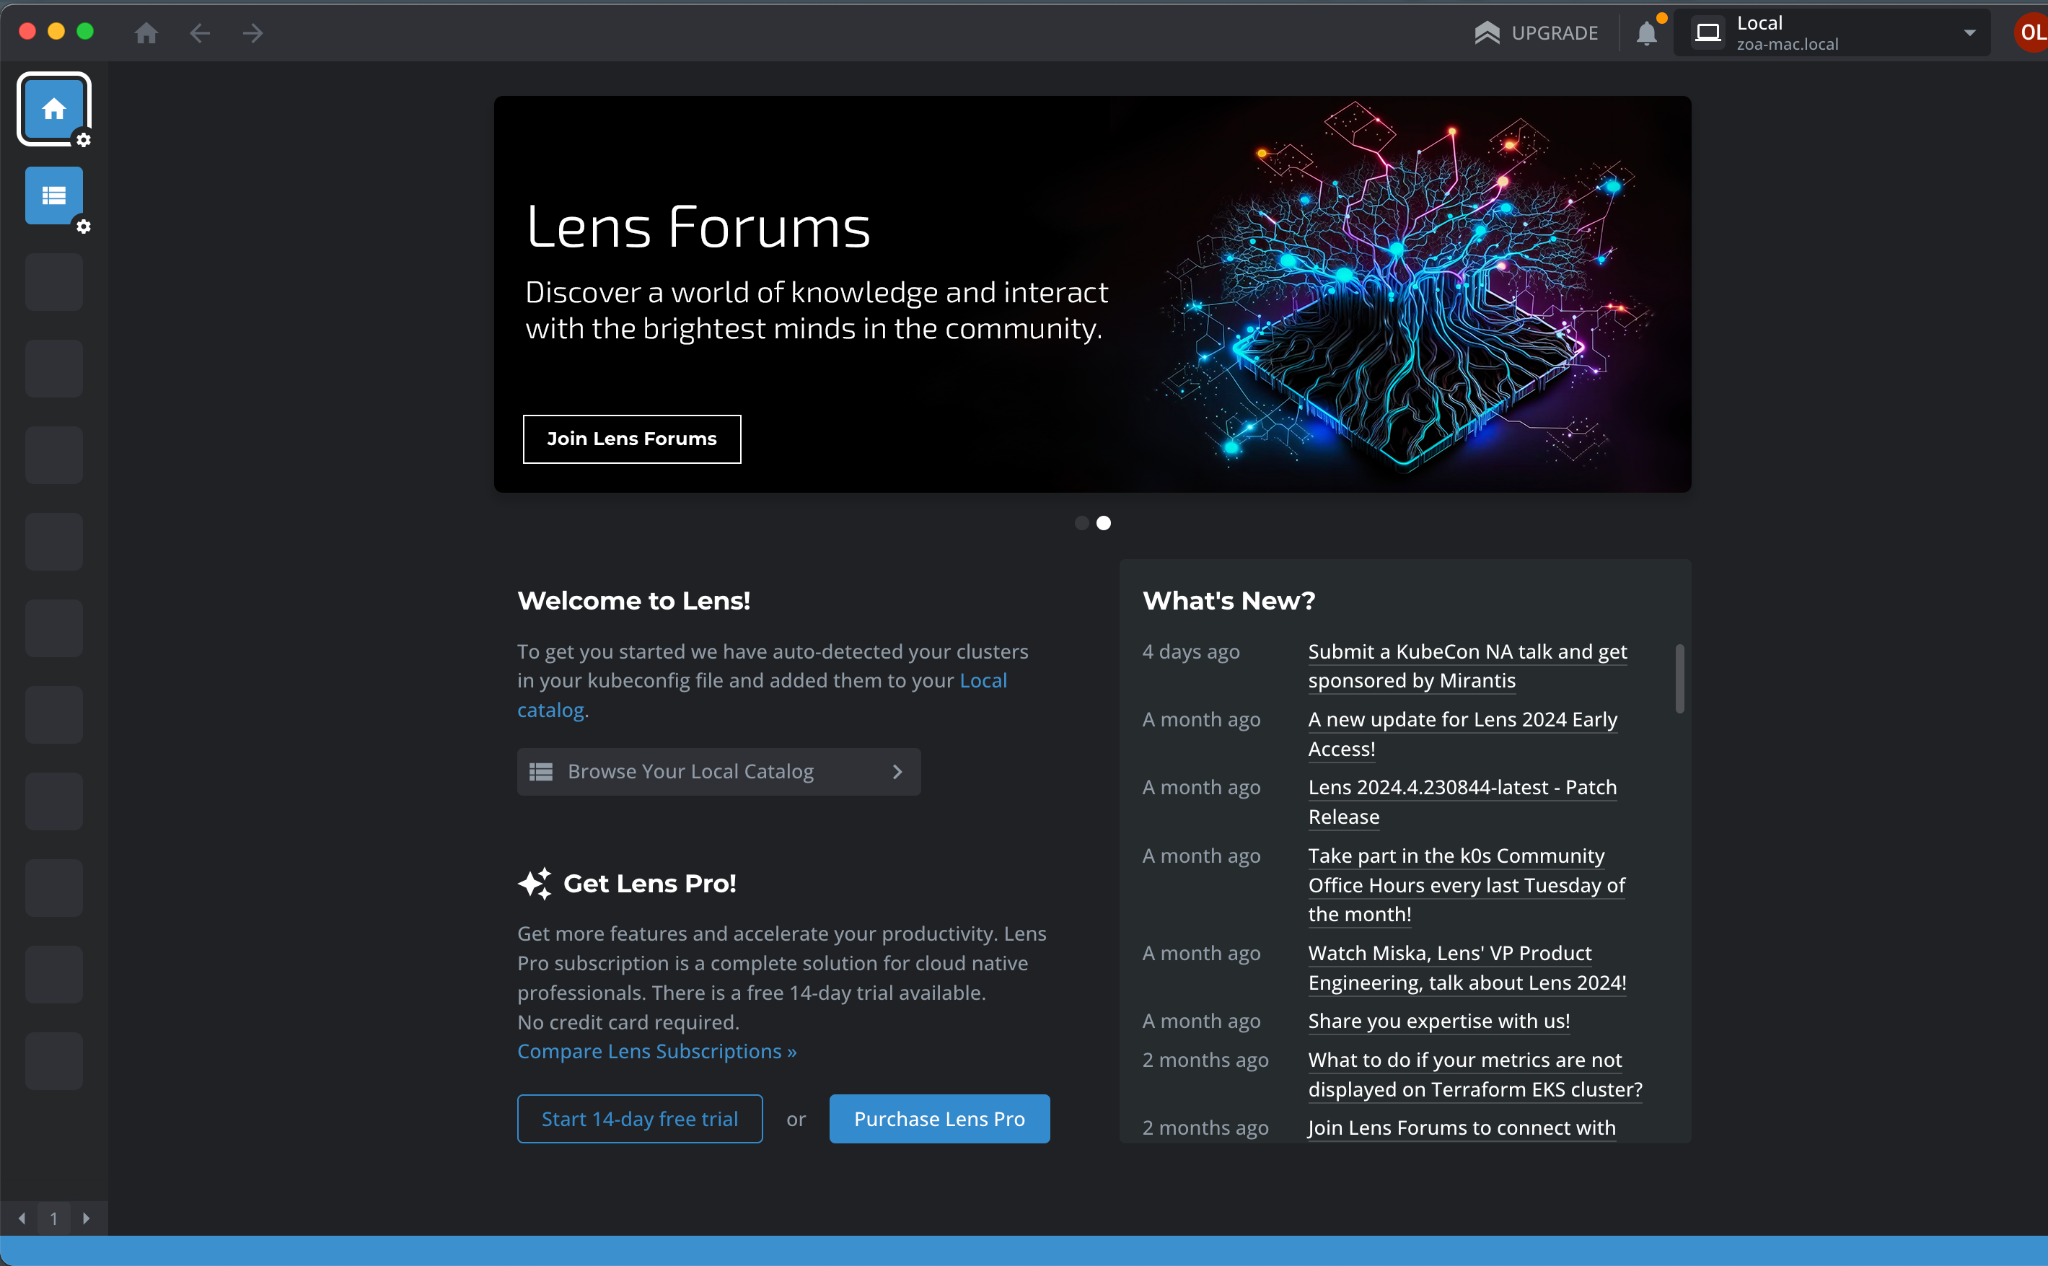
After Lens is activated, you’ll see a welcome screen like this:
4. Connect to Your Kubernetes Cluster
In Lens, select Catalog in the upper left corner, then select Clusters. Click the + button in the bottom-right corner to add your configuration file:
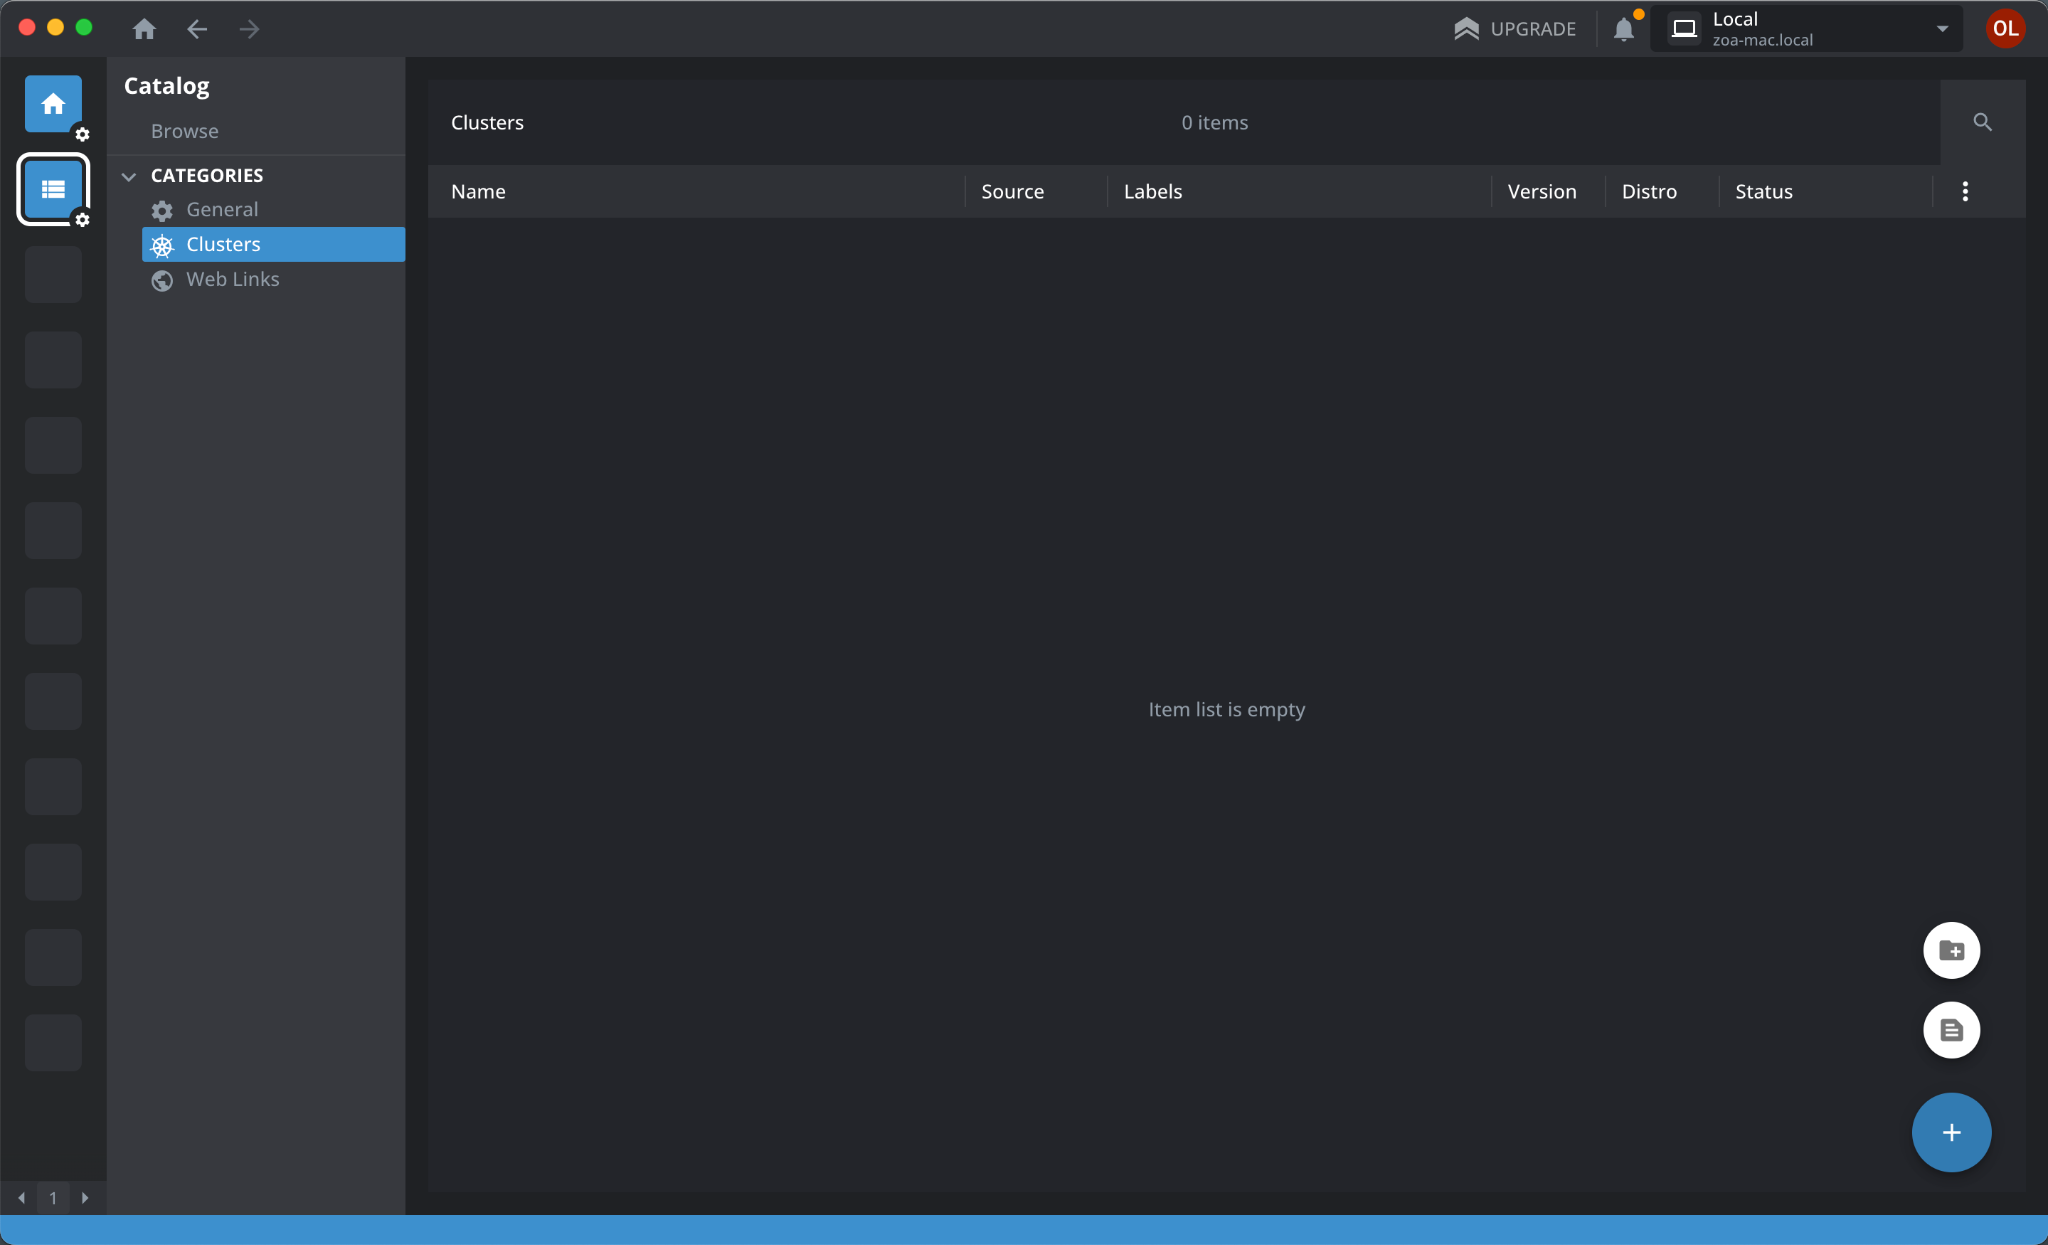
Select the config file you downloaded earlier and click Sync. You’ll see that connection is in progress:
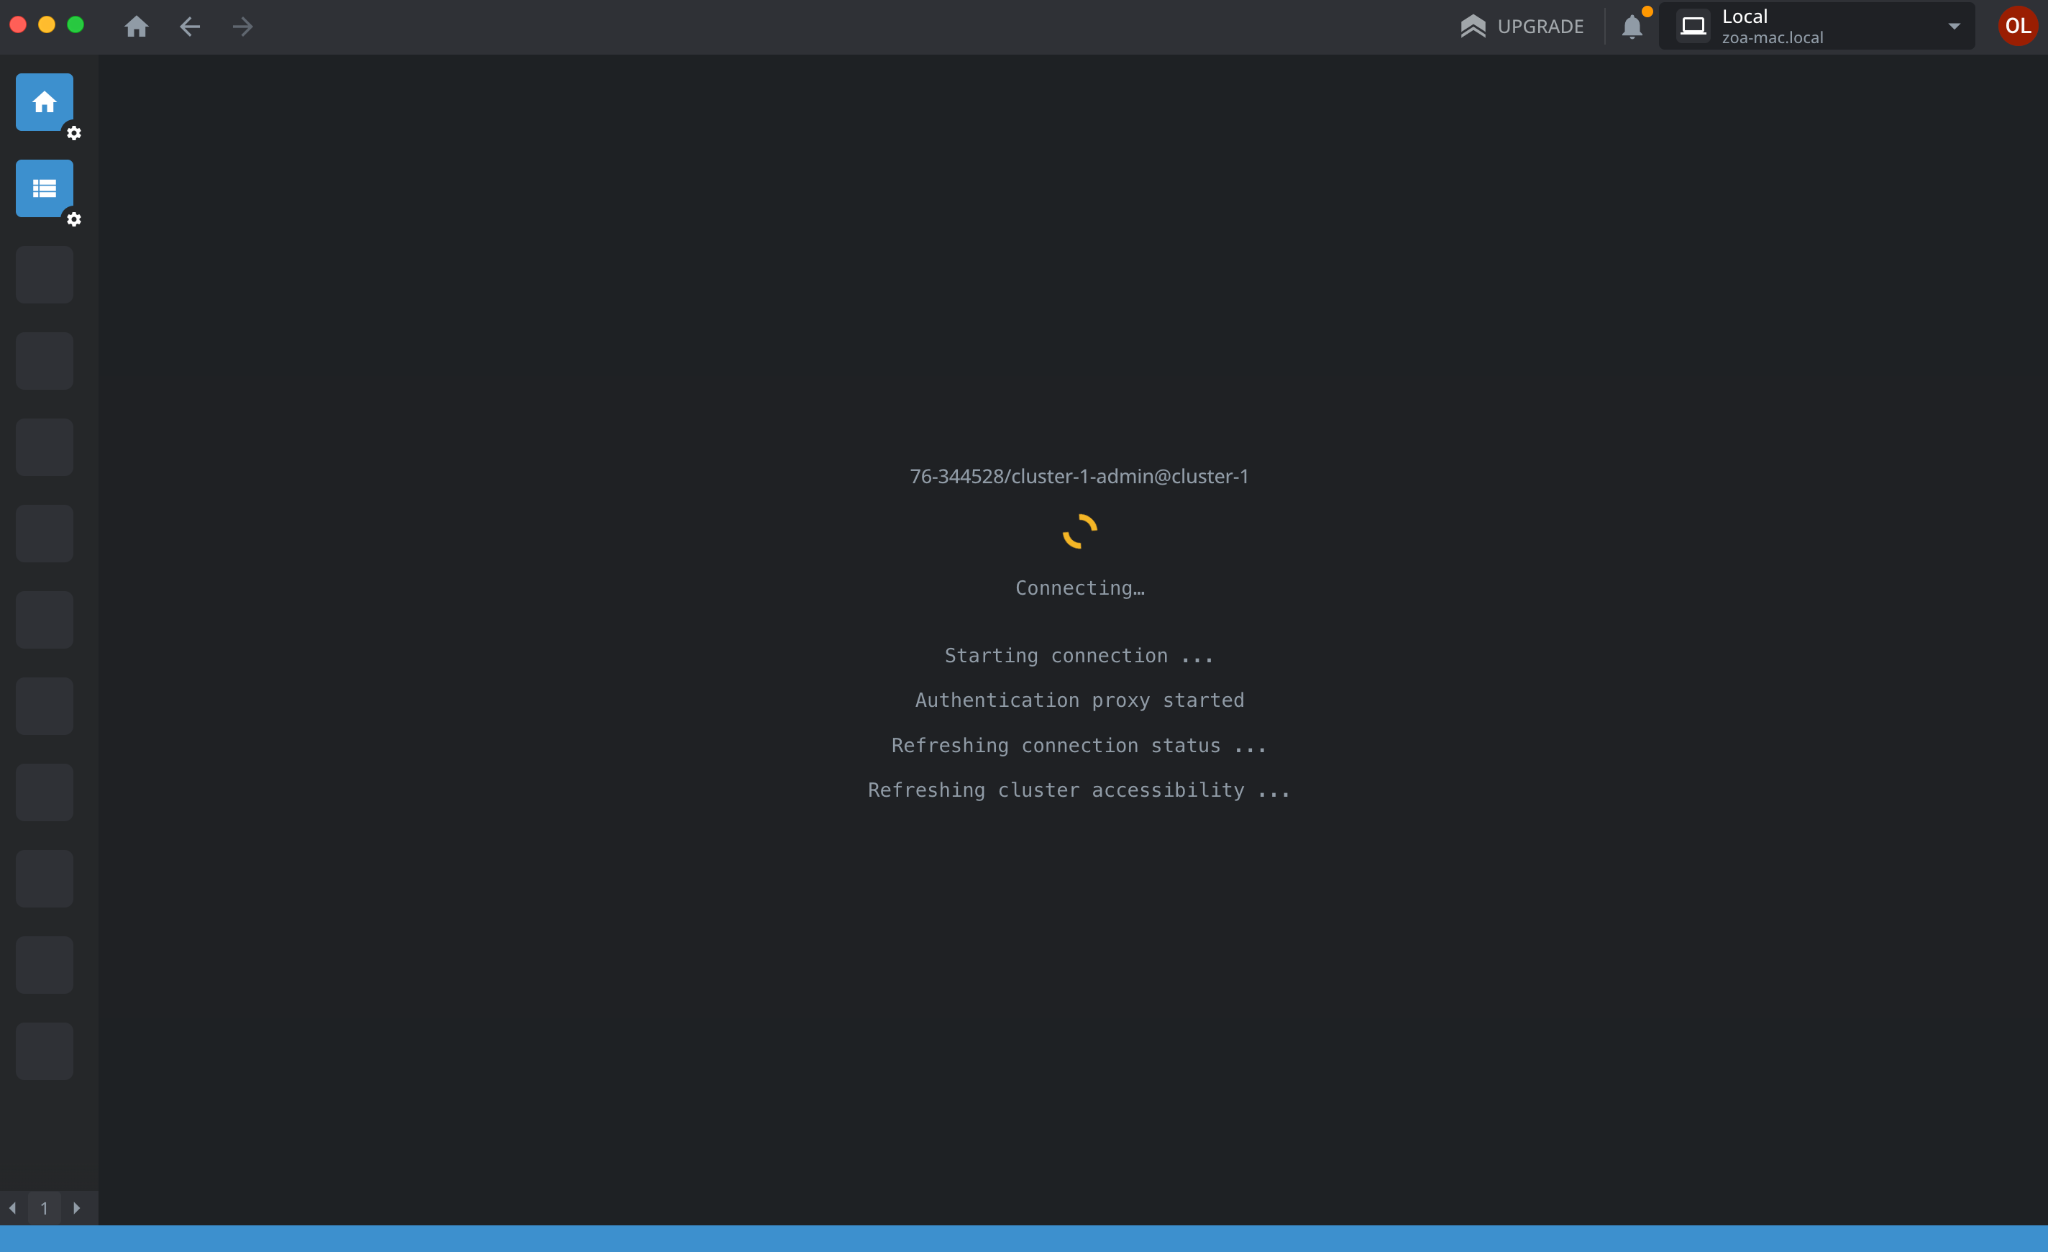
Once Lens is connected to your cluster, it will appear in the cluster list.
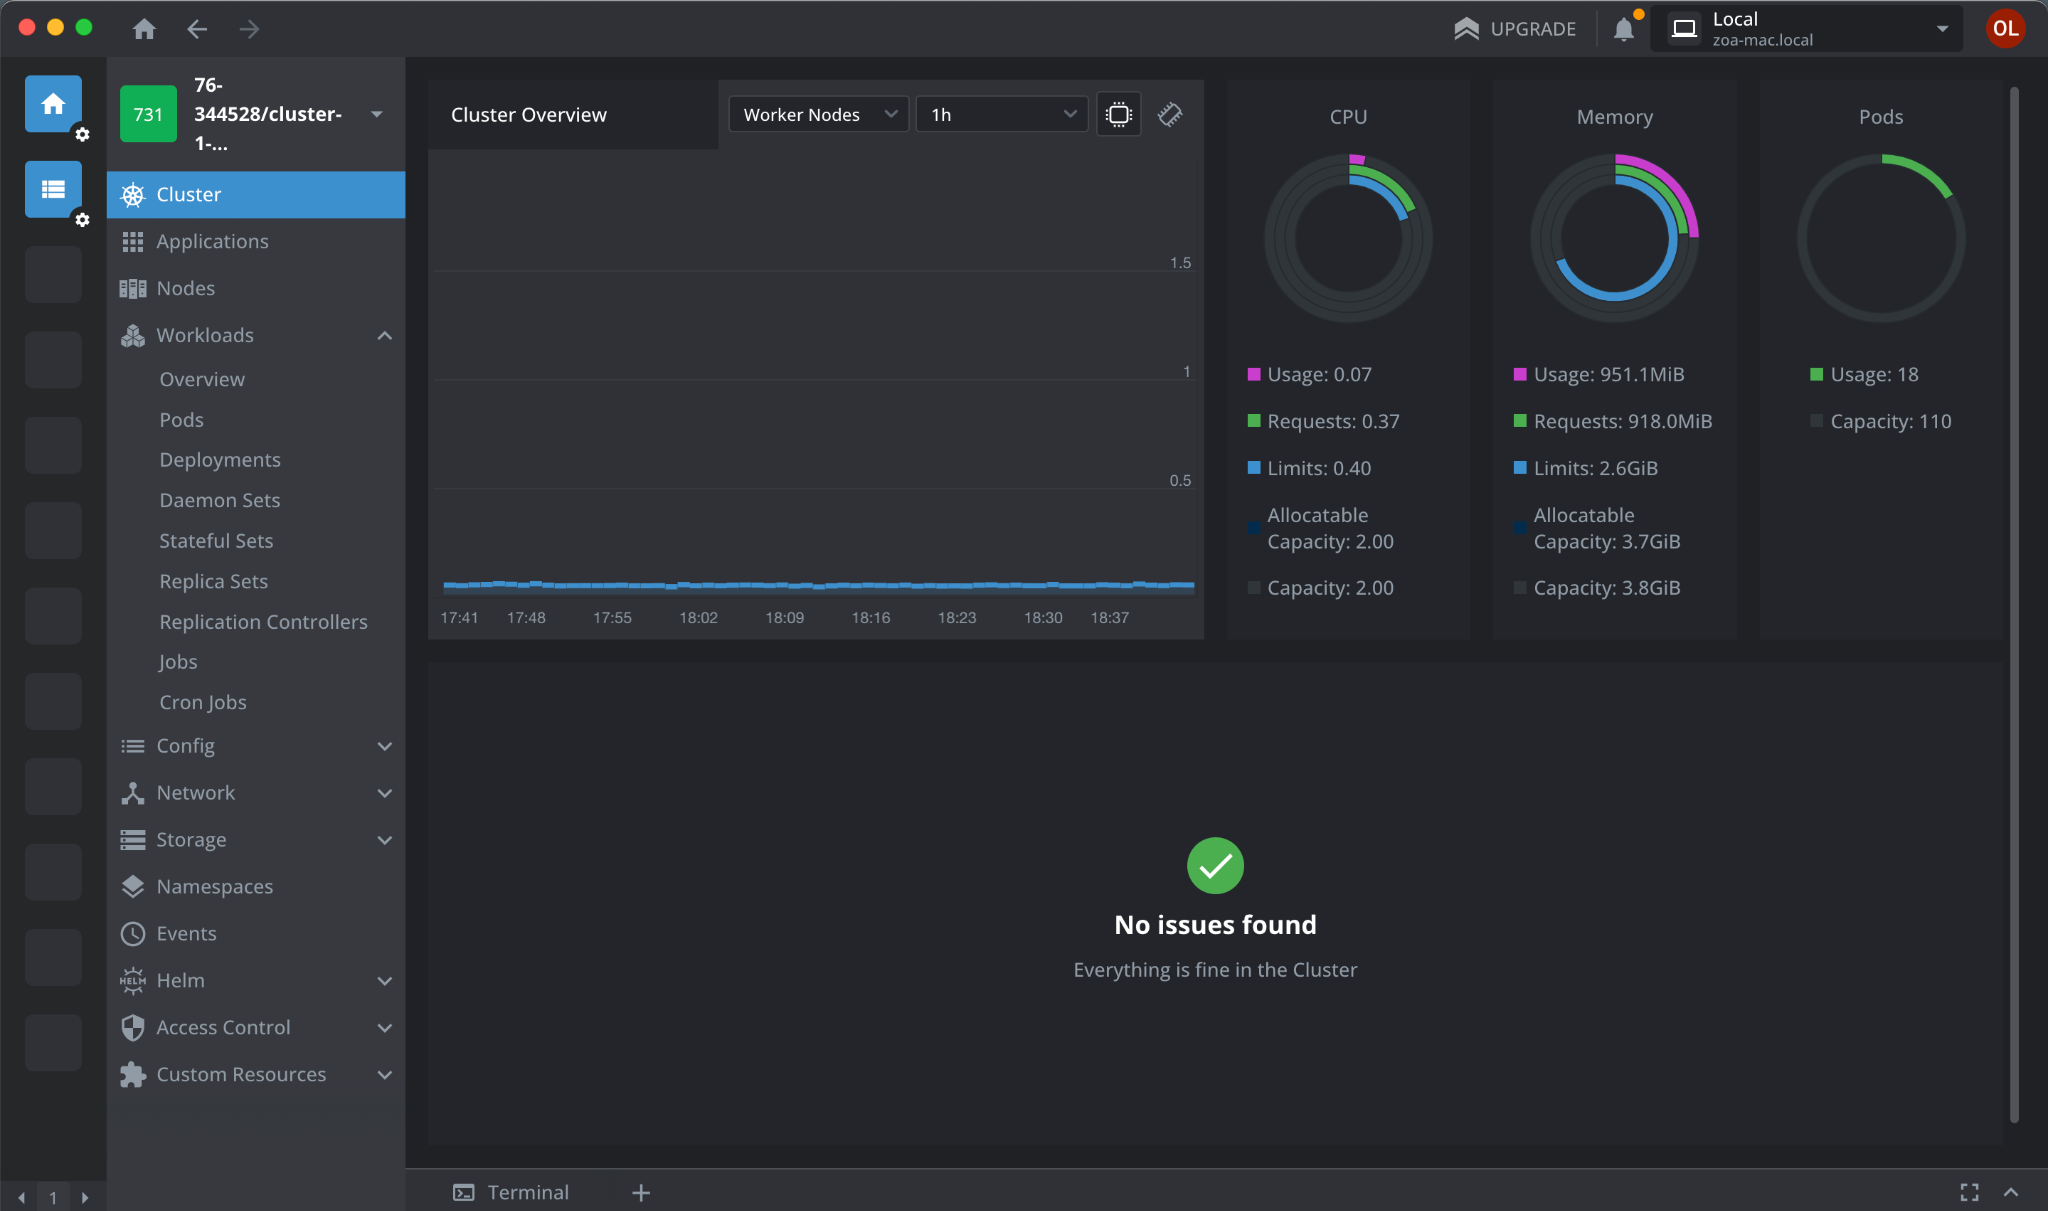
Congratulations! You are now ready to manage your cluster with Lens. Double-click your cluster to see an overview:
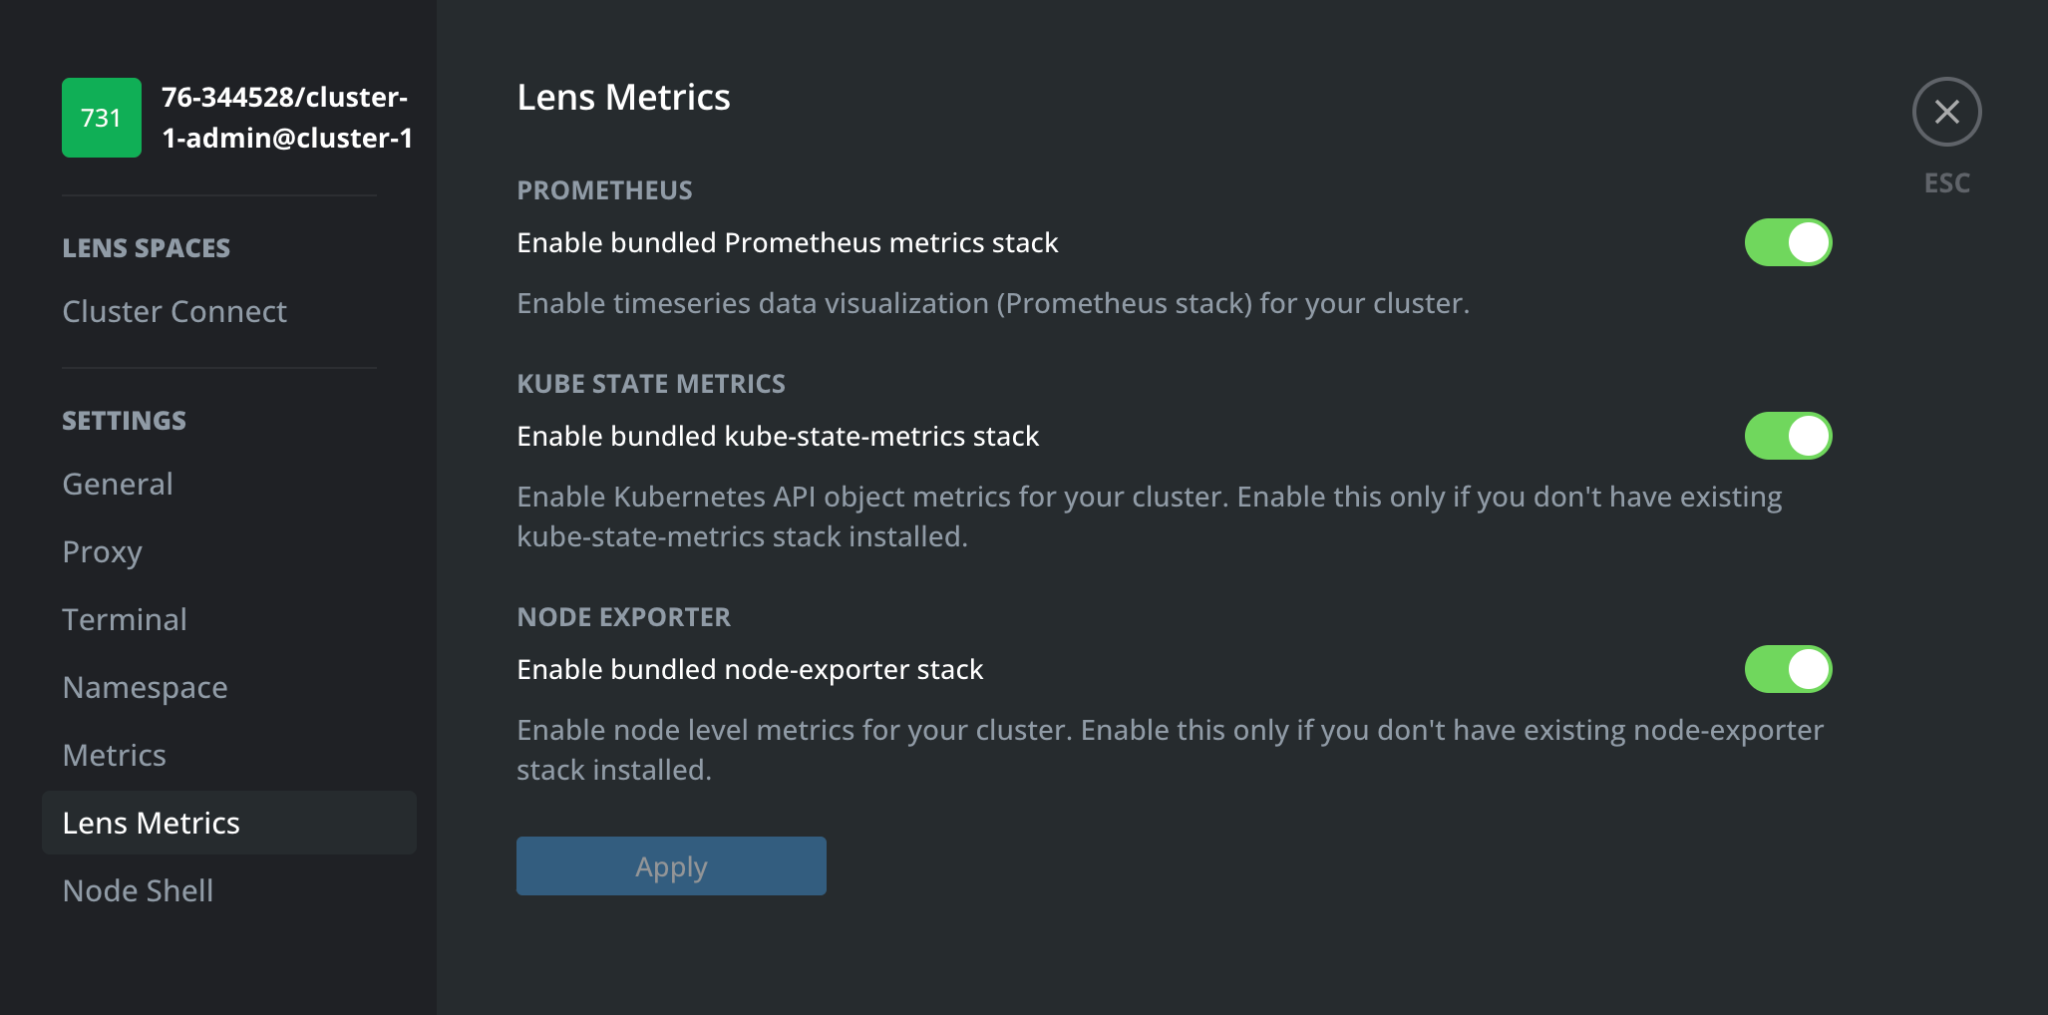
5. Enable Lens Metrics (Optional)
Enabling Lens Metrics helps prepare your cluster for real work. The feature provides metrics exporters that collect data about your cluster’s resource usage.
Open the cluster Settings and select Lens Metrics. Toggle all options on:
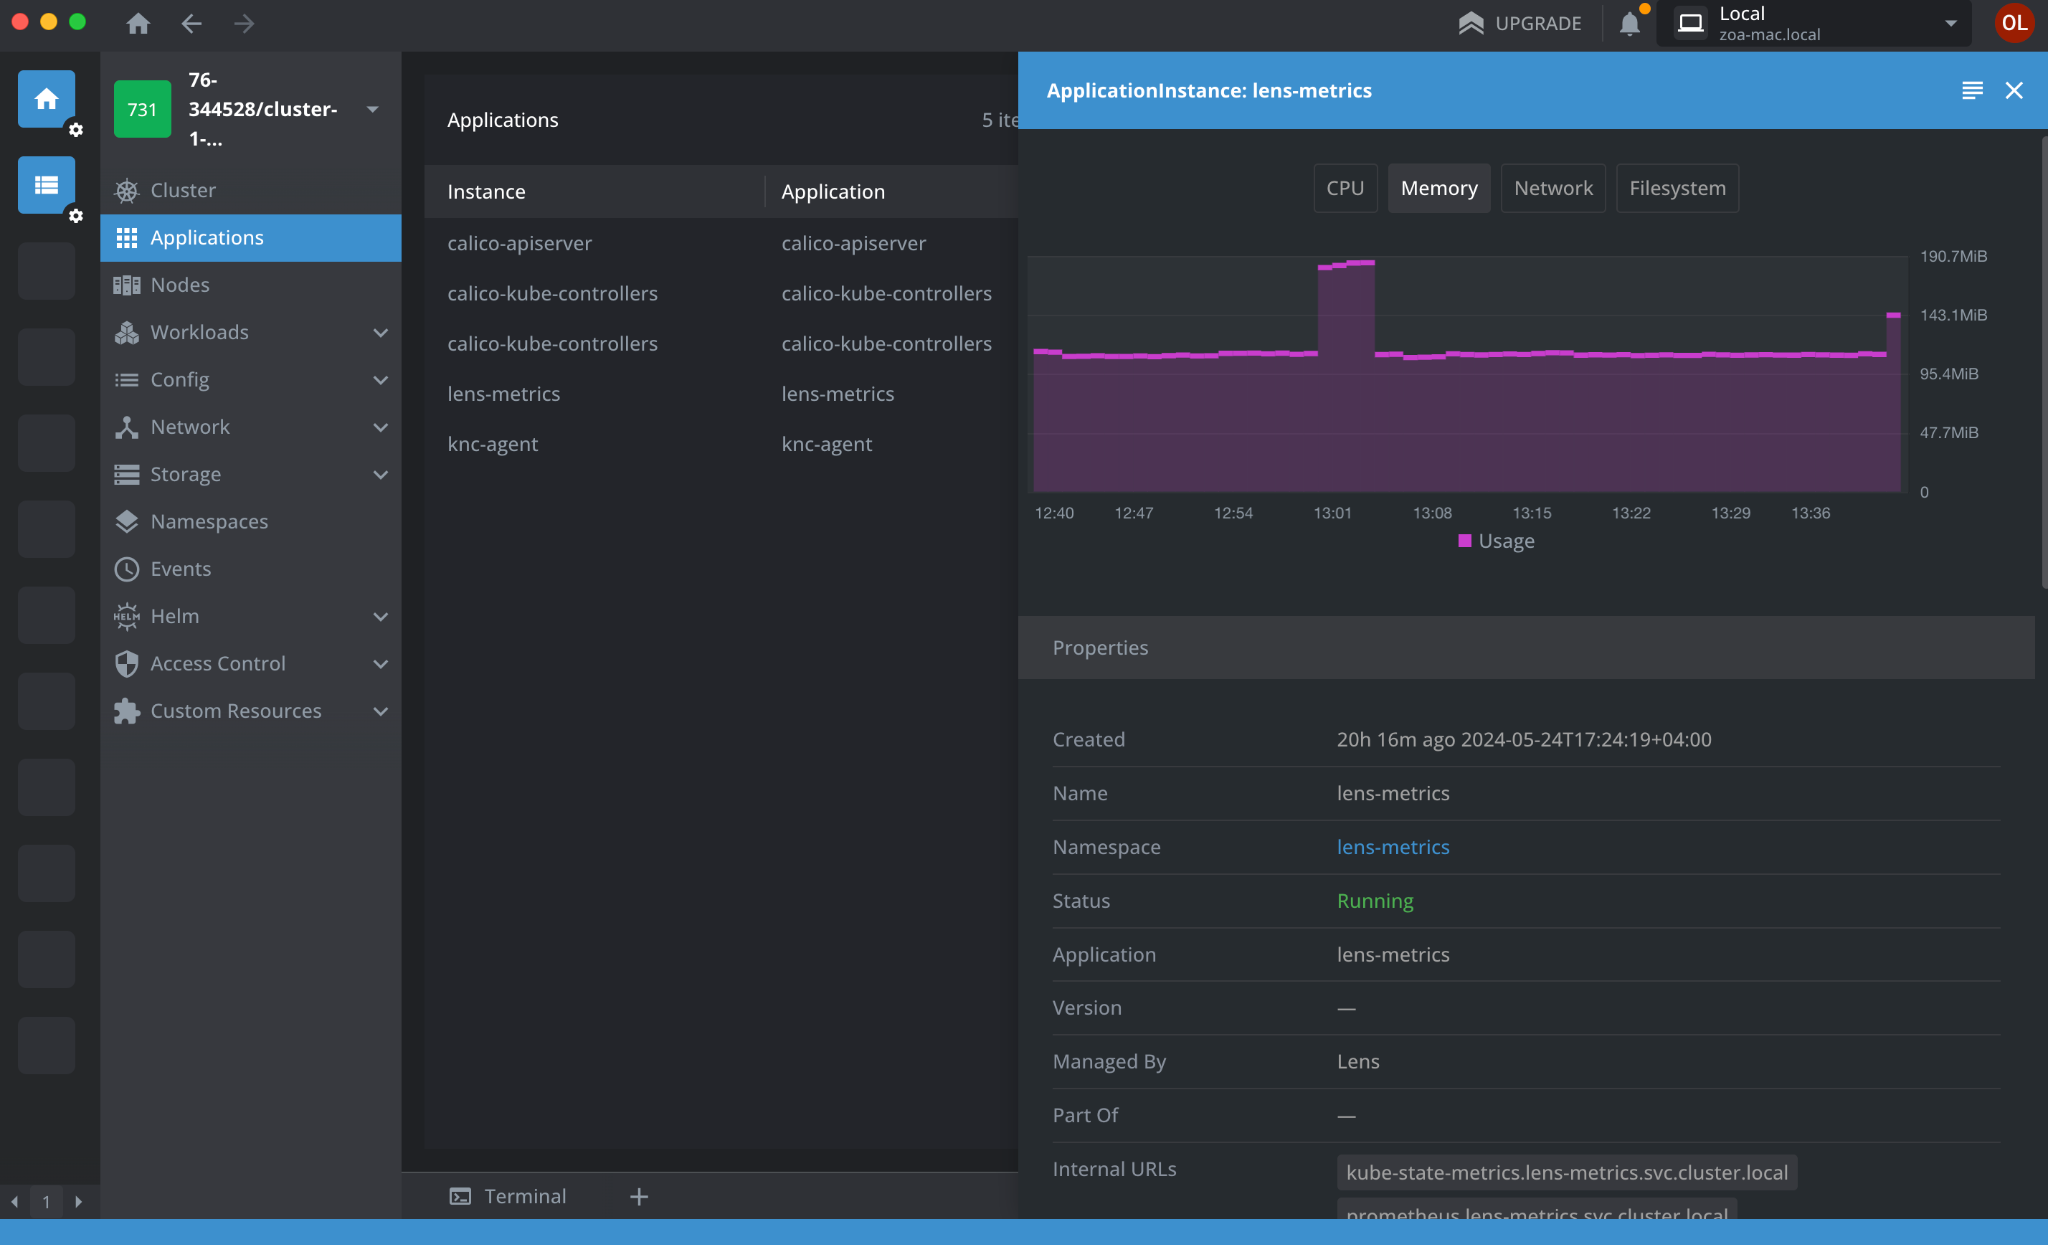
On the cluster overview page, you’ll see that Lens has started visualizing CPU, memory, network, and other resource usage. You can even see how many computing resources each application is using:
Conclusion
Free GUI tools for Kubernetes offer a range of features and functionality for visualizing and managing Kubernetes resources, from intuitive web-based interfaces to multi-cluster support and YAML editors. Some GUIs are general-purpose, like Lens and Kubernetes Dashboard, while others are more specific, like Kubevious.
No matter which of these free Kubernetes GUI you choose, you can use it with Gcore Managed Kubernetes. Gcore Managed Kubernetes offers support for bare metal and virtual machine worker nodes, free cluster management with a 99.9% SLA, and the same pricing for worker nodes as for VMs and Bare Metal instances.
Tidak ada komentar:
Posting Komentar