k8s as multi-cluster (kubeadm) on centos7 for Production
Hai semuanya, pada kempatan kali ini kita akan membahas cara install kubernetes di Production Environment menggunakan OS Centos 7
![]()
Untuk multi cluster, 1 master dan 2 worker Adapun langkah-langkahnya sebagai berikut:
- Setup machine
- Install Docker
- Allow/Open port by firewall used by kubernetes
- Disable swap
- Install
Kubeadm,kubelet, dankubectl - Initial Cluster
- Add/Join Cluster to master
- Simple create deployment, Expose service, and Set replication
Setup machine
Untuk machine yang kita akan gunakan, dengan specifikasi seperti berikut:
Master-Node:
    - NodeName: 'k8s-master'
      CPU: '2 Cores'
      RAM: '4 GB'
      Storage: '20 GB'
      Network:
        - IP: 'Brige (192.168.100.251)'
        - hostname: 'k8s-master.example.com'
Worker-Nodes:
    - NodeName: 'k8s-worker1'
      CPU: '2 Cores'
      RAM: '2 GB'
      Storage: '20 GB'
      Network:
        - IP: 'Brige (192.168.100.252)'
        - hostname: 'k8s-worker1.example.com'
    - NodeName: 'k8s-worker3'
      CPU: '2 Cores'
      RAM: '2 GB'
      Storage: '20 GB'
      Network:
        - IP: 'Brige (192.168.100.253)'
        - hostname: 'k8s-worker2.example.com'
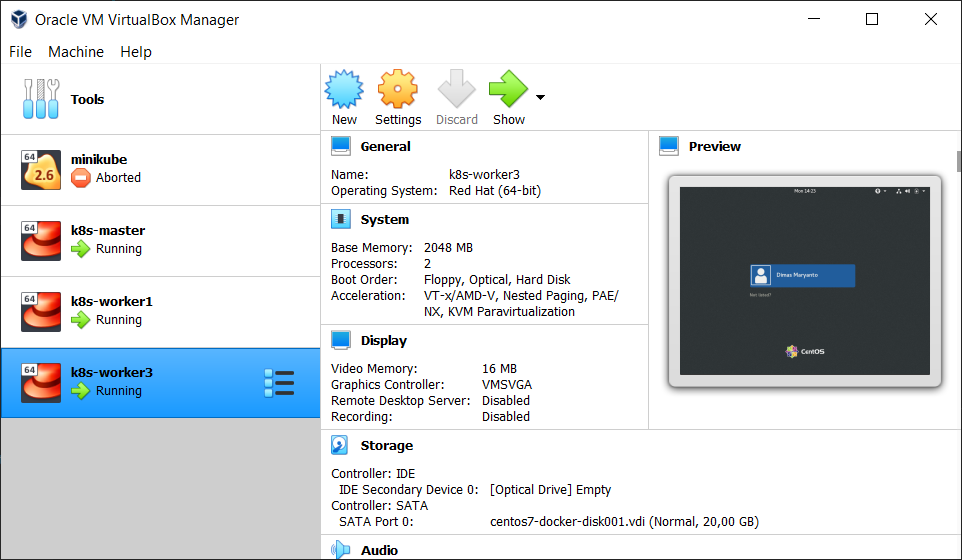
Berikut adalah configurasi Virtualbox yang saya gunakan:
Unqiue hostname required
Verify the MAC address and product_uuid are unique for every node, Untuk set hostname, kita bisa menggunakan perintah berikut
hostnamectl set-hostname <new-hostname>Seperti berikut, hasilnya:
## login ke 192.168.100.251
ssh root@192.168.100.251

[root@k8s-master ~]# hostnamectl set-hostname k8s-master.example.com
[root@k8s-master ~]# hostnamectl
   Static hostname: k8s-master.example.com
         Icon name: computer-vm
           Chassis: vm
        Machine ID: 01f05947a75e624abd665bfb2f1d4cd3
           Boot ID: cd1f007bd4de4424bcb6c63755768c79
    Virtualization: kvm
  Operating System: CentOS Linux 7 (Core)
       CPE OS Name: cpe:/o:centos:centos:7
            Kernel: Linux 3.10.0-1160.24.1.el7.x86_64
      Architecture: x86-64

# restart server
[root@k8s-master ~]# reboot

## login ke 192.168.100.252
ssh root@192.168.100.252

[root@k8s-master ~]# hostnamectl set-hostname k8s-worker1.example.com
[root@k8s-worker1 ~]# hostnamectl
   Static hostname: k8s-worker1.example.com
         Icon name: computer-vm
           Chassis: vm
        Machine ID: 01f05947a75e624abd665bfb2f1d4cd3
           Boot ID: dc8b540fc314400694f9cf0daa463ead
    Virtualization: kvm
  Operating System: CentOS Linux 7 (Core)
       CPE OS Name: cpe:/o:centos:centos:7
            Kernel: Linux 3.10.0-1160.24.1.el7.x86_64
      Architecture: x86-64

# restart server
[root@k8s-master ~]# reboot

## login ke 192.168.100.252
ssh root@192.168.100.252

[root@k8s-master ~]# hostnamectl set-hostname k8s-worker2.example.com
[root@k8s-master ~]# hostnamectl
   Static hostname: k8s-worker2.example.com
         Icon name: computer-vm
           Chassis: vm
        Machine ID: 01f05947a75e624abd665bfb2f1d4cd3
           Boot ID: 155411d9a5724e48b48b29a4cf77bd77
    Virtualization: kvm
  Operating System: CentOS Linux 7 (Core)
       CPE OS Name: cpe:/o:centos:centos:7
            Kernel: Linux 3.10.0-1160.24.1.el7.x86_64
      Architecture: x86-64

# restart server
[root@k8s-master ~]# reboot
Install Docker
Allow firewall access port/tcp
Untuk node master, kita perlu buka port seperti berikut
firewall-cmd --zone=public --add-port=6443/tcp --permanent
firewall-cmd --zone=public --add-port=2379-2380/tcp --permanent
firewall-cmd --zone=public --add-port=10250/tcp --permanent
firewall-cmd --zone=public --add-port=10251/tcp --permanent
firewall-cmd --zone=public --add-port=10252/tcp --permanent
firewall-cmd --zone=public --add-port=30000-32767/tcp --permanent

## restart firewall
firewall-cmd --reload
Sedangkan untuk node worker, kita perlu buka port seperti berikut:
firewall-cmd --zone=public --add-port=10250/tcp --permanent
firewall-cmd --zone=public --add-port=30000-32767/tcp --permanent

## restart firewall
firewall-cmd --reload
Disable swap
swapoff -a
untuk disable permanent, edit file /etc/fstab comment baris swap seperti berikut
#
# /etc/fstab
# Created by anaconda on Fri Apr 23 14:34:06 2021
#
# Accessible filesystems, by reference, are maintained under '/dev/disk'
# See man pages fstab(5), findfs(8), mount(8) and/or blkid(8) for more info
#
/dev/mapper/cl-root                         /                       xfs     defaults        0 0
UUID=9228576f-79ab-47eb-a5b0-7e25186b45d4   /boot                   xfs     defaults        0 0
#/dev/mapper/cl-swap                        swap                    swap    defaults        0 0
Letting iptables see bridged traffic
Make sure that the br_netfilter module is loaded. This can be done by running lsmod | grep br_netfilter. To load it explicitly call sudo modprobe br_netfilter.
As a requirement for your Linux Node’s iptables to correctly see bridged traffic, you should ensure net.bridge.bridge-nf-call-iptables is set to 1 in your sysctl config, e.g.
cat <<EOF | sudo tee /etc/modules-load.d/k8s.conf
br_netfilter
EOF

cat <<EOF | sudo tee /etc/sysctl.d/k8s.conf
net.bridge.bridge-nf-call-ip6tables = 1
net.bridge.bridge-nf-call-iptables = 1
EOF
sudo sysctl --system
Installing Runtime
Karena kita pake Docker, kita perlu setting Docker Daemon menggunakan cgroupdriver=systemd dengan membuat file daemon.json di folder /etc/docker/ seperti berikut
sudo mkdir /etc/docker
cat <<EOF | sudo tee /etc/docker/daemon.json
{
  "exec-opts": ["native.cgroupdriver=systemd"],
  "log-driver": "json-file",
  "log-opts": {
    "max-size": "100m"
  },
  "storage-driver": "overlay2"
}
EOF
Setelah itu restart docker daemonnya dengan perintah seperti berikut
systemctl daemon-reload && \
systemctl enable --now docker && \
systemctl restart docker
Sekarang kita check pada docker info:
[root@k8s-master ~]# docker info
Client:
 Context:    default
 Debug Mode: false
 Plugins:
  app: Docker App (Docker Inc., v0.9.1-beta3)
  buildx: Build with BuildKit (Docker Inc., v0.5.1-docker)
  scan: Docker Scan (Docker Inc.)

Server:
 Containers: 0
  Running: 0
  Paused: 0
  Stopped: 0
 Images: 0
 Server Version: 20.10.6
 Storage Driver: overlay2
  Backing Filesystem: xfs
  Supports d_type: true
  Native Overlay Diff: true
  userxattr: false
 Logging Driver: json-file
 Cgroup Driver: systemd
 Cgroup Version: 1
 Plugins:
  Volume: local
  Network: bridge host ipvlan macvlan null overlay
  Log: awslogs fluentd gcplogs gelf journald json-file local logentries splunk syslog
 Swarm: inactive
 Runtimes: io.containerd.runc.v2 io.containerd.runtime.v1.linux runc
 Default Runtime: runc
 Init Binary: docker-init
 containerd version: 05f951a3781f4f2c1911b05e61c160e9c30eaa8e
 runc version: 12644e614e25b05da6fd08a38ffa0cfe1903fdec
 init version: de40ad0
 Security Options:
  seccomp
   Profile: default
 Kernel Version: 3.10.0-1160.24.1.el7.x86_64
 Operating System: CentOS Linux 7 (Core)
 OSType: linux
 Architecture: x86_64
 CPUs: 2
 Total Memory: 1.952GiB
 Name: k8s-worker2.example.com
 ID: IOJP:TW2J:Y3QI:V3SB:IPX4:R4IN:IFSE:CP7M:U3BM:MWA4:Z2HN:2I4W
 Docker Root Dir: /var/lib/docker
 Debug Mode: false
 Registry: https://index.docker.io/v1/
 Labels:
 Experimental: false
 Insecure Registries:
  127.0.0.0/8
 Live Restore Enabled: false
Jika output Cgroup Driver: systemd, Cgroup Version: 1 berarti configurasi sudah betul. Tahap selajutnya adalah install Kubernetes CLI
Install Kubernet CLI
You will install these packages on all of your machines:
kubeadm: the command to bootstrap the cluster.kubelet: the component that runs on all of the machines in your cluster and does things like starting pods and containers.kubectl: the command line util to talk to your cluster.
Karena kita menggunakan Centos 7, kita bisa menggunakan repository seperti berikut:
cat <<EOF | sudo tee /etc/yum.repos.d/kubernetes.repo
[kubernetes]
name=Kubernetes
baseurl=https://packages.cloud.google.com/yum/repos/kubernetes-el7-\$basearch
enabled=1
gpgcheck=1
repo_gpgcheck=1
gpgkey=https://packages.cloud.google.com/yum/doc/yum-key.gpg https://packages.cloud.google.com/yum/doc/rpm-package-key.gpg
exclude=kubelet kubeadm kubectl
EOF

# Set SELinux in permissive mode (effectively disabling it)
sudo setenforce 0
sudo sed -i 's/^SELINUX=enforcing$/SELINUX=permissive/' /etc/selinux/config

sudo yum install -y kubelet kubeadm kubectl --disableexcludes=kubernetes

sudo systemctl enable --now kubelet
Initializing your control-plane node
The control-plane node is the machine where the control plane components run, including etcd (the cluster database) and the API Server (which the kubectl command line tool communicates with).
Pertama kita login ke host yang mau di jadikan control panel, sebagai contoh k8s-master.example.com kemudian kita jalankan perintah kubeadm init seperti berikut:
# login ke 192.168.100.251
ssh root@192.168.100.251

kubeadm init \
--apiserver-advertise-address=192.168.100.251 \
--pod-network-cidr=10.244.0.0/16
Jika di jalankan maka hasilnya seperti berikut:
[root@k8s-master ~]# kubeadm init \
> --apiserver-advertise-address=192.168.100.251 \
> --pod-network-cidr=10.244.0.0/16
[init] Using Kubernetes version: v1.21.0
[preflight] Running pre-flight checks
        [WARNING Firewalld]: firewalld is active, please ensure ports [6443 10250] are open or your cluster may not function correctly
[preflight] Pulling images required for setting up a Kubernetes cluster
[preflight] This might take a minute or two, depending on the speed of your internet connection
[preflight] You can also perform this action in beforehand using 'kubeadm config images pull'
[certs] Using certificateDir folder "/etc/kubernetes/pki"
[certs] Generating "ca" certificate and key
[certs] Generating "apiserver" certificate and key
[certs] apiserver serving cert is signed for DNS names [k8s-master.example.com kubernetes kubernetes.default kubernetes.default.svc kubernetes.default.svc.cluster.local] and IPs [10.96.0.1 192.168.100.251]
[certs] Generating "apiserver-kubelet-client" certificate and key
[certs] Generating "front-proxy-ca" certificate and key
[certs] Generating "front-proxy-client" certificate and key
[certs] Generating "etcd/ca" certificate and key
[certs] Generating "etcd/server" certificate and key
[certs] etcd/server serving cert is signed for DNS names [k8s-master.example.com localhost] and IPs [192.168.100.251 127.0.0.1 ::1]
[certs] Generating "etcd/peer" certificate and key
[certs] etcd/peer serving cert is signed for DNS names [k8s-master.example.com localhost] and IPs [192.168.100.251 127.0.0.1 ::1]
[certs] Generating "etcd/healthcheck-client" certificate and key
[certs] Generating "apiserver-etcd-client" certificate and key
[certs] Generating "sa" key and public key
[kubeconfig] Using kubeconfig folder "/etc/kubernetes"
[kubeconfig] Writing "admin.conf" kubeconfig file
[kubeconfig] Writing "kubelet.conf" kubeconfig file
[kubeconfig] Writing "controller-manager.conf" kubeconfig file
[kubeconfig] Writing "scheduler.conf" kubeconfig file
[kubelet-start] Writing kubelet environment file with flags to file "/var/lib/kubelet/kubeadm-flags.env"
[kubelet-start] Writing kubelet configuration to file "/var/lib/kubelet/config.yaml"
[kubelet-start] Starting the kubelet
[control-plane] Using manifest folder "/etc/kubernetes/manifests"
[control-plane] Creating static Pod manifest for "kube-apiserver"
[control-plane] Creating static Pod manifest for "kube-controller-manager"
[control-plane] Creating static Pod manifest for "kube-scheduler"
[etcd] Creating static Pod manifest for local etcd in "/etc/kubernetes/manifests"
[wait-control-plane] Waiting for the kubelet to boot up the control plane as static Pods from directory "/etc/kubernetes/manifests". This can take up to 4m0s
[kubelet-check] Initial timeout of 40s passed.
[apiclient] All control plane components are healthy after 62.504271 seconds
[upload-config] Storing the configuration used in ConfigMap "kubeadm-config" in the "kube-system" Namespace
[kubelet] Creating a ConfigMap "kubelet-config-1.21" in namespace kube-system with the configuration for the kubelets in the cluster
[upload-certs] Skipping phase. Please see --upload-certs
[mark-control-plane] Marking the node k8s-master.example.com as control-plane by adding the labels: [node-role.kubernetes.io/master(deprecated) node-role.kubernetes.io/control-plane node.kubernetes.io/exclude-from-external-load-balancers]
[mark-control-plane] Marking the node k8s-master.example.com as control-plane by adding the taints [node-role.kubernetes.io/master:NoSchedule]
[bootstrap-token] Using token: nctj2h.s42tcwnpe5e6atyk
[bootstrap-token] Configuring bootstrap tokens, cluster-info ConfigMap, RBAC Roles
[bootstrap-token] configured RBAC rules to allow Node Bootstrap tokens to get nodes
[bootstrap-token] configured RBAC rules to allow Node Bootstrap tokens to post CSRs in order for nodes to get long term certificate credentials
[bootstrap-token] configured RBAC rules to allow the csrapprover controller automatically approve CSRs from a Node Bootstrap Token
[bootstrap-token] configured RBAC rules to allow certificate rotation for all node client certificates in the cluster
[bootstrap-token] Creating the "cluster-info" ConfigMap in the "kube-public" namespace
[kubelet-finalize] Updating "/etc/kubernetes/kubelet.conf" to point to a rotatable kubelet client certificate and key
[addons] Applied essential addon: CoreDNS
[addons] Applied essential addon: kube-proxy

Your Kubernetes control-plane has initialized successfully!

To start using your cluster, you need to run the following as a regular user:

  mkdir -p $HOME/.kube
  sudo cp -i /etc/kubernetes/admin.conf $HOME/.kube/config
  sudo chown $(id -u):$(id -g) $HOME/.kube/config

Alternatively, if you are the root user, you can run:

  export KUBECONFIG=/etc/kubernetes/admin.conf

You should now deploy a pod network to the cluster.
Run "kubectl apply -f [podnetwork].yaml" with one of the options listed at:
  https://kubernetes.io/docs/concepts/cluster-administration/addons/

Then you can join any number of worker nodes by running the following on each as root:

kubeadm join 192.168.100.251:6443 --token nctj2h.s42tcwnpe5e6atyk \
        --discovery-token-ca-cert-hash sha256:b3d23f88e8f85b31300cf00cfe604d3daf9666cd20436954107cac8e9455b46e
Setelah itu, simpanlan tokenya dari log diatas. karena kedepanya kita akan join cluster master tersebut untuk node worker1 dan worker2
Kemudian kita jalankan perintah berikut, supaya profile kubernetes di set
mkdir -p $HOME/.kube
sudo cp -i /etc/kubernetes/admin.conf $HOME/.kube/config
sudo chown $(id -u):$(id -g) $HOME/.kube/config
Test Pod, Service, and Node Running
[root@k8s-master ~]# kubectl get nodes
NAME                       STATUS   ROLES                  AGE     VERSION
k8s-master.example.com   Ready    control-plane,master   5m19s   v1.21.0

[root@k8s-master ~]# kubectl get pods --all-namespaces
NAMESPACE     NAME                                               READY   STATUS              RESTARTS   AGE
kube-system   coredns-558bd4d5db-fc5v5                           0/1     ContainerCreating   0          4m59s
kube-system   coredns-558bd4d5db-fsdw4                           0/1     ContainerCreating   0          4m59s
kube-system   etcd-k8s-master.example.com                      1/1     Running             0          5m25s
kube-system   kube-apiserver-k8s-master.example.com            1/1     Running             0          5m25s
kube-system   kube-controller-manager-k8s-master.example.com   1/1     Running             0          5m25s
kube-system   kube-proxy-r9hw9                                   1/1     Running             0          4m59s
kube-system   kube-scheduler-k8s-master.example.com            1/1     Running             0          5m25s

[root@k8s-master ~]# kubectl get services --all-namespaces
NAMESPACE     NAME         TYPE        CLUSTER-IP   EXTERNAL-IP   PORT(S)                  AGE
default       kubernetes   ClusterIP   10.96.0.1    <none>        443/TCP                  5m41s
kube-system   kube-dns     ClusterIP   10.96.0.10   <none>        53/UDP,53/TCP,9153/TCP   5m40s
[root@k8s-master ~]#
Karena pod kube-system/coredns-558bd4d5db-fc5v5, kube-system/coredns-558bd4d5db-fsdw4 statusnya stuck ContainerCreating kita perlu install Addons Container Network Interface (CNI)
Installing Addons Networking and Network Policy
Untuk network plugin and policy, sebetulnya ada banyak implementasinya. bisa di check disini namun di materi kali ini kita akan menggunakan calico seperti berikut untuk menginstallnya:
kubectl apply -f https://raw.githubusercontent.com/coreos/flannel/master/Documentation/kube-flannel.ymlSetelah itu kita tunggu sampe semua service, config dan lain-lain jalan. dengan menggunakan perintah berikut:
watch kubectl get pods -ASetelah semua jalan pada namespace calico-system, kita check kembali semua podsnya makahasilnya seperti berikut:
[root@k8s-master ~]# kubectl get pods --all-namespaces
NAMESPACE         NAME                                               READY   STATUS    RESTARTS   AGE
kube-system       coredns-558bd4d5db-fc5v5                           1/1     Running   0          13m
kube-system       coredns-558bd4d5db-fsdw4                           1/1     Running   0          13m
kube-system       etcd-k8s-master.example.com                        1/1     Running   0          14m
kube-system       kube-apiserver-k8s-master.example.com              1/1     Running   0          14m
kube-system       kube-controller-manager-k8s-master.example.com     1/1     Running   0          14m
kube-system       kube-proxy-r9hw9                                   1/1     Running   0          13m
kube-system       kube-scheduler-k8s-master.example.com              1/1     Running   0          14m
kube-system       kube-flannel-ds-mpgq2                              1/1     Running   0          46m
Nah sekarang udah gak ada yang statusnya Pending atau stuck di CreatingContainer artinya single cluster kubernetes dengan kubeadm sudah selesai.
Joining Worker nodes
Untuk multiple cluster, kita bisa join ke master / control panel dengan perintah yang tadi yaitu
kubeadm join 192.168.100.251:6443 --token nctj2h.s42tcwnpe5e6atyk \
        --discovery-token-ca-cert-hash sha256:b3d23f88e8f85b31300cf00cfe604d3daf9666cd20436954107cac8e9455b46e
Jalankan setiap worker, yaitu dalam kasus ini k8s-worker1.example.com dan k8s-worker2.example.com. Jika dijalankan maka hasilnya seperti berikut:
[root@k8s-worker1 ~]# kubeadm join 192.168.100.251:6443 --token nctj2h.s42tcwnpe5e6atyk \
>         --discovery-token-ca-cert-hash sha256:b3d23f88e8f85b31300cf00cfe604d3daf9666cd20436954107cac8e9455b46e
[preflight] Running pre-flight checks
[preflight] Reading configuration from the cluster...
[preflight] FYI: You can look at this config file with 'kubectl -n kube-system get cm kubeadm-config -o yaml'
[kubelet-start] Writing kubelet configuration to file "/var/lib/kubelet/config.yaml"
[kubelet-start] Writing kubelet environment file with flags to file "/var/lib/kubelet/kubeadm-flags.env"
[kubelet-start] Starting the kubelet
[kubelet-start] Waiting for the kubelet to perform the TLS Bootstrap...

This node has joined the cluster:
* Certificate signing request was sent to apiserver and a response was received.
* The Kubelet was informed of the new secure connection details.

Run 'kubectl get nodes' on the control-plane to see this node join the cluster.
Sekarang kita bisa check dari control panel atau master. node apa saja yang telah Ready menggunakan perintah berikut:
[root@k8s-master ~]# kubectl get nodes -o wideJika dijalankan berikut hasilnya:
NAME                        STATUS     ROLES                  AGE     VERSION   INTERNAL-IP       EXTERNAL-IP   OS-IMAGE                KERNEL-VERSION                CONTAINER-RUNTIME
k8s-master.example.com    Ready      control-plane,master   24m     v1.21.0   192.168.100.251   <none>        CentOS Linux 7 (Core)   3.10.0-1160.24.1.el7.x86_64   docker://20.10.6
k8s-worker1.example.com   Ready      <none>                 5m51s   v1.21.0   192.168.100.252   <none>        CentOS Linux 7 (Core)   3.10.0-1160.24.1.el7.x86_64   docker://20.10.6
k8s-worker2.example.com   Ready      <none>                 9s      v1.21.0   192.168.100.253   <none>        CentOS Linux 7 (Core)   3.10.0-1160.24.1.el7.x86_64   docker://20.10.6
Simple create deployment, Expose service, and Set replication
Sekarang kita coba untuk membuat deployment, berikut adalah perintahnya:
kubectl create deployment web-server --image=nginx --port=80 && \
kubectl expose deployment/web-server --port=80 --type="NodePort"
Sekarang kita check servicenya, dengan perintah seperti berikut:
[root@k8s-master ~]# kubectl get pods -o wide
NAME                          READY   STATUS    RESTARTS   AGE   IP               NODE                        NOMINATED NODE   READINESS GATES
web-server-6547ddf6c9-7wrr9   1/1     Running   0          33s   192.168.189.65   k8s-worker1.example.com  <none>           <none>

[root@k8s-master ~]# kubectl get services -o wide
NAME         TYPE        CLUSTER-IP       EXTERNAL-IP   PORT(S)        AGE   SELECTOR
kubernetes   ClusterIP   10.96.0.1        <none>        443/TCP        33m   <none>
web-server   NodePort    10.104.145.106   <none>        80:31735/TCP   51s   app=web-server
[root@k8s-master ~]#
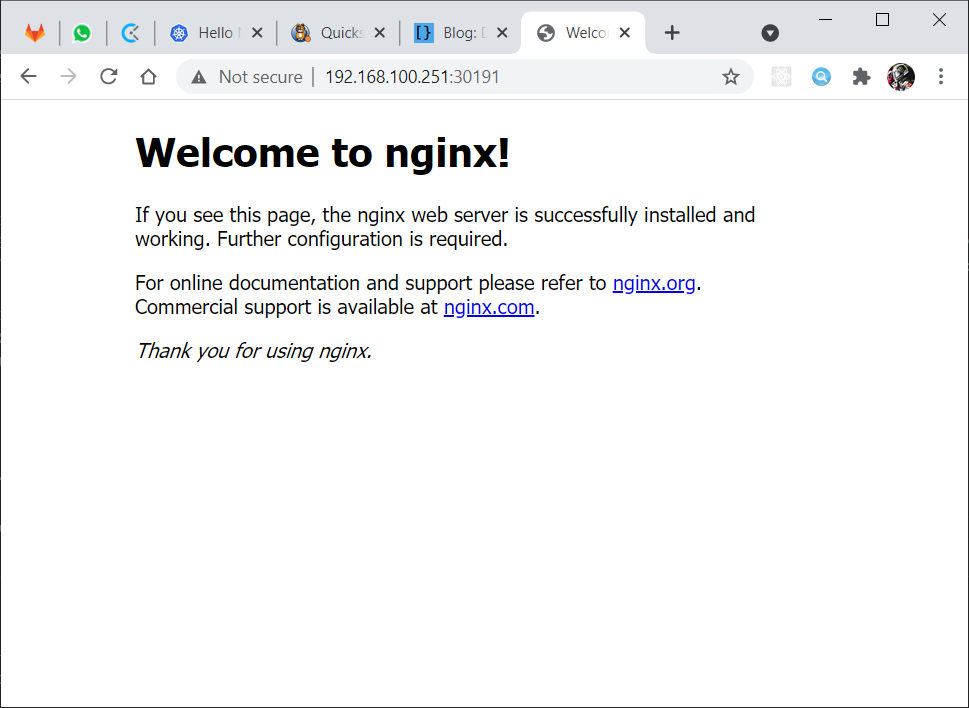
Sekarang kita coba check dari browser, maka hasilnya seperti berikut:
Sekarang kita akan set replicationnya menjadi 3, berikut adalah perintahnya:
kubectl scale deployment/web-server --replicas=4Jika di jalankan, maka hasilnya seperti berikut:
[root@k8s-master ~]# kubectl scale deployment/web-server --replicas=4
deployment.apps/web-server scaled

[root@k8s-master ~]# kubectl get pods -o wide
NAME                          READY   STATUS    RESTARTS   AGE     IP               NODE                        NOMINATED NODE   READINESS GATES
web-server-6547ddf6c9-75djz   1/1     Running   0          39s     192.168.143.2    k8s-worker2.example.com     <none>           <none>
web-server-6547ddf6c9-7wrr9   1/1     Running   0          5m28s   192.168.189.65   k8s-worker1.example.com     <none>           <none>
web-server-6547ddf6c9-g2d2v   1/1     Running   0          39s     192.168.143.1    k8s-worker2.example.com     <none>           <none>
web-server-6547ddf6c9-nl7vd   1/1     Running   0          39s     192.168.189.66   k8s-worker1.example.com     <none>           <none>
Nah jadi dengan multicluster tersebut podnya akan di spread ke node worker lain, dan secara default dengan service tersebut akan menggunakan LoadBalancer roundrobin.
Referensi
- https://kubernetes.io/docs/setup/production-environment/tools/kubeadm/install-kubeadm/
- https://kubernetes.io/docs/setup/production-environment/container-runtimes/#docker
- https://kubernetes.io/docs/setup/production-environment/tools/kubeadm/create-cluster-kubeadm/
- https://docs.projectcalico.org/getting-started/kubernetes/quickstart
Tidak ada komentar:
Posting Komentar