Tutorial: Getting Started with YugabyteDB and Docker
When developing modern applications, it is important to maintain dev/prod parity (that is, keep development, staging, and production as similar as possible). This should also extend to the local development environment. However, containerization makes it easy to achieve consistency across all environments, even with more complicated components such as databases.
YugabyteDB is a cloud-native, distributed SQL database that is also PostgreSQL compatible. This interoperability makes it possible for developers to leverage existing tools, languages, and frameworks to quickly become productive with a modern distributed RDBMS.
In this blog post, we’ll show you how to run YugabyteDB on your local machine with the convenience of a Docker container and not require manual installation. It is useful to have a fully working database running locally to explore YugabyteDB featuoes and for application development.
Download Options
YugabyteDB can be downloaded and installed manually, but for many scenarios, it is easier to use an OCI compliant Docker container on Mac, Linux or the Windows Subsystem for Linux (WSL).
As a convenience, this guide uses podman as a replacement for the Docker CLI. Podman has the distinct advantage of being a daemonless container engine that can run without requiring root privilege escalation. But it is still possible to use the Docker CLI with this guide by replacing the Podman command “podman” with “docker”.
Downloading the YugabyteDB OCI Docker image
To review available YugabyteDB versions, use the “Filter Tags” feature on the DockerHub tags page to find the specific version tag desired. It is also possible to use the DockerHub API directly (if on Linux or Mac):
$ curl -L -s 'https://registry.hub.docker.com/v2/repositories/yugabytedb/yugabyte/tags?page_size=5' | jq '."results"[]["name"]'This command fetches all the images tag metadata and limits the result to the first 5. If you don’t already have jq installed, please refer to the installation documentation.
In most cases, it is desirable to use a specific version of the database and not rely on the latest tag. For example, to download the 2.8.0 release use:
$ podman pull yugabytedb/yugabyte:2.8.0.0-b37YugabyteDB stable releases use an even numbered minor version (e.g. 2.6, 2.8, etc.) Odd numbered minor versions are more experimental. Read more about YugabyeDB Release Versioning.
Running the YugabyteDB container
Once the YugabteDB image is local, run it using this command:
$ podman run -d --name yugabyte-2.8.0 -p7000:7000 -p9000:9000 -p5433:5433 -p9042:9042 yugabytedb/yugabyte:2.8.0.0-b37 bin/yugabyted start --base_dir=/home/yugabyte/yb_data --daemon=falseBelow is a breakdown of the options:
-d
The detach option runs the container as a background process and displays the container ID. This option regains control of the shell since the yugabyted process is long-lived.
–name yugabyte-2.8.0
This option gives the container a user-friendly name for later use. Adding the version to the name makes it easier to keep track of different versions of the database.
-p7000:7000 -p9000:9000 -p5433:5433 -p9042:9042
These options expose internal ports to the host so they can be interacted with from outside the container. We’ll discuss these YugabyteDB significant ports later.
yugabytedb/yugabyte:2.8.0.0-b37
This is the container image and version (tag) to run.
bin/yugabyted start –base_dir=/home/yugabyte/yb_data –daemon=false
This command starts yugabyted, the parent process for YugabyteDB and passes additional options to set the base directory for the YugabyteDB data folder and directs the process to not run in the background (the default behavior which would cause the container to stop).
It is important to note that YugabyteDB is a distributed SQL database and that the image used is only a single node deployment (i.e. a replication factor of 1). This is not typical for a production environment which would usually be RF=3 or even RF=5. Running a multi-node environment locally is possible but beyond the scope of this guide.
Testing the YugabyteDB container
Next, validate that the container process is running:
$ podman psThe output should look like this:

If not, it likely errored due to a port conflict with another process. Review any local running processes and ports, stopping anything that conflicts and try again.
Next, exec a Bash session on the container:
$ podman exec -it yugabyte-2.8.0 bash The default starting directory should be /home/yugabyte. This folder contains the YugabyteDB installation as well as the yb_data directory (from the –base_dir option). This directory contains all the runtime data and logs from the YugabyteDB processes, specifically in three sub directories:
$ ls -ls yb_data/
total 12
4 drwxr-xr-x 2 root root 4096 Nov 17 20:38 conf
4 drwxr-xr-x 4 root root 4096 Nov 17 20:39 data
4 drwxr-xr-x 2 root root 4096 Nov 17 20:30 logs
The conf directory contains the yugabyted.conf file for customizing the behavior of the system via various settings called “GFlags”. This configuration file will be important later to enable YSQL logging.
The data and logs directories respectively contain the database data files and process logs. To view the current Postgres logs, use this command from the yb_data directory:
$ tail -f `cat data/pg_data/current_logfiles | cut -c7-`The Postgres process frequently rotates its log but the current_logfiles file contains the name of the current one. It is also possible to navigate directly to the log file under /home/yugabyte/yb_data/data/yb-data/tserver/logs/.
Alternatively, it is possible to bind mount a volume into the container and map it to a local directory (e.g. -v ~/yb_data:/home/yugabyte/yb_data). This option can be added to the original command to run the container. This option is useful if you want to use native desktop tools to edit or view the config or log files or reuse an existing database across multiple versions of the YugabyteDB container.
Reviewing the YugabyteDB admin UIs
YugabyteDB contains several distinct processes including the YB-Master and YB-TServer. Once started, these processes each have an administrative UI exposed at https://localhost:7000 and https://localhost:9000 respectively.

These views provide a comprehensive overview of the database that was just deployed. Feel free to explore both servers, but now let’s focus on interacting with the database via command line interface.
Using the Yugabyte YSQL command
From the Bash prompt, type ysqlsh:
[root@05a7aef6fd68 yugabyte]# ysqlsh
ysqlsh (11.2-YB-2.8.0.0-b0)
Type "help" for help.

yugabyte=#
The ysqlsh command is similar to the Postgres psql command and most commands will be exactly the same. This CLI will mainly be used to issue DDL statements to the database or experiment with query performance using the explain command.
To quit ysqlsh, type backslash q (e.g. \q).
Note, it is possible to execute the ysqlsh command directly from podman and skip the Bash shell:
$ podman exec -it yugabyte-2.8.0 ysqlsh
ysqlsh (11.2-YB-2.8.0.0-b0)
Type "help" for help.

yugabyte=#
Using the Yugabyte YCQL command
From the container’s Bash prompt, type ycqlsh:
[root@05a7aef6fd68 yugabyte]# ycqlsh
Connected to local cluster at 127.0.0.1:9042.
[ycqlsh 5.0.1 | Cassandra 3.9-SNAPSHOT | CQL spec 3.4.2 | Native
protocol v4]
Use HELP for help.
ycqlsh>
The ycqlsh command is equivalent to—and derived from—cqlsh.
Enable YSQL logging
To enable the YSQL Postgres query logging, edit the yugabyted.conf file (using vi) and add the ysql_log_statement=all GFlag. Editing config files may be unusual for immutable containers, but it is useful for debugging in development.
Go to the /home/yugabyte/yb_data/conf directory and open the yugabyted.conf file, it should look something like this:
{
        "tserver_webserver_port": 9000,
        "master_rpc_port": 7100,
        "universe_uuid": "099c3df0-011b-47c5-83e3-4a1e286986bb",
        "webserver_port": 7200,
        "ysql_enable_auth": false,
        "ycql_port": 9042,
        "data_dir": "/home/yugabyte/yb_data/data",
        "tserver_uuid": "767e00774ade4e9f90728eaf6fb3a13e",
        "use_cassandra_authentication": false,
        "log_dir": "/home/yugabyte/yb_data/logs",
        "polling_interval": "5",
        "listen": "0.0.0.0",
        "callhome": true,
        "master_webserver_port": 7000,
        "master_uuid": "587434752fc74cba85ea27fea81164bd",
        "master_flags": "",
        "node_uuid": "1be46681-4047-4278-b6c4-040ff1f5897c",
        "join": "",
        "ysql_port": 5433,
        "tserver_flags": "",
        "tserver_rpc_port": 9100
}
This configuration file modifies the behavior of YugabyteDB as well as the YB-Master and YB-TServer process individually.
Add the log parameter to the “tsever_flags” as shown:
"tserver_flags": "ysql_log_statement=all"
This parameter accepts none (default), ddl, or all. With the value set to all, the Postgres logs will contain every SQL statement executed by the database. This is particularly helpful when using a higher level database abstraction (e.g. ORM) that generates SQL statements or manages transactional elements in an application.
Once modified, the configuration change won’t take place without exiting and restarting the container.
$ podman restart yugabyte-2.8.0After the restart, execute another Bash command on the image:
$ podman exec -it yugabyte-2.8.0 bashThen tail the logs:
$ tail -f `cat yb_data/data/pg_data/current_logfiles | cut -c7-`Use any program that can connect to the database and execute a few SQL commands, the statements should start showing up in the logs (e.g.):
2021-11-01 17:58:26.591 UTC [50477] LOG: statement: select 1;
How-to: Connect with a data tool
If you have a favorite DB client like DBeaver or DataGrip, you can establish a connection to the database now using the exposed ports (just remember that 5433 is the default for the YSQL / Postgres interface).
Using DBeaver
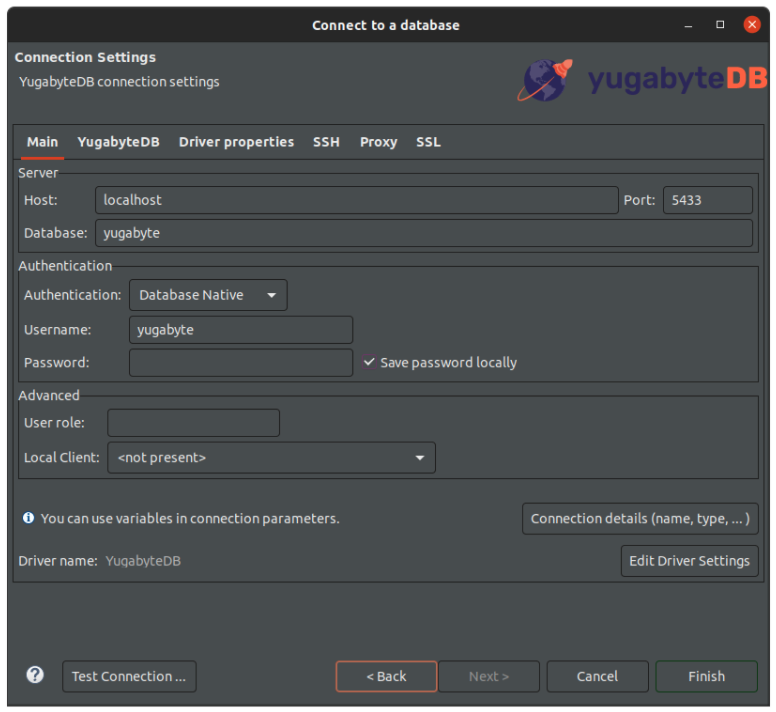
DBeaver (Community Edition) is a free database tool that can be used with Yugabyte YSQL (for YCQL consider using TablePlus). Once DBeaver is installed, select the “New Database Connection” option and in the filter field, type “yuga” and it will filter out the other database drivers.
Select the “YugabyteDB” tile and click Next.

The default settings will set localhost and port 5433 correctly. No other configuration changes are required.

Click “Test Connection…” to validate the connection as configured. A message should appear that displays relevant information about the connection. If it connects successfully, select “Finish”.
In DBeaver, it is advisable to rename the connection to be relevant to the use case (e.g. “yugabyte-ysql-local”).
Using IntelliJ
Both the commercial version of IntelliJ and the stand-alone product DataGrip can connect to YugabyteDB.
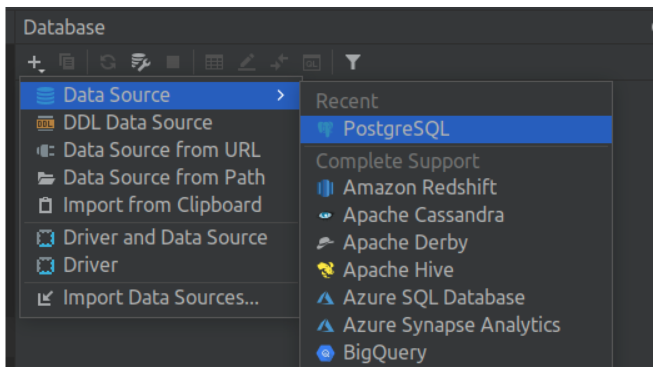
Open the Database tab and select “New” > “Datasource”.

Pick the PostgreSQL driver.

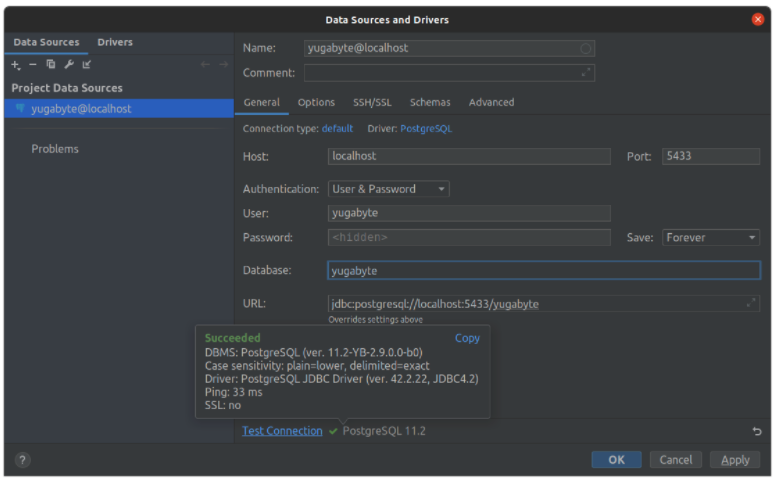
Feel free to name the datasource appropriately to the use case and change the Port to “5433”, User and Database to “yugabyte”. Use the “Test Connection” to validate the configuration and then Okay.
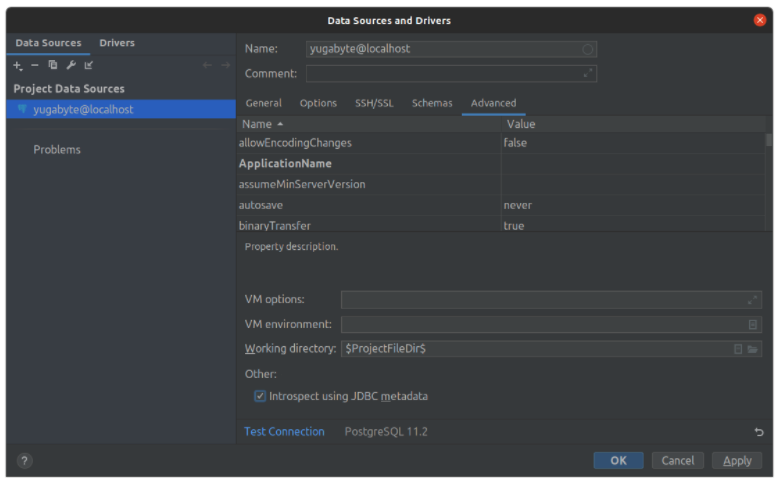
If this error appears:
ERROR: System column with id -3 is not supported yet.
Edit the configuration and go to the Advanced tab. Check the “Other: Introspect with JDBC metadata” option and click Apply and then refresh.

Conclusion
This should be enough information to get started using YugabyteDB locally in a Docker container.
Using YugabyteDB locally can help streamline all phases of the application development process and help ensure dev/prod parity. It is also a great way to experiment with new versions and features as they become available.
Have any questions about working with YugabyteDB? Join the YugabyteDB community Slack channel where you can get them answered—and stay in the know on all things distributed SQL!
Tidak ada komentar:
Posting Komentar