https://upcloud.com/resources/tutorials/get-started-rancher
How to get started with Rancher
If you are looking for advanced high-availability and platform reliability, you are probably interested in clusters. Clusters are a way of combining servers into a single, easy-to-manage, collection of computation power and go often hand in hand with containerization. This can all be a bit much to manage on your own. Luckily, container management on clusters can be greatly simplified using tools such as Rancher.
Rancher is an open-source management panel for multiple Kubernetes clusters in production. It unifies cluster controls between just about any provider under a centralized authentication and access control. Rancher brings all of your Kubernetes clusters to a single, managed Kubernetes Cloud making it easy to get started even for newcomers. In this guide, we’ll show how to install and configure a new Rancher server together with UpCloud drivers and deploy a new cluster.
We’ve launched the UpCloud Managed Kubernetes, a fully managed container orchestration service with all the benefits of a self-maintained system but without any of the headaches! See how quick and easy it is to get started by following our dedicated tutorial.
Deploying a new cloud server
Rancher is used for creating and commanding clusters in the cloud but it itself needs a cloud server to live on. If you haven’t yet got an UpCloud account, start by getting signed up!
Head over to your UpCloud control panel and deploy a new server to host Rancher.
In the server deployment settings, make the following selections.
- Pick the location you want to deploy to. The location closest to you is often the best choice.
- Choose a configuration from the Simple plans and make your own with the Flexible option. For a simple web server, the base level 1xCPU-1GB is more than enough.
- Select your favourite Linux distribution. For this guide, we’ll be using Ubuntu 18.04 but any other will work just fine with a little extra knowledge.
- Include a public SSH key to make logging into your Rancher server simple and easy.
Once all set, click the Deploy button at the bottom of the page.
While your new cloud server is deploying, you should configure a domain name record to point to the public IP of your Rancher server. This is not strictly necessary for test environments but will make the experience far better and allow you to enable HTTPS for added security.
Configuring API access
Now, to allow Rancher to deploy and manage clusters on your UpCloud account, you first need to set up the API permissions. We recommend creating a new workspace member account specifically for API usage with its own username and password for each external service you might use. This allows you to limit API access and specify permissions for increased security.
You can find detailed instructions on how to create API credentials at our beginners guide for UpCloud API.
Once you have a workspace member account for Rancher API access, continue ahead with the next steps in our guide.
Installing pre-requisites
Rancher loves containers and runs in a Docker container itself. To be able to install Rancher, you’ll first need to install a recent version of Docker that is supported by Kubernetes, namely 18.09.2 or newer. Follow the Docker installation instruction below to get going.
The steps for installing Docker are the only parts of this guide that differ depending on your choice of an operating system. If you want to install Docker CE on some other distribution than Ubuntu, you can find instructions for the alternatives at Docker documentation.
Docker CE
Docker can be installed using their handy script, however, the recommended approach is to set up their own repositories. This will make it far easier to install and upgrade the software later.
First, install the following packages to allow apt to use a repository over HTTPS.
sudo apt-get install apt-transport-https ca-certificates curl
gnupg-agent software-properties-common
Next, add Docker’s official GPG key.
curl -fsSL https://download.docker.com/linux/ubuntu/gpg | sudo apt-key add -
Then verify that the key with the fingerprint 9DC8 5822 9FC7 DD38 854A E2D8 8D81 803C 0EBF CD88 can be found by searching for the last 8 characters of the fingerprint.
sudo apt-key fingerprint 0EBFCD88
pub rsa4096 2017-02-22 [SCEA]
9DC8 5822 9FC7 DD38 854A E2D8 8D81 803C 0EBF CD88
uid [ unknown] Docker Release (CE deb) <docker@docker.com>
sub rsa4096 2017-02-22 [S]
Next, add the Docker repository for their stable release chain with the following command.
sudo add-apt-repository
   "deb [arch=amd64] https://download.docker.com/linux/ubuntu
   $(lsb_release -cs)
   stable"
With the Docker repositories configure, update your list of repositories.
sudo apt-get update
Then finally install Docker Community Edition itself.
sudo apt-get install docker-ce docker-ce-cli containerd.io
Now that docker is installed, check that it responds and verify the version is 18.09.2 or newer.
sudo docker -v
Docker version 18.09.6, build 481bc77
That’s it! In the future, you can simply update Docker with the usual update && upgrade commands
Configuring SSL – Optional
Now that you have Docker installed and ready, you could already jump right into deploying the Rancher container. However, we’d recommend you to obtain and install SSL certificates to enable HTTPS for secure connection while you are configuring your cluster on Rancher. Luckily, this is quick and painless thanks to Let’s Encrypt.
Note that you will need to have a domain configured to point to your Rancher server.
Let’s Encrypt
Let’s Encrypt offers free SSL certificates and makes the installation simple with their Certbot. The client can be installed by itself on most Linux distributions but since we already have Docker, we might as well put that into good use!
Obtain SSL certificates using a containerised Let’s Encrypt Certbot.
First, make a new directory to hold your certificates.
mkdir -p ~/docker/letsencrypt
Then run the following command to start a new Certbot container in a standalone certonly mode. Replace the example domain highlighted in red with your own.
docker run -it --rm -p 80:80 -v ~/docker/letsencrypt:/etc/letsencrypt
certbot/certbot certonly --standalone -d rancher.example.com
Once the Certbot client starts, it will ask you to confirm a couple of settings.
- Enter an email address to receive SSL expiration notifications
- Read the Let’s Encrypt Terms of Service and select A to agree
- Check that the certificate was issued successfully
Alright! Now that you’ve obtained the certificates, you will need to set up a way for your Rancher server to use them. Although the Rancher container already includes a web server, we are going to install the certificates to an Nginx proxy container.
Nginx
Nginx is one of the most popular web servers and includes options to be configured as a web proxy. Proxies allow you to listen and accept connections in one software, or container in this case and forward the connection to the actual service.
To get started, you’ll need to make a new directory to house your proxy configuration.
mkdir -p ~/docker/nginx
Next, create a configuration file using your favourite text editor, for example, nano on Ubuntu.
nano ~/docker/nginx/default.conf
Then enter the following configuration into the file. Again, replace all four occurrences of the example domain highlighted in red with your own domain.
upstream rancher {
    server rancher-server;
}

map $http_upgrade $connection_upgrade {
    default Upgrade;
    ''      close;
}

server {
    listen 443 ssl http2;
    server_name rancher.example.com;
    ssl_certificate /etc/letsencrypt/live/rancher.example.com/fullchain.pem;
    ssl_certificate_key /etc/letsencrypt/live/rancher.example.com/privkey.pem;

    location / {
        proxy_set_header Host $host;
        proxy_set_header X-Forwarded-Proto $scheme;
        proxy_set_header X-Forwarded-Port $server_port;
        proxy_set_header X-Forwarded-For $proxy_add_x_forwarded_for;
        proxy_pass http://rancher;
        proxy_http_version 1.1;
        proxy_set_header Upgrade $http_upgrade;
        proxy_set_header Connection $connection_upgrade;
        proxy_read_timeout 900s;
    }
}

server {
    listen 80;
    server_name rancher.example.com;
    return 301 https://$server_name$request_uri;
}
Once done, save the file and exit the editor.
Next, create a network to connect your containers using the command below. This will allow the containers to communicate with each other.
sudo docker network create rancher-network
Then create the Nginx proxy container with the command below but we are not starting it just yet.
sudo docker create -p 443:443 -p 80:80
-v ~/docker/letsencrypt:/etc/letsencrypt
-v ~/docker/nginx:/etc/nginx/conf.d
--restart=unless-stopped
--network=rancher-network
--name=nginx-proxy nginx
Now that the proxy is ready, you need to set up the Rancher container before you can run the proxy. Continue in the next part to deploy Rancher.
Deploying Rancher container
Installing Rancher itself is as straightforward as just deploying the service container. Depending on whether you configure a proxy for SSL or not, you will either want to run the container at the default HTTP port 80 or at an alternative port according to your proxy configuration.
First, make a directory for your Rancher files to allow persistence.
mkdir -p ~/docker/rancher
Deploy Rancher to run with the proxy using the next command.
sudo docker run -d -p 8080:80
-v ~/docker/rancher:/var/lib/rancher
--restart=unless-stopped
--network=rancher-network
--name=rancher-server rancher/rancher
Then to enable HTTPS, start the Nginx proxy container you created earlier with the following command. This will allow you to reach the Rancher container.
sudo docker start nginx-proxy
You should now be able to reach the Rancher control panel by going to your domain on a web browser.
Configuring the UpCloud driver for Rancher
Rancher provides a simple yet powerful web control panel that allows you to configure and manage your clusters. Get started with the setup by opening your Rancher server domain in your web browser.
https://rancher.example.com
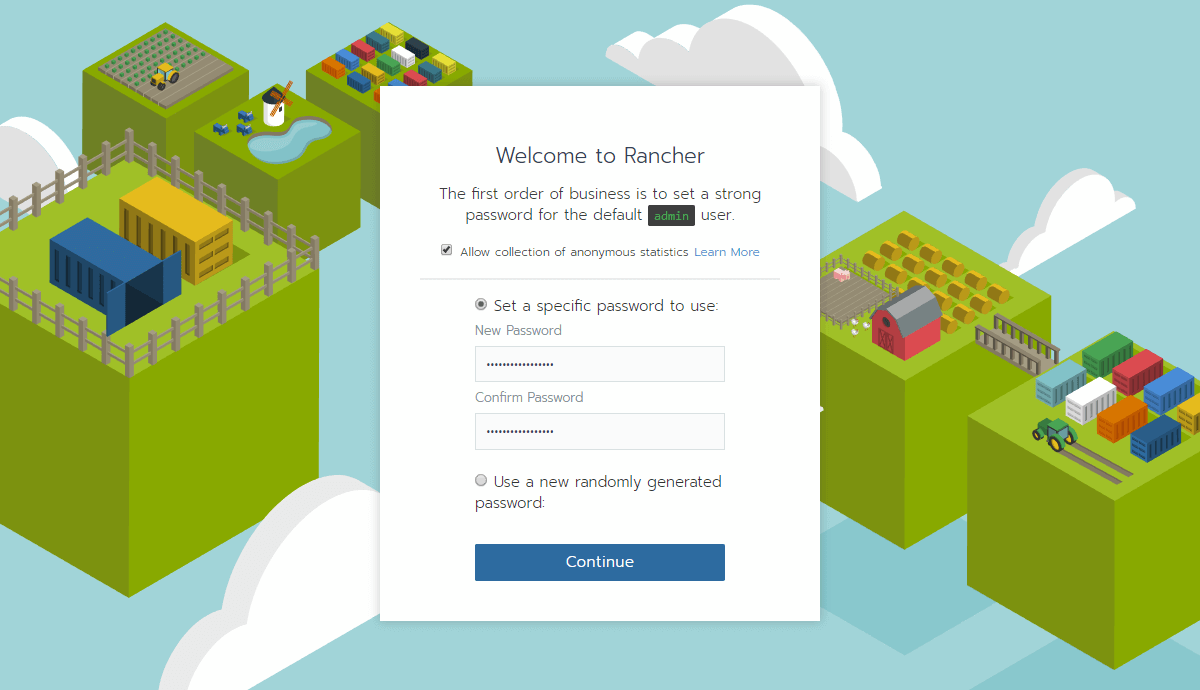
When initially installed, you will be greeted by the Rancher Welcome page. As the first step, set a password for your admin account, then click the Continue button.
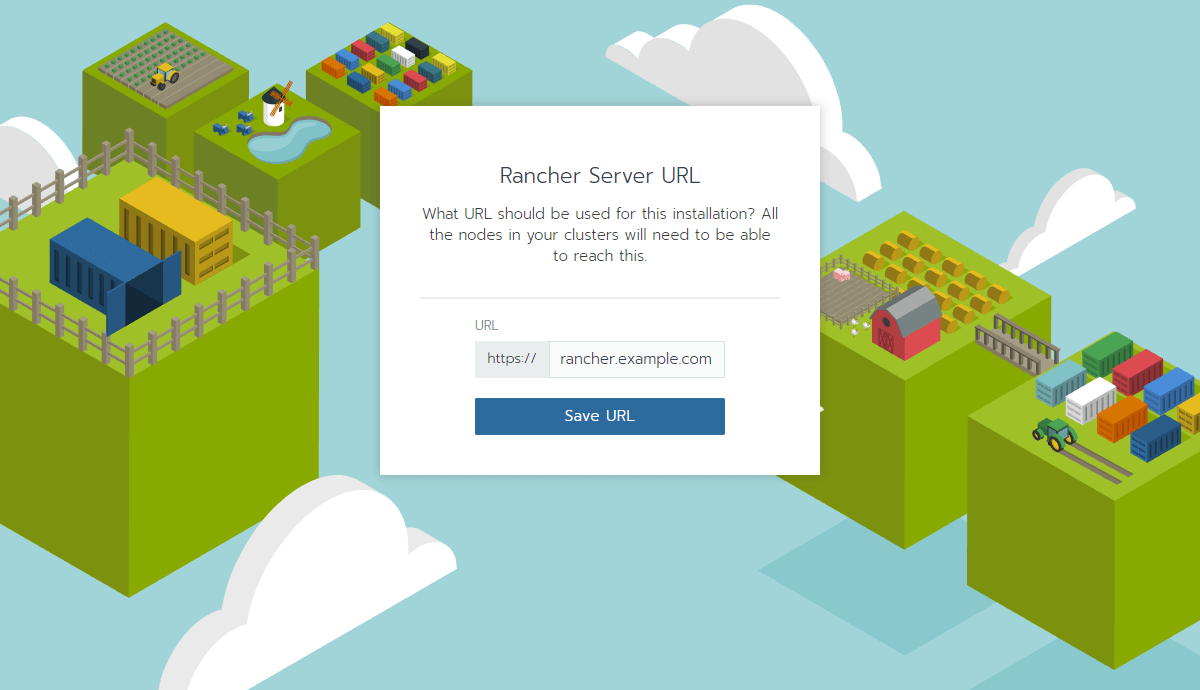
Next, enter your Rancher domain to set the URL to be used for the installation. Note that the server URL is used by your cluster and needs to be reachable by all nodes.
Then click the Save URL button to confirm.
With the first two steps done, you are redirected to your Rancher control panel.
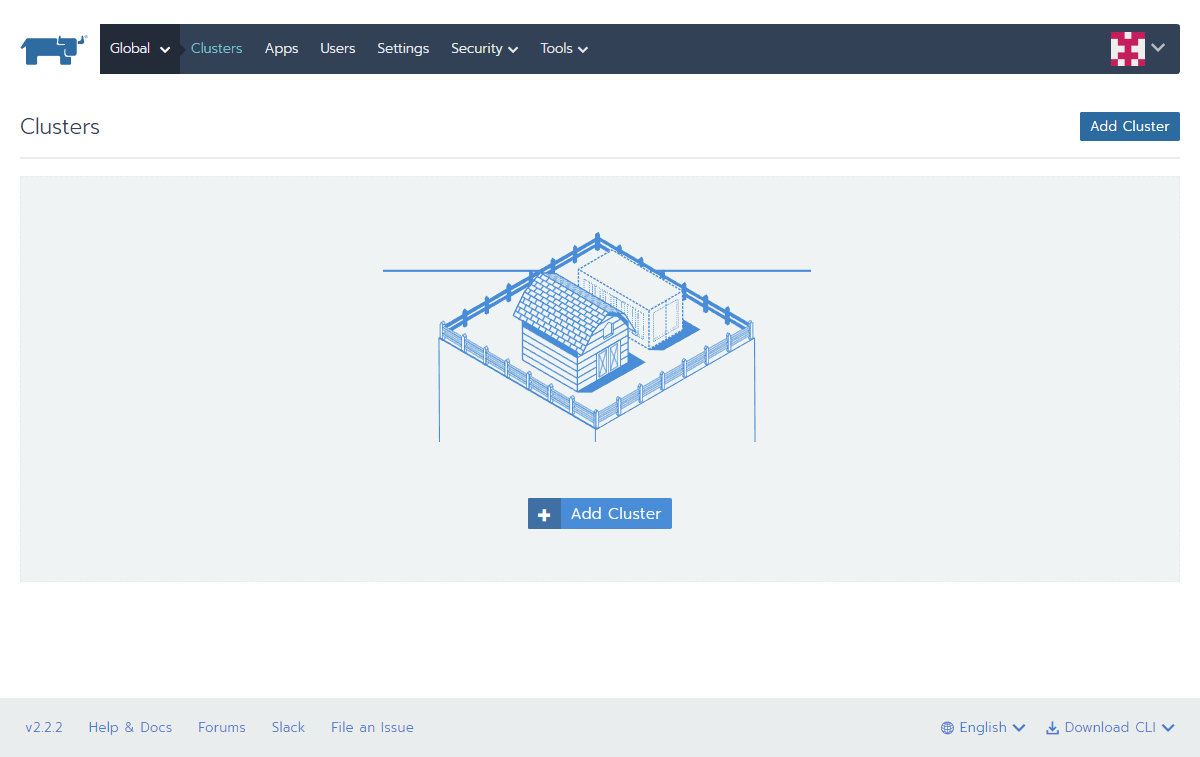
The cluster is still empty for the moment, but before you can start deploying nodes, you will need to install the UpCloud drivers.
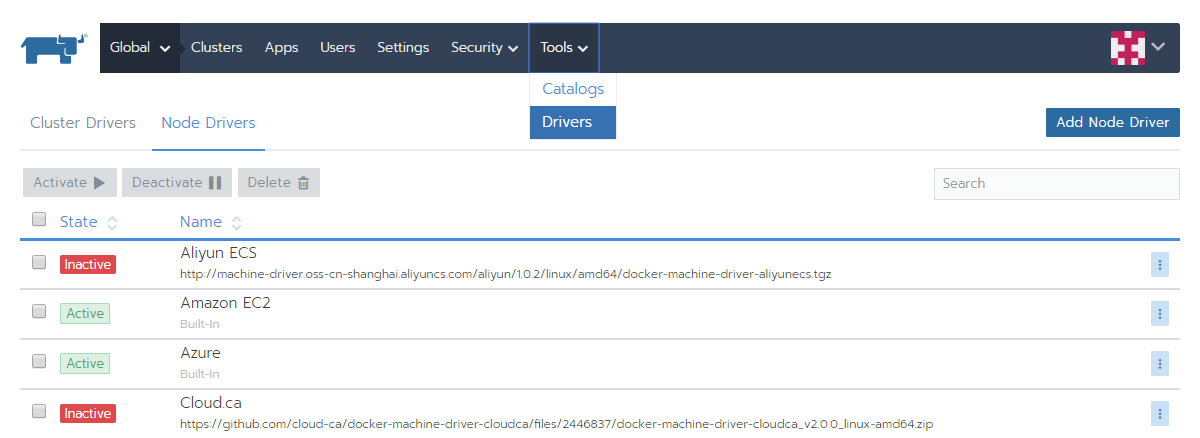
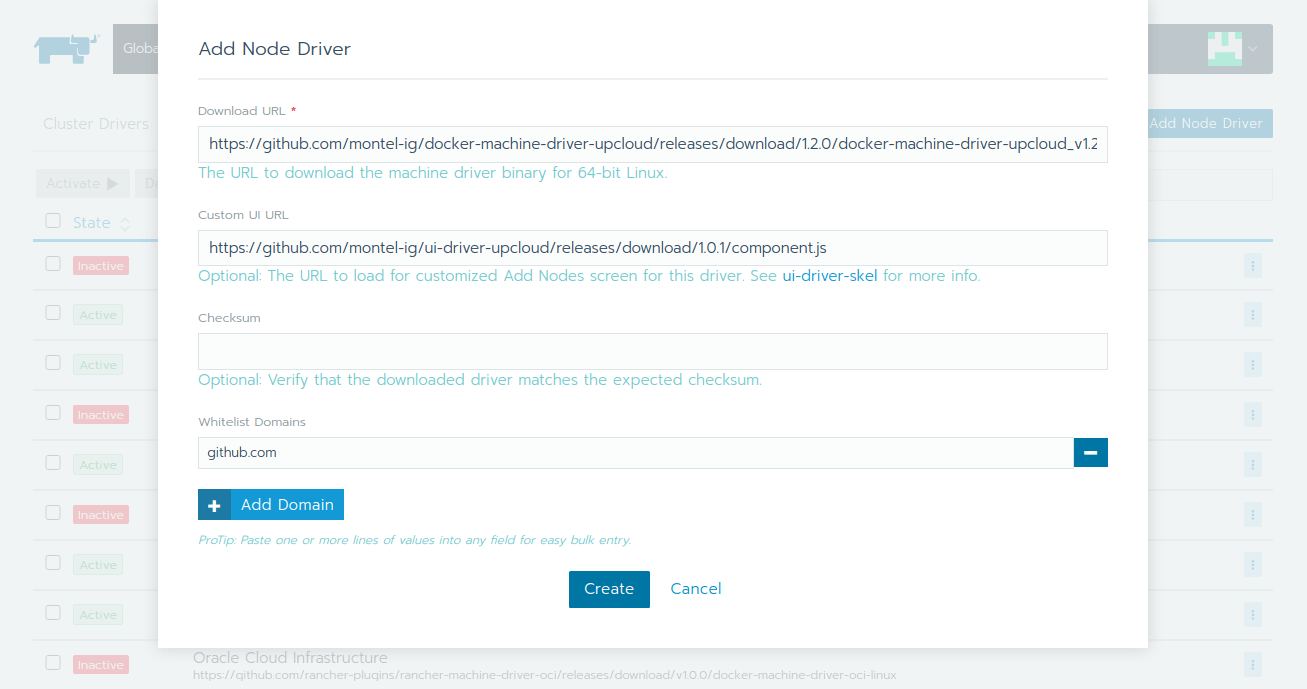
Go to the Node Drivers under Tools and Drivers menus found in the navigation bar. Then click the button Add Node Driver to open the configuration dialogue.
In the new node driver setup window, enter the following source information. Click the Add Domain button to whitelist the github.com domain which is needed to download the drivers.
The Rancher driver for UpCloud is a community developed by our friends at Montel Intergalactic and can be found on their GitHub.
| Download URL | https://github.com/montel-ig/docker-machine-driver-upcloud/releases/download/1.2.0/docker-machine-driver-upcloud_v1.2.0-2-ga70b638_linux-amd64.zip |
| Custom UI URL | https://github.com/montel-ig/ui-driver-upcloud/releases/download/1.0.1/component.js |
| Whitelist Domains | github.com |
Then confirm and save by clicking the Create button.
Rancher will then download and install the necessary drivers to allow you to deploy onto UpCloud’s infrastructure. Once finished, you should see the UpCloud driver listed as Active.
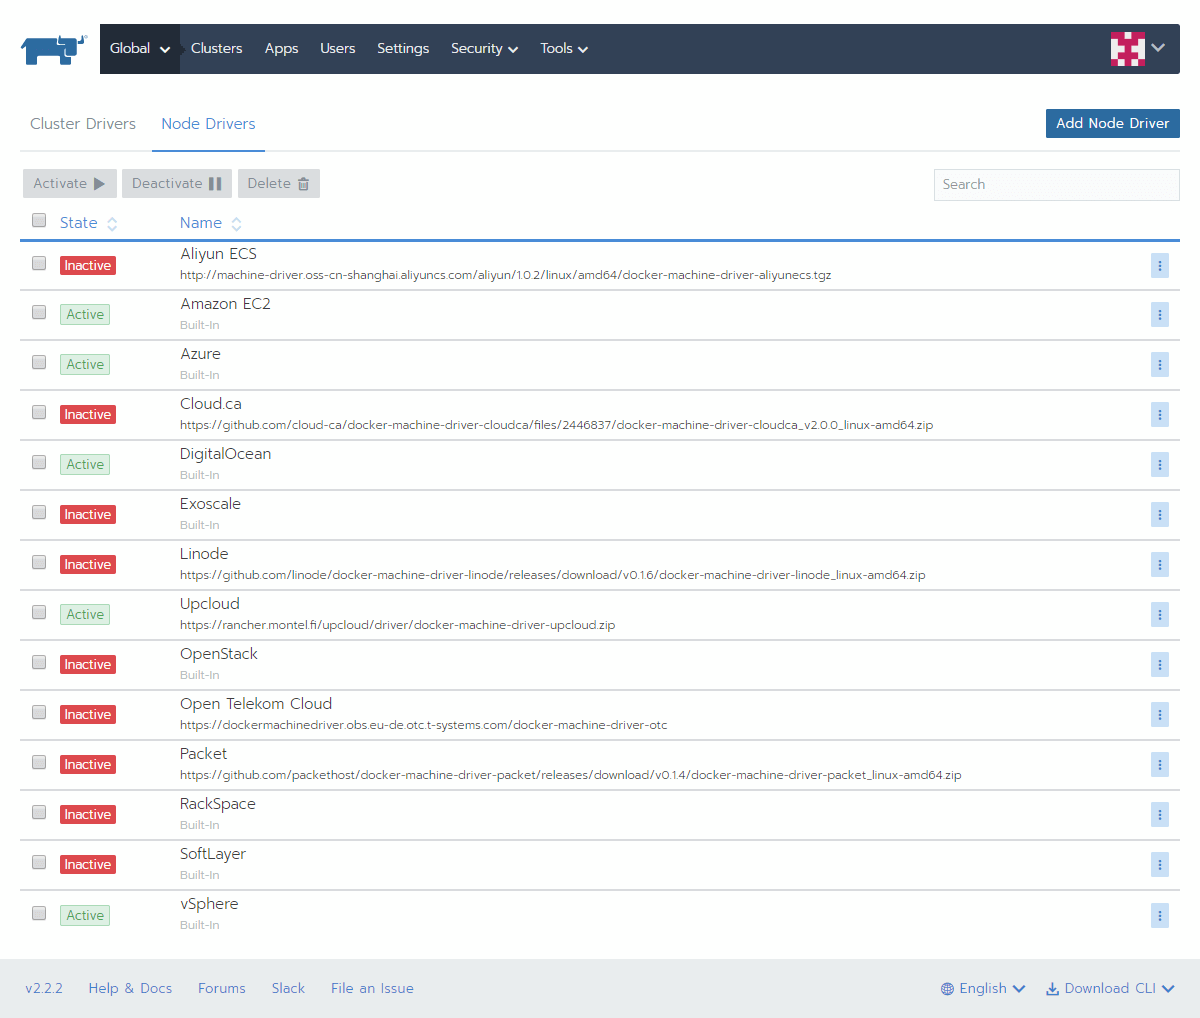
That’s it for the installation, you are now ready to start deploying your first cluster!
Deploying a cluster
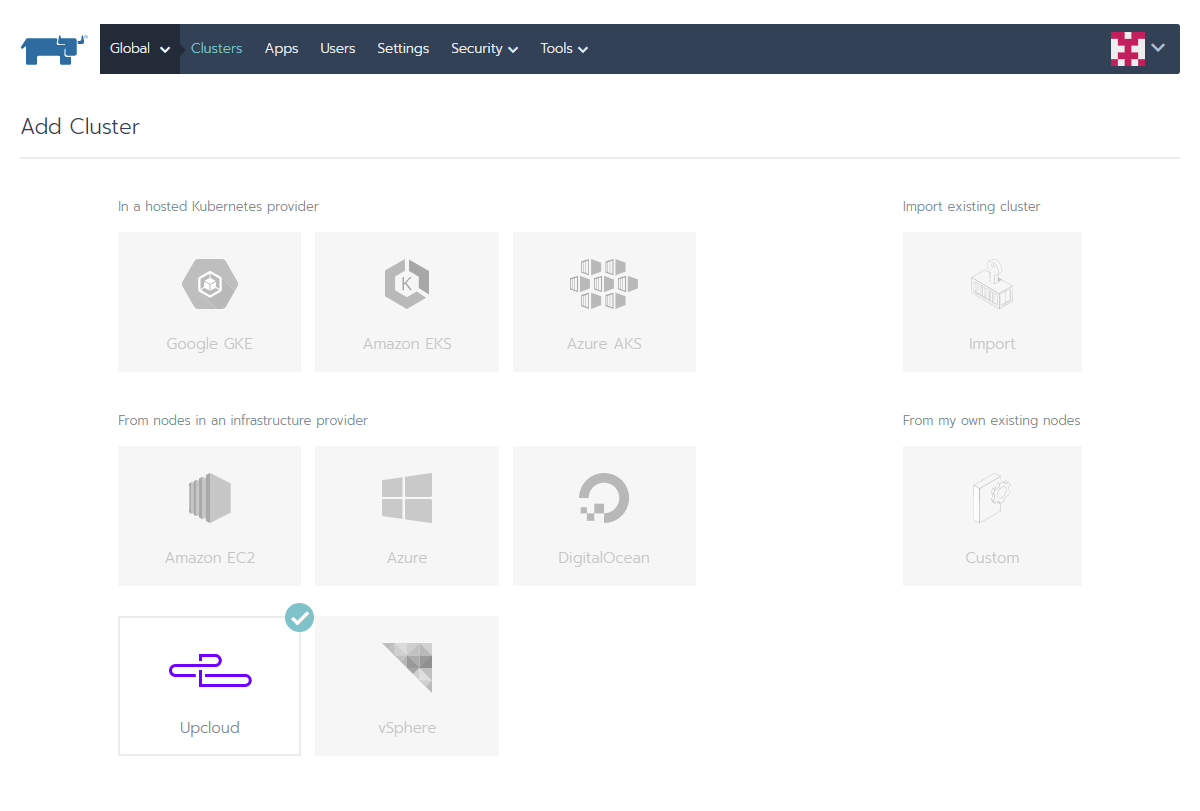
With the installation done, you can get cracking on your first cluster deployment. Click the Add Cluster button on the Clusters page.
In the cluster settings, select UpCloud as your infrastructure provider. Then scroll down to the rest of the settings.
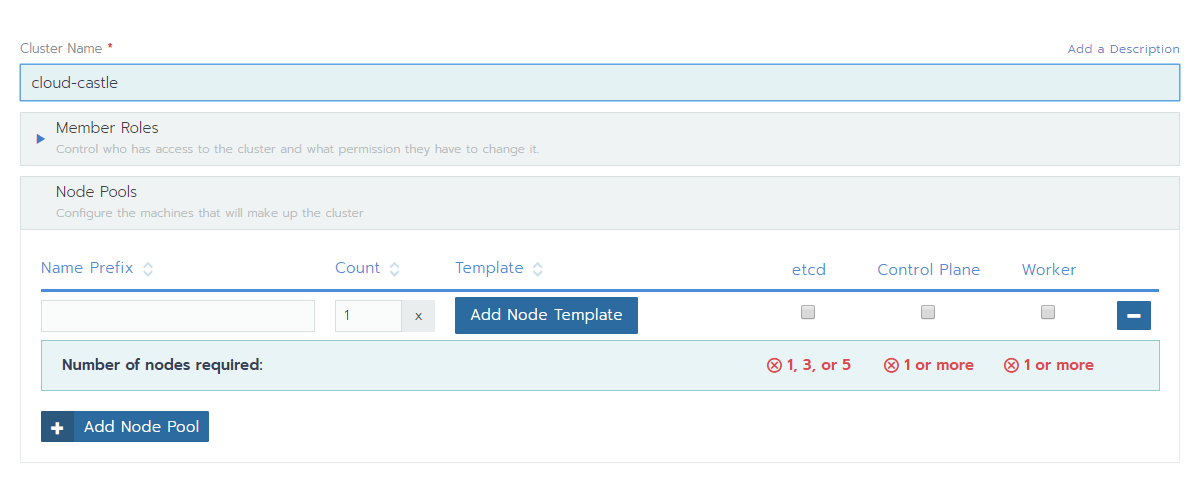
Next, name the cluster.
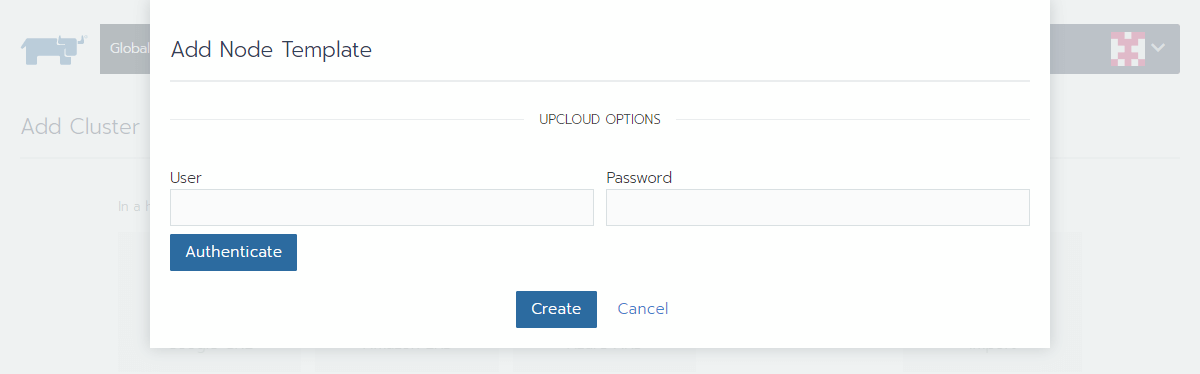
Then, under the Node Pools settings, click the Add Node Template button.
This opens the settings to configure your UpCloud API access. Enter your API username and password as you set them earlier, then click the Authenticate button to verify the credentials.
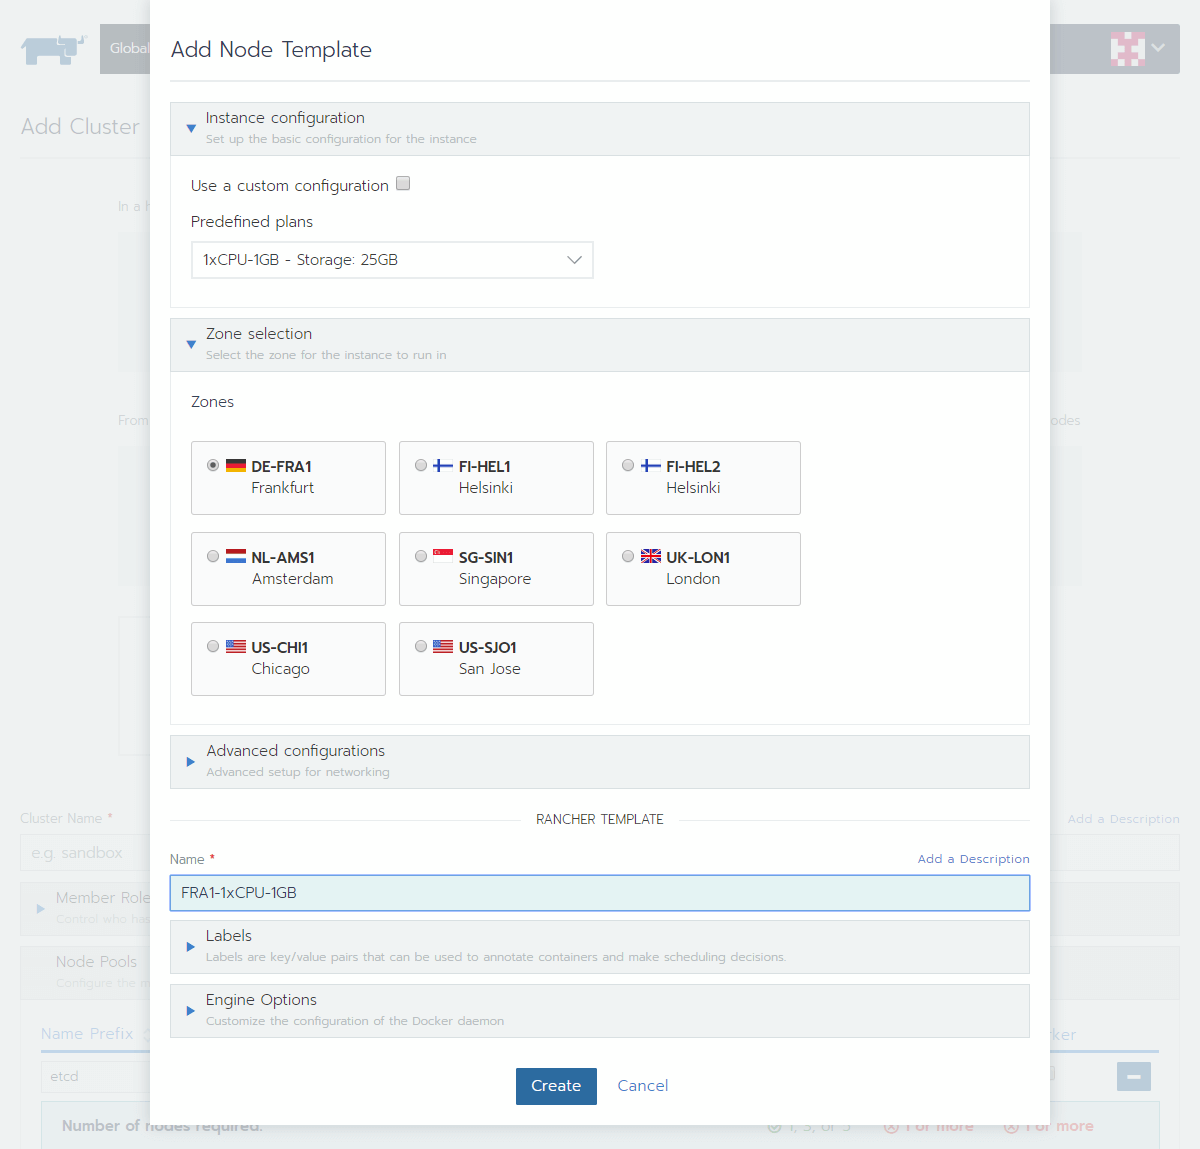
If the connection test was successful, Rancher will display the cloud server configuration options.
- Select from one of the Simple plans in the dropdown menu or use the custom configuration for fine grain control over your node resources.
- Pick the location you want the nodes using this template to be deployed to.
- Name the template with something descriptive, e.g. zone-plan.
Once done, click the Create button to save the template configuration.
You can create multiple node templates to allow different configuration for different role nodes in your cluster. However, for this example, a single template with the minimum resources is enough.
Next, configure nodes to fulfil the cluster requirements by assigning the three roles to at least one node. In practice, the roles can be assigned freely as long as the requirements displayed below the roles are met as indicated by a green tic.
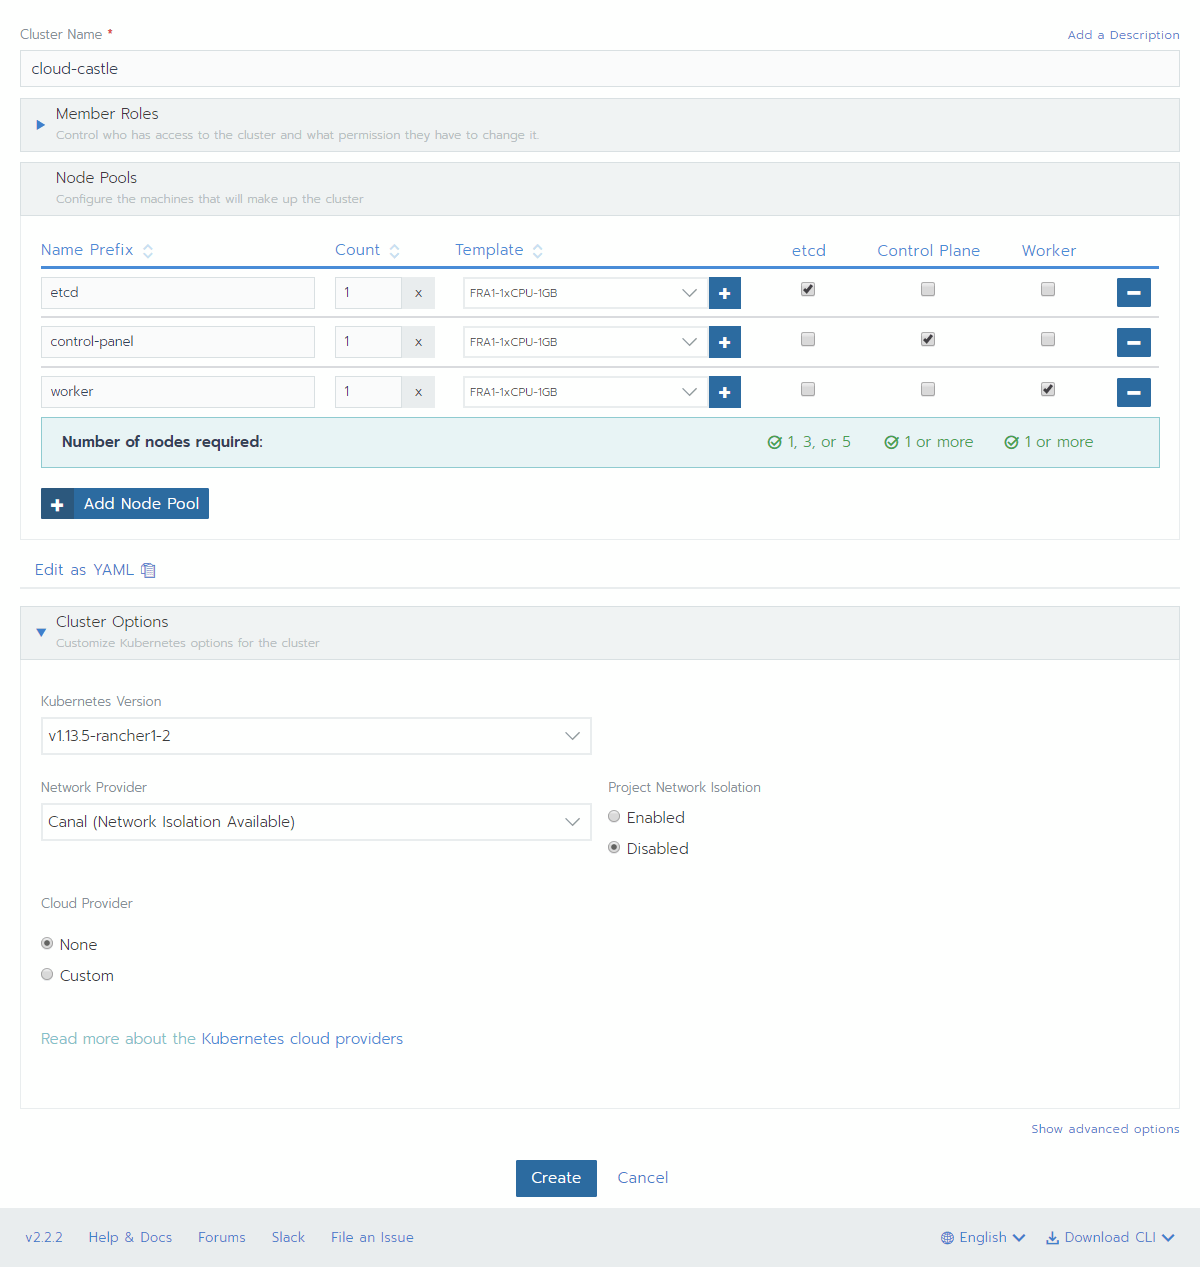
Once your cluster configuration is all set, click the Create button at the bottom of the page.
Your cluster will then be deployed, connected, and configured. The progress of the deployment is shown on the Clusters page. When completed, the state of your cluster will show as Active.
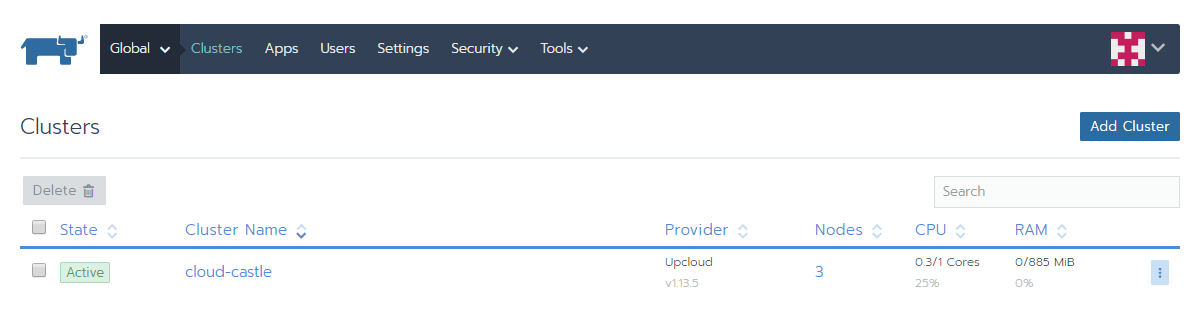
All done! You now have a brand new Rancher cluster installed and ready to go. Feel free to start exploring the cluster view by clicking your cluster name on the list.
Conclusions
Congratulation! Your cluster is all set and ready for you to start deploying applications. If you are unsure where to begin, Kubernetes offers beginner tutorials to test your cluster.
Rancher is a great way of getting started with Kubernetes clusters and makes short work of any sized deployment. Using the UpCloud driver for Rancher, you have the power to configure and launch clusters worthy of any production environment on the world’s fastest cloud!
Tidak ada komentar:
Posting Komentar