https://www.truenas.com/blog/how-to-install-truenas-core/
=================================================================
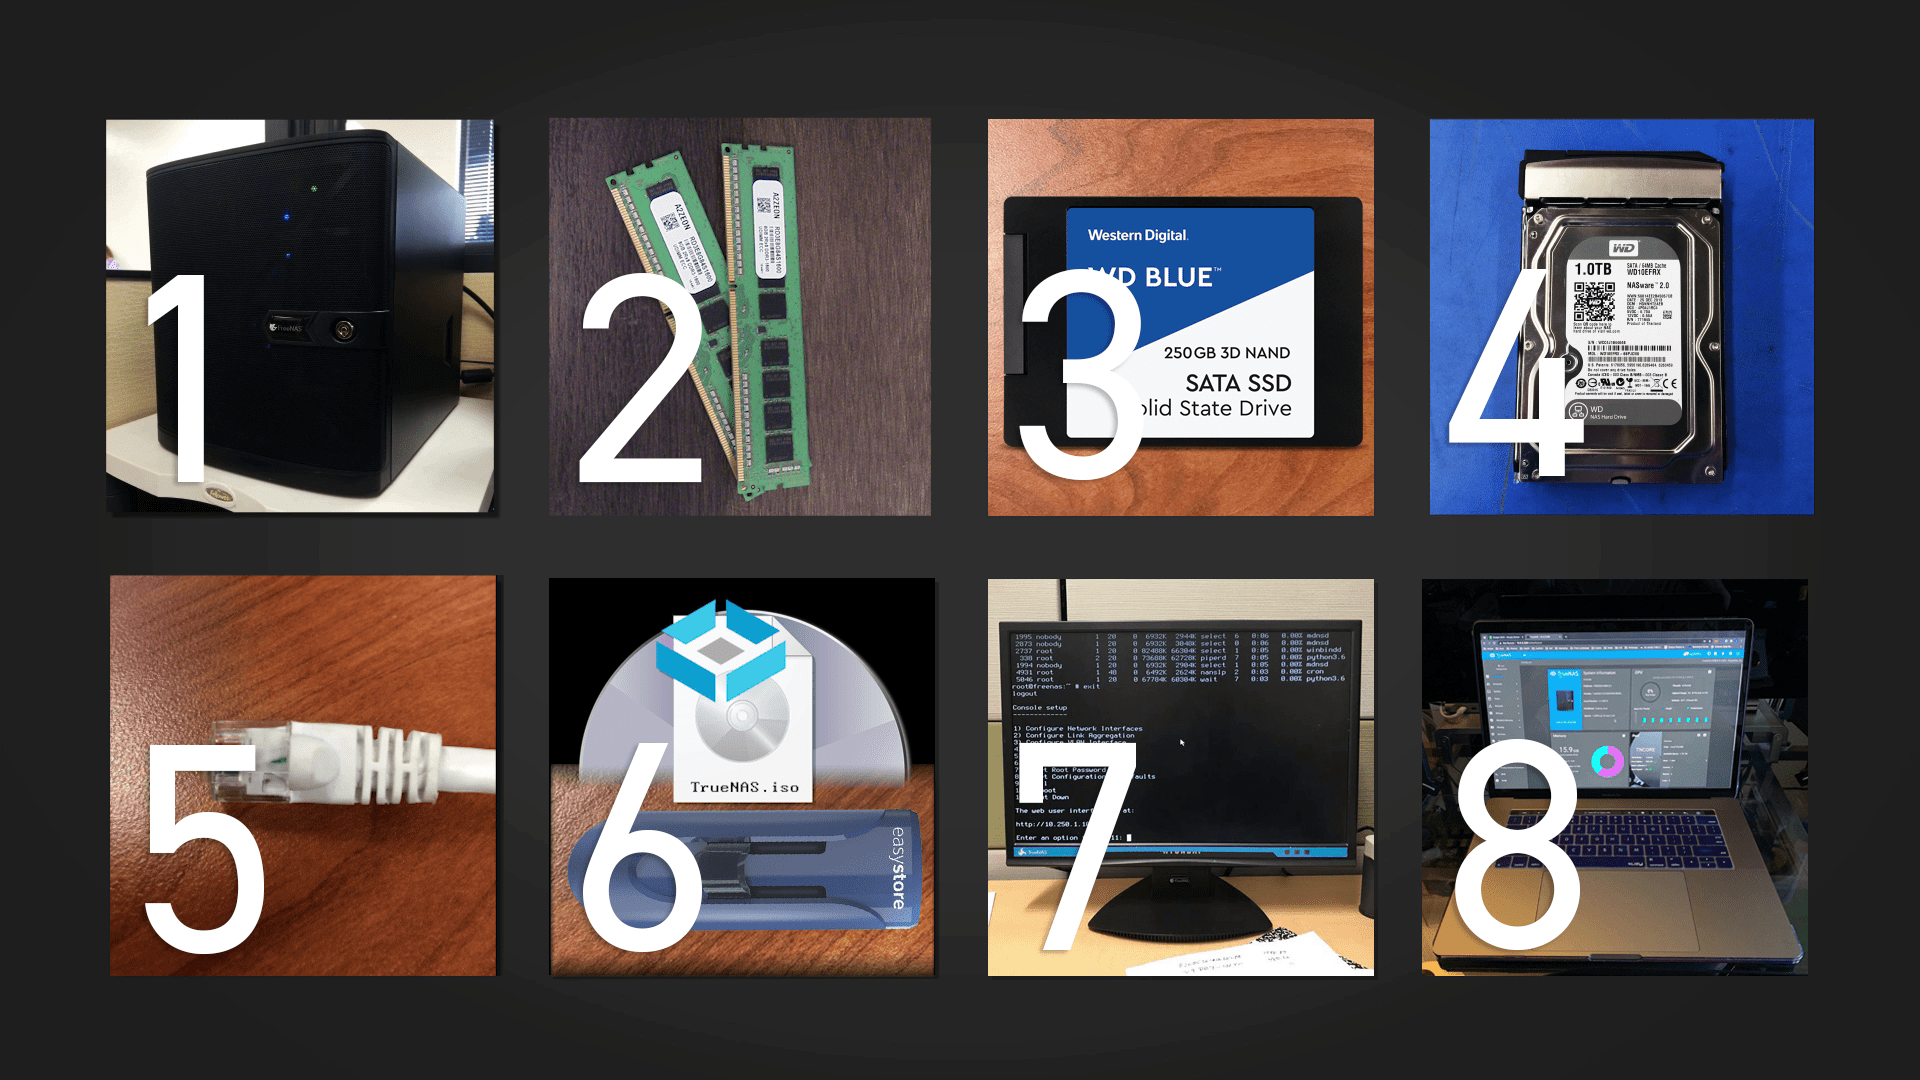
Persyaratan Minimal
Berikut adalah dasar-dasar yang Anda perlukan untuk menjalankan TrueNAS:
- Sistem 64-bit : Hanya digunakan untuk TrueNAS CORE. TrueNAS TIDAK ramah dual-boot, jadi pastikan Anda hanya menggunakan sistem untuk TrueNAS.
- RAM minimum 8 GB : Gunakan lebih banyak jika Anda memasang mesin virtual atau plugin.
- Perangkat boot (SSD atau HDD) : Juga dikenal sebagai drive boot. Setidaknya diperlukan kapasitas penyimpanan 16 GB agar berfungsi sebagai perangkat boot untuk TrueNAS. SSD adalah pilihan ideal untuk umur panjang; perlu diingat bahwa seluruh disk akan digunakan untuk sistem operasi TrueNAS. Stik USB tidak lagi disarankan karena tingginya jumlah tugas penulisan di TrueNAS.
- Drive penyimpanan (SSD atau HDD) : Setidaknya satu hard drive untuk penyimpanan file, namun beberapa drive dengan kapasitas yang sama dapat dengan mudah digabungkan untuk memberikan redundansi jika drive gagal. Drive Western Digital adalah pilihan tepat untuk penyimpanan data, namun seperti halnya vendor mana pun, pastikan untuk menghindari drive yang menggunakan teknologi SMR (Shingled Magnetic Recording) dalam aplikasi ZFS.
- Kabel Ethernet : Untuk menghubungkan sistem Anda ke jaringan, melalui router atau modem. Tidak ada dukungan nirkabel di TrueNAS.
- DVD kosong atau stik USB : Diperlukan untuk membuat media instalasi TrueNAS. Image ISO TrueNAS melebihi 700 MB sehingga CD tidak akan berfungsi. Stik USB Anda harus berukuran minimal 1 GB. Perlu diketahui bahwa media instalasi tidak sama dengan perangkat boot.
Untuk mengakses gambar TrueNAS terbaru : https://www.truenas.com/download-truenas-core/ - Monitor & keyboard : Setelah pengaturan selesai dan Anda telah menuliskan alamat IP sistem TrueNAS Anda, monitor dapat diputuskan sambungannya.
- Komputer atau laptop & browser internet : Untuk mengakses GUI dan mengelola sistem TrueNAS Anda.
Membuat Media Instalasi dan Perangkat Sistem Operasi untuk TrueNAS
Penting untuk dipahami bahwa TrueNAS memerlukan dua perangkat selama proses instalasi, media instalasi dan perangkat sistem operasi (perangkat boot). Media instalasi digunakan untuk menginstal TrueNAS ke perangkat sistem operasi di komputer.
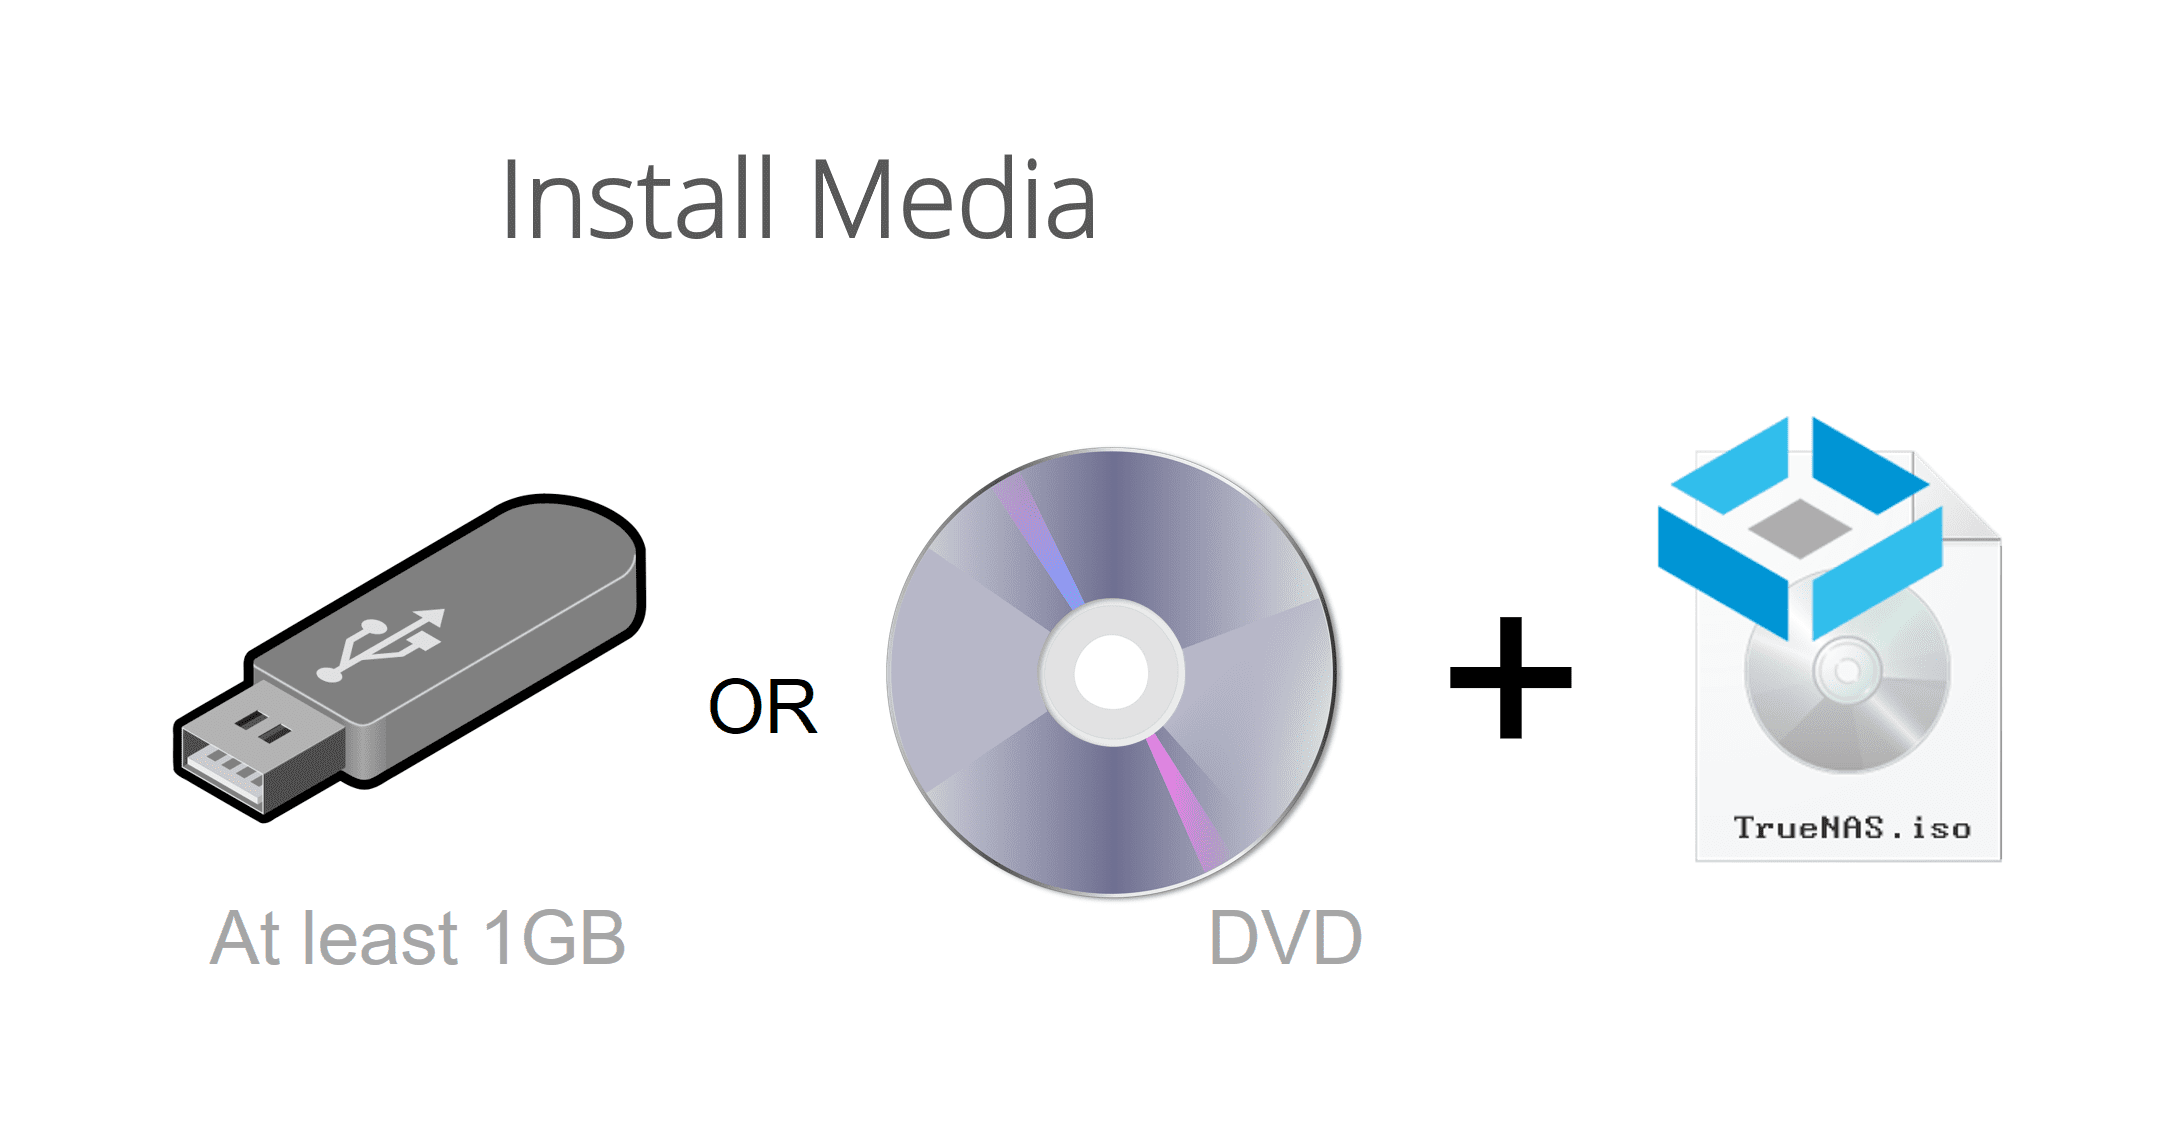
Stik USB atau DVD dapat digunakan sebagai media instalasi. Dalam tutorial ini, kita akan menggunakan stik USB 8 GB sebagai media instalasi. Ukuran minimum yang diperlukan adalah 1 GB.
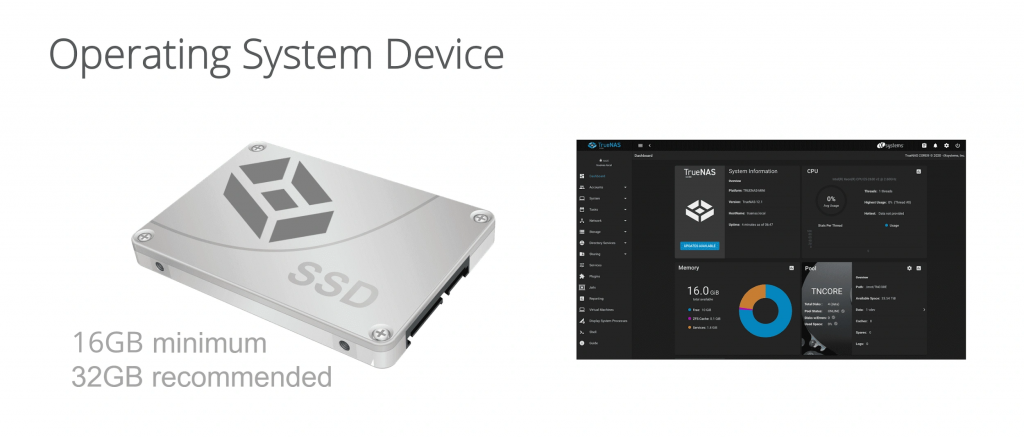
Perangkat sistem operasi TrueNAS CORE dapat berupa SSD atau hard drive. Perangkat sistem operasi harus memiliki setidaknya 16 GB ruang, namun kami merekomendasikan 32 GB atau lebih untuk kapasitas penyimpanan perangkat sistem operasi guna menyediakan ruang untuk pencatatan, lingkungan sistem operasi, dan peningkatan di masa mendatang. SSD disarankan untuk meningkatkan respons secara keseluruhan serta kecepatan menginstal peningkatan lebih lanjut.
Perlu diperhatikan bahwa seluruh perangkat sistem operasi akan digunakan untuk sistem operasi TrueNAS. Drive tidak dapat digunakan untuk berbagi data melalui TrueNAS.
TrueNAS membaca dan menulis ke perangkat sistem operasi, sehingga keandalan sangat penting. Menggunakan SSD atau hard drive kecil akan memberikan umur panjang terbaik. Karena tingginya tugas penulisan di TrueNAS CORE, stik USB tidak terlalu dapat diandalkan dalam jangka panjang. Dengan TrueNAS CORE yang dijadwalkan untuk menerima pembaruan berkelanjutan untuk stabilitas dan keamanan , memilih perangkat booting yang berkualitas dan andal adalah langkah pertama menuju sistem TrueNAS yang dibangun dengan baik.
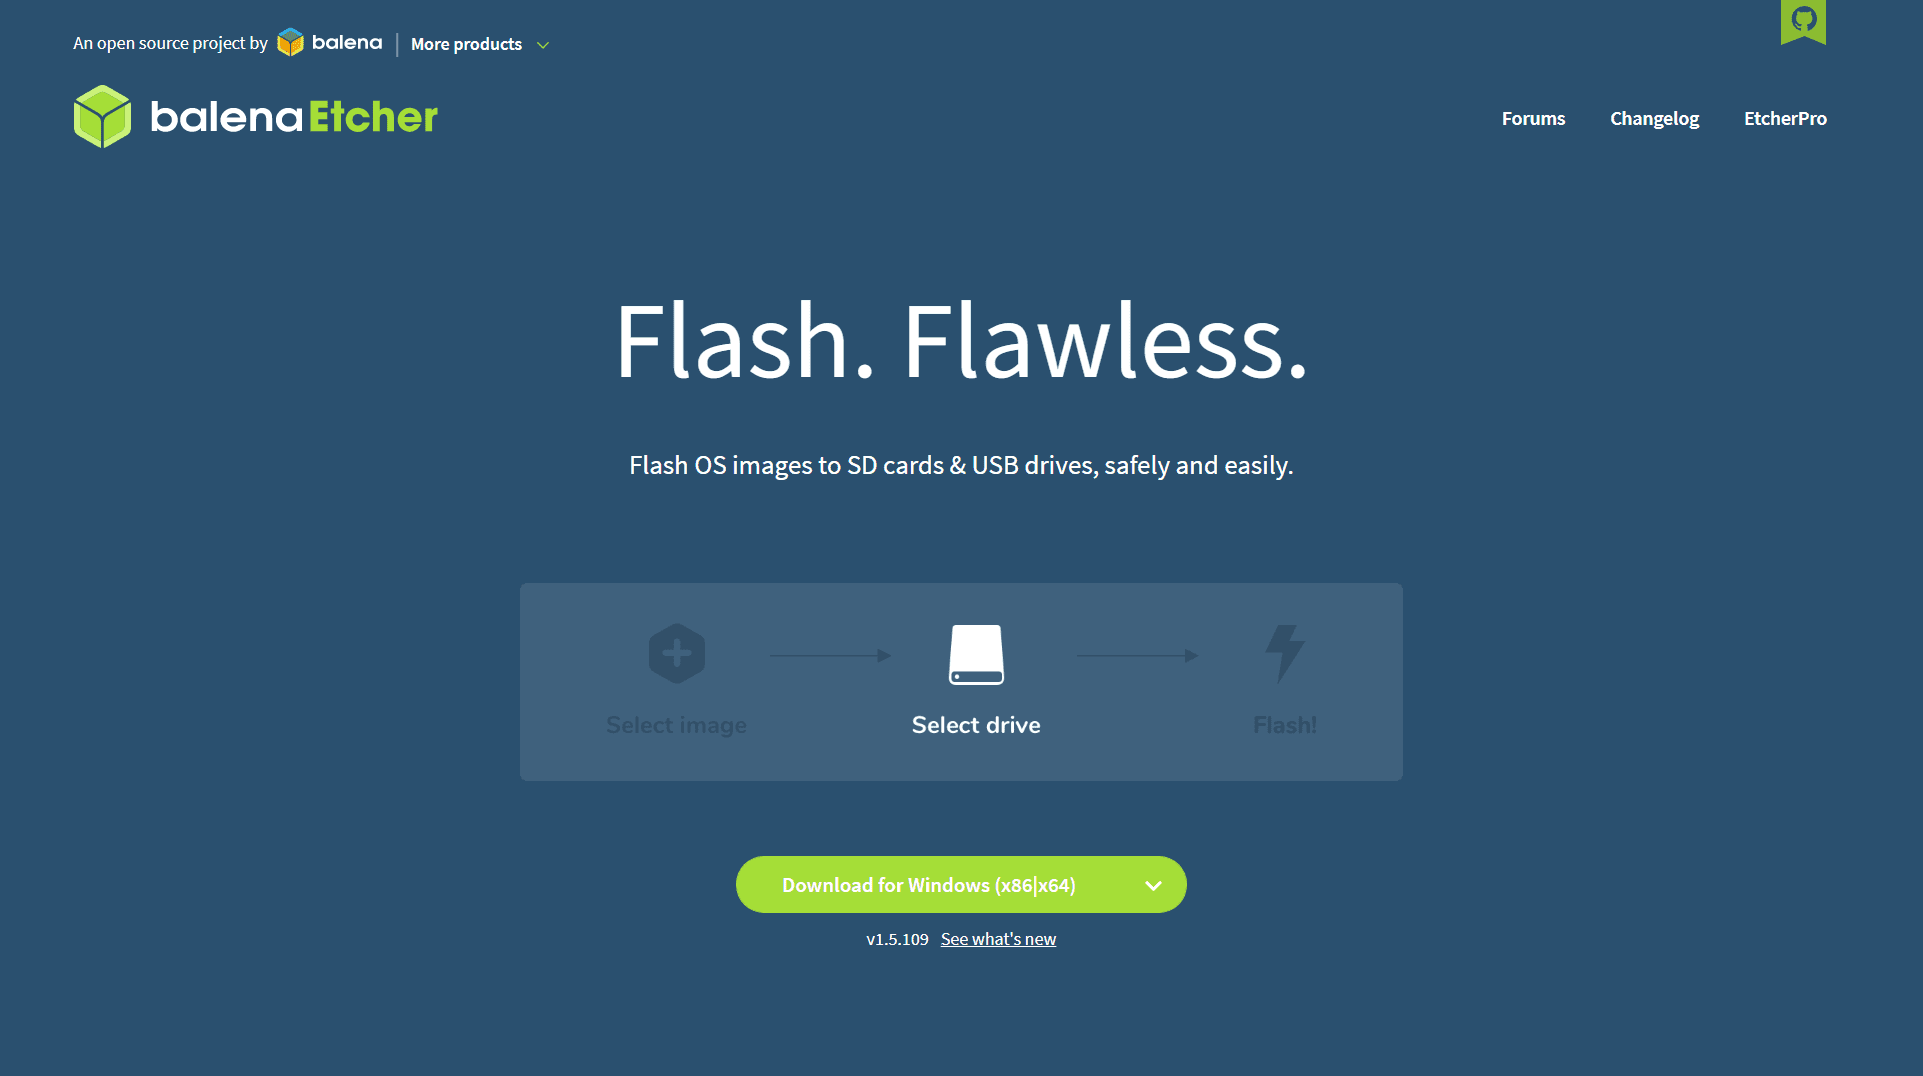
Untuk contoh ini, kita akan menggunakan alat bernama balenaEtcher yang juga dikenal sebagai Etcher . Gulir ke bawah halaman web dan klik tombol Unduh untuk Etcher. Unduh, instal, dan jalankan Etcher.
Sekarang masukkan stik USB Anda ke mesin Anda. Verifikasi huruf drive dengan masuk ke "PC Ini".
Untuk contoh ini, kita akan menggunakan alat bernama balenaEtcher yang juga dikenal sebagai Etcher . Gulir ke bawah halaman web dan klik tombol Unduh untuk Etcher. Unduh, instal, dan jalankan Etcher.
Sekarang masukkan stik USB Anda ke mesin Anda. Verifikasi huruf drive dengan masuk ke "PC Ini".
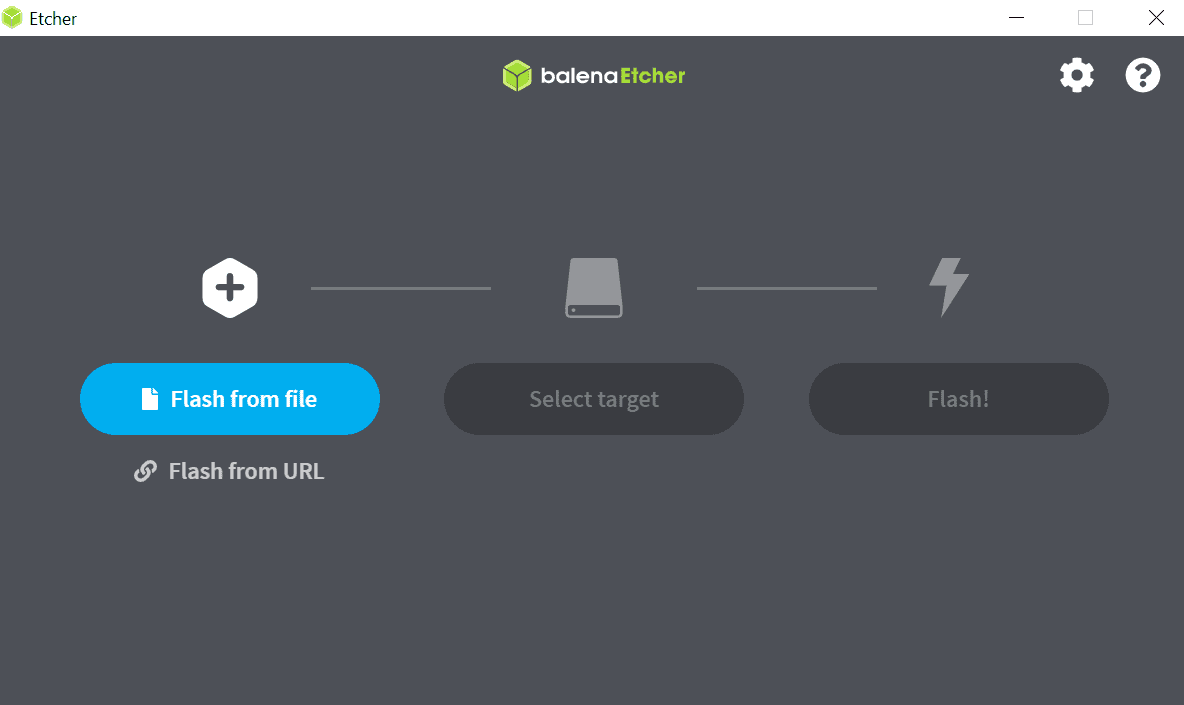
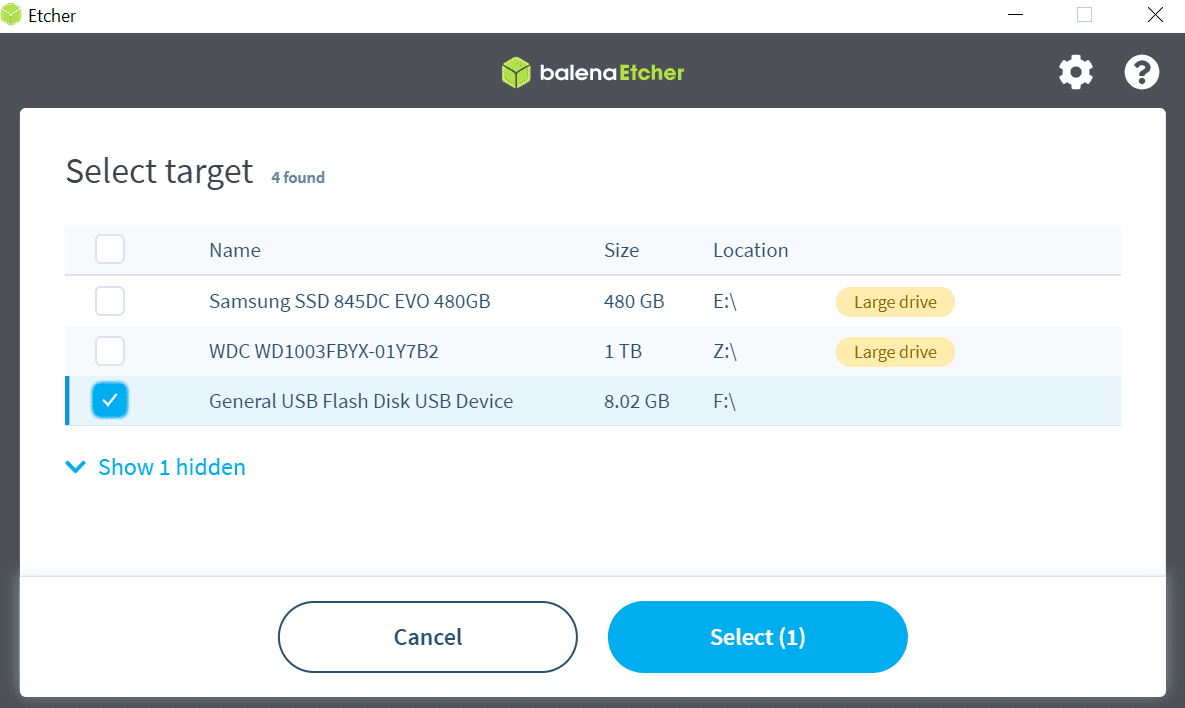
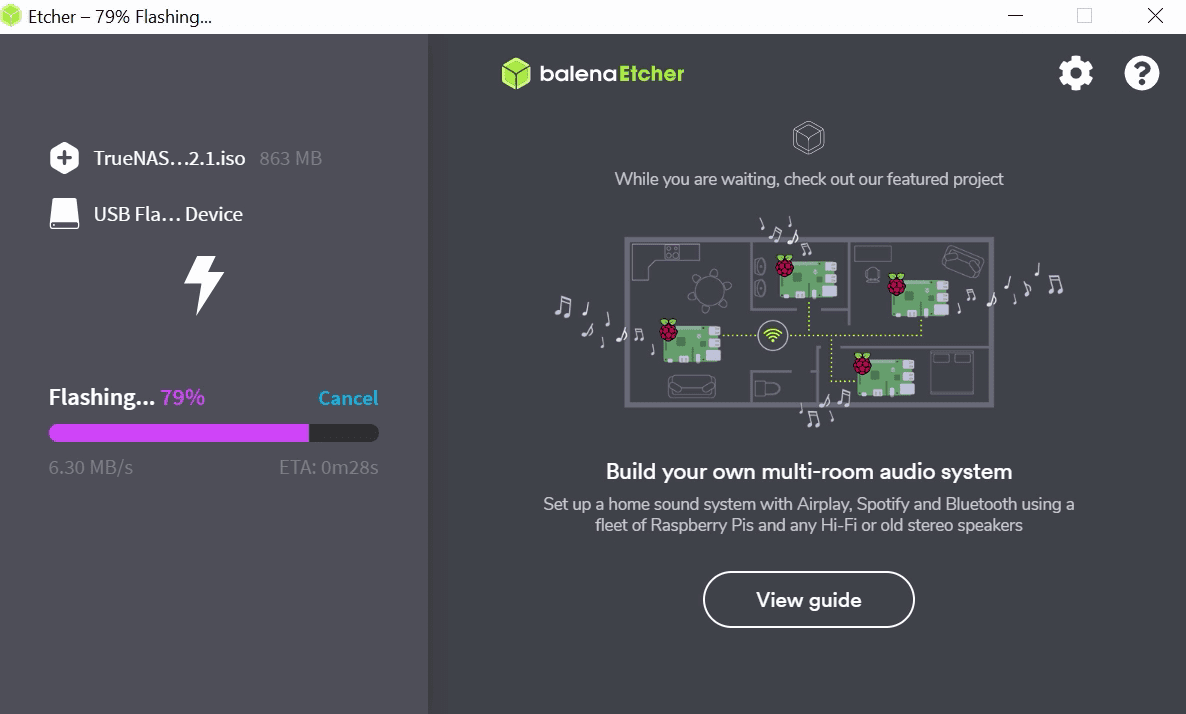
Pada aplikasi Etcher, klik “Flash from file” dan ramban ke file TrueNAS .iso yang sudah Anda download tadi. Jika stik USB Anda belum dipilih, klik “Pilih Target” dan pilih drive yang akan digunakan sebagai media instalasi. Ingat, ini adalah media instalasinya, bukan perangkat sistem operasinya. Sekarang, klik “Flash!” Dibutuhkan beberapa menit untuk menulis gambar ke disk. Sebuah "Flash Selesai!" pesan ditampilkan setelah selesai.

Setelah file penginstal ditulis ke media penginstalan, Anda siap menginstal TrueNAS.
Menginstal TrueNAS
Sekarang kita telah mempelajari dasar-dasar apa yang Anda perlukan untuk memulai, mari mulai instalasi TrueNAS.
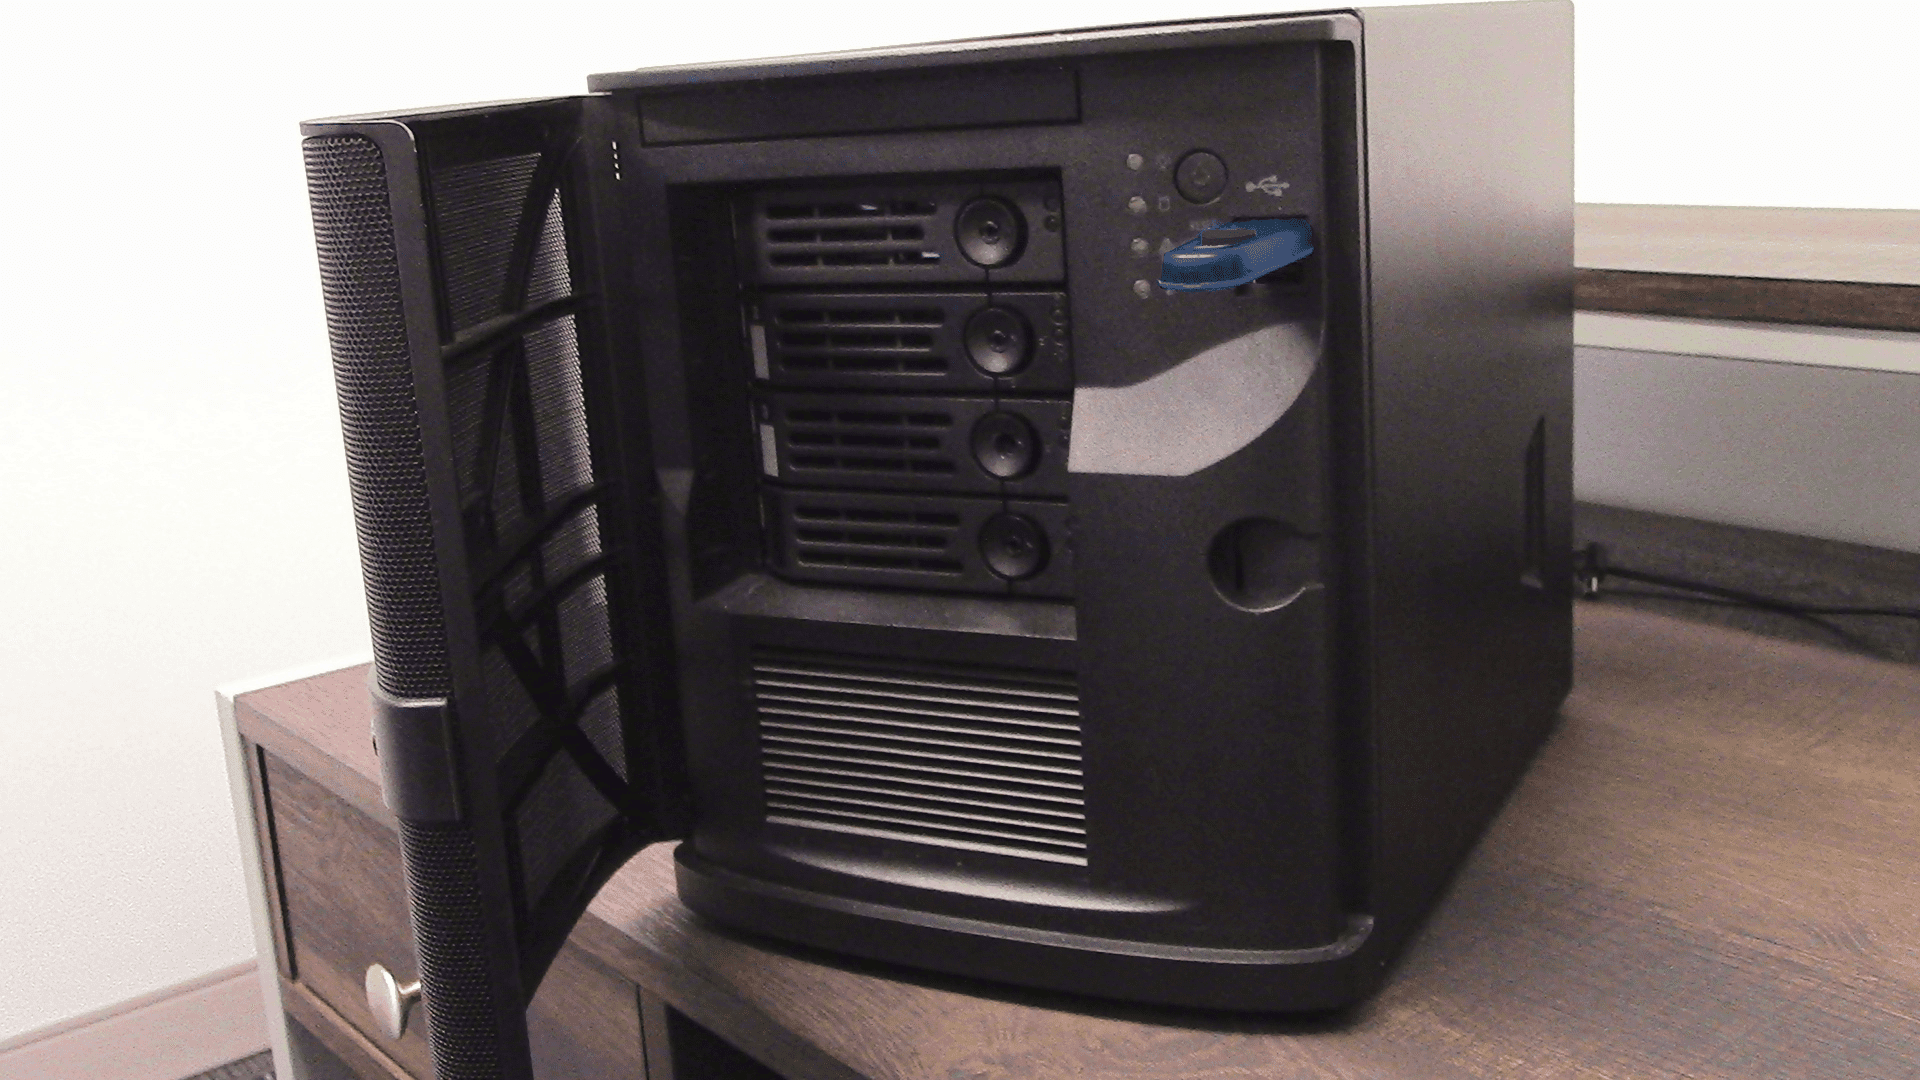
Pastikan perangkat boot dan media instalasi TrueNAS dimasukkan ke mesin yang Anda pilih untuk menjalankan TrueNAS.
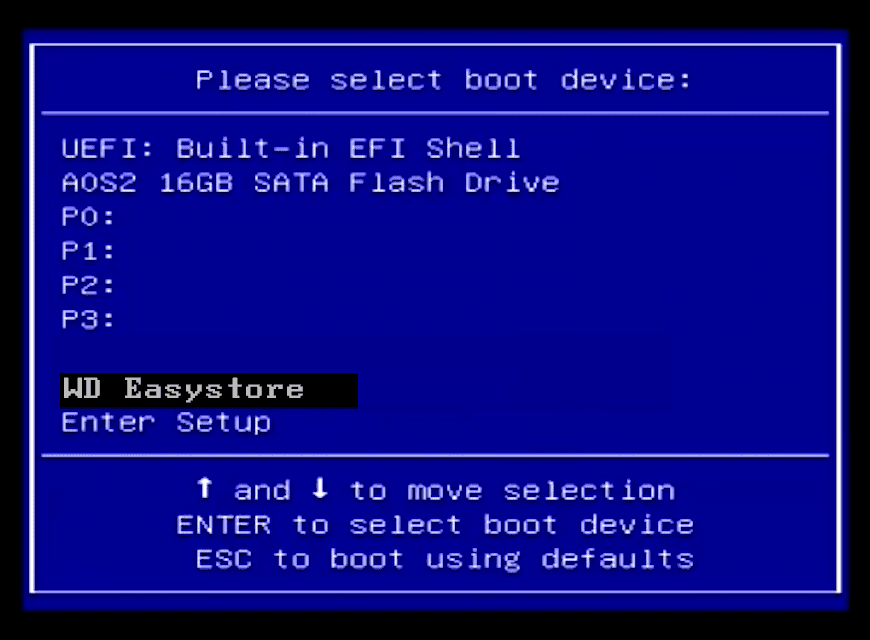
Boot ke BIOS sistem dan periksa kembali apakah sistem Anda diatur untuk melakukan booting dari perangkat yang berisi media instalasi TrueNAS yang Anda buat sebelumnya. Setelah mengonfirmasi, reboot sistem.
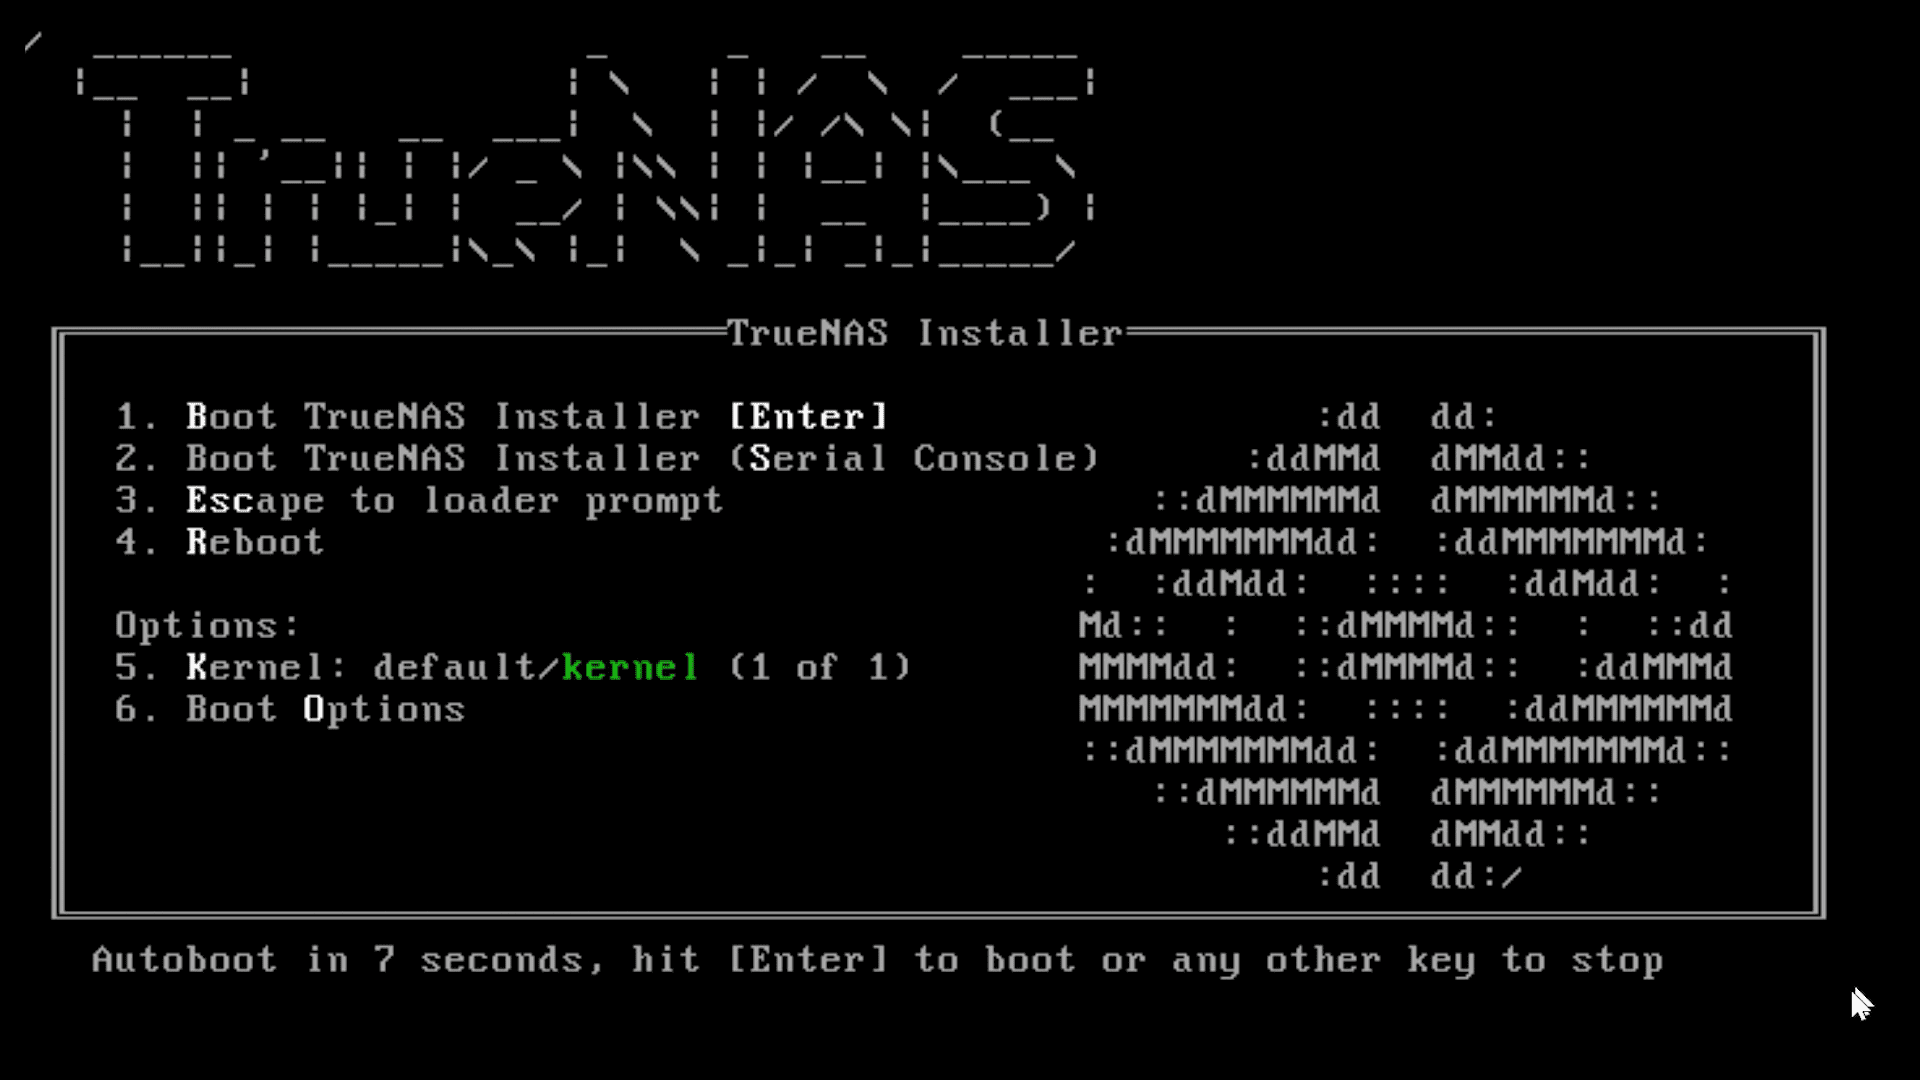
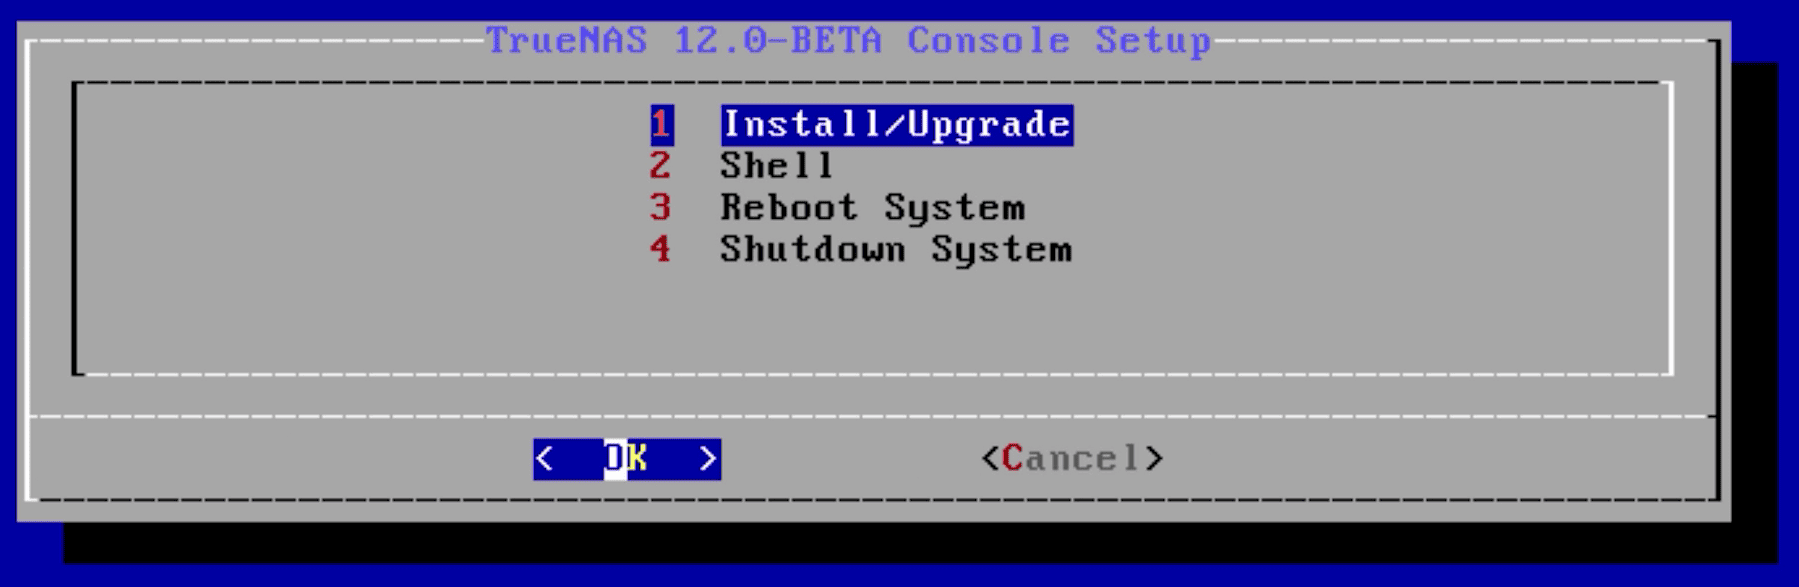
Menu instalasi TrueNAS akan ditampilkan. Pilih opsi 1 pada menu untuk memulai instalasi TrueNAS. Ini akan memuat menu Pengaturan Konsol. Tekan enter untuk memilih opsi “Instal/Tingkatkan”.
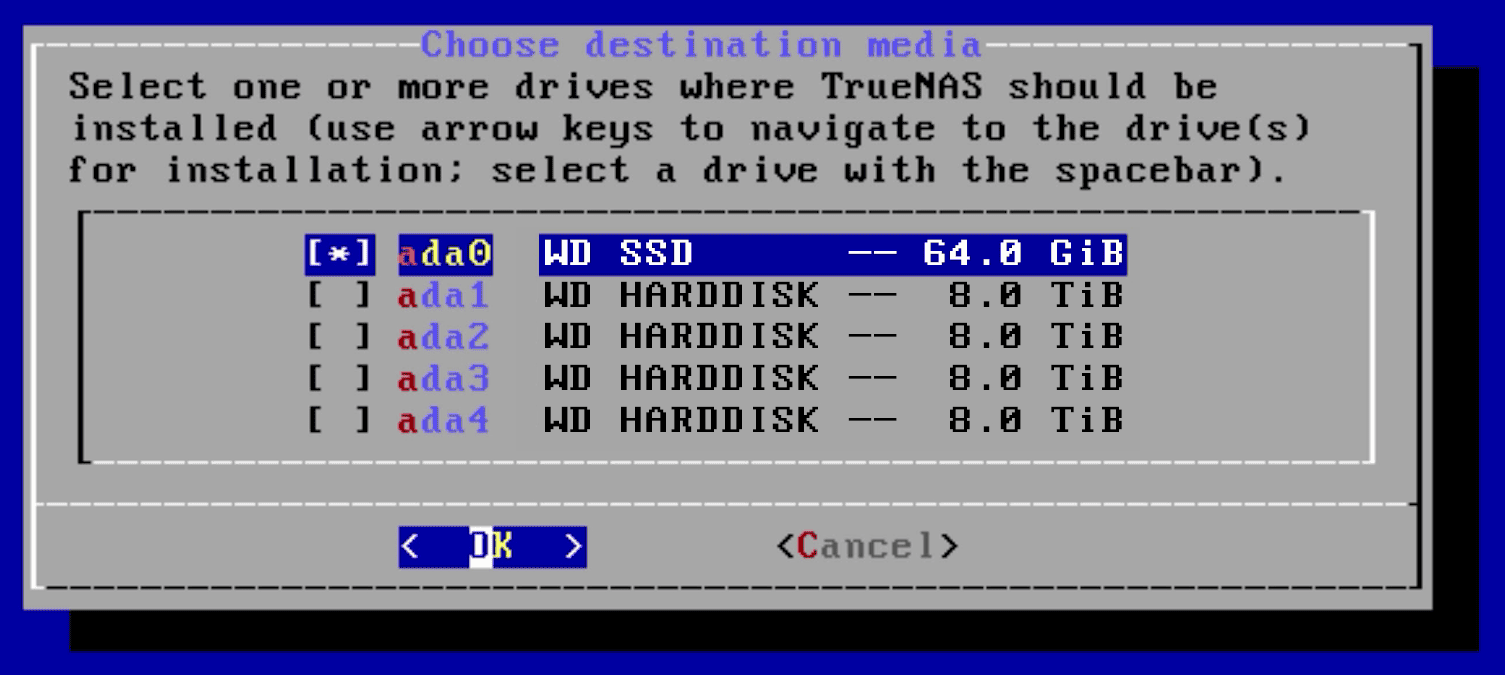
Menu berikutnya menanyakan drive mana yang harus digunakan untuk TrueNAS. Pastikan untuk memilih perangkat boot dan bukan disk penyimpanan. Menu ini akan menampilkan ukuran disk untuk memudahkan dalam menentukan perangkat boot, yang umumnya berukuran lebih kecil dibandingkan disk penyimpanan (yang akan lebih besar). Yang Anda inginkan kemungkinan besar adalah yang terkecil dalam daftar. Perhatikan bahwa nama drive Anda akan berbeda.
Tekan tombol panah untuk memilih drive, dan tekan spasi untuk menetapkannya sebagai drive yang ingin Anda gunakan.
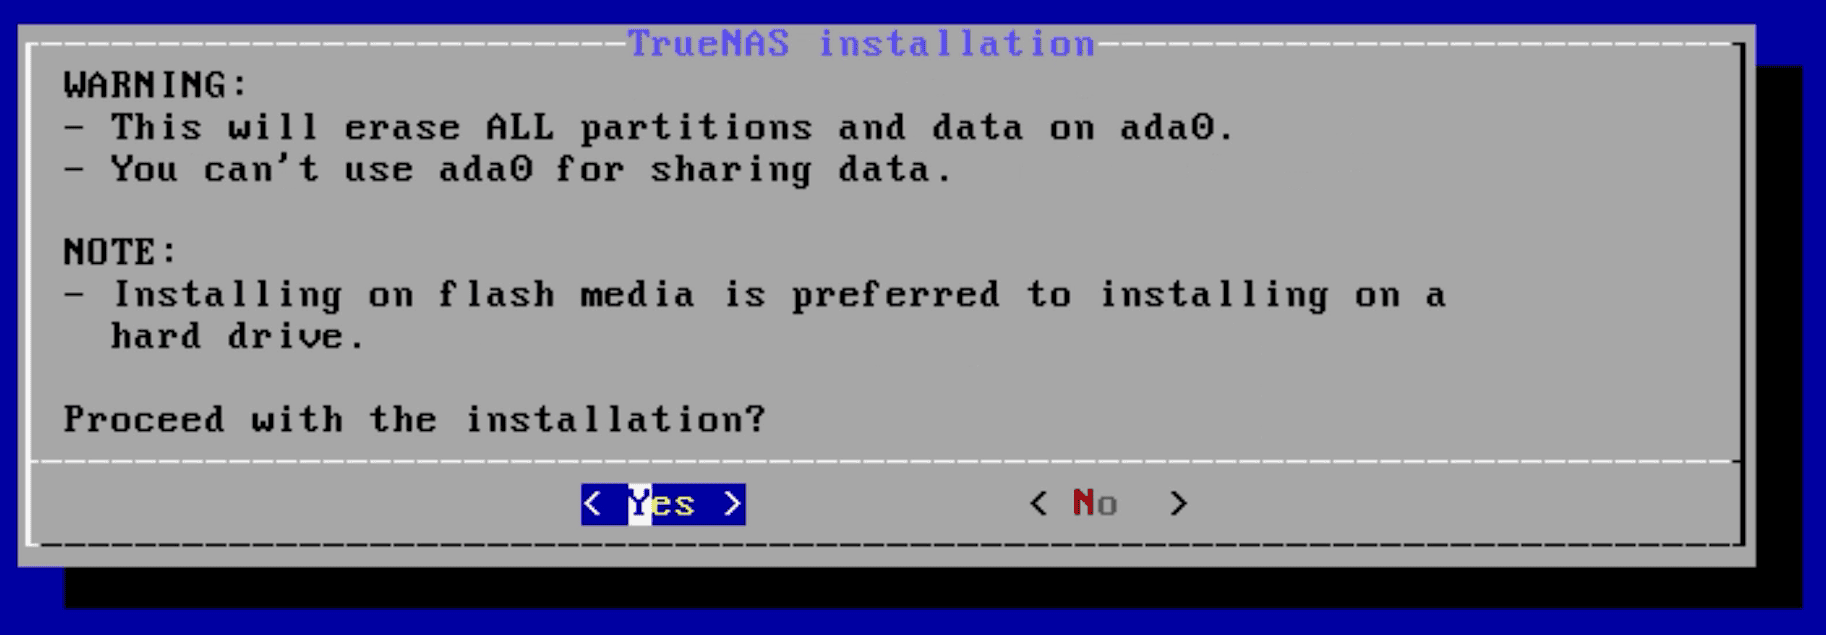
Perangkat boot tidak dapat digunakan untuk apa pun selain sistem operasi itu sendiri . Tekan OK, lalu YES, untuk melanjutkan.
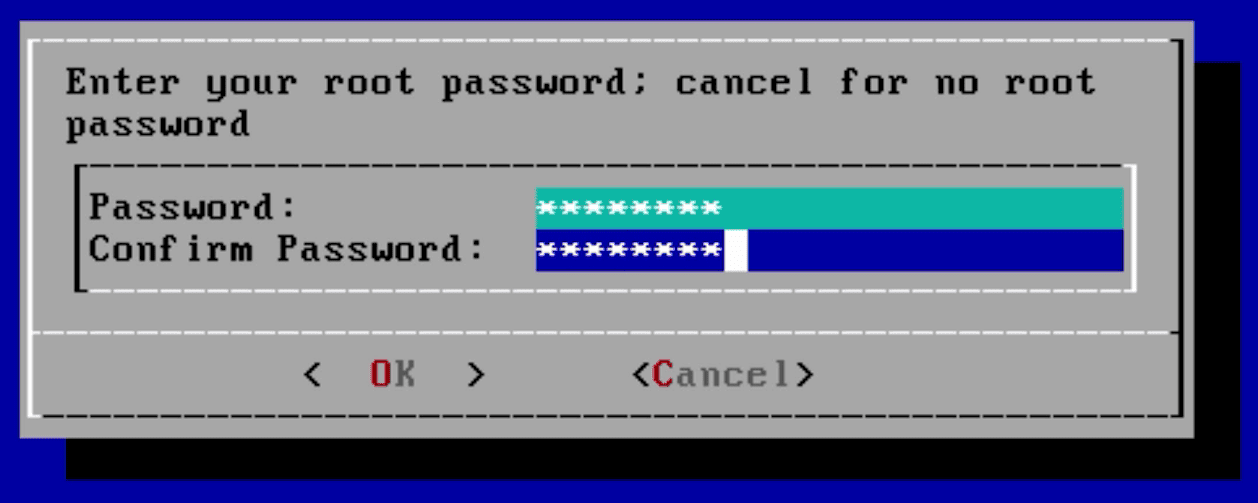
Selanjutnya ketik dan konfirmasi password yang akan digunakan untuk login TrueNAS.
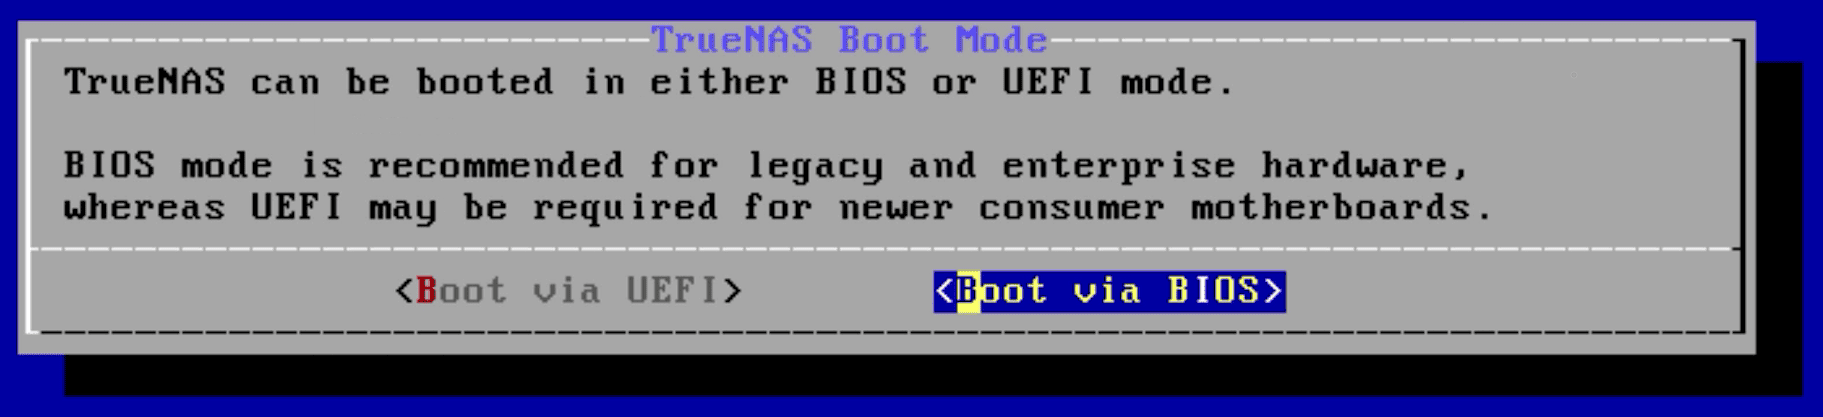
TrueNAS dapat di-boot dalam mode BIOS atau UEFI. Untuk keperluan video ini, saya akan memilih BIOS. BIOS berfungsi untuk hampir semua motherboard dan biasanya merupakan pilihan untuk perangkat keras lama. Memilih UEFI mengharuskan motherboard Anda lebih modern dan mampu UEFI.
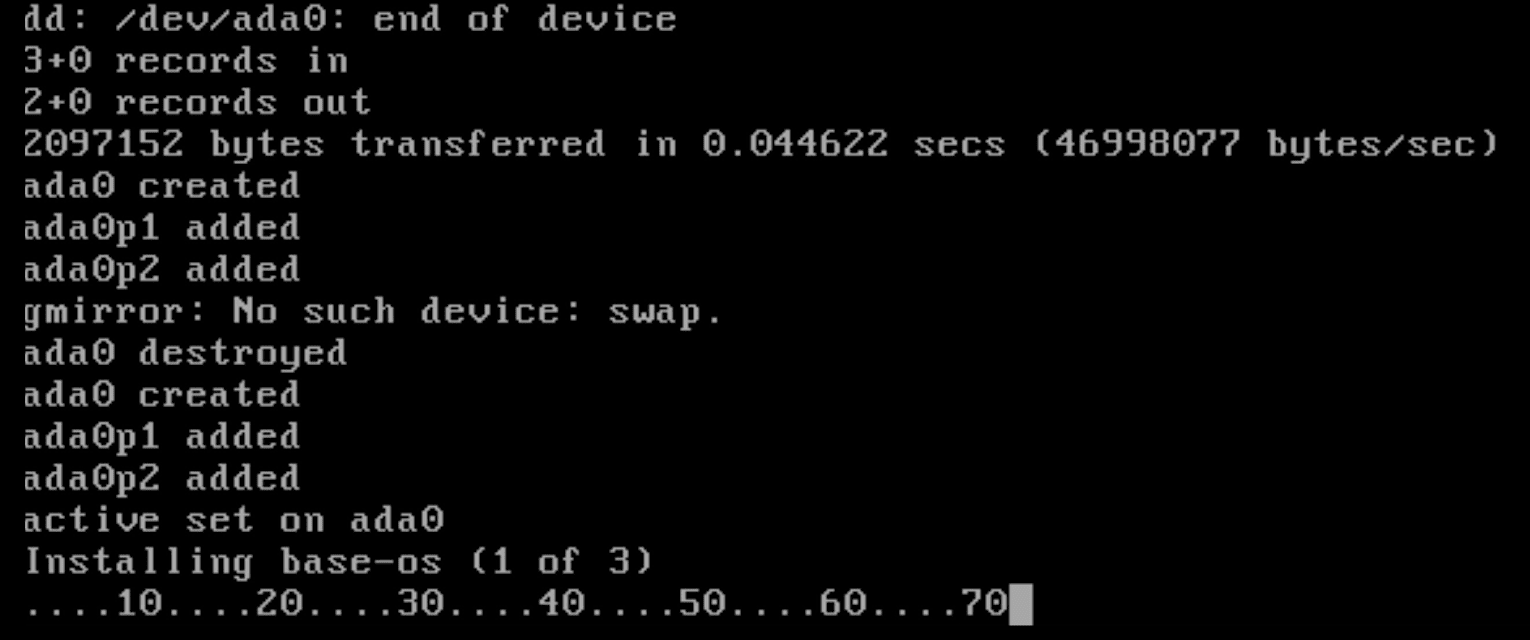
Setelah dipilih, instalasi Anda akan dimulai. Tunggu sebentar, semua perintah yang muncul di layar adalah hal yang normal. Ini akan memakan waktu beberapa menit.

Sebuah pesan akan muncul mengatakan untuk reboot dan menghapus media instalasi. Pilih OK untuk mem-boot ulang. Hapus media instalasi dari sistem Anda. Saat sistem di-boot ulang, periksa kembali BIOS untuk memastikan urutan boot sekarang ditetapkan secara default ke perangkat boot.
Jalankan TrueNAS
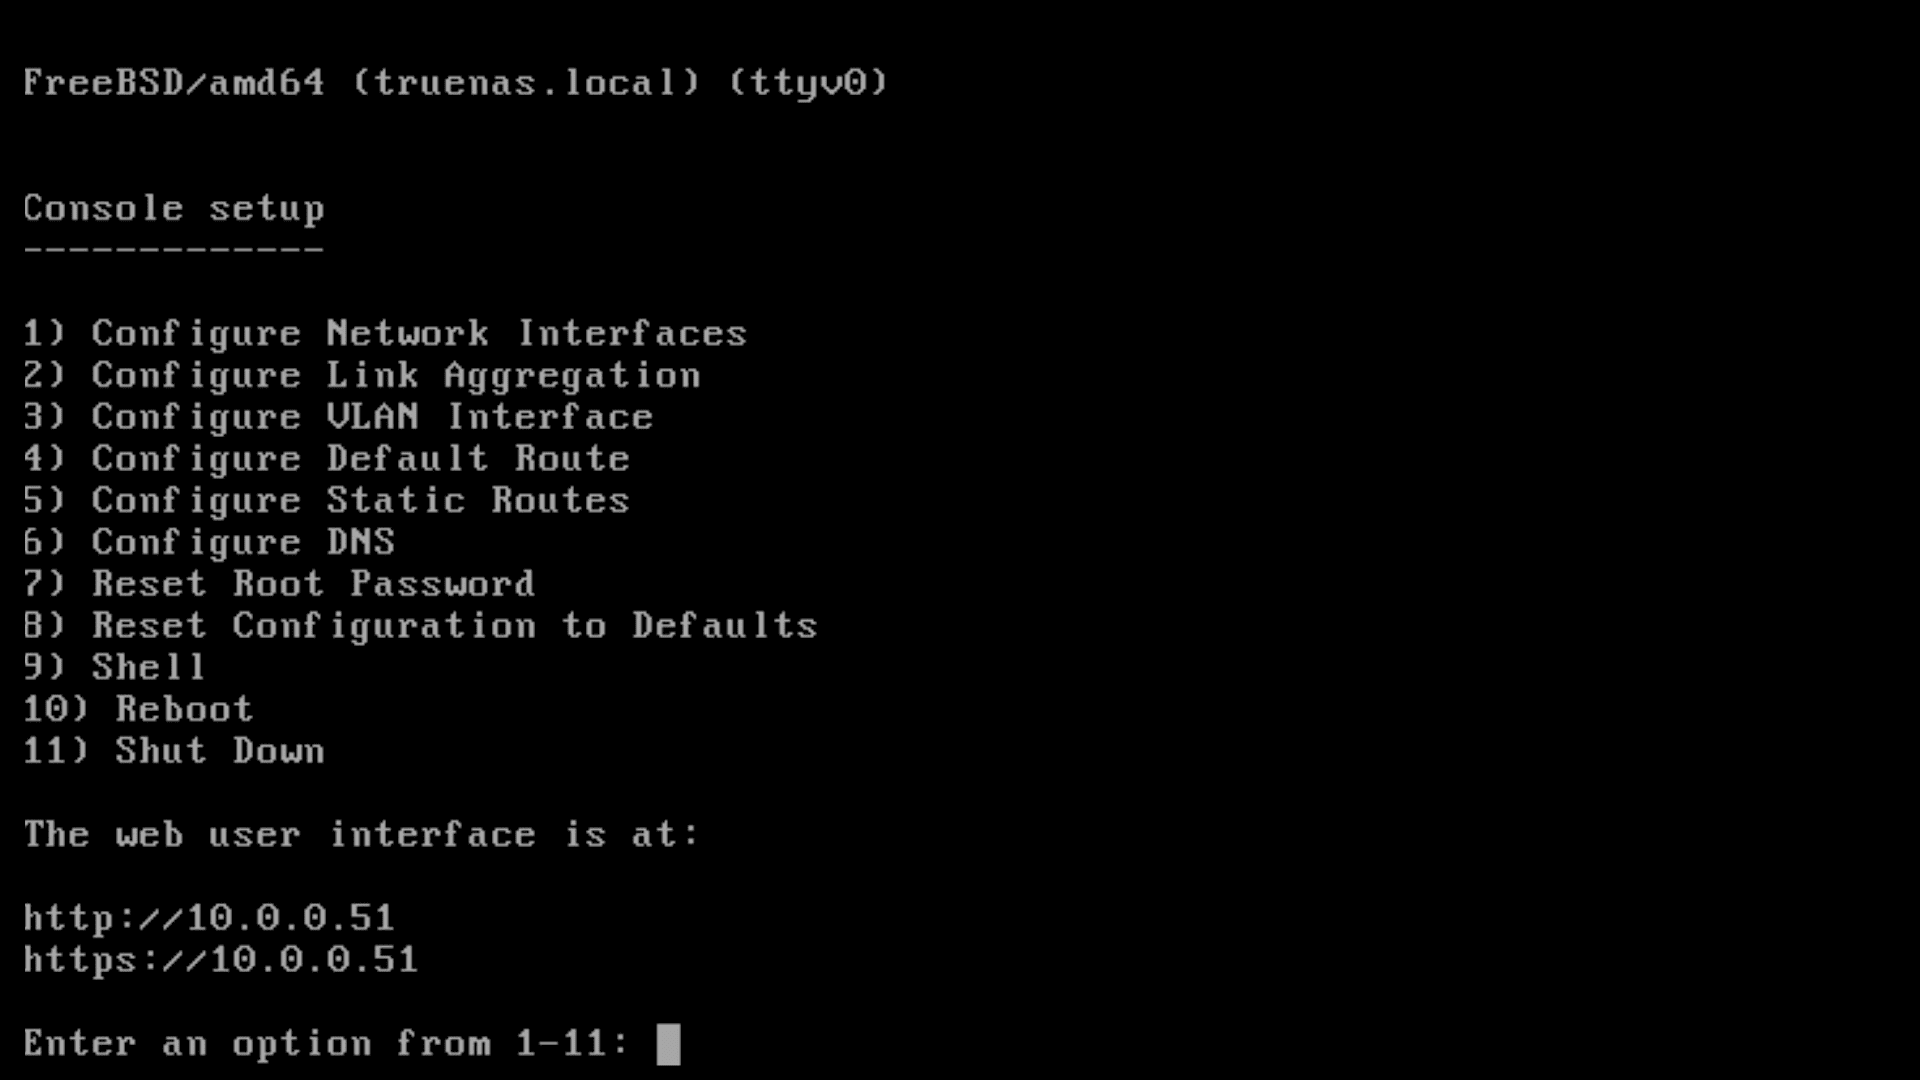
Saat sistem melakukan booting dari perangkat boot, pesan akan muncul saat sistem operasi TrueNAS dimuat. Ketika selesai memuat Anda akan melihat menu "Pengaturan konsol". Di bagian bawah layar ini, alamat IP akan dicantumkan.
Dari komputer terpisah yang terhubung ke jaringan yang sama, buka browser web dan ketik alamat tersebut. Jika yang ditampilkan adalah “0.0.0.0”, periksa apakah kabel jaringan telah terpasang dan apakah jaringan tersebut memiliki server DHCP.
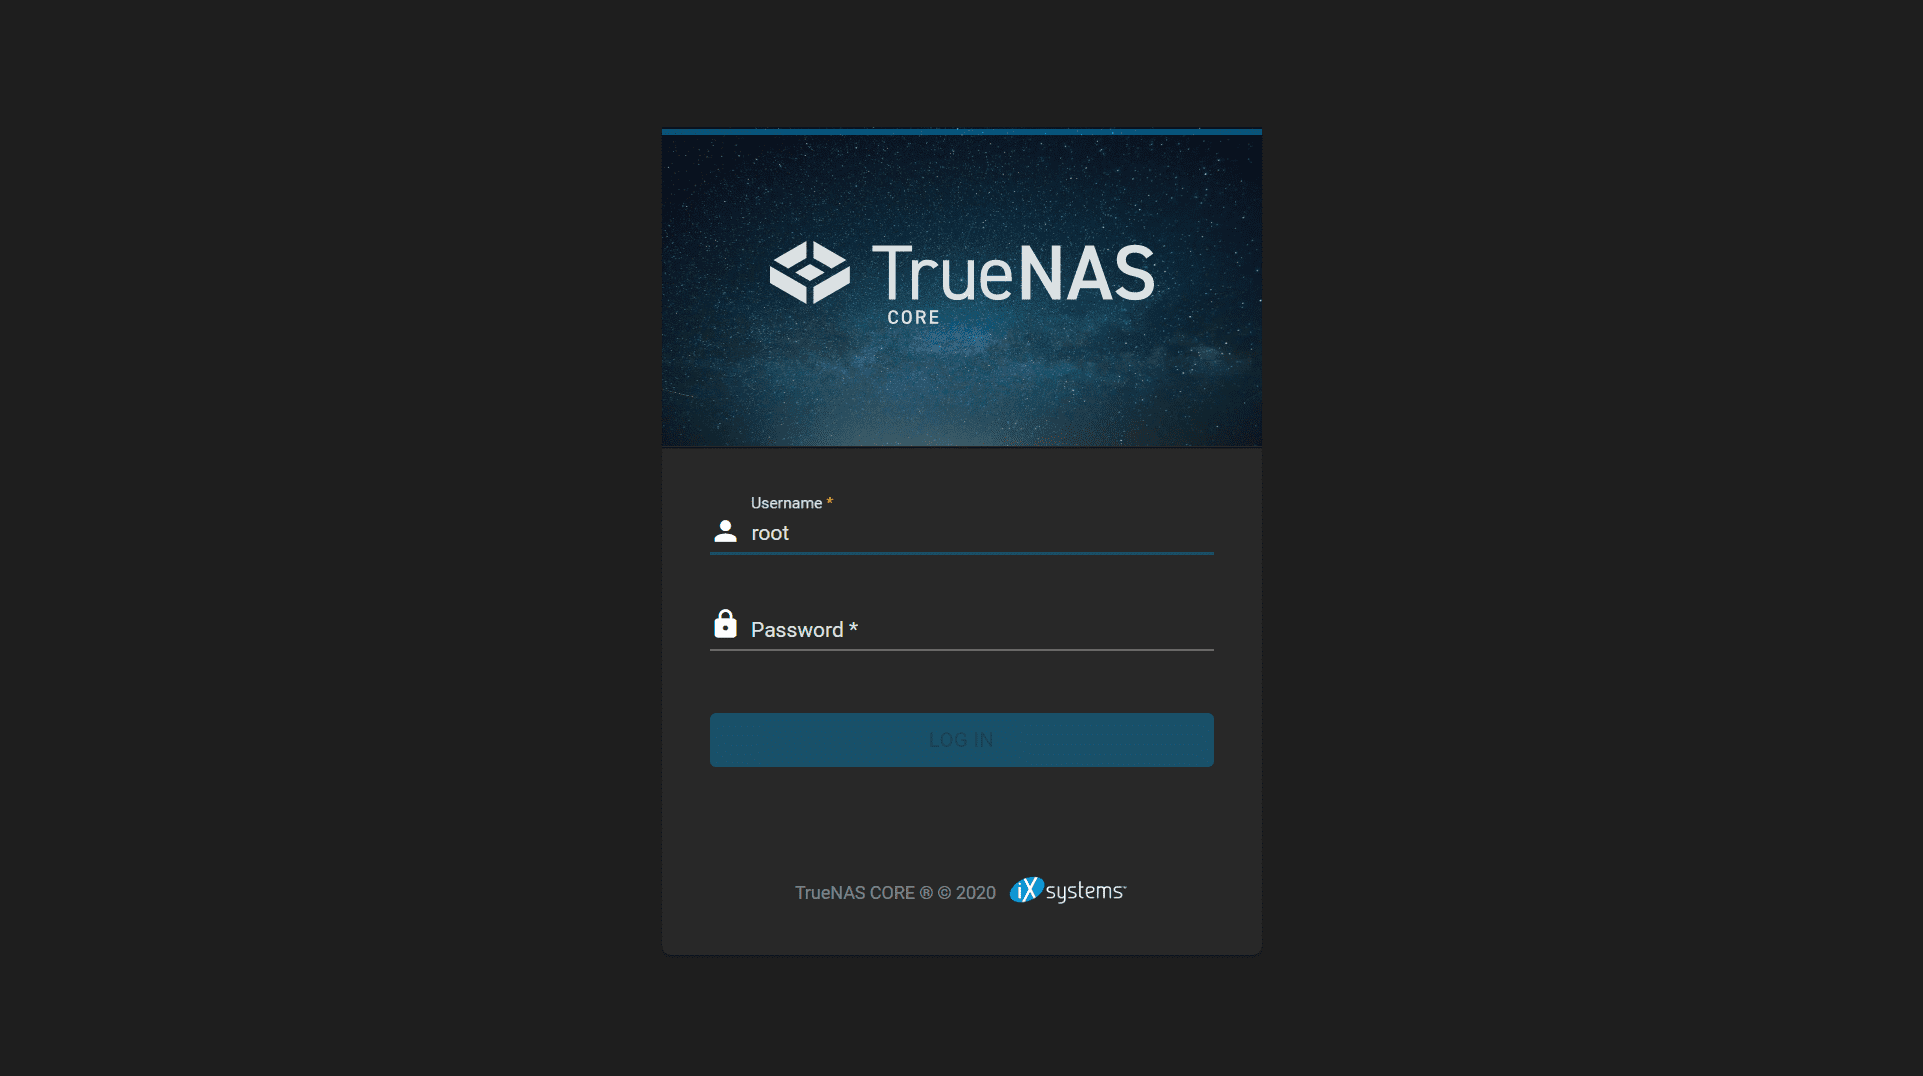
Menu login TrueNAS akan muncul setelah bootup selesai. Ketik root untuk nama pengguna dan kata sandi yang Anda buat saat instalasi.
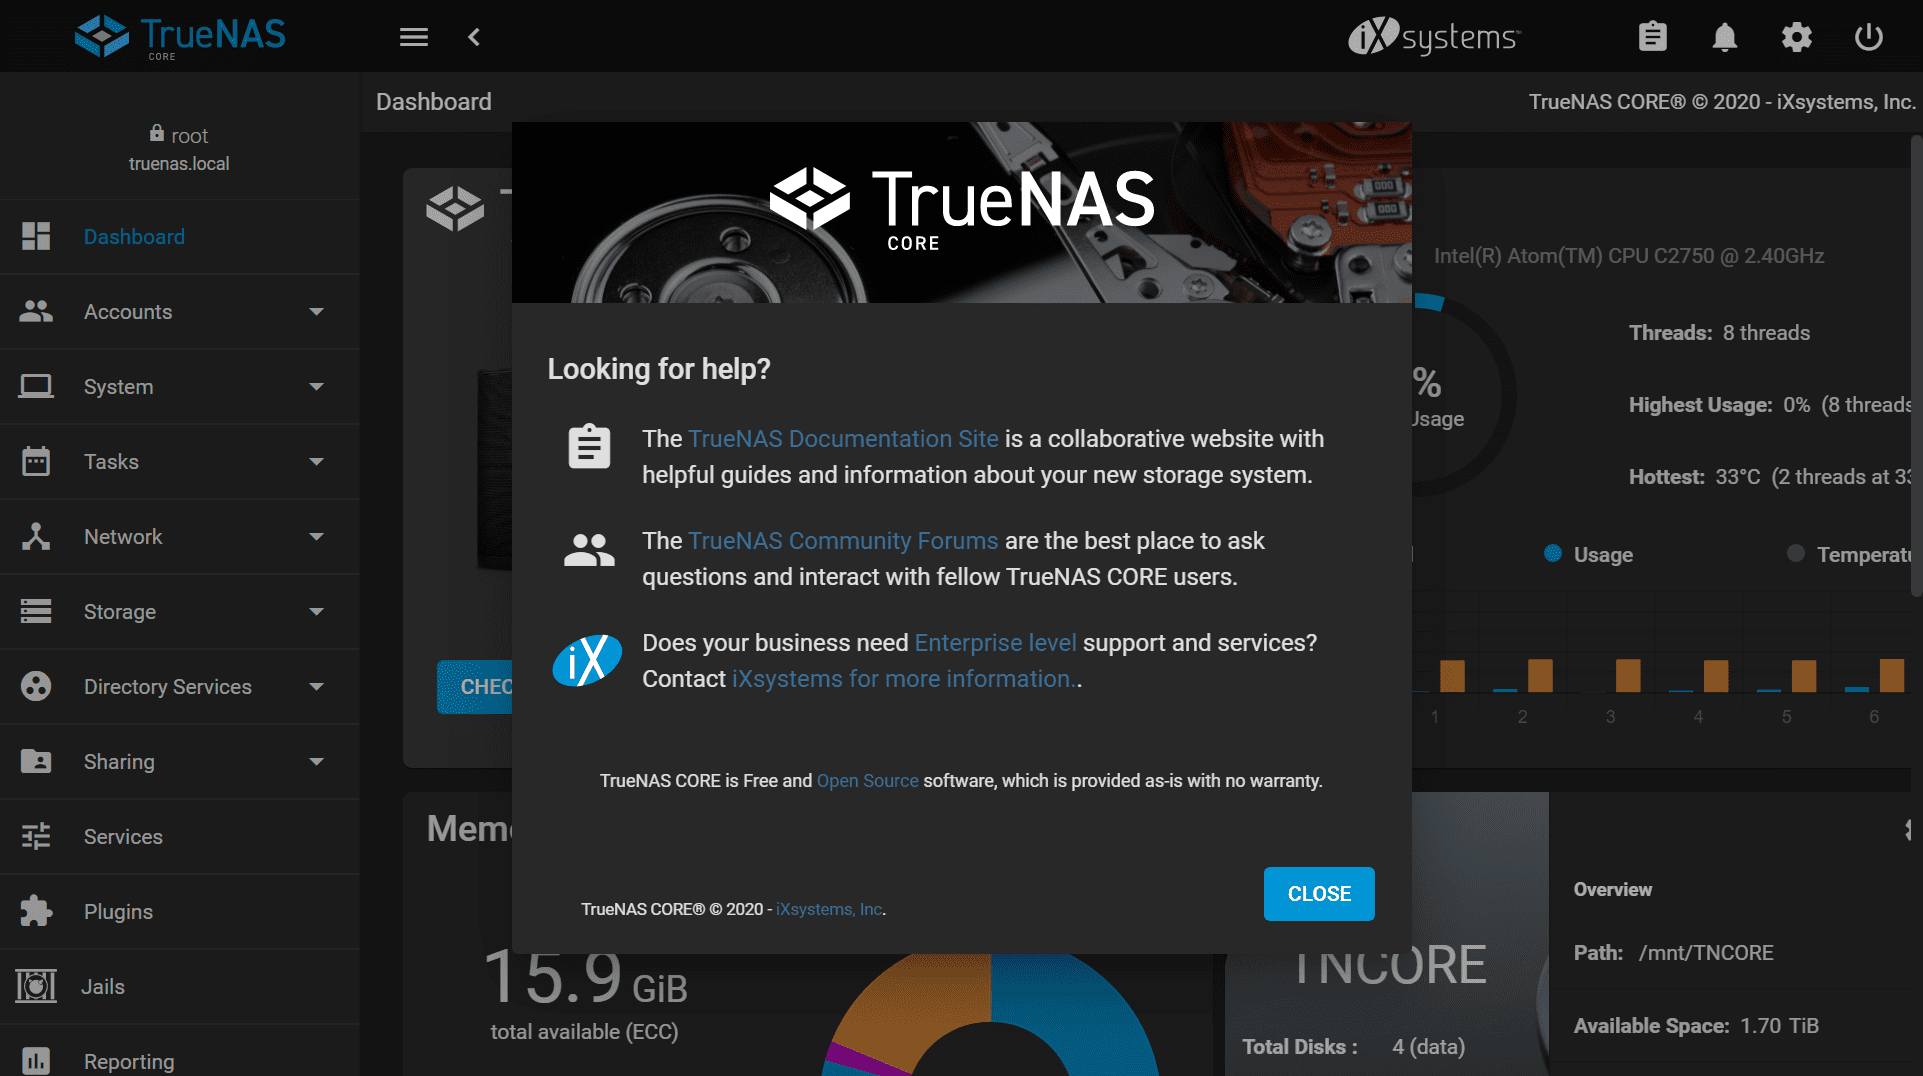
Setelah Anda masuk, Anda akan memiliki akses ke antarmuka web TrueNAS yang digunakan untuk mengelola disk penyimpanan Anda, mengonfigurasi akses ke data yang disimpan, dan melihat status sistem.
Selamat! Anda baru saja menginstal TrueNAS. Pastikan untuk membaca tutorial dan video kami yang lain untuk mempelajari lebih lanjut tentang mengonfigurasi dan menggunakan TrueNAS.
Untuk informasi lengkap tentang mengonfigurasi TrueNAS, kunjungi docs.truenas.com .
Bagikan Di Sosial:
=================================================================
We’re going to walk you through the basic requirements to run the TrueNAS CORE storage operating system, creating the installation media, and installing it onto your system.
Minimum Requirements
Here are the basics of what you’ll need to run TrueNAS:
- 64-bit system: Used solely for TrueNAS CORE. TrueNAS is NOT dual-boot friendly, so make sure you’re only using the system for TrueNAS.
- Minimum 8 GB of RAM: Use more if you’re installing virtual machines or plugins.
- Boot device (SSD or HDD): Also known as the boot drive. At least 16 GB of storage capacity is required to serve as the boot device for TrueNAS. An SSD is an ideal choice for longevity; keep in mind that the entire disk will be used for the TrueNAS operating system. USB sticks are no longer recommended, due to the high amount of write tasks on TrueNAS.
- Storage drives (SSDs or HDDs): At least one hard drive for storage of files, but multiple drives of the same capacity can be easily bundled together to provide redundancy if a drive fails. Western Digital drives are a great choice for data storage, but as with any vendor, make sure to avoid drives using SMR (Shingled Magnetic Recording) technology in ZFS applications.
- Ethernet cord: To connect your system to the network, through a router or modem. There is no wireless support in TrueNAS.
- Blank DVD or USB stick: Required to create the TrueNAS installation media. The TrueNAS ISO image exceeds 700 MB so CDs will not work. Your USB stick should be at least 1 GB. Please note that the installation media is not the same as the boot device.
To access the latest TrueNAS image: https://www.truenas.com/download-truenas-core/ - Monitor & keyboard: After the setup is complete and you’ve written down your TrueNAS system’s IP address, the monitor can be disconnected.
- Computer or laptop & internet browser: To access the GUI and administer your TrueNAS system.
Creating the Installation Media and Operating System Device for TrueNAS
It’s important to understand that TrueNAS needs two devices during the installation process, the install media and the operating system device (boot device). The install media is used to install TrueNAS to the operating system device on a computer.
A USB stick or DVD can be used as the install media. In this tutorial, we will be using an 8 GB USB stick as our install media. The minimum size required is 1 GB.
The TrueNAS CORE operating system device can be an SSD or hard drive. The operating system device must have at least 16 GB of space, but we recommend 32 GB or more for operating system device storage capacity to provide room for logging, operating system environments, and future upgrades. An SSD is recommended to improve overall responsiveness as well as the speed of installing further upgrades.
Note that the entire operating system device will be used for the TrueNAS operating system. The drive cannot be used for sharing data through TrueNAS.
TrueNAS reads and writes to the operating system device, so reliability counts. Using a small SSD or hard drive will provide the best longevity. Due to the high write tasks in TrueNAS CORE, USB sticks are not very reliable over the long term. With TrueNAS CORE scheduled to receive continued updates for stability and security, choosing a quality, reliable boot device is the first step towards a well-built TrueNAS system.
For this example, we will be using a tool called balenaEtcher also known as Etcher. Scroll down the web page and click on the Download button for Etcher. Download, install, and run Etcher.
Now insert your USB stick into your machine. Verify the drive letter by going to “This PC”.
For this example, we will be using a tool called balenaEtcher also known as Etcher. Scroll down the web page and click on the Download button for Etcher. Download, install, and run Etcher.
Now insert your USB stick into your machine. Verify the drive letter by going to “This PC”.
In the Etcher application, click “Flash from file” and browse to the TrueNAS .iso file that you downloaded earlier. If your USB stick is not already selected, click “Select Target” and choose the drive to use as the install media. Remember, this is the install media, not the operating system device. Now, click “Flash!” It takes a few minutes to write the image to the disk. A “Flash Complete!” message is shown when done.
After the installer file has been written to the install media, you’re ready to install TrueNAS.
Installing TrueNAS
Now that we’ve gone through the basics of what you need to get started, let’s begin the installation of TrueNAS.
Make sure that both the boot device and the TrueNAS installation media are inserted in the machine that you chose to run TrueNAS.
Boot into the BIOS of the system and double-check that your system is set to boot from the device that contains the TrueNAS installation media that you created earlier. After confirming, reboot the system.
The TrueNAS install menu will be displayed. Choose option 1 on the menu to begin the TrueNAS installation. This will load the Console Setup menu. Hit enter to choose the “Install/Upgrade” option.
The next menu asks which drive should be used for TrueNAS. Make sure to select the boot device and not the storage disk. This menu will show the size of the disks to make it easier to determine the boot device, which is generally a smaller size than the storage disks (which will be larger). The one you want will likely be the smallest on the list. Note that the names of your drives will be different.
Press the arrow keys to select a drive, and press the spacebar to designate it as the drive you wish to use.
The boot device cannot be used for anything other than the operating system itself. Press OK, then YES, to proceed.
Next, type in and confirm the password that will be used to login to TrueNAS.
TrueNAS can be booted in either BIOS or UEFI mode. For the purposes of this video, I’ll be choosing BIOS. BIOS works for almost all motherboards and is typically the option to choose for older hardware. Choosing UEFI will require that your motherboard is more modern and UEFI capable.
Once chosen, your installation will begin. Wait for a bit, all those commands popping up on the screen are perfectly normal. It should take a few minutes.
A message will appear saying to reboot and remove the installation media. Choose OK to reboot. Remove the installation media from your system. As the system reboots, double-check the BIOS to make sure the boot order now defaults to the boot device.
Fire up TrueNAS
When the system boots from the boot device, messages will appear as the TrueNAS operating system loads. When it is done loading you will see the “Console setup” menu. At the bottom of this screen, an IP address will be listed.
From a separate computer that is connected to the same network, open a web browser and type in that address. If it instead shows “0.0.0.0”, check if the network cable is plugged in, and that the network has a DHCP server.
The TrueNAS login menu will appear once the bootup is complete. Type in root for the username and the password you created during the installation.
Once you are logged in, you will have access to the TrueNAS web interface which is used to manage your storage disks, configure access to the stored data, and view the status of the system.
Congratulations! You have just installed TrueNAS. Be sure to check out our other tutorials and videos to learn more about configuring and using TrueNAS.
For comprehensive information on configuring TrueNAS, visit docs.truenas.com.
Tidak ada komentar:
Posting Komentar