How to Migrate VMware VM to Proxmox in 2 ways?
2024-04-28 | Dan Zeng
With the continuous development of virtualization technology, more and more people need to migrate their existing VMware virtual machines to Proxmox virtualization platform smoothly. This article describes in 2 ways how to perform this VMware Proxmox migration process successfully.
Method 1. Using Proxmox new import wizard
Proxmox VE introduces a new integrated VM Import Wizard in the 2024 phase that allows reuse of the storage plug-in system for seamless integration with APIs and web-based user interfaces. You can use it to import entire VMware ESXi VMs, enabling VM migration from VMware to Proxmox.
Prerequisite: Make sure that your Proxmox VE version is 8 (or higher) and that the latest available system updates are applied.
To Migrate VMware VM to Proxmox, following these steps:
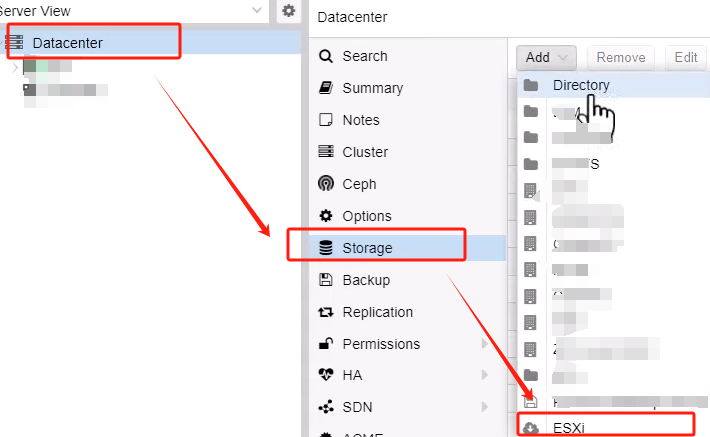
1. In Proxmox VE, Datacenter > Storage > Add > ESXi > enter IP, Username,Password
2. Select the VMs to be imported > Specify Imported VMs > Import
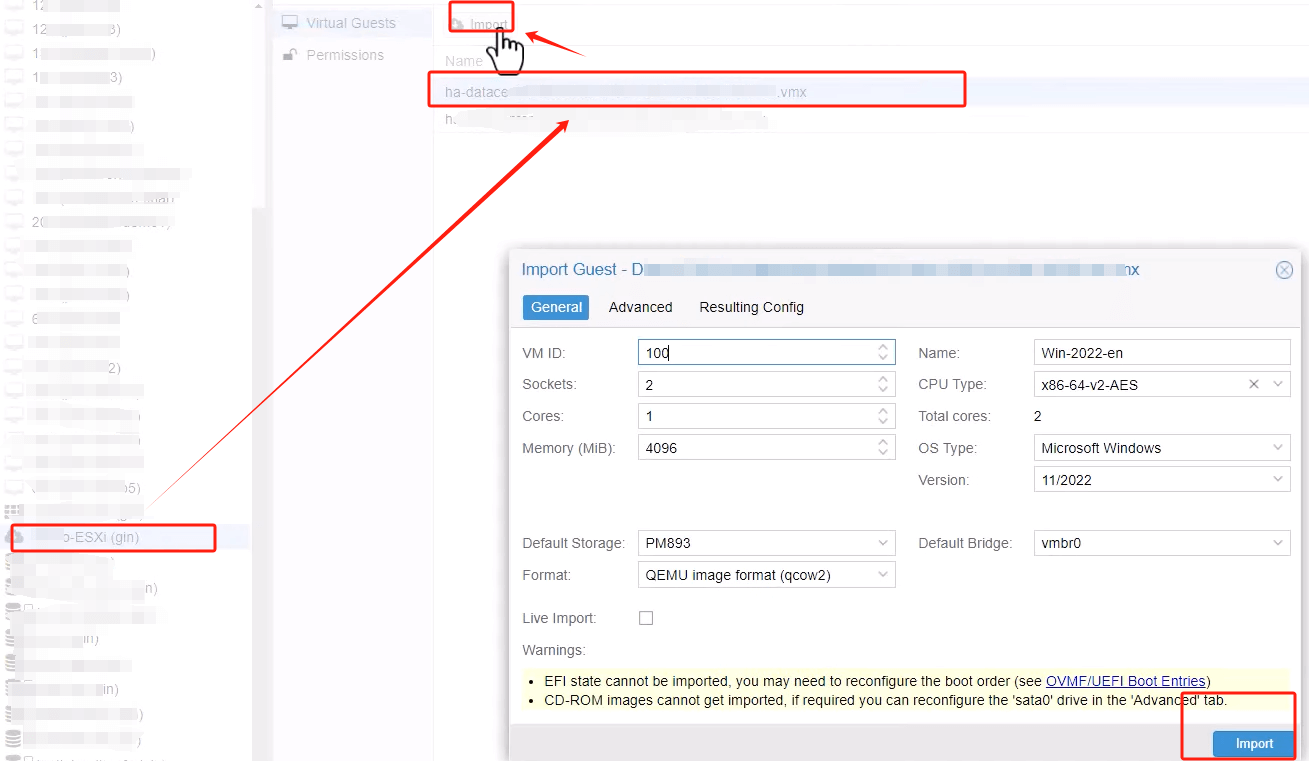
Pay attention!
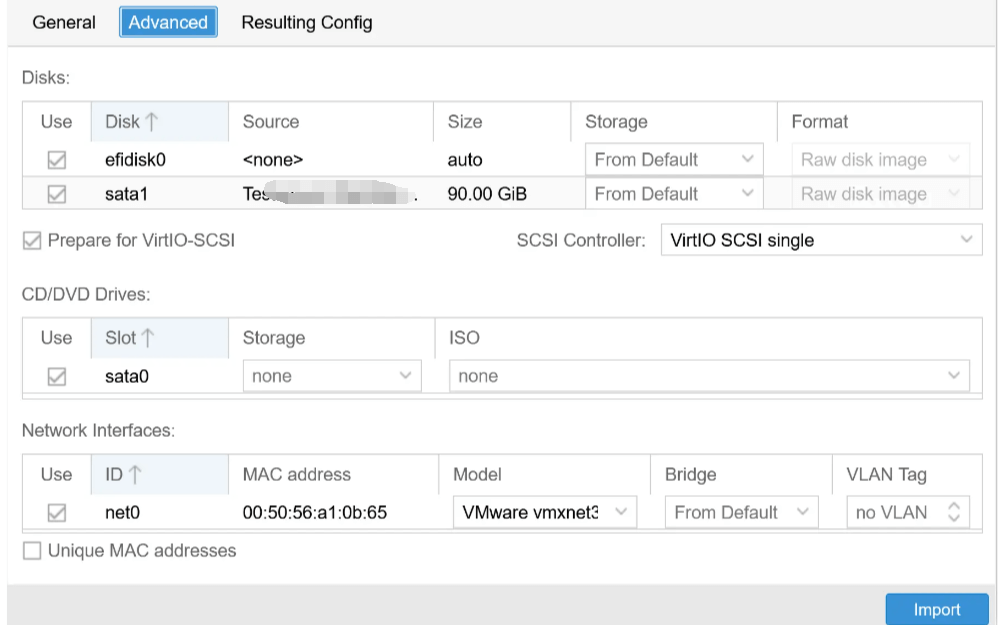
In Advanced, you can choose to:
- Select a new ISO image for the CD-ROM drive.
- Choose different storage targets for each disk if you have multiple disks.
- Configure different network hardware models or bridges for multiple network devices.
- Disable the import of certain disks, CD-ROM drives, or network devices.
Here you can see that Proxmox VMware migration was successful.

Method 2. Manually perform VMware to Proxmox migration
To migrate VM from VMware to Proxmox, following these steps:
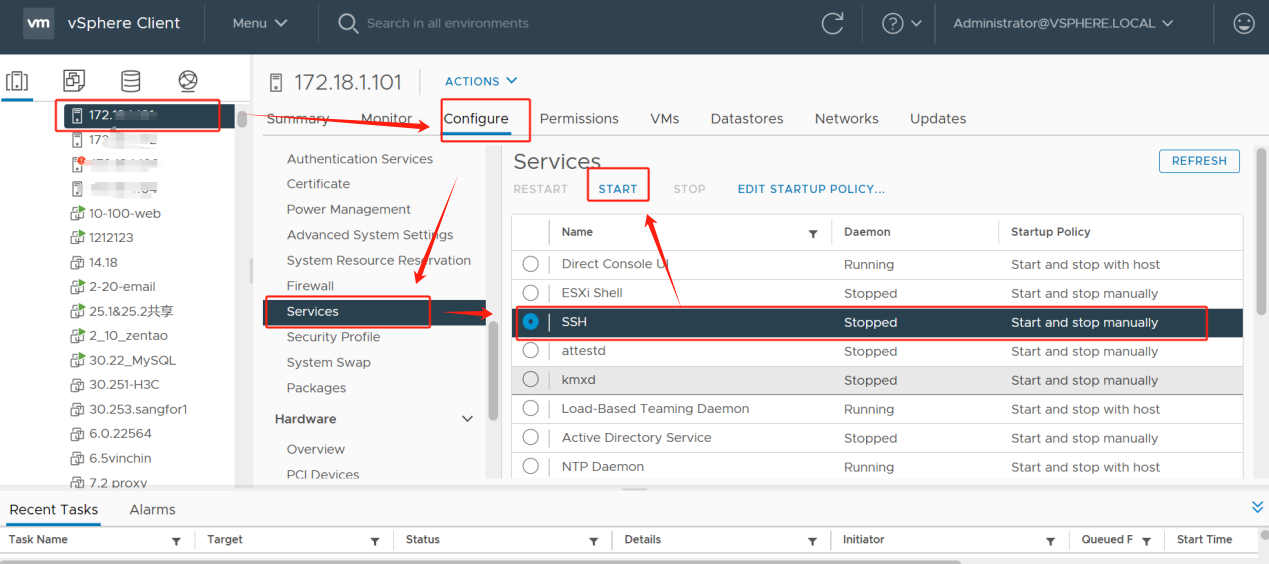
Step1. Enable SSH on VMware ESXi
In vSphere Client, hit host > click Configure > choose Services > click SSH > hit START
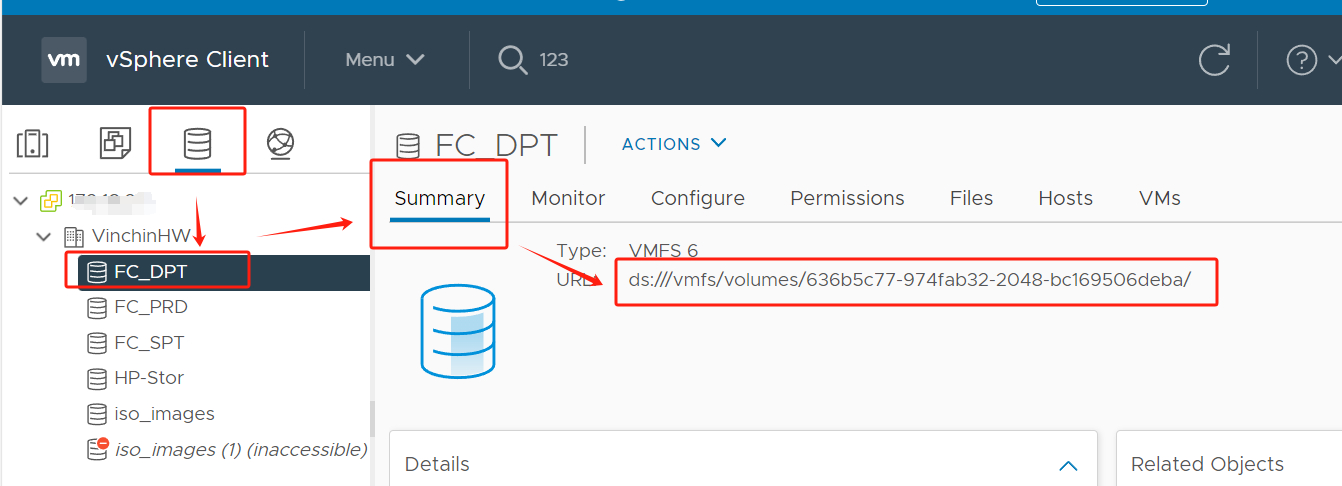
Step 2. Find the VM storage path
The sample is VM 99, and since VM99 is stored in vSphere's FCD-DPT, you can see its path directly.
Click Storage > choose FC-DPT > hit Summary > get its path
Step 3. Use WinSCP to connect to the host IP of the VM
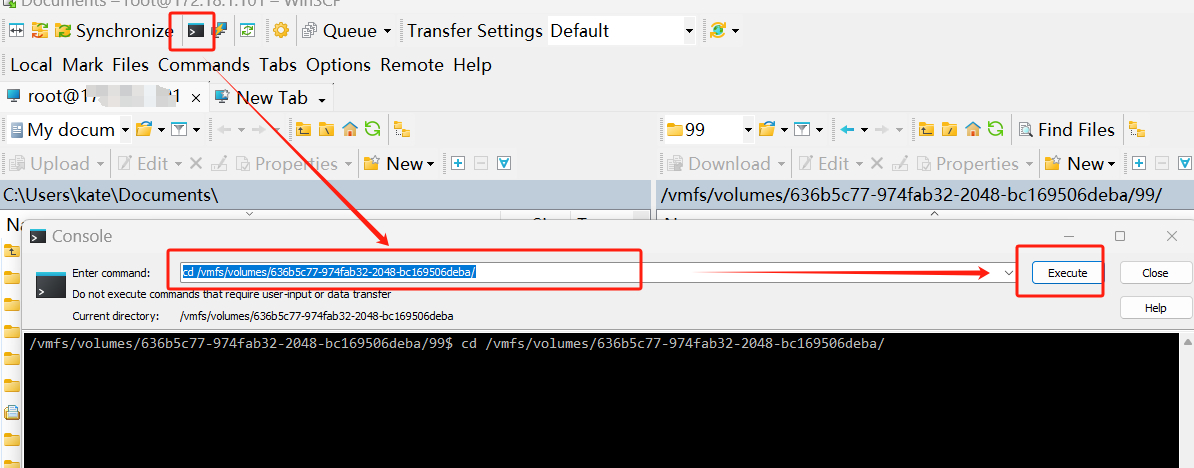
1. Using WinSCP to connect to the host IP where the VM is located > hit terminal > type the following command > hit Execute
cd /vmfs/volumes/636b5c77-974fab32-2048-bc169506deba/
cd: Perform path switching
Storage path: /vmfs/volumes/636b5c77-974fab32-2048-bc169506deba/
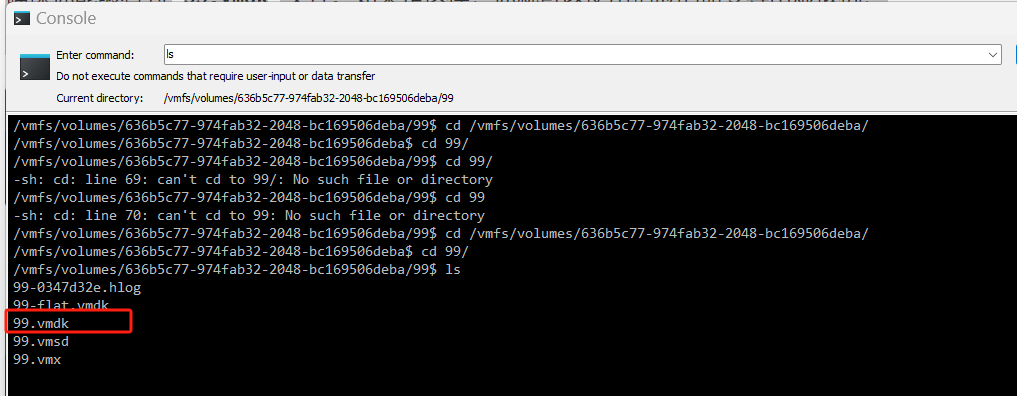
2. Switch to the VM 99 path and enter the following script > click Execute
cd 99/
1s
Make sure you can see the 99.vmdk file. Next, you can export the VM using the appropriate command.
Step 4. Create Proxmox VM
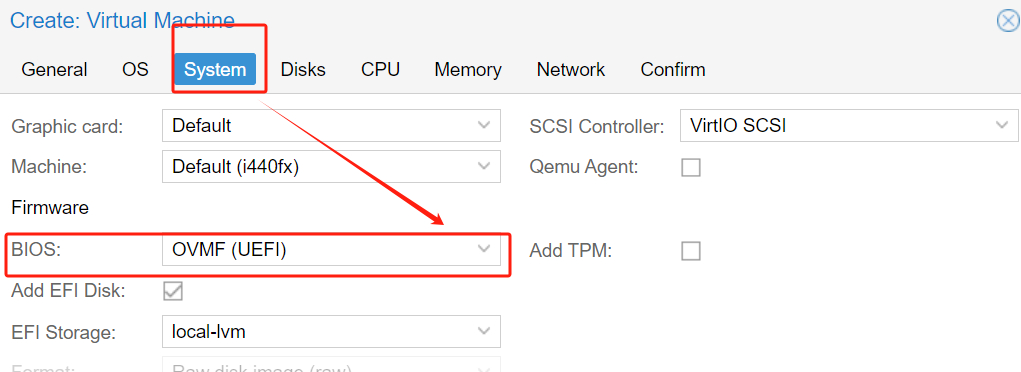
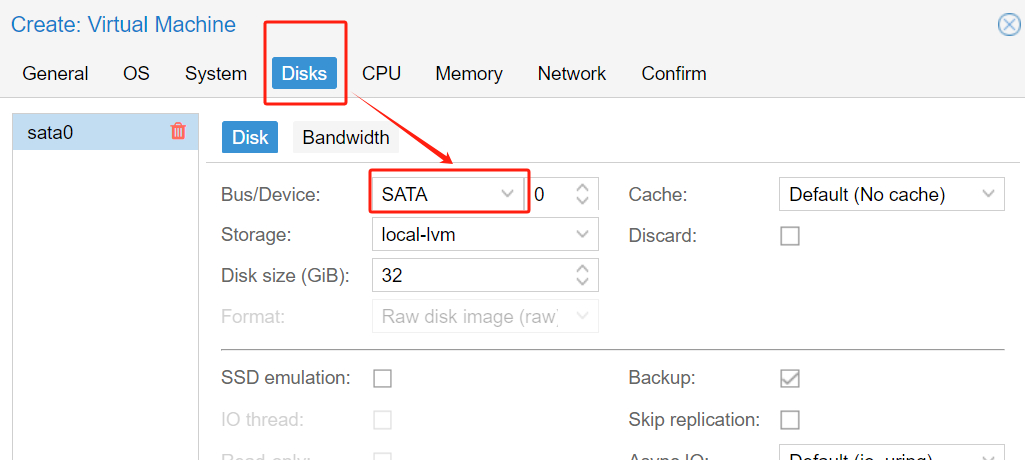
During the process of creating a Proxmox virtual machine, make sure you select the correct BIOS settings and hard disk drive type. Typically, you should select OVMF (UEFI) as the BIOS setting and set the hard disk drive type to SATA. The following are detailed step-by-step instructions:
1. In System, adjust the BIOS settings to UEFI (usually OVMF (UEFI) is selected)
2. In Disks, select Device Type as SATA
Step 5. Use SCP for file transfer in Proxmox
1. Usually a virtual disk will have two files: .vmdk and -flat.vmdk. These two files must be copied together to the target path of Proxmox. In Proxmox, hit Shell > type the following command:
scp -v <source> <destination>
scp -v root@172.18.1.101:/vmfs/volumes/636b5c77-974fab32-2048-bc169506deba/99/99.vmdk /var/lib/vz/
scp -v root@172.18.1.101:/vmfs/volumes/636b5c77-974fab32-2048-bc169506deba/99/99-flat.vmdk /var/lib/vz/
<source> is the path to the source file: root@172.18.1.101:/vmfs/volumes/636b5c77-974fab32-2048-bc169506deba/99/99.vmdk /var/lib/vz/
<destination> is the destination path:/var/lib/vz/
This command will copy the file from the remote machine (172.xxxxx) located at the path /vmfs/volumes/636b5c77-974fab32-2048-bc169506deba/99/99.vmdk to the local Proxmox machine at the path /var/lib/vz/.

Step 6. Import the VMDK Disk
1. Type the command:
qm importdisk 117 /var/lib/vz/99.vmdk Proxmox_NFS
You can see that it has been successfully imported.

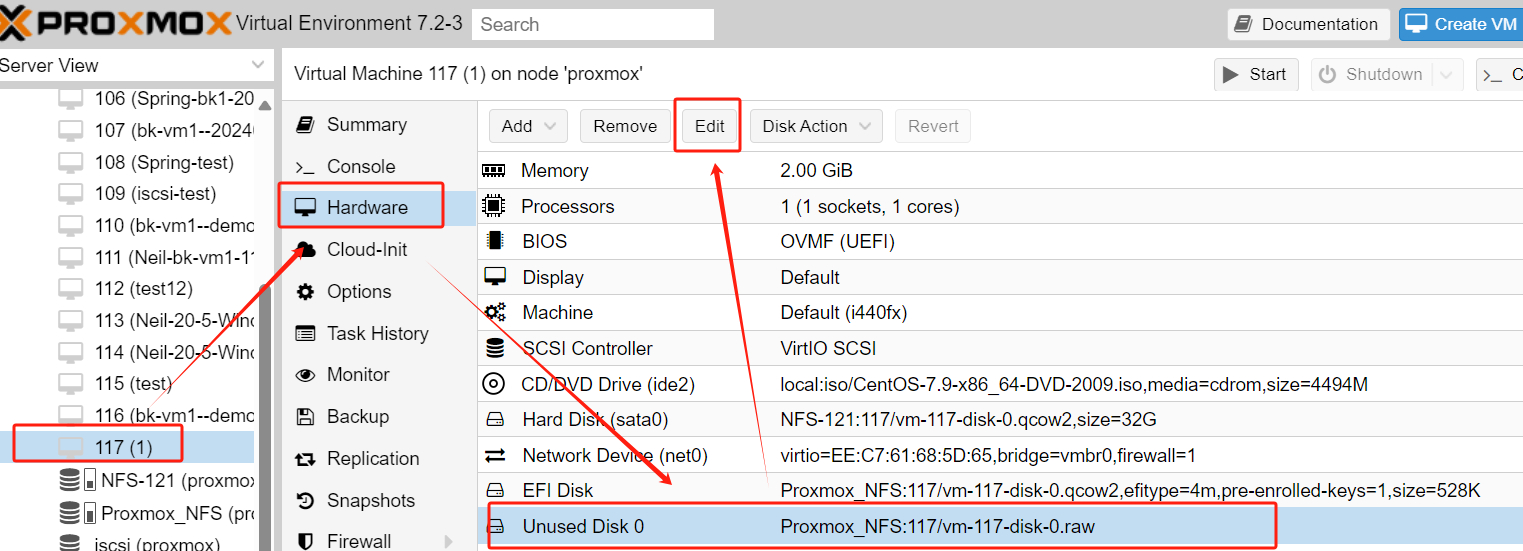
2. The converted vmdk disk will be automatically displayed as Unused Disk in the Proxmox VE.
Now, click the VM > hit Hardware > click Unused Disk 0 > choose Edit and make sure the bus/device is also SATA
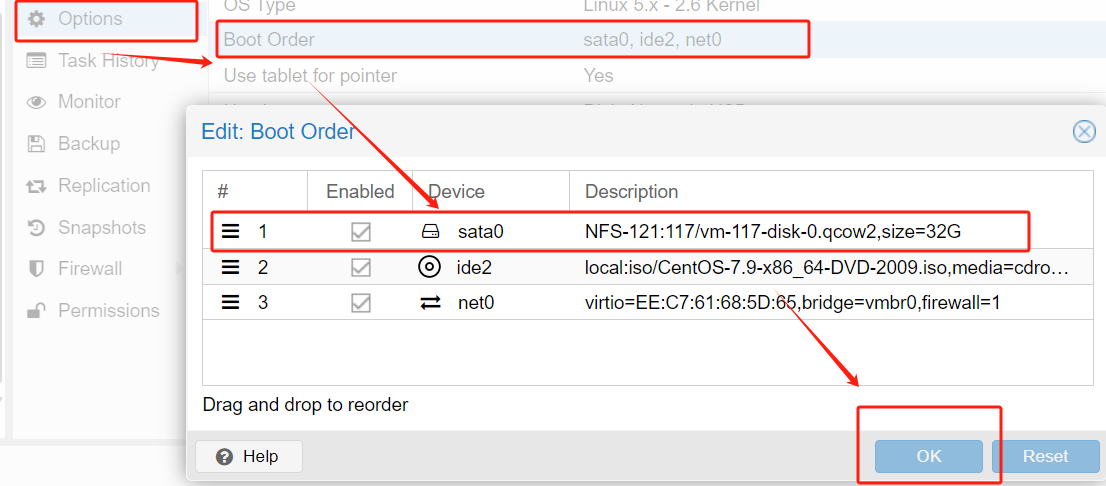
3. Click Options > double-click Boot Order > move newly attached disk at first > enabled it > hit OK
Step 7. Start the VM
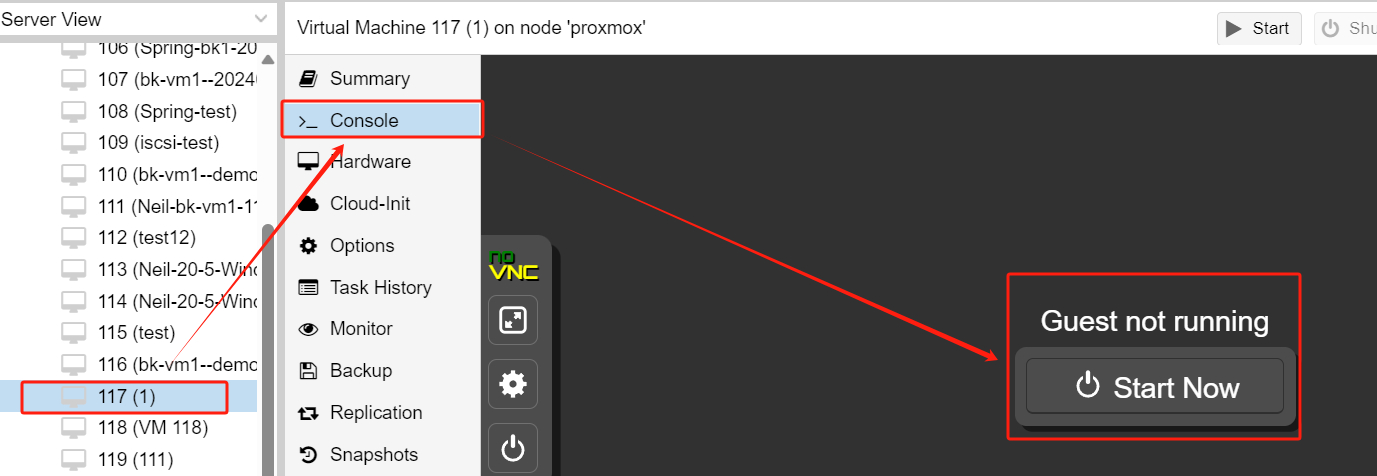
Now you can start the VM in Proxmox VE to check whether it is migrated successfully
Click the VM > hit Console > click Start Now
How to migrate VM from VMware to Proxmox with Vinchin Backup & Recovery?
Vinchin Backup & Recovery stands out as a professional data protection solution crafted to facilitate organizations in achieving dependable backup and swift Proxmox VMware migration within VM environments.
Supporting various virtualization platforms such as Proxmox, VMware, Hyper-V, Citrix XenServer, and more, Vinchin offers a versatile range of backup policy settings, catering to diverse data protection requirements.
In addition, Vinchin delivers an intuitive and user-friendly management interface, coupled with robust data protection and disaster recovery capabilities. Whether grappling with hardware failures, data loss, or unforeseen catastrophes, Vinchin empowers users to swiftly restore their VM environment, ensuring the continuity of stable business operations.
When it comes to migrate VMware VM to Proxmox, the process is simplified—eliminating the need for intricate conversion tasks. Users can effortlessly select the VM backup and restore it onto the new host, streamlining the migration experience.
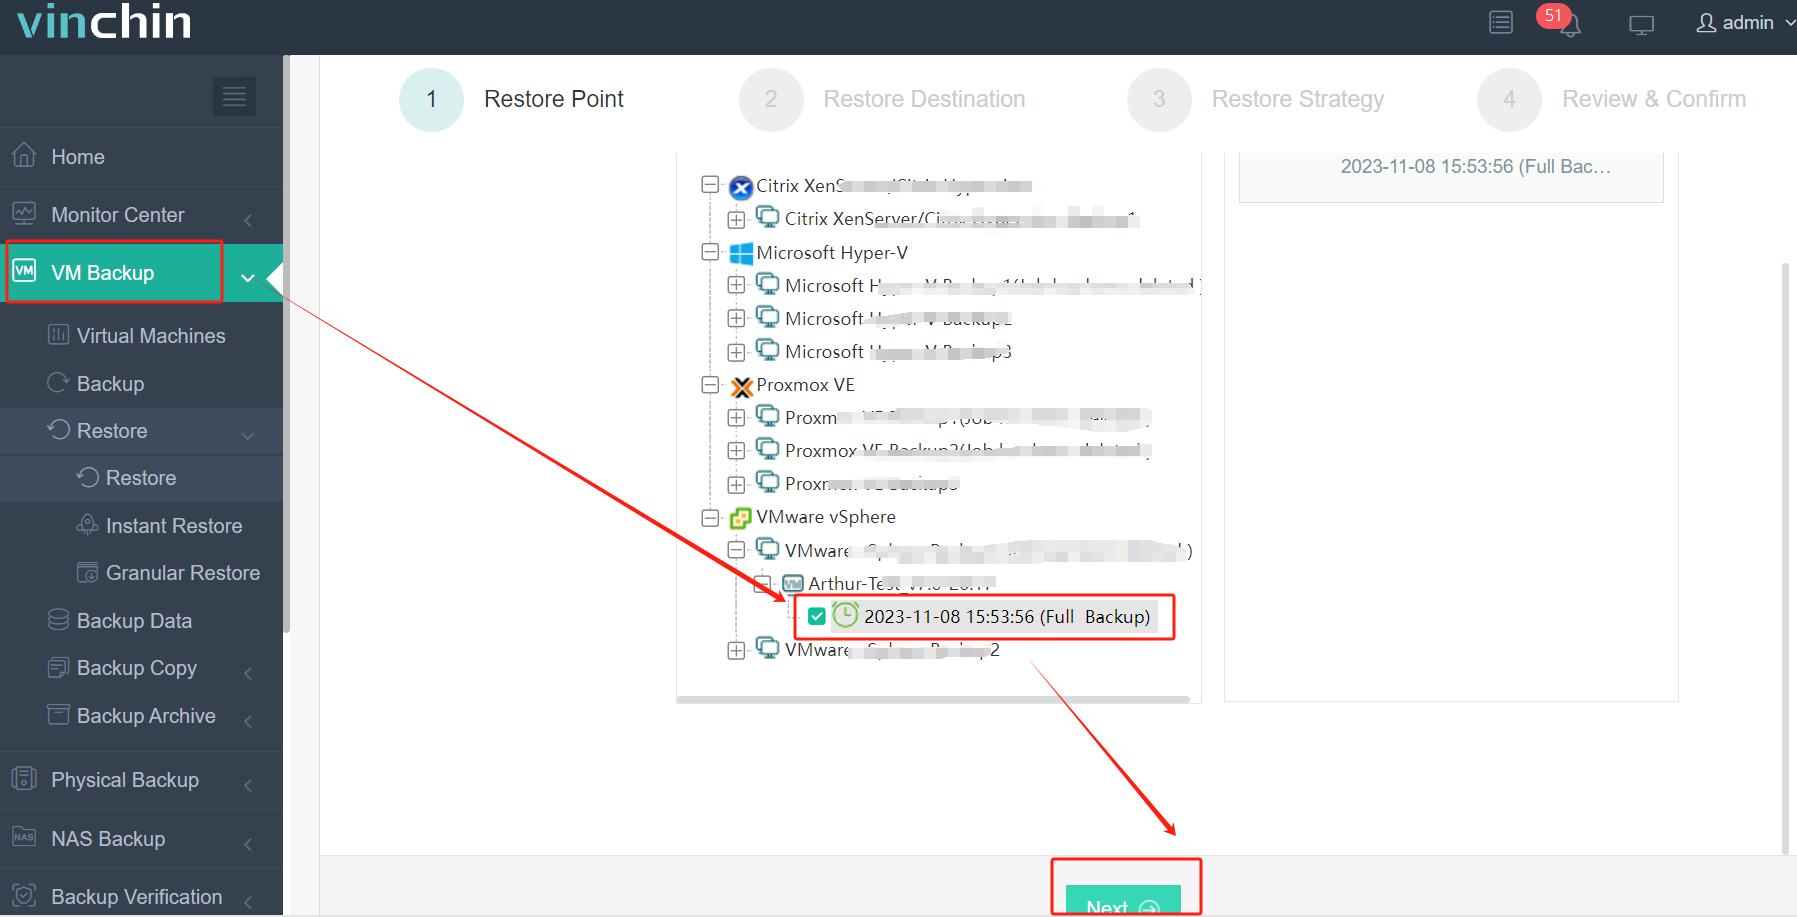
1. Just select the backup of VMware VM > click Next
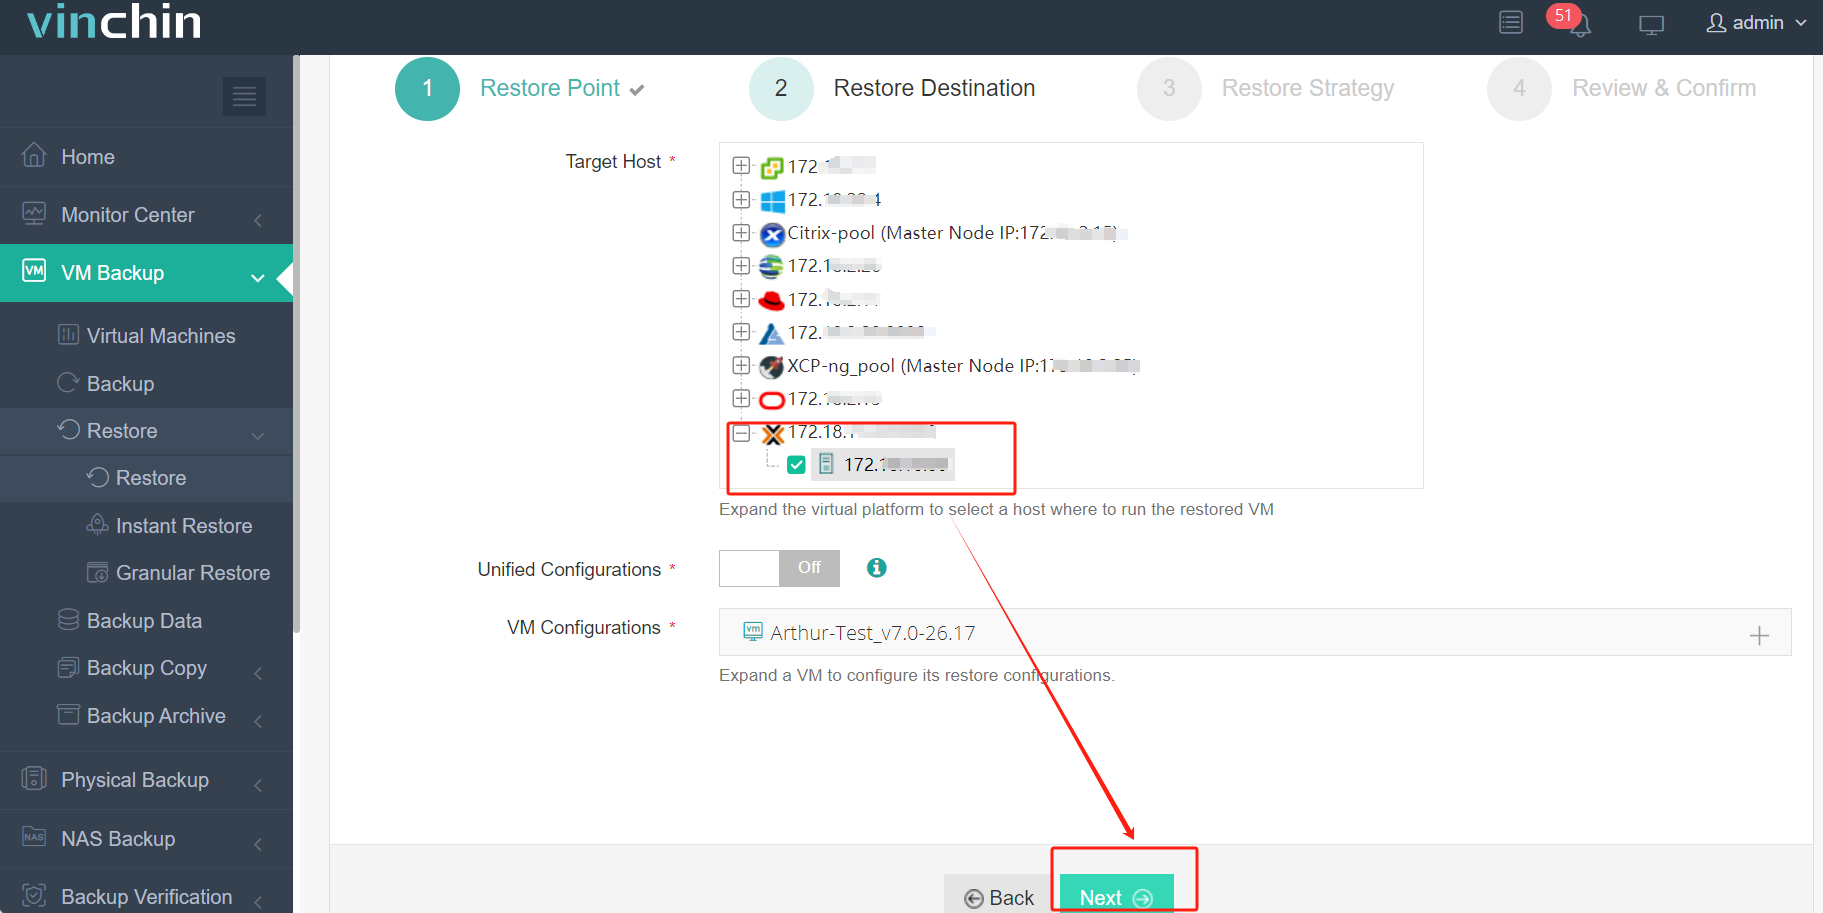
2. Select the Proxmox host as the target host > click Next
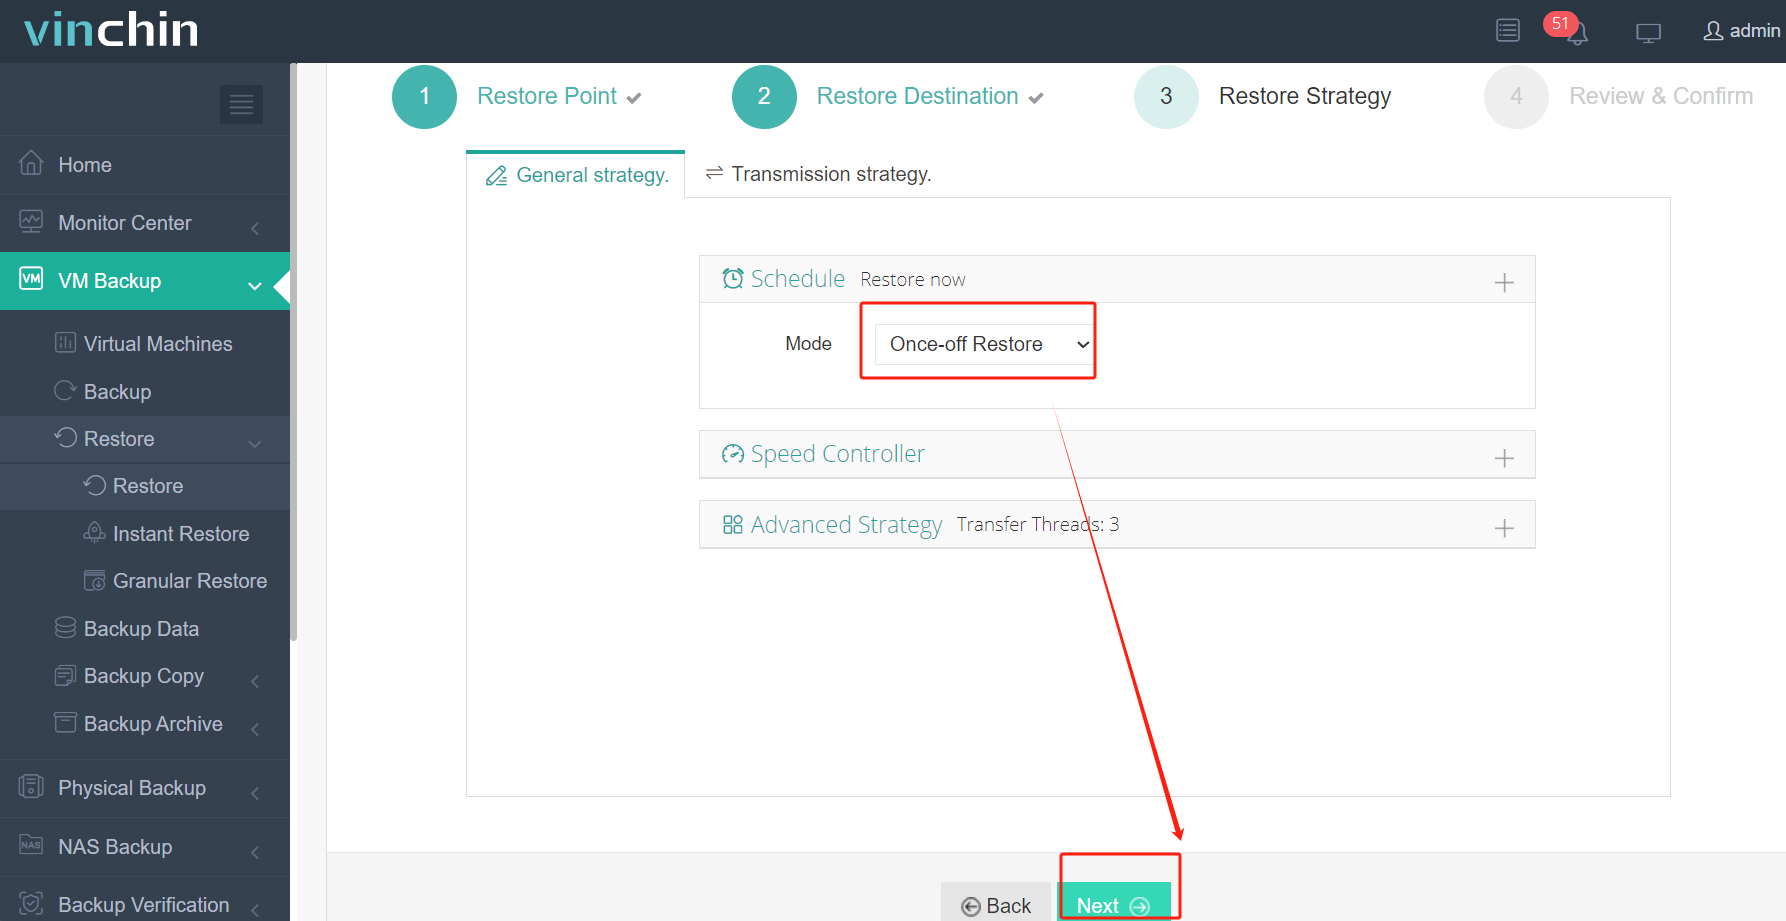
3. Select Once-off Restore > click Next
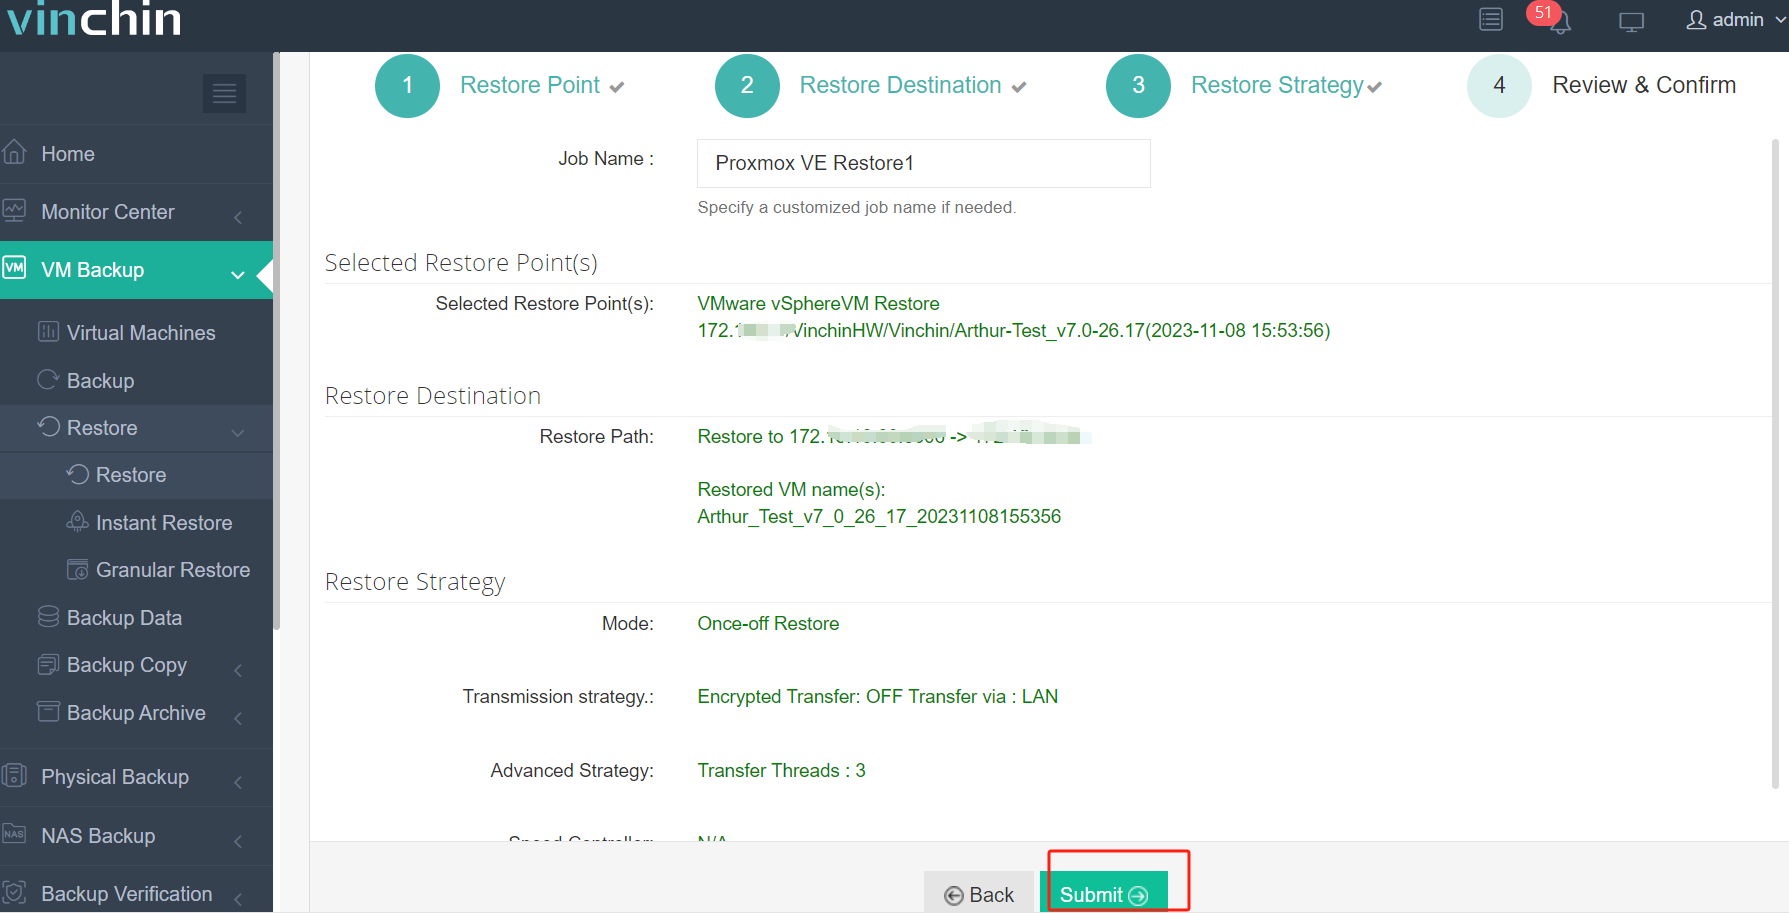
4. Submit the job
Vinchin offers users a 60-day free trial to try it out in a real-world environment. For more information, please contact Vinchin directly, or contact our local partners.
VMware to Proxmox Migration FAQs
Q:Why should you migrate from VMware to Proxmox?
A: Proxmox provides a free open source virtualization platform with KVM and Container (LXC) support, which is more affordable compared to VMware.Proxmox also provides a powerful web interface that is easy to use.
Q: Will data be lost during the migration process?
A: Migration processes inherently carry some risk. It's crucial to back up essential data before initiating migration. After completing the migration, conduct tests to ensure the proper functioning of VMs and verify the integrity of the data. For additional peace of mind, consider using third-party backup software like Vinchin to back up your VMs.
Conclusion
In conclusion, migrating VMware VMs to Proxmox can be achieved successfully by following a series of steps. Proxmox provides a cost-effective alternative to VMware, with its open-source nature and support for KVM virtualization. Tools such as WinSCP and the Proxmox new import wizard facilitate file transfer, while Vinchin Backup & Recovery provides a streamlined solution for VM migration.
Tidak ada komentar:
Posting Komentar