Menambahkan host Windows
Catatan : Saat ini kami mencoba mencari cara yang lebih baik untuk mempermudah proses backup data dari klien Windows. Tampaknya dalam waktu dekat versi Windows akan memiliki opsi untuk menjalankan ssh sebagai layanan, sehingga kami dapat mengkonfigurasi klien Windows dan Linux menggunakan prosedur yang sama. Sementara itu kami akan terus menggunakan prosedur yang dijelaskan di bawah.
Perbedaan utama antara klien Windows dan Linux terletak pada parameter URL, selebihnya sama.
Dengan server Windows gunakan protokol rsync sebagai pengganti protokol ssh. Untuk melakukan ini, mesin Windows harus menerima koneksi rsync, artinya memerlukan server rsync yang aktif.
Dalam contoh kita:
Name: Cliente Windows

URL: 10.15.181.156:

QUOTA: -1

Description: One of our Windows Servers

Pre/Post script: We leave it unselected.
Perhatikan parameter URL. Setelah memasukkan alamat IP kita harus memasukkan " : ", dengan cara ini kita mengatakan bahwa ia menggunakan protokol rsync.
Kami dapat menemukan server Rsync yang berbeda untuk platform Windows. Kami akan menggunakan cwRsync versi gratis , untuk itu kami akan mengunduh Penginstal cwRsyncServer 4.0.5.
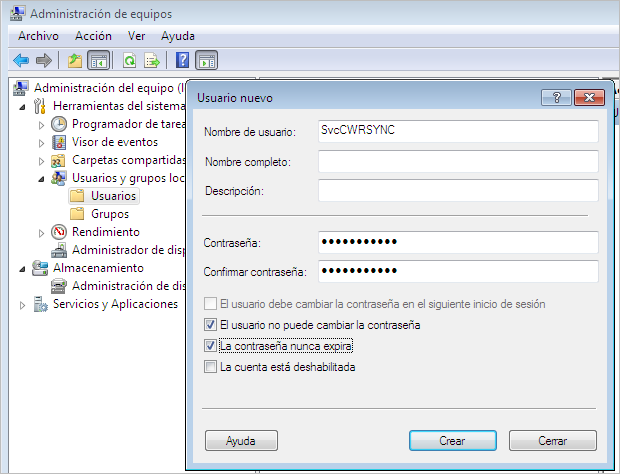
Sebelum kami menginstal, kami akan menambahkan pengguna lokal ke mesin Windows. Di mesin virtual dengan Windows7 yang kami gunakan dalam contoh, kami memanggil pengguna SvcCWRSYNC dan kami telah memberikan elkarbackup sebagai kata sandi pengguna.
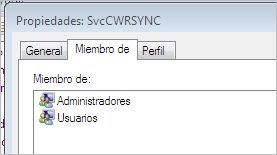
Karena layanan akan berjalan dengan pengguna ini, diharapkan mereka memiliki izin yang diperlukan, jadi dalam contoh saya telah menambahkannya ke grup administrator (mungkin dengan izin yang lebih sedikit juga sudah cukup)
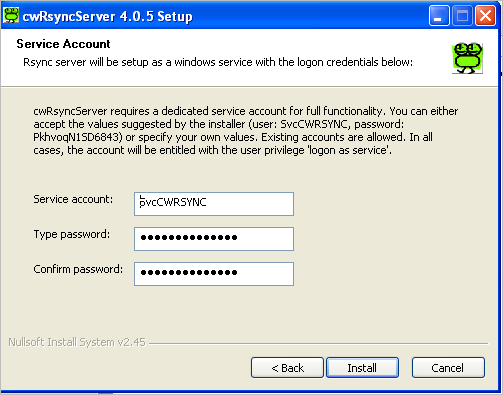
Kami sekarang melanjutkan ke instalasi program cwRsyncServer. Instalasi akan menanyakan pengguna dan kata sandi untuk layanan ini, dan kami akan memperkenalkan yang baru saja kami buat
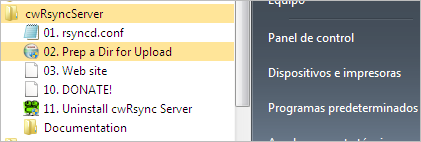
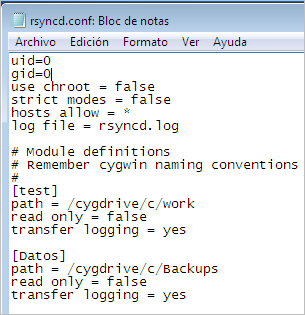
Setelah instalasi selesai, itu akan muncul di antara program yang tersedia, dan kami akan mengedit file rsyncd.conf untuk menentukan folder mana yang ingin kami sinkronkan. Di Windows 7 dan lebih tinggi, Anda perlu membukanya sebagai administrator, jika tidak maka perubahan tidak dapat disimpan. Kami akan melakukan ini dengan mengklik tombol kanan dan "menjalankannya" sebagai administrator.
Ini akan menjadi konfigurasi untuk mengkonfigurasi folder C:\Backups
Pada awalnya kami menempatkan dua baris ini:
uid=0
gid=0
Selanjutnya kita menambahkan blok untuk setiap folder yang ingin kita sinkronkan. Dalam contoh kami menamai folder tersebut sebagai_** [Data]:**_
[Data]
jalur = /cygdrive/c/Backups
hanya baca = salah
transfer pencatatan = ya
Jika folder yang ingin Anda salin alih-alih berada di c:\Backups ada di d:\Backups , jalur jalurnya adalah ini:
jalur = /cygdrive/d/Backups
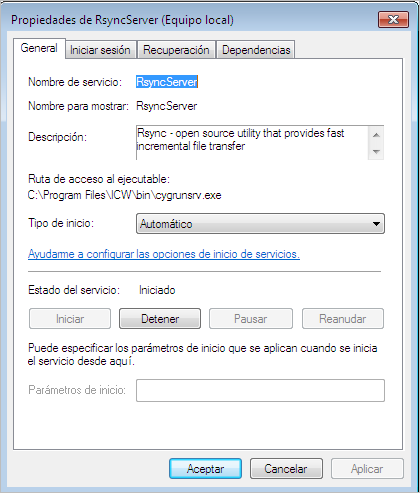
Sekarang kami memeriksa apakah layanan sedang berjalan, dan jika tidak, kami akan mem-bootnya dengan menetapkan bahwa boot harus otomatis

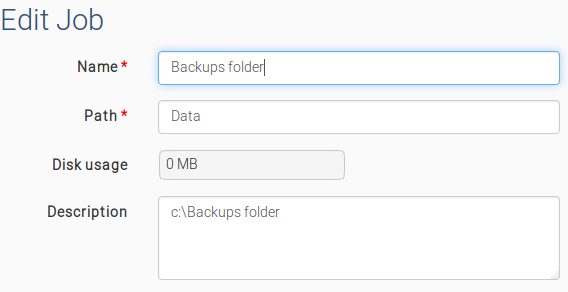
Sekarang kita kembali ke antarmuka ElkarBackup dan menambahkan tugas ke klien Windows kami untuk membuat salinan folder Cadangan Anda .
Kita harus ingat bahwa folder dalam file konfigurasi mesin Windows ini telah dikonfigurasi di blok_** [Data] _ , dan itu akan menjadi nama yang akan kita gunakan di bidang _ Jalur _. Kami juga menerapkan kebijakan _Kebijakan default**_.
Kami akan menyimpannya dan mengklik tombol Jalankan Sekarang untuk memverifikasi bahwa penyalinan dilakukan tanpa kesalahan. Opsi ini memungkinkan kita meluncurkan tugas tanpa menunggu jadwal eksekusi tiba. Layar yang memberi kita gambaran umum juga akan memberi kita informasi tentang status setiap tugas, menunjukkan tugas yang menunggu ( ANTRIAN ) atau sedang berjalan ( RUNNING ).
Jika kita menunggu, kita akan melihat bahwa salinannya telah dibuat. Di Log juga kita bisa melihat informasi hasil prosesnya.
====================================
https://docs.elkarbackup.org/docs/hosts-windows.html
Adding Windows hosts
Note: Nowadays we are trying to find a better way in order to make easier the process to backup data from Windows clients. It appears that in the near future Windows versions will have the option to run ssh as service, so we could configure Windows and Linux clients using the same procedure. In the meantime we will continue to use the procedure described below.
The main difference between Windows and Linux clients is in the URL parameter, the rest is the same.
With Windows servers use the rsync protocol in place of ssh protocol. In order to do this, the Windows machine has to accept rsync connections, that is, it needs an active rsync server.
In our example:
Name: Cliente Windows

URL: 10.15.181.156:

QUOTA: -1

Description: One of our Windows Servers

Pre/Post script: We leave it unselected.
Pay attention to the URL parameter. After putting the IP address we have to put ":", this way we say that it uses the rsync protocol.
We can find different Rsync servers for Windows platforms. We will use the free version of cwRsync, for which we will download the cwRsyncServer 4.0.5 Installer.
Before we install, we will add a local user to the Windows machine. In the virtual machine with Windows7 that we are using in the example we have called the user SvcCWRSYNC and we have given elkarbackup as the user's password.

As the service is going to run with this user, it is desirable that they have the necessary permissions, so in the example I have added it to the administrators group (probably with fewer permissions will also be enough)

We now proceed to the installation of the cwRsyncServer program. The installation will ask for the user and the password for this service, and we will introduce the ones we just created

Once the installation is finished, it will appear among the available programs, and we will edit the file rsyncd.conf to specify which are the folders we want to synchronize. In Windows 7 and higher it is necessary to open it as administrator, otherwise it does not allow to save the changes. We will do this by clicking the right button and "running" it as administrator.

This would be the configuration to configure the C:\Backups folder
At the beginning we put these two lines:
uid=0
gid=0
Next we add a block for each folder we want to synchronize. In the example we have named the folder as_** [Data]:**_
[Data]
path = /cygdrive/c/Backups
read only = false
transfer logging = yes
If the folder you want to copy instead of being in c:\Backups is in d:\Backups, the path line would be this:
path = /cygdrive/d/Backups

Now we check that the service is running, and if it was not, we would boot it specifying that the boot has to be automatic


Now we go back to the ElkarBackup interface and add a task to our Windows client to make a copy of your Backups folder.
We have to keep in mind that this folder in the configuration file of the Windows machine has been configured in the_** [Data]_ block, and that will be the name that we will use in the _Path_ field. We also apply the policy _Default policy**_.

We will save it and click the Run Now button to verify that the copy is done without errors. This option allows us to launch the task without waiting for scheduled execution to arrive. The screen that gives us the overview will also give us information about the status of each task, showing those that are waiting (QUEUED) or running (RUNNING).
If we wait, we will see that the copy has been made. In the Log also we can see information of the process result.
=============================================================
ALLOW PORT di windows server
Trying 172.16.40.252...
Connected to 172.16.40.252.
Escape character is '^]'.
@RSYNCD: 30.0
^C^C
Connection closed by foreign host
root@ubuntu:~/elkabackup/sshkeys# cat id_rsa.pub | ssh root@172.16.7.18 "mkdir -p ~/.ssh && cat >> ~/.ssh/authorized_keys"


Tidak ada komentar:
Posting Komentar