Downloads
Oracle has long supplied a powerful utility, Oracle Recovery Manager (RMAN), along with the database software install, which is used to backup and recover Oracle databases, either as a complete or incremental backup. The scripts are placed in a shell script wrapper at the Unix level, and then scheduled using the Unix cron job facility. These scripts need to be tested, verified and maintained.
While this task is manageable for one or two databases, the same task must be repeated with every new database or every new database server that is provisioned-and the time spent on setting up such backups increases correspondingly.
In this technical article, we will see how the DBA can set up and schedule RMAN database backups for thousands of databases using Enterprise Manager Cloud Control 12c more easily and efficiently than the older, more time-consuming, manual method of performing Unix shell scripting and cron jobs for each database to be backed up.
Using Enterprise Manager also removes the need to continuously maintain customized RMAN scripts with every new database release. As and when Oracle releases new versions of the Oracle database, the future versions of the Oracle Enterprise Manager database plug-in would automatically cater to the new release, and any special feature in that release, making RMAN script maintenance unnecessary. New RMAN features (such as compression, encryption, block change tracking, etc.) would be available when setting up the backup in Enterprise Manager itself.
With the Enterprise Manager approach, you can set up and schedule database backups without writing any script-Enterprise Manager will create the RMAN script and schedule it-and without using the Unix cron job utility, by simply using Oracle Enterprise Manager Cloud Control. This results in time and cost savings due to increased productivity and automation of the entire approach.
Initial Steps
Suppose you want to back up a database that is already a target in the Enterprise Manager system, i.e., the Enterprise Manager Agent has been installed on the database server and the database has been discovered and promoted as a managed target.
Move to the Database home page via Targets > Databases, and click on the database name. When the home page appears (make sure you are logged in to the database with SYSDBA credentials), set up the Fast Recovery Area (FRA) to help automate the backups.
The FRA can be set up by selecting Availability > Backup & Recovery > Recovery Settings from the Target menu:
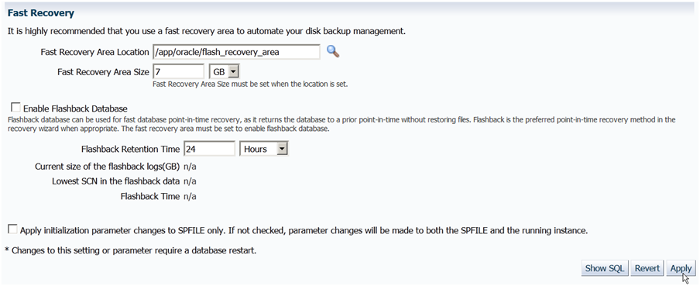
Figure 1: Setting up the Fast Recovery Area
Simply specify a location for the FRA, and the size in GB.
Click Apply.
Remember to specify an appropriate size depending on the size of the database and how exactly you will be backing up-for example, if you will be using image copies of your datafiles or only compressed backup sets (which will take up much lesser space). It is possible to resize the FRA later on, but if it runs out of space, archive logs (if in Archivelog Mode) may stop being generated, and the database will not process any transaction after that unless the space issue is resolved.
After the FRA is set up, the next step is to enable ARCHIVELOG Mode for the database. This allows you to take online backups and point-in-time recovery. You can enable ARCHIVELOG Mode on the page where you set up the FRA, as shown below:
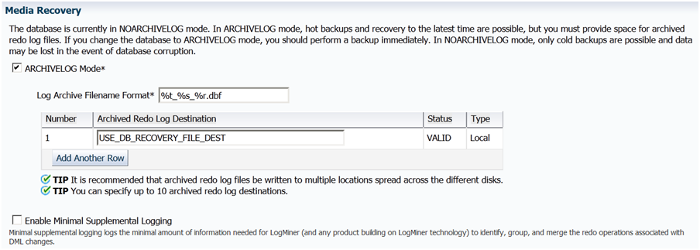
Figure 2: Setting ARCHIVELOG Mode
After the ARCHIVELOG Mode is set, Enterprise Manager will prompt you to restart the database and then immediately take a whole database backup.
The database is now opened in ARCHIVELOG Mode, and you can proceed with the backup.
Backup SettingsFrom the Database home page, select Availability > Backup & Recovery > Backup Settings. This page appears:
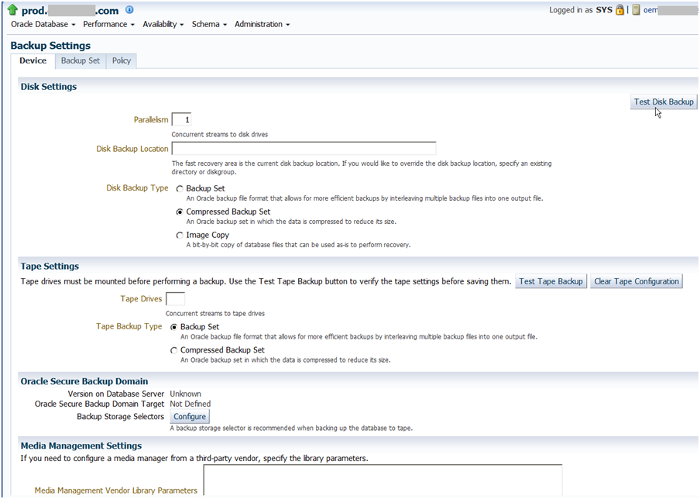
Figure 3: Entering Backup Settings
In the Disk Settings section of the Device tab, select a Parallelism of 1 (the default) and the Disk Backup Type Compressed Backup Set. Selecting a larger parallelism will increase the number of concurrent RMAN streams to the disk backup location; use this feature with care, since it depends on how much the disk can handle. Using such a setting will increase the speed of the backup, but this will also depend on the disk subsystem structure.
The options for Disk Backup Type are to create a Backup Set, a Compressed Backup Set, or an Image Copy. Select the Compressed option for the best use of the backup space. This sort of backup compression was introduced in Oracle 10g and was welcomed by DBAs.
Instead of a backup set, you can also select an Image Copy as the backup type. This will create an exact copy of each datafile. This is also useful for fast recovery, as we will discuss below.
Keep the disk backup location as blank, so as to use the FRA, provided it has been set up.
Use the Test Disk Backup button to make sure the disk backup is set up properly. This requires that the Host Credentials section at the bottom of this tab be filled up. The test will write some test backup files to the disk backup location, and let you know if successful.
Likewise, if you want your backups to be created on tape, fill in the Tape Settings section.
The other sections on the page let you specify Oracle Secure Backup (OSB) domains and parameters. Oracle's integrated secure tape backup management system, OSB provides an alternative to third-party tape backup solutions that may not be tightly integrated with Oracle RMAN and Oracle Enterprise Manager.
OSB protects not just the Oracle 9i, 10g, 11g and 12c databases, but also the entire environment, including heterogeneous application file systems (from OSB 10.2 onwards). You can read more about Oracle Secure Backup here.
Alternatively, if using a third-party vendor's media manager, you can specify the library parameters in the Media Management Settings section.
Let's move on to the Backup Set tab.
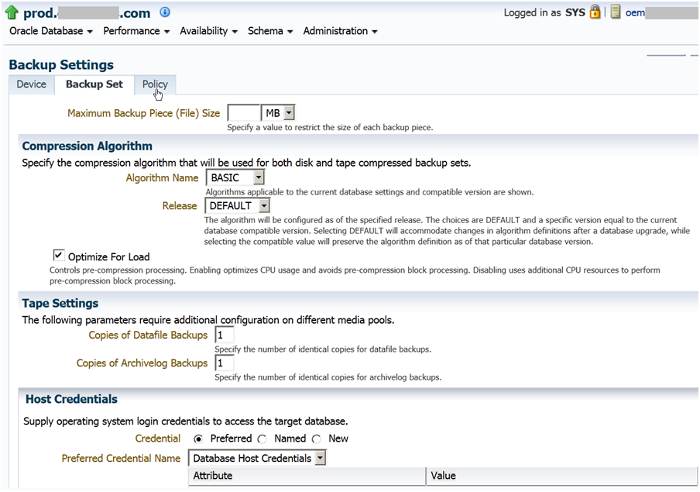
Figure 4: The Backup Set Tab
In this tab, you can specify the Maximum Backup Piece (File) Size. as well as the Compression Algorithm (choose Basic, Low, Medium or High compression).
The Release can be selected as either Default or as a specific version, such as 11.2.0.0.0, to preserve the algorithm definition for that database version.
You can also optimize the compression's CPU usage, in particular by avoiding pre-compression block processing.
Click the Policy tab.
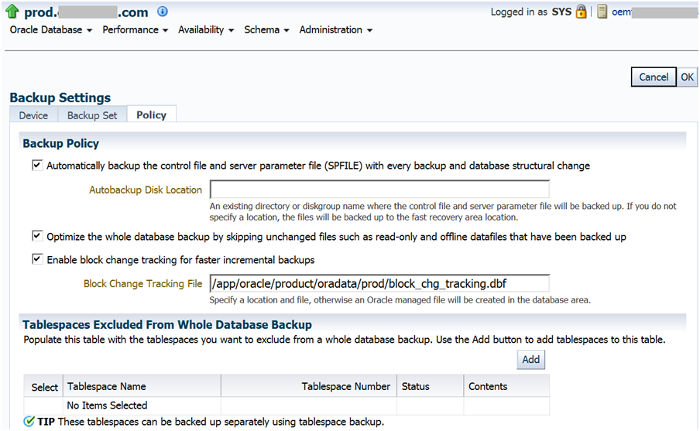
Figure 5: The Backup Policy Tab
In the Backup Policy tab, you can specify that the Database Control File and Server Parameter File (SPFILE) be backed up automatically with every database backup or database structural change.
Note: Specifying this automatic backup is strongly recommended, since these are very important files for the database. Since you are using the nocatalog mode of RMAN, it is of utmost importance to ensure the safety of the control file and make certain it is backed up, because the control files contains the history of all the backups.
If the Autobackup Disk Location is not specified, it will default to the FRA.
You can also optimize the database backup by skipping unchanged read-only or offline datafiles that have been previously backed up. It is not necessary to back up such datafiles again.
Block Change Tracking can also be enabled on this tab, and a file name specified for this purpose. This feature was introduced in Oracle 10g and helps considerably to increase the speed of incremental backups, since all database block changes are tracked in this special file (only tens of MB in size). The RMAN process in this case will not need to scan the entire datafile for changed blocks, when taking incremental backups.
Such full scanning took place during incremental backups in 9i, and as a result the incremental backups were much slower in that version. This is no longer the case in 10g onwards. Incremental backups are much faster with block change tracking.
The lower half of the Policy tab shows the Retention Policy and the Archived Redo Log Deletion Policy:
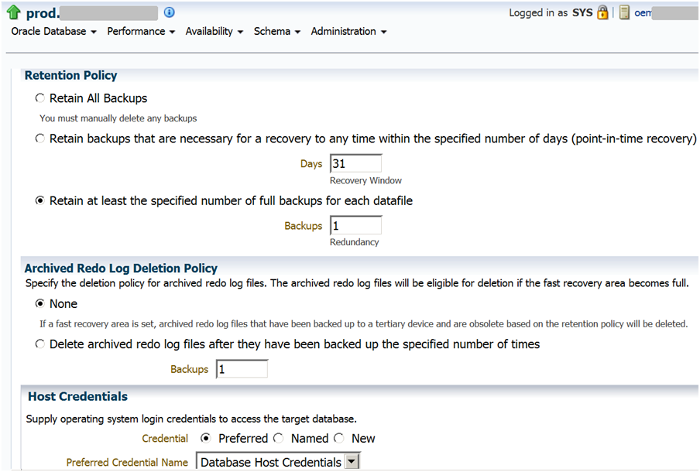
Figure 6: Retention Policy
Choose a retention policy based on redundancy instead of a recovery window. Select Retain at least the specified number of full backups for each datafile, and enter 1 as the number of backups to retain at any one time - this is your redundancy. (1 is actually the default setting.)
The result is that, when a new backup is taken, the older backup will be marked as obsolete-since only one backup is to be retained at any time. Obsolete backups can then be deleted by RMAN maintainance commands such as:
DELETE NOPROMPT OBSOLETE DEVICE TYPE DISK;If using the Recovery Window ("Retain backups that are necessary for a recovery to any time within the specified number of days"), you must specify the number of days instead of the number of backups. In this case, backups would be retained to allow recovery of the database up to the specified number of days.
Suppose the RMAN Retention Policy is specified as a recovery window of 7 days, indicating that database backups will be retained to enable recovery up to the last 7 days. However, retaining more than 1 database backup on disk could have space repercussions. You must take into account the following:
The database administrator must keep all these factors in mind, and closely monitor the database backup space available over the next few weeks, adjusting the Recovery Window if required or changing the Retention Policy to Redundancy instead of a Recovery Window.
The "Archived Redo Log Deletion Policy" section specifies the deletion policy for archived redo logs, which can be made eligible for deletion in one of two ways when the FRA becomes full:
If this is a primary database-and not a standby database-in an Oracle Data Guard configuration, one more option, Delete archived redo log files, will appear on the page; it has two sub-options:
It is also possible to select both Delete archived redo log files and Delete archived redo logs after they have been backed up the specified number of times. This option deletes the archived redo logs that have been applied or shipped to all remote destinations, and also deletes archived logs after considering whether the specified number of archived log backups have been backed up to a tertiary device.
We've discussed the options available for a primary database. In the case of a standby database, there are three main options:
1. None
2. Delete archived redo log files after they have been applied to the standby database
3. Delete archived redo logs after they have been backed up the specified number of times.
Click OK to save the backup settings in the control file of the database (because you are not using an RMAN catalog database).
To confirm the changed settings, log into RMAN at the command prompt. Execute the show all command, which displays the RMAN configuration:
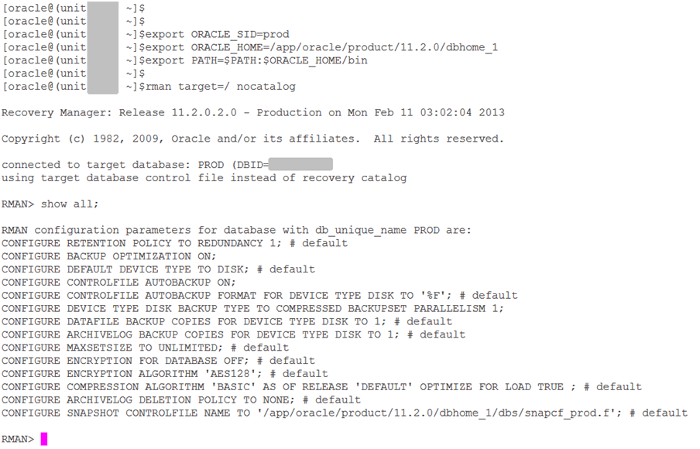
Figure 7: Output of Show All
Your modifications in the Backup Settings tabs of Enterprise Manager Cloud Control 12c have been saved as the configuration settings in RMAN. They are stored in the control file of the PROD database.
The # default comment shows the unchanged configuration settings; conversely, the settings without this comment have been modified. Backup optimization is ON, controlfile autobackup is ON, and there is a parallelism of 1 using a compressed backupset. These are all the settings that you had changed in the preceding pages.
Scheduling a Full Backup
We can now proceed to schedule the database backup.
In the Enterprise Manager Cloud Control 12c console, select Availability > Backup & Recovery > Schedule Backup from the Home page of the PROD database.

Figure 8: Schedule Backup
In the Customized Backup section of the Schedule Backup screen, select Whole Database, then click Schedule Customized Backup.
The Customized Backup section also allows you to backup individual Tablespaces, Datafiles, or only the Archived Logs. The final option on this page is to backup All Recovery Files on Disk. Choose this option to backup the FRA of the database to tape.
You can create the FRA only in an Oracle Database version 10g or later. This area is where all the RMAN backup pieces, image copies, and archive logs are stored. Backing up the FRA creates a backup of your backup—ideally, as Oracle recommends—to a less expensive disk (i.e., not your tier 1 or even tier 2 disk) instead of tape. The DBA can then perform a fast recovery from the available disk-based backup, in case of any production issues, rather than waiting for the tape to be located and the tape backup to be restored to the disk.
The FRA, which contains the disk-based database backups, can then be backed up to tape once a week, allowing offsite tape backups as well as onsite disk backups. This would be a suitable Oracle backup strategy.
Next: the Schedule Customized Backup: Options page.
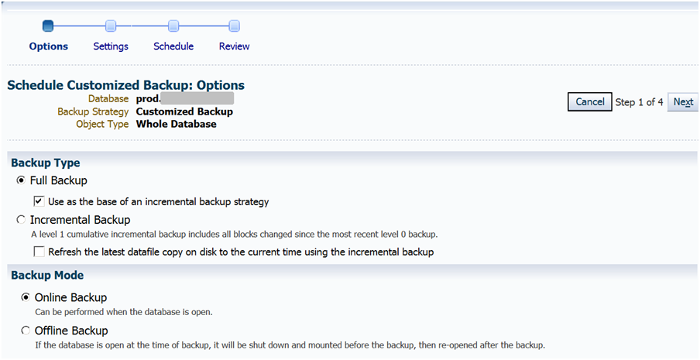
Figure 9: Options for Schedule Customized Backup
First, select Full Backup as the Backup Type, then check Use as the base of an incremental backup strategy. We are going to set up a full backup of this type on Sundays, as well as a daily incremental backup of the database.
Select Online Backup as the Backup Mode, then scroll down to the Advanced section.
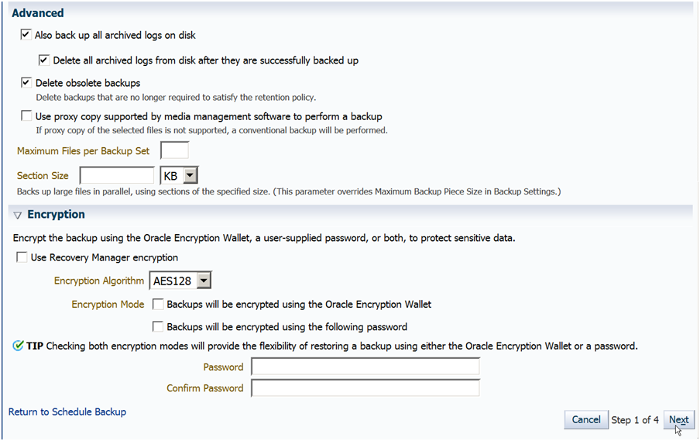
Figure 10: Advanced Section
Select Also back up all archived logs on disk as well as Delete all archived logs from disk after they are successfully backed up.
Selecting these options configures the backup to include all archive logs with the full database backup and deletes the archive logs from disk after they are backed up. To delete backups marked as obsolete (as per the retention policy), select Delete obsolete backups.
Click the Encryption icon to expand it and display the Encryption fields that are applicable to your target database version. Backup Encryption was first introduced in Oracle Database 10g Release 2 and is available for all later versions.
Note that Oracle's Advanced Security Option is required if you wish to create encrypted backups on disk with RMAN. You must make sure you are licensed to use this option, because being licensed for the Oracle Database Enterprise Edition (EE) does not automatically mean you are licensed to use the Advanced Security Option.
The other alternative is to use Oracle Secure Backup (OSB) to create encrypted backups on tape. Again, you must make sure you are licensed to use this product. OSB must be installed separately.
If you decide to select Use Recovery Manager Encryption, you can select encryption using the Oracle Wallet as well as encryption using the password. Specify the password in the field below and confirm. This will encrypt the backup using both these methods. Also, there will be greater flexibility since you can use either the wallet or the password when the RMAN backup needs to be restored. By default, AES128 is selected as the Encryption Algorithm. We have decided not to use encryption in this case.
Move to the next page.
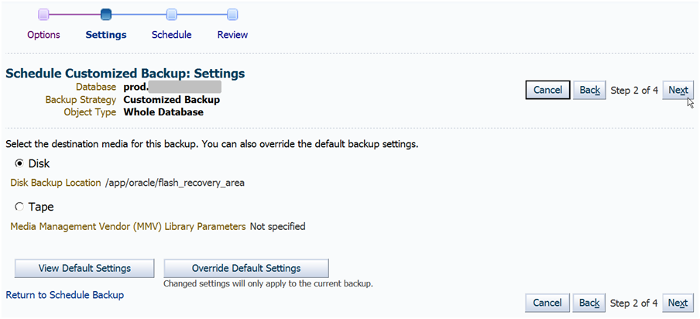
Figure 11: Destination Media for Backup
The Disk Backup Location is displayed as the FRA. This is configured in our case as /app/oracle/flash_recovery_area. You can name this location whatever you wish as per your company standards.
Move to the next page, which is the Scheduling screen. This is where you set the day and time you want your backup to run.
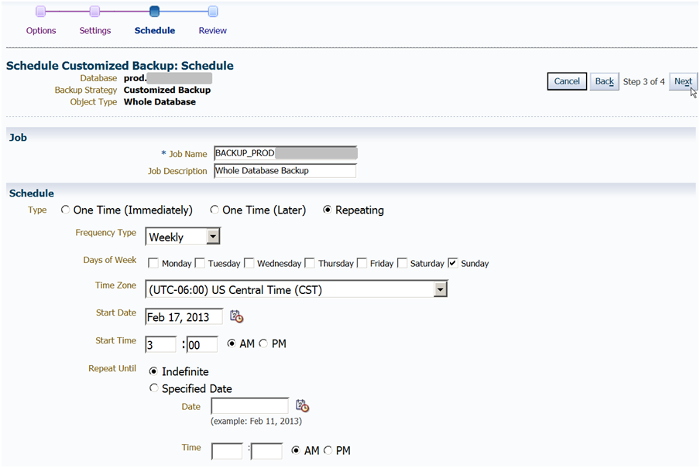
Figure 12: Setting the Schedule
There are three options. You can schedule the backup to run once, immediately; once, at a later time; or repeatedly, at a schedule you define.
The second and third options allow you to specify the start date and time you wish the backup to run and the time zone associated with the time you specify. The repeating option also lets you select the frequency type (e.g., days or weeks) and the frequency. For example, if you select days as the frequency type and 1 as the frequency, the back up will run once every day at the time you have specified.
You can repeat the frequency type and frequency you select indefinitely, or until a specified date and time. The current time is shown as the suggested setting for the backup. We suggest 3 AM the following morning so that the backup will start at this time of low activity.
Weekly is selected as the Frequency Type since we want a full database backup to be performed each week. Under the "Days of the Week," we have selected Sunday.
Select the Repeat until Indefinite radio button, which means that the backup schedule will be continued indefinitely with no end date or time.
Move to the next page. This is the Scheduled Customized Backup: Review screen.

Figure 13: Review of the Scheduled Backup
Enterprise Manager Cloud Control 12c has generated the RMAN script that will be used in the backup, based on the input criteria you identified in the previous screens.
The RMAN commands perform a full database and archivelog backup. The archive logs are deleted after backup, after which the maintenance commands that delete obsolete diskbackups are executed. These actions are derived from what we previously specified in the Cloud Control backup setup and backup schedule wizard pages.
To make modifications to the generated script and then submit it, click Edit RMAN Script. Once modifications are made, you cannot return to the previous pages of the Wizard. Nevertheless, you may want to change the RMAN script to include extra maintenance commands that will crosscheck backups and archivelogs, and delete the backups and archivelogs that have expired. These commands can be:
allocate channel for maintenance device type disk;
  crosscheck backup;
  delete noprompt expired backup;
  delete noprompt obsolete device type disk;
  crosscheck archivelog all;
  delete noprompt expired archivelog all;
  release channel;
Click Submit Job. After the job is submitted successfully, you can then select View Job to see the job's status and progress:
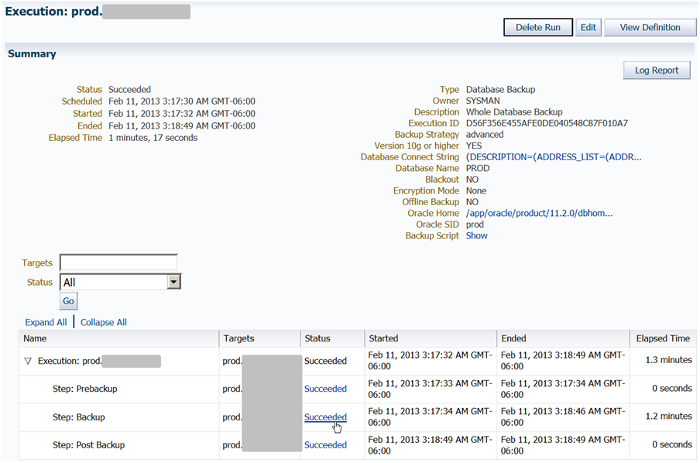
Figure 14: Job Summary
Click the Succeeded link in the status column to view the output in detail.
The RMAN output appears as follows:

Figure 15: RMAN Output
The entire RMAN output of this step is reproduced below.
The entire RMAN output of this step is reproduced below.

Output Log

Recovery Manager: Release 11.2.0.2.0 - Production on Mon Feb 11
03:17:35 2013
Copyright (c) 1982, 2009, Oracle and/or its affiliates. All rights
reserved.

RMAN>
connected to target database: PROD (DBID=nnnnnnnnnnn)
using target database control file instead of recovery catalog

RMAN>
echo set on

RMAN> set command id to 'BACKUP_PROD.ORACLE_021113031732';
executing command: SET COMMAND ID

RMAN> backup incremental level 0 cumulative device type disk tag
'BACKUP_PROD.ORACLE_021113031732' database;
Starting backup at 11-FEB-13
allocated channel: ORA_DISK_1
channel ORA_DISK_1: SID=28 device type=DISK
channel ORA_DISK_1: starting compressed incremental level 0 datafile
backup set
channel ORA_DISK_1: specifying datafile(s) in backup set
input datafile file number=00001 name=/app/oracle/product/oradata/prod/system01.dbf

input datafile file number=00002
name=/app/oracle/product/oradata/prod/sysaux01.dbf

input datafile file number=00005
name=/app/oracle/product/oradata/prod/example01.dbf
input datafile file number=00003
name=/app/oracle/product/oradata/prod/undotbs01.dbf

input datafile file number=00004
name=/app/oracle/product/oradata/prod/users01.dbf

input datafile file number=00006
name=/app/oracle/product/11.2.0/dbhome_1/dbs/demo_01.dbf

channel ORA_DISK_1: starting piece 1 at 11-FEB-13

channel ORA_DISK_1: finished piece 1 at 11-FEB-13
piece
handle=/app/oracle/flash_recovery_area/PROD/backupset/2013_02_11/
o1_mf_nnnd0_BACKUP_PROD_ORACLE_0_8kkfsjn2_.bkp
tag=BACKUP_PROD.ORACLE_021113031732 comment=NONE
channel ORA_DISK_1: backup set complete, elapsed time: 00:01:05
Finished backup at 11-FEB-13

Starting Control File and SPFILE Autobackup at 11-FEB-13
piece
handle=/app/oracle/flash_recovery_area/PROD/autobackup/2013_02_11/
o1_mf_s_807074321_8kkfvkvb_.bkp comment=NONE
Finished Control File and SPFILE Autobackup at 11-FEB-13

RMAN> backup device type disk tag
'BACKUP_PROD.ORACLE_021113031732' archivelog all not backed up
delete all input;
Starting backup at 11-FEB-13
current log archived
using channel ORA_DISK_1
channel ORA_DISK_1: starting compressed archived log backup set
channel ORA_DISK_1: specifying archived log(s) in backup set
input archived log thread=1 sequence=187 RECID=1 STAMP=807074323
channel ORA_DISK_1: starting piece 1 at 11-FEB-13
channel ORA_DISK_1: finished piece 1 at 11-FEB-13
piece
handle=/app/oracle/flash_recovery_area/PROD/backupset/2013_02_11/
o1_mf_annnn_BACKUP_PROD_ORACLE_0_8kkfvmfh_.bkp
tag=BACKUP_PROD.ORACLE_021113031732 comment=NONE
channel ORA_DISK_1: backup set complete, elapsed time: 00:00:01
channel ORA_DISK_1: deleting archived log(s)
archived log file
name=/app/oracle/flash_recovery_area/PROD/archivelog/2013_02_11/
o1_mf_1_187_8kkfvm0n_.arc RECID=1 STAMP=807074323
Finished backup at 11-FEB-13

Starting Control File and SPFILE Autobackup at 11-FEB-13
piece handle=/app/oracle/flash_recovery_area/PROD/autobackup/2013_02_11/
o1_mf_s_807074324_8kkfvnot_.bkp comment=NONE
Finished Control File and SPFILE Autobackup at 11-FEB-13

RMAN> allocate channel for maintenance type disk;
released channel: ORA_DISK_1
allocated channel: ORA_MAINT_DISK_1
channel ORA_MAINT_DISK_1: SID=28 device type=DISK

RMAN> delete noprompt obsolete device type disk;
RMAN retention policy will be applied to the command
RMAN retention policy is set to redundancy 1
Deleting the following obsolete backups and copies:
Type                Key    Completion Time  Filename/Handle
– – – – – – – – – – –   – – –   – – – – – – – – – – –   – – – – – – – – – –
Backup Set                     3           11-FEB-13
Backup Piece                     3           11-FEB-13
/app/oracle/flash_recovery_area/PROD/autobackup/2013_02_11/
o1_mf_s_807074321_8kkfvkvb_.bkp
deleted backup piece
backup piece handle=/app/oracle/flash_recovery_area/PROD/autobackup/2013_02_11/
o1_mf_s_807074321_8kkfvkvb_.bkp RECID=3 STAMP=807074321
Deleted 1 objects

RMAN> release channel;
released channel: ORA_MAINT_DISK_1

RMAN> exit;

Recovery Manager complete.
Tidak ada komentar:
Posting Komentar