LinOTP installation and usage
Hi, I want to share my experience with LinOTP and provide an example for strong authentication with LinOTP + FreeRADIUS and Wallix Bastion.

LinOTP is an enterprise-level, innovative, flexible and versatile OTP-platform for strong authentication.
Wallix Bastion is a Privileged Access Management (PAM) solution.
Systems used:
- linotp 2.12.3
- Debian 10 (Also supported OS).
- Wallix Bastion 8.0.4
There..two…one.. GO.
- Installation of LinOTP.
Add the linotp.org repository:
echo ‘deb http://www.linotp.org/apt/debian buster linotp linotp-deps’ > /etc/apt/sources.list.d/linotp.listFor package verification import the package signing key:
apt-get install dirmngr
apt-key adv — keyserver keyserver.ubuntu.com — recv-keys 913DFF12F86258E5
Install the database:
apt-get update
apt-get install mariadb-server
mysql_secure_installation
Finally, install the LinOTP:
apt-get install linotp2. Integration with Active Directory.
Access the LinOTP Admin UI at
https://<linotp_ip>/manageGo to LinotpConfig, press UserIdResolvers, and create the new one with LDAP type:

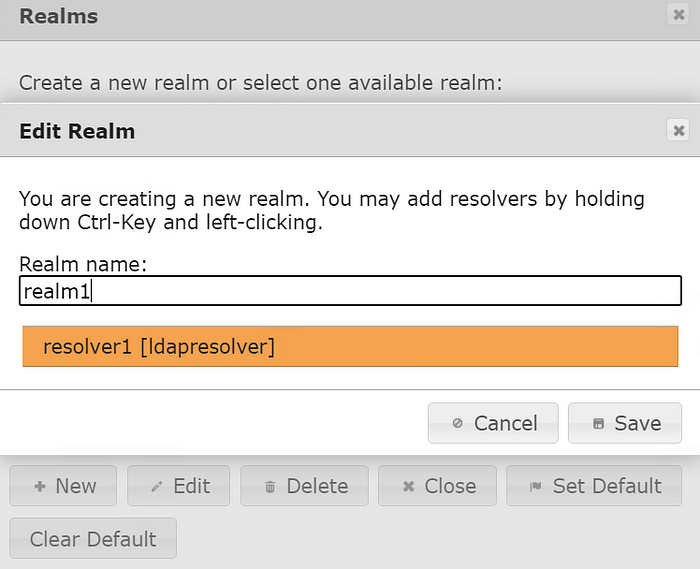
You must add the Realm now:
UserIdResolver is organized in so-called “realms” in order to use them in LinOTP. One Realm can hold many Resolvers.

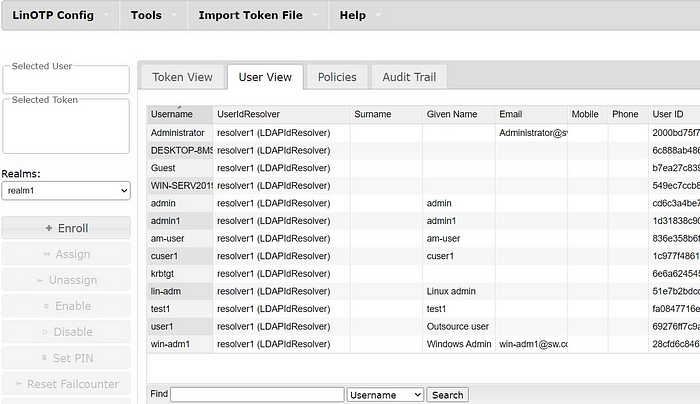
At this point, we can check synchronized users at User View:

3. Integrate LinOTP with FreeRADIUS.
Install freeradius and needed packages:
apt-get install linotp-adminclient-cli python-ldap freeradius python-passlib python-bcrypt git libio-all-lwp-perl libconfig-file-perl libtry-tiny-perlCreate symlinks and config for freeradius:
ln -s /etc/freeradius/3.0/sites-available /etc/freeradius/sites-available
ln -s /etc/freeradius/3.0/sites-enabled /etc/freeradius/sites-enabled
ln -s /etc/freeradius/3.0/clients.conf /etc/freeradius/clients.conf
ln -s /etc/freeradius/3.0/users /etc/freeradius/users
Install authentication module linotp-auth-freeradius-perl
git clone https://github.com/LinOTP/linotp-auth-freeradius-perl.git
cd linotp-auth-freeradius-perl/
cp radius_linotp.pm /usr/share/linotp/radius_linotp.pm
Change the config file like this :
nano /etc/freeradius/sites-enabled/linotpserver linotp {
listen {
  ipaddr = *
  port = 1812
  type = auth
}
listen {
  ipaddr = *
  port = 1813
  type = acct
}
authorize {
  preprocess
  update {
    &control:Auth-Type := Perl
  }
}
authenticate {
  Auth-Type Perl {
    perl
  }
}
accounting {
  unix
  }
}
Leave only linotp in the sites-enabled directory:
ls /etc/freeradius/sites-enabled
linotp
We can add hosts that will connect to freeradius now (In my case, I add Wallix Bastion):
nano /etc/freeradius/clients.confclient Wallix {
  ipaddr = 192.168.10.10
  secret = your secret
}
Use perl connector as user base:
nano /etc/freeradius/users
DEFAULT Auth-type := perlnano /etc/freeradius/3.0/mods-available/perl
 perl {
 filename = /usr/share/linotp/radius_linotp.pm
 func_authenticate = authenticate
 func_authorize = authorize
 }
Create symlink to mods-enabled and remove eap:
ln -s /etc/freeradius/3.0/mods-available/perl /etc/freeradius/3.0/mods-enabled/perl
 rm /etc/freeradius/3.0/mods-enabled/eap
Create connectors’ config to check credentials that came to Radius:
nano /etc/linotp2/rlm_perl.iniURL=https://<LINOTP_ip>/validate/simplecheck
REALM=realm1
RESCONF=resolver1
Debug=True
SSL_CHECK=False
4. Users token enrolment.
At this point, we want to allow our users to enroll tokens by themselves. LinOTP has selfservice portal for this.
Go to LinOTP config > policies and add a new policy. In my case, users will use time-based OTP that they enroll to Google Authenticator:

URL for users:
https://<LINOTP_ip> OR https://<LINOTP_ip>/selfservice/login5. Wallix Bastion Integration.
To force Wallix Bastion to ask users for a second factor - first, we need to add an external authentication.
Go to Configuration > external authentication and add new RADIUS authentication. The secret is the same we used before in freeRADIUS configuration.

Go to LDAP/AD domains and choose (or add if you haven’t already) the domain we synchronized with linOTP. At Secondary authentication choose linotp and apply the configuration. After you have done the domain will look like this:

From this point, you can (hopefully) authenticate to Wallix Bastion with 2-factor authentication.
6. Troubleshoot.
If something doesn’t work you can look through:
RADIUS logs:
/var/log/freeradius/radius.logLinOTP logs:
/var/log/linotp/linotp.logCheck token:
https://<yourlinotpserver>/validate/check?user=<login>&pass=<OTPvalue>Conclusion
So, we have configured strong authentication on Wallix Bastion with LinOTP as the second-factor verifier and FreeRADIUS as the connector.
Thank you for your time :)
Tidak ada komentar:
Posting Komentar