How to Install Red Hat Openshift Container Platform 4 on IBM Power Systems (PowerVM)
Hybrid Cloud — featuring IBM Power Systems with PowerVM®
Vergie Hadiana, Solution Specialist Hybrid Cloud — Sinergi Wahana Gemilang
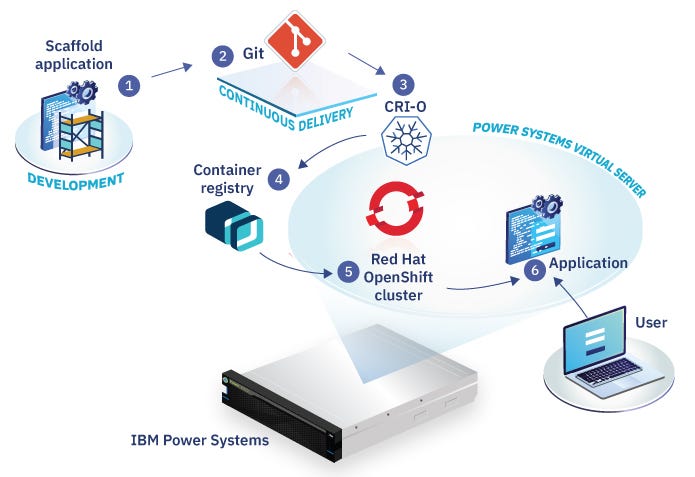
This tutorial shows you how to deploy a Red Hat® OpenShift® cluster on IBM® Power Systems™ Virtual Machine (PowerVM®) using the user-provisioned infrastructure (UPI) method.
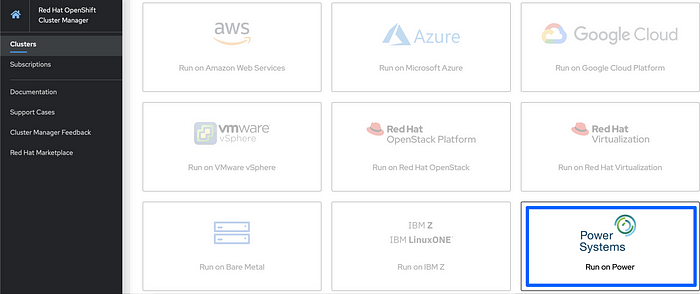
Red Hat OpenShift Container Platform builds on Red Hat Enterprise Linux to ensure consistent Linux distributions from the host operating system through all containerized function on the cluster. In addition to all these benefits, OpenShift also enhances Kubernetes by supplementing it with a variety of tools and capabilities focused on improving the productivity of both developers and IT Operations.
OpenShift Container Platform is a platform for developing and running containerized applications. OpenShift expands vanilla Kubernetes into an application platform designed for enterprise use at scale. Starting with the release of OpenShift 4, the default operating system is Red Hat Enterprise Linux CoreOS (RHCOS), which provides an immutable infrastructure and automated updates.
CoreOS Container Linux, the pioneering lightweight container host, has merged with Project Atomic to become Red Hat Enterprise Linux (RHEL) CoreOS. RHEL CoreOS combines the ease of over-the-air updates from Container Linux with the Red Hat Enterprise Linux kernel to deliver a more secure, easily managed container host. RHEL CoreOS is available as part of Red Hat OpenShift.
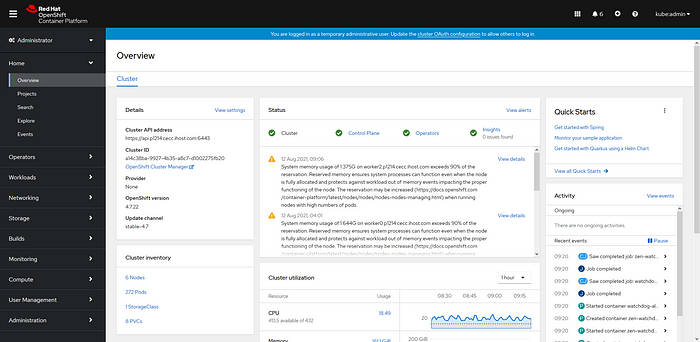
This guide will help you to build an OCP 4.7 cluster on IBM® Power Systems™ so that you can start using OpenShift.
Machine Overview
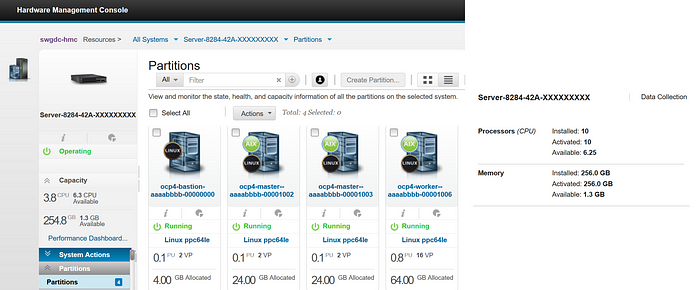
For my installation, using two servers IBM® Power Systems™ (POWER8):
1 Server IBM® Power Systems™ S824 with 10 Core 256GB of RAM
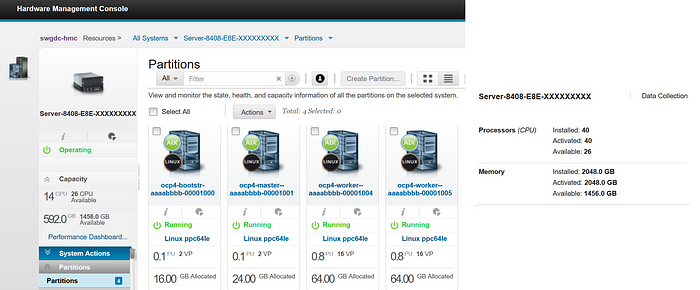
1 Server IBM® Power Systems™ E850 with 40 Core 2048GB (2TB) of RAM
Here is a breakdown table of the virtual machines / IBM Power® logical partition (LPAR)s:

Architecture Diagram
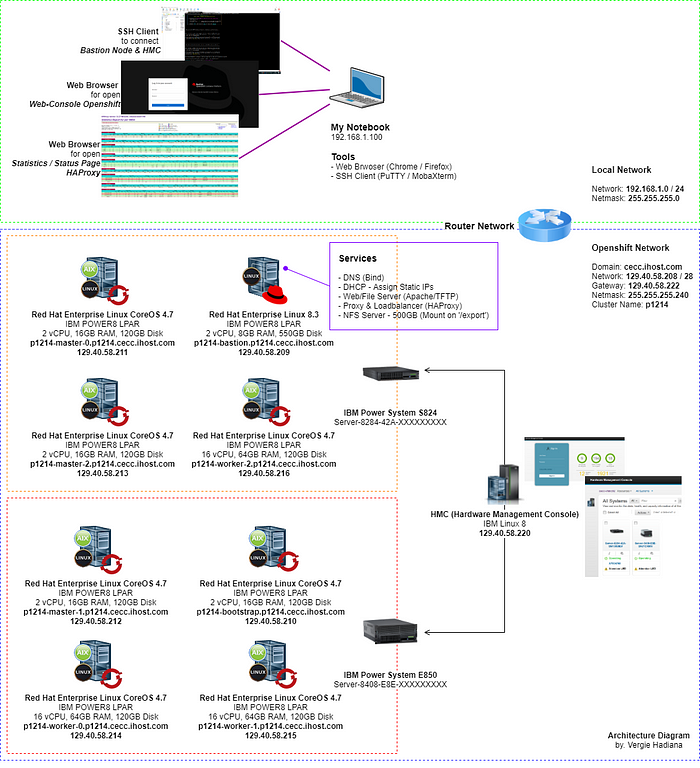
Network Information

Prerequisites and Planning
- IBM® Power Systems™ (POWER8 or POWER9) e.g S8xx / H8xx / E8xx / S9xx / E9xx
- Provides the 8 (eight) virtual machines or IBM Power® logical partition (LPAR) on IBM® Power Systems™
- The bastion or helper node will be installed using Red Hat Enterprise Linux 8.3 or later with SELinux enabled and in enforcing mode but firewalld is not enabled or configured.
- A system to execute the tutorial steps. This could be your laptop or a remote virtual machine (VM / IBM Power® logical partition (LPAR)) with connectivity and bash shell installed.
- Download and save pull-secret from Red Hat OpenShift Cluster Manager site | Pull Secret
Configure Bastion Node / Helper Node services:
The ocp4-bastion-aaaabbbb-00000000 (p1214-bastion) IBM Power® logical partition (LPAR) is used to provide DNS, DHCP, NFS Server, WebServer (Apache & TFTP), and Load Balancing (HAProxy).
- Install RHEL 8.3 or later on the p1214-bastion host
* Remove the home dir partition and assign all free storage to ‘/’
* Enable the LAN NIC from the OpenShift network and set static IP (e.g. 129.40.58.209) - Boot the ocp4-bastion-aaaabbbb-00000000 (p1214-bastion) node
- Connect to the p1214-bastion node using SSH Client
- Switches to the superuser and move to
/root/directory
sudo su
cd /root
5. Install Extra Packages for Enterprise Linux (EPEL)
sudo yum -y install https://dl.fedoraproject.org/pub/epel/epel-release-latest-$(rpm -E %rhel).noarch.rpm6. Install Git, Nano (text editor) and Ansible
sudo yum -y install nano ansible git7. Create .openshift directory under /root/ directory and then upload file pull-secret
mkdir -p /root/.openshift
8. Clone the repo ocp4-helpernode playbook go to /root/ocp4-helpernode/ directory
git clone https://github.com/RedHatOfficial/ocp4-helpernode
cd ocp4-helpernode
10. Create vars.yaml file under /root/ocp4-helpernode/ directory, Change some value based your network and version openshift you want install.
In my case like below :
cat << EOF >> vars.yaml
---
disk: sda
helper:
  name: "helper"
  ipaddr: "129.40.58.209"
dns:
  domain: "cecc.ihost.com"
  clusterid: "p1214"
  forwarder1: "129.40.242.1"
  forwarder2: "129.40.242.2"
dhcp:
  router: "129.40.58.222"
  bcast: "129.40.58.223"
  netmask: "255.255.255.240"
  poolstart: "129.40.58.209"
  poolend: "129.40.58.222"
  ipid: "129.40.58.208"
  netmaskid: "255.255.255.240"
bootstrap:
  name: "bootstrap"
  ipaddr: "129.40.58.210"
  macaddr: "fa:aa:bb:cc:dd:00"
masters:
  - name: "master0"
    ipaddr: "129.40.58.211"
    macaddr: "fa:aa:bb:cc:dd:01"
  - name: "master1"
    ipaddr: "129.40.58.212"
    macaddr: "fa:aa:bb:cc:dd:02"
  - name: "master2"
    ipaddr: "129.40.58.213"
    macaddr: "fa:aa:bb:cc:dd:03"
workers:
  - name: "worker0"
    ipaddr: "129.40.58.214"
    macaddr: "fa:aa:bb:cc:dd:04"
  - name: "worker1"
    ipaddr: "129.40.58.215"
    macaddr: "fa:aa:bb:cc:dd:05"
  - name: "worker2"
    ipaddr: "129.40.58.216"
    macaddr: "fa:aa:bb:cc:dd:06"
ppc64le: trueocp_bios: "https://mirror.openshift.com/pub/openshift-v4/ppc64le/dependencies/rhcos/4.7/4.7.13/rhcos-live-rootfs.ppc64le.img"
ocp_initramfs: "https://mirror.openshift.com/pub/openshift-v4/ppc64le/dependencies/rhcos/4.7/4.7.13/rhcos-live-initramfs.ppc64le.img"
ocp_install_kernel: "https://mirror.openshift.com/pub/openshift-v4/ppc64le/dependencies/rhcos/4.7/4.7.13/rhcos-live-kernel-ppc64le"
ocp_client: "https://mirror.openshift.com/pub/openshift-v4/ppc64le/clients/ocp/stable-4.7/openshift-client-linux.tar.gz"
ocp_installer: "https://mirror.openshift.com/pub/openshift-v4/ppc64le/clients/ocp/stable-4.7/openshift-install-linux.tar.gz"
helm_source: "https://get.helm.sh/helm-v3.6.3-linux-ppc64le.tar.gz"
EOF
11. Run the playbook setup command inside helpernode under /root/ocp4-helpernode/ directory
sudo ansible-playbook -e @vars.yaml tasks/main.ymlDownload the openshift-installer and oc client:
Connect to the p1214-bastion node using SSH Client
Download the stable 4.7 / latest version of the oc client and openshift-install from the OCPv4 ppc64le client releases page.
Note: (must be same version openshift you want install on vars.yaml file before)
wget https://mirror.openshift.com/pub/openshift-v4/ppc64le/clients/ocp/stable-4.7/openshift-client-linux.tar.gzwget https://mirror.openshift.com/pub/openshift-v4/ppc64le/clients/ocp/stable-4.7/openshift-install-linux.tar.gz
Extract / un-tar the Openshift version of the oc client and openshift-install to /usr/local/bin/ and show the version :
sudo tar -xzf openshift-client-linux.tar.gz -C /usr/local/bin/
sudo tar -xzf openshift-install-linux.tar.gz -C /usr/local/bin/cp /usr/local/bin/oc /usr/bin/
cp /usr/local/bin/openshift-install /usr/bin/oc version
openshift-install version
The latest and recent releases openshift are available at
https://openshift-release.apps.ci.l2s4.p1.openshiftapps.com/
Setup the openshift-installer (Generate install files)
- Generate an SSH key if you do not already have one and store the key files under
/root/.ssh/directory with name of the files will be helper_rsa for private key, and helper_rsa.pub for public key.
ssh-keygen -f /root/.ssh/helper_rsa2. Create an ocp4 directory, and change directory to ocp4
mkdir /root/ocp4cd /root/ocp4
3. Create an the install-config.yaml file under /root/ocp4/directory
cat << EOF >> install-config.yaml
apiVersion: v1
baseDomain: cecc.ihost.com
compute:
- hyperthreading: Enabled
  name: worker
  replicas: 0
controlPlane:
  hyperthreading: Enabled
  name: master
  replicas: 3
metadata:
  name: p1214
networking:
  clusterNetworks:
  - cidr: 10.254.0.0/16
    hostPrefix: 24
  networkType: OpenShiftSDN
  serviceNetwork:
  - 172.30.0.0/16
platform:
  none: {}
pullSecret: '$(< ~/.openshift/pull-secret-rhel)'
sshKey: '$(< ~/.ssh/helper_rsa.pub)'
EOF
4. Generate the installation manifest files under /root/ocp4/directory it will consume the install-config.yaml file
openshift-install create manifests --dir=/root/ocp4/
5. Modify the cluster-scheduler-02-config.yaml manifest file to prevent pods from being scheduled on the control plane (master) machines
sed -i 's/mastersSchedulable: true/mastersSchedulable: false/g' /root/ocp4/manifests/cluster-scheduler-02-config.ymlcat /root/ocp4/manifests/cluster-scheduler-02-config.yml
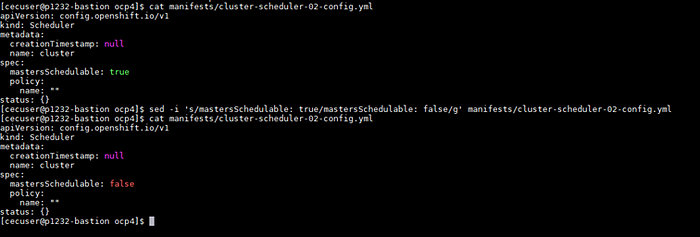
6. Generate the ignition config and kubernetes auth files under /root/ocp4/ directory
openshift-install create ignition-configs --dir=/root/ocp4/
7. Copy the ignition files to the ignition web server directory ( /var/www/html/ignition ), then change the web server directory’s ( /var/www/html/ ) ownership and permissions.
sudo cp ~/ocp4/*.ign /var/www/html/ignition/sudo restorecon -vR /var/www/html/sudo chmod o+r /var/www/html/ignition/*.ign
8. Check the ignition files under /var/www/html/ignition/ directory and the coreOS image files for PXE Booting under the directory files /var/lib/tftpboot/rhcos/ and /var/www/html/install/directories.
ls -haltr /var/lib/tftpboot/rhcos/*
ls -haltr /var/www/html/install/*
ls -haltr /var/www/html/ignition/*

9. Test the result by using cURL command to localhost:8080/ignition/ and localhost:8080/install/
curl localhost:8080/ignition/
curl localhost:8080/install/
Deploy the Openshift
- Connect to the Hardware Management Console (HMC) using SSH Client
- Now it is time to boot it up to install RHCOS on to LPAR’s disk.
The following command HMC CLI can be used to boot the LPAR with bootp, it need to be run on HMC system use lpar_netboot command:
lpar_netboot -f -t ent -m <macaddr> -s auto -d auto <lpar_name> <profile_name> <managed_system>
Note: MAC Address contains multiple colons ‘:’, you need to insert it as a parameter without colon ‘:’ (e.g. fa:aa:bb:cc:dd:00 to faaabbccdd00)
3. Boot the LPARs in the following order (Bootstrap -> Masters -> Workers) :
— 3.1. Bootstrap
lpar_netboot -f -t ent -m faaabbccdd00 -s auto -d auto ocp4-bootstr-aaaabbbb-00001000 default_profile Server-8408-E8E-XXXXXXXXX— 3.2. Masters / Control Panel
lpar_netboot -f -t ent -m faaabbccdd01 -s auto -d auto ocp4-master--aaaabbbb-00001001 default_profile Server-8284-E8E-XXXXXXXXX
lpar_netboot -f -t ent -m faaabbccdd02 -s auto -d auto ocp4-master--aaaabbbb-00001002 default_profile Server-8408-42A-XXXXXXXXX
lpar_netboot -f -t ent -m faaabbccdd03 -s auto -d auto ocp4-master--aaaabbbb-00001003 default_profile Server-8284-42A-XXXXXXXXX
— 3.3. Workers
lpar_netboot -f -t ent -m faaabbccdd04 -s auto -d auto ocp4-master--aaaabbbb-00001004 default_profile Server-8408-E8E-XXXXXXXXX
lpar_netboot -f -t ent -m faaabbccdd05 -s auto -d auto ocp4-master--aaaabbbb-00001005 default_profile Server-8408-E8E-XXXXXXXXX
lpar_netboot -f -t ent -m faaabbccdd06 -s auto -d auto ocp4-master--aaaabbbb-00001006 default_profile Server-8284-42A-XXXXXXXXX
4. Bootstrap installation automatically continues after you boot up the bootstrap VM/LPAR. Run openshift-install to monitor the bootstrap process completion.
openshift-install wait-for bootstrap-complete --log-level debug
5. After the bootstrap process is completed, remove or just comment (#) the server bootstrap line inside haproxy.cfg file ( /etc/haproxy/haproxy.cfg ).
nano /etc/haproxy/haproxy.cfg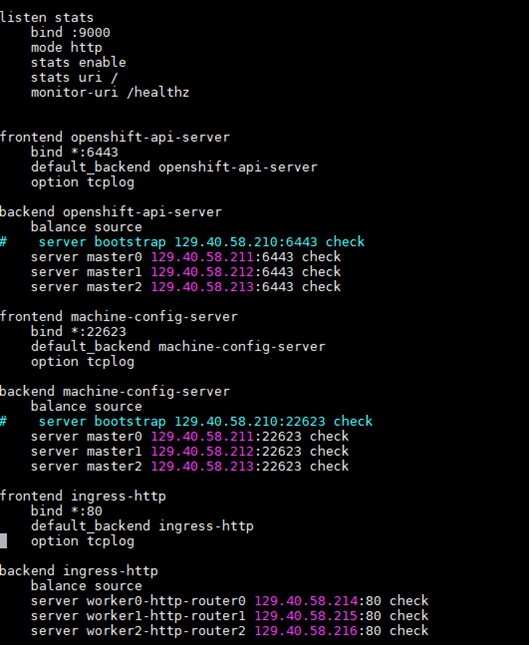
6. Restart the haproxy services (always do this after modifying haproxy configuration)
systemctl restart haproxy.service
systemctl status haproxy.service
Join the workers node and complete the installation
- Now the master nodes are online, you should be able to login with the oc client. Use the following commands to log in :
export KUBECONFIG=/root/ocp4/auth/kubeconfig
oc whoami
2. Approve all pending certificate signing requests (CSRs). Make sure to double-check all CSRs are approved.
Note: Once you approve the first set of CSRs additional ‘kubelet-serving’ CSRs will be created. These must be approved too. If you do not see pending requests wait until you do.
# View CSRs
oc get csr
# Approve all pending CSRs
oc get csr --no-headers | awk '{print $1}' | xargs oc adm certificate approve
# Wait for kubelet-serving CSRs and approve them too with the same command
oc get csr --no-headers | awk '{print $1}' | xargs oc adm certificate approve

3. Wait for all the worker nodes to join the cluster. Make sure all worker nodes’ statuses are ‘Ready’. This can take 5–10 minutes. You can monitor it with:
This can take 5–10 minutes
watch oc get nodes4. You also can check the status of the cluster operators
oc get clusteroperators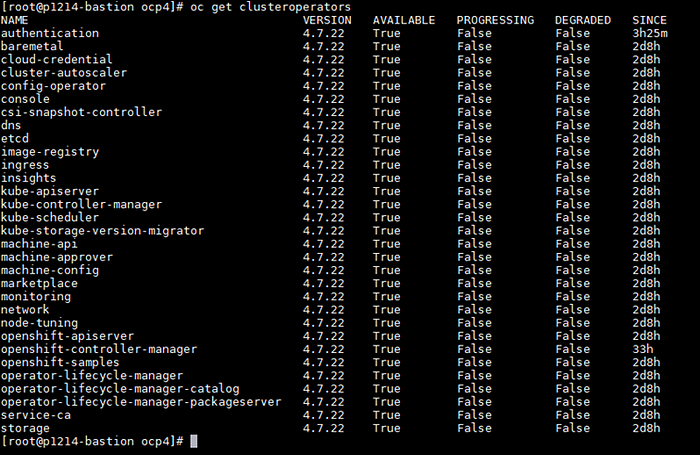
5. Collect the OpenShift Console address and kubeadmin credentials from the output of the install-complete event
openshift-install wait-for install-complete --dir=/root/ocp4/
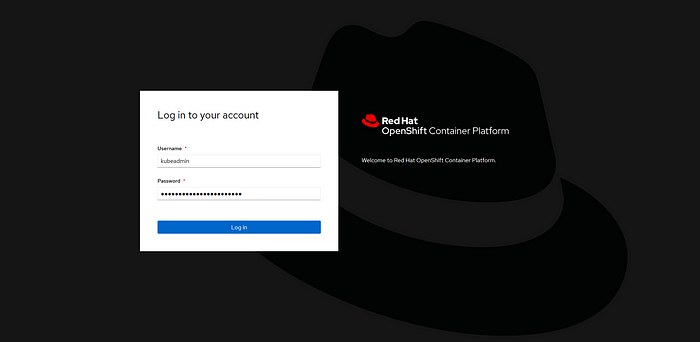
Log in to the Openshift web console on Browser
The OpenShift 4 web console will be running at https://console-openshift-console.apps.{{ dns.clusterid }}.{{ dns.domain }}
(e.g. https://console-openshift-console.apps.p1213.cecc.ihost.com)
You can log in using the user kubeadmin and password you collected before. If you forget the password, you can retrieve it again by check the value from the kubeadmin-password file ( /root/ocp4/auth/kubeadmin-password )
- Username: kubeadmin
- Password: the output of
cat /root/ocp4/auth/kubeadmin-password
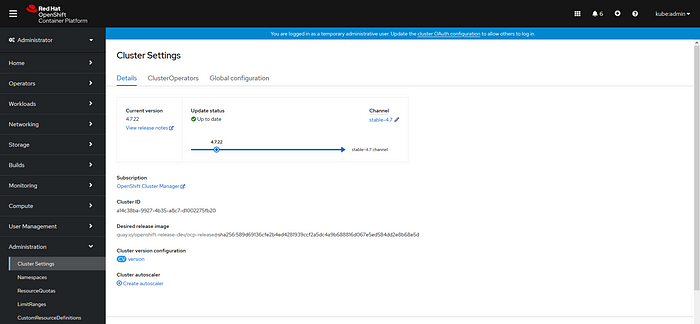
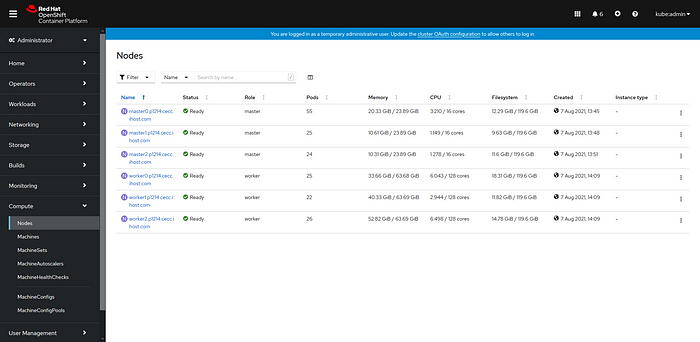
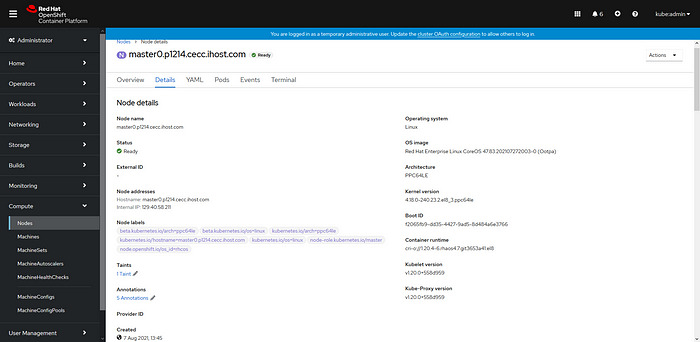
Congrats! You have created an Openshift 4.7 Cluster!
Hopefully, you have created an Openshift cluster and learned a few things along the way. Your install should be done!
Next step how to create NFS Storage for Openshift and Try to deploy the apps
UPDATES:
18-Apr-2022, Added Graphic credit illustration 1 from Aaron J Dsouza (IBM)
Tidak ada komentar:
Posting Komentar