Real-Time 2G/3G/LTE Arduino GPS Tracker + IoT Dashboard
Learn how to make a powerful Arduino GPS tracker that posts data to the cloud via LTE CAT-M and view data graphically on IoT dashboards!
Things used in this project
Story
Introduction
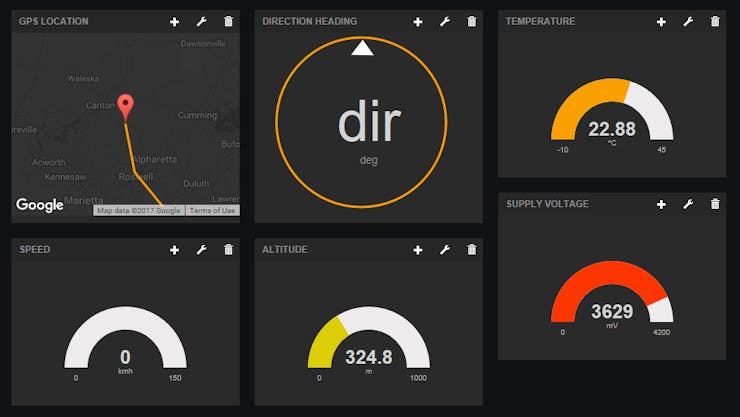
1 / 3 • In the first part we'll be using freeboard.io to visualize data
Hey guys! In this tutorial we'll be creating a GPS tracker using the Botletics SIM7000 LTE shield and an Arduino and view the data on two free IoT dashboards. I'll start off by explaining how to get everything set up and posting data to the cloud, then I'll move into how to set up the IoT dashboards to view data. The two dashboards we will be looking at are Freeboard.io and ThingsBoard.io.
Since this tutorial is a follow-up of my first Instructable on using the Botletics LTE/NB-IoT shield for Arduino so if you haven't already, please read it to get a good overview of how to use the shield and what it's all about. In this tutorial I'll focus on IoT data logging, and specifically, GPS and temperature tracking and provide you will all the code and guidance you'll need to hit the road and test it out! It'll be a decently lengthy tutorial so sit tight and grab some coffee!
Although I'll be mainly focusing on the LTE shield that I personally designed and built, everything here (including the Github Arduino library) should work on SIMCom's 2G and 3G modules like the SIM800/808/5320 as well since it's just an updated version of the Adafruit FONA library. Regardless of hardware the concept is exactly the same and you can do lots of cool stuff with this, including sensor data logging, remote weather monitoring, auto theft karma GPS tracking, etc... so read on!
Tutorial prerequisite:
Step 1: Gather Parts
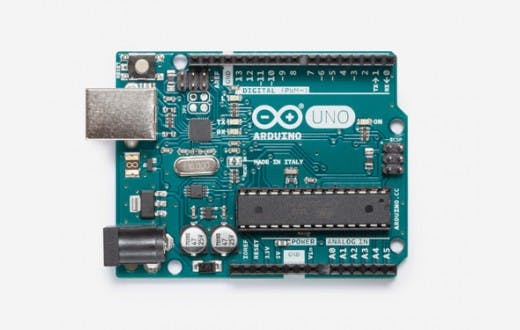
1 / 4 • Photo credit: Picture taken from store.arduino.cc
The list is the same as in the intro tutorial and is really simple!
- Arduino Uno, Mega, or Leonardo. Alternatively you can use any other 3.3V or 5V microcontroller but you would have to wire up the pins externally.
- Botletics SIM7000 Shield Kit (comes with the shield, dual LTE/GPS uFL antenna, and stacking female headers). Make sure you see this wiki page to select an appropriate version!
- Hologram SIM card. The first SIM card (called the "developer" SIM card) is completely free and comes with 1MB of data per month! The shield kit includes a Hologram SIM card, but if you want your own feel free to try it!
- A 3.7V LiPo battery (like from Sparkfun or Adafruit)
- USB cable to program and power your Arduino
For the GPS tracking test:
- You can use a car USB adapter to power your Arduino while testing the shield on the road.
- Alternatively, you can use a battery pack (7-12V) to power the Arduino via the VIN and GND pins.
Step 2: Physical Assembly
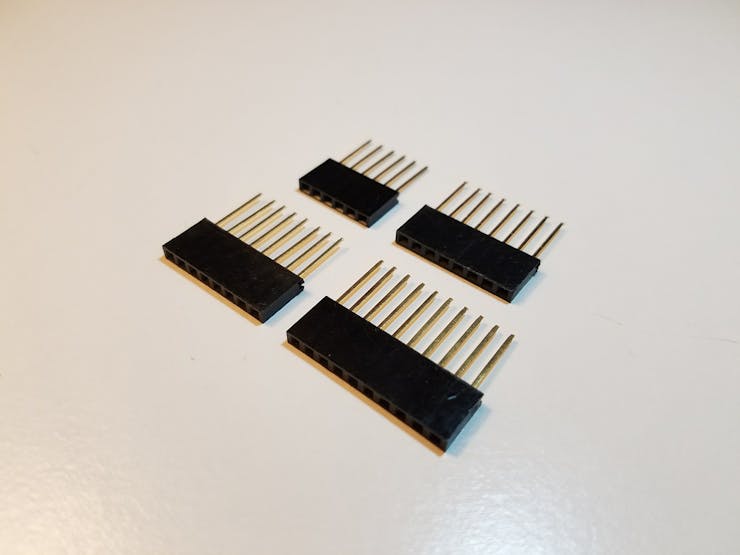
1 / 5 • The shield comes with a little baggie with these stacking female headers.
Now that you have all your parts, here's a quick recap of what you need to do to set up your hardware:
- Solder the stacking female headers onto the shield. See this tutorial on how to do that.
- Plug the shield into the Arduino, making sure to line up all the pins so you don't damage them!
- Insert the SIM card as shown in the picture. The metal contacts face downward and make note of the location of the notch in the corner.
- Plug in your Arduino to your computer using a USB cable. You might notice that the shield's green power LED doesn't light up. That's perfectly normal because the shield's PWRKEY pin needs to be pulsed low for a little bit in order to turn it on. The example Arduino sketch in the following section will take care of that for you!
- Attach the dual LTE/GPS antenna to the uFL connectors at the right edge of the shield. Note that the wires will criss-cross so don't plug in the wrong ones!
- You're all set for the software!
Step 3: Arduino Setup & Device Testing
Arduino IDE Setup
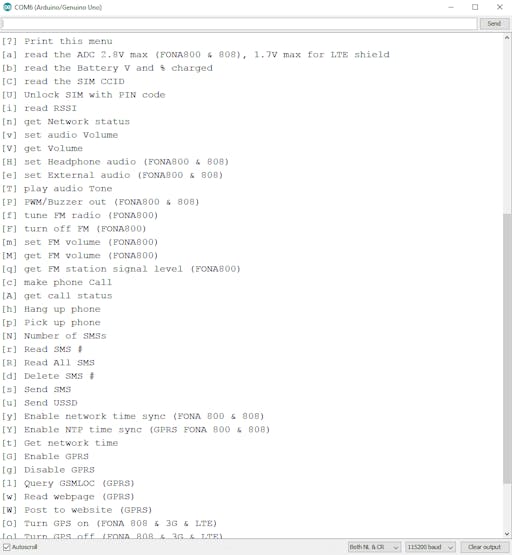
You should load the demo sketch to test the functionality of your shield first!
If you haven't already, please see the "Arduino IDE Setup" and "Arduino Example" steps in my previous Instructable to make sure your board is functioning properly. In those instructions you'll need to download the library on the Github page and open the example code "LTE_Demo". Full Arduino IDE setup instructions can be found on the Github wiki. After following those instructions you should have tested the network connection, GPS, and posting data to dweet.io.
IoT Example Sketch
Now that you've tested the core features of your shield, load the "IoT_Example" sketch in Arduino IDE. You can also find it here on Github. Upload this code to your Arduino and open the serial monitor and you should see the Arduino find the SIM7000 module, connect to the cell network, enable GPS and keep trying until it obtains a fix on location, and post the data to dweet.io. This should all run without changing any line of the code, assuming you're using the SIM7000 shield.
One thing you may want to select is the transfer methods used for sending data to the cloud. This can be done via the "PROTOCOL_XXXX" lines in the #define section near the top of the code:
// Uncomment *one* of the following protocols you want to use
// to send data to the cloud! Leave the other commented out
#define PROTOCOL_HTTP_GET         // Generic
//#define PROTOCOL_HTTP_POST        // Generic
//#define PROTOCOL_MQTT_AIO         // Adafruit IO
//#define PROTOCOL_MQTT_CLOUDMQTT   // CloudMQTT
By default the shield will use HTTP GET requests to send data to dweet.io but you can change this to HTTP POST (with or without authentication) or MQTT to send data to brokers like Adafruit IO or CloudMQTT. To select a transfer method, simply uncomment the desired method and leave the others commented out. This defines what blocks of code run in the rest of the sketch. Later on, of course, you can also change the destination to send data to other servers and proprietary API's, which we'll also get into in the ThingsBoard.io section in this tutorial.
Also by default you will see the following line define the sampling rate (well, actually the delay in between posts).
#define samplingRate 30 // The time in between posts, in seconds
If this line is left uncommented, the Arduino will post data, delay 30s, post data again, repeat, etc. During the 30s delay you can do things like put the Arduino in low-power mode and fancy things like that, but to keep things simple I'll just use the delay() function to pause the operation. If you comment this line the Arduino will post data then go directly to low-power sleep mode indefinitely until you press the reset button on your Arduino. This is useful if you are testing something and don't want to burn your precious free data (although honestly each post uses practically nothing) or maybe you have external circuitry to reset the Arduino (555 timer? Accelerometer interrupt pin? Temperature sensor interrupt? Think outside the box!)
The next line sets whether the shield will turn off after posting data or remain on. You might opt for the former choice by uncommenting the line if you're only sampling once in a while, but if you have a relatively high sampling rate you will want to leave the line commented so that the shield stays on and doesn't have to re-initialize, re-enable GPRS and GPS, etc. When the shield is left on it's able to post extremely quickly!
//#define turnOffShield // Turn off shield after posting data
Also keep in mind that this example automatically fetches the module-specific and globally-unique IMEI number of the SIM7000 and uses it as the device ID (or "name" if you prefer) to identify the device when it posts data to dweet.io. You can change this if you want, so I'd thought I'd just let you know :)
To check if your data is actually being sent to dweet.io, simply fill in the appropriate info and copy/paste the URL into any browser:
dweet.io/get/latest/dweet/for/{deviceID}
where {deviceID} should be substituted with the IMEI number which is printed out in the serial monitor at the beginning, right after the Arduino finds it. After entering that URL in your browser you should see a JSON response like the following:
{"this":"succeeded","by":"getting","the":"dweets","with":[{"thing":"112233445566778","created":"2017-12-28T23:32:39.803Z","content":{"lat":11.223344,"long":-55.667788,"speed":10,"head":75,"alt":330.7,"temp":21.2,"batt":3630}}]}
Looking at the "content" you should see the latitude, longitude of your location, your speed (in kilometers per hr), direction heading (degrees), altitude (meters), temperature (*C, but feel free to convert in the code), and the supply voltage in milli-Volts (which for the LTE shield should always be around 3600mV because of the voltage regulator). For more info on the NMEA data string you can take a look at page 149 of the SIM7000 AT command manual.
Once you verify that your setup is successfully sending data to dweet, let's set up the dashboard to view all our data on a nice interface!
Step 4: Freeboard.io Setup
For this tutorial we'll be using freeboard.io, a cool IoT dashboard that can connect with numerous cloud platforms like PubNub and dweet, as well as other features like JSON and MQTT. As you probably have guessed we'll be also using dweet.io which is used in the example code from the previous section. As an important note, dragging panes in freeboard.io doesn't seem to work in Chrome so use Firebox or Microsoft Edge instead. If you don't, it can be a real "pane" to re-arrange the items on your screen!
Account & Device Setup
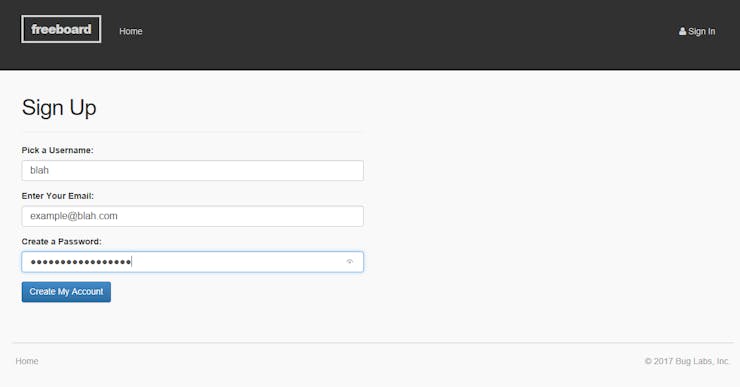
1 / 3 • Create an account!
- The first thing you'll need to do is create an account by clicking the red "START NOW" button on the freeboard.io home page, enter credentials, and click "Create My Account". You will then get an email notification confirming your new account.
- Now click "Login" at the top right of the home page and after signing in you should see your "freeboards", which are just dashboards that you set up fr your projects. Obviously if the account is new you will see nothing here so just enter a new project name and click "Create New" near the top right. This will then bring you to an empty dashboard where you can set up the interface just how you like it. In freeboard there you can set up various "panes", and each pane can have a single or multiple "widgets" which are things like graphs, maps, gauges, etc. that display your data in some way.
- The first thing we need to do now is to set up the actual source of data, which is your Arduino + LTE shield. To do that, click "ADD" on the top right under "Datasources". Next, select "Dweet.io" and enter any name you want under the "Name" field. However, make sure that under the "Thing Name" field you enter the shield's IMEI number instead of any arbitrary name, because that's what freeboard will use to pull data from dweet.
- After clicking "Save" you should see your device appear under "Datasources" as well as the last time it sent data to the dweet. You can also click the refresh button to check for the latest values, but freeboard will update by itself so you normally shouldn't have to use that button.
Dashboard Setup
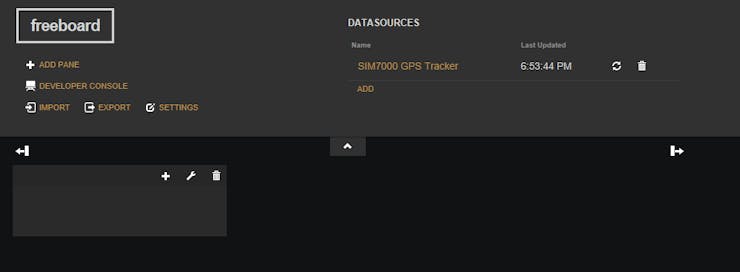
1 / 6 • Add an empty pane and it should appear in your dashboard. Let's add some widgets in it!
Now let's take a look at how to set up the actual bells and whistles that you want to see on your screen!
- To add a pane, click the "ADD PANE" button at the top left and you will see it add a small window on your screen. However, there's nothing here yet because we haven't added any widgets!
- To add a widget click the little "+" button on the pane. This will bring up a dropdown menu with various widget options. Since we're going to be doing some GPS tracking let's pick the "Google Map" widget. You should then see two fields, the latitude and longitude. In order to fill these out properly your device needs to have posted to dweet already. Assuming it has, you should be able to click "+ Datasource", click on the datasource (the "SIM7000 GPS Tracker"), then click on "lat", which is the variable name that the shield uses when posting to dweet. Repeat the procedure for the longitude field and click the slider at the bottom if you want the map to draw lines between data points to mark where you've been.
- Now you should see a small map of your approximate location! To test if the map works, try changing your current GPS lat/long to something slightly different by changing, for example, the first digit after the decimal point of the lat/long values in the dweet URL that was printed in the serial monitor in Arduino IDE when the shield posted data. After tweaking them, copy and paste the URL and execute it in your browser.
dweet.io/dweet/for/112233445566778?lat=11.223344&long=-55.667788&speed=0&head=10&alt=324.8&temp=22.88&batt=3629
- Now switch back to freeboard and you should see that it graphed your tweaked location and drew an orange line between the points! Cool stuff huh? So I think you get the picture that our GPS tracker will send location data to dweet for you to see it on freeboard in real time or after your adventure is over
Extras
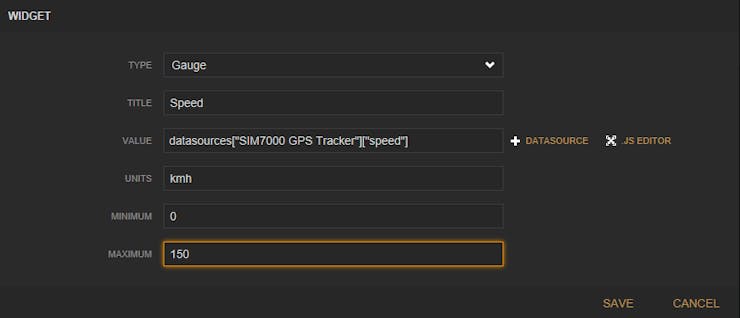
1 / 6 • Let's add a gauge, great for real-time data monitoring!
Since our little GPS tracker sends not only lat/long data but also altitude, speed, heading, and temperature, let's throw in a few more widgets to make our dashboard more colorful!
- Let's begin by adding a new pane then to add a gauge within the new pane click the "+" button in the pane and select "Gauge". Just like before, use the datasource and select "speed" as the data we're interested in fetching for this gauge. You should then see a nice gauge on your dashboard!
- Repeat this for the altitude and temperature values.
- Now for the heading let's add a "Pointer" instead. This is essentially a compass because it starts off pointing up (North) at 0 degrees and rotates clockwise for positive headings.. Perfecto!
- To change the size of the pane, hover over the pane which contains the map and you should see a little wrench symbol at the top right. Click that and enter a title for the pane and enter "2" under "Columns" to increase the width of the pane.
- To change the locations of the panes simply drag them around! You can also experiment adding a "Sparkline" which is basically just a line graph so you can see not only the latest data but historic data as well.
Have fun and set it all up how you like it because we're ready to go out on a field trip!
Step 5: Testing
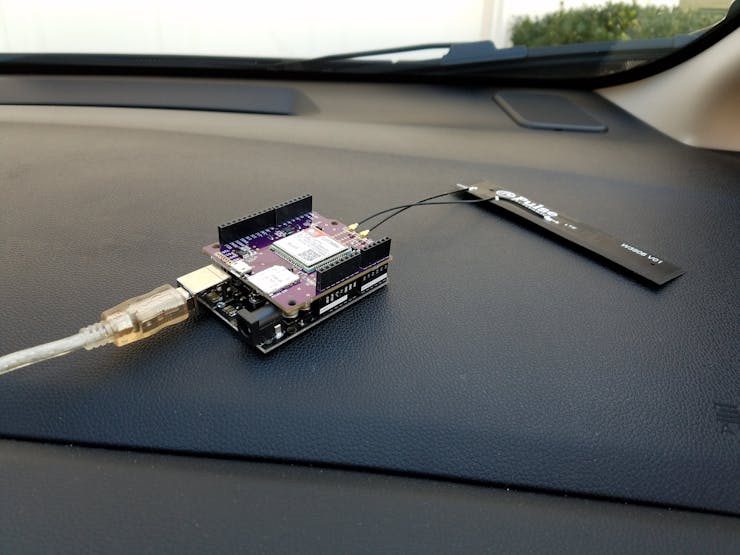
1 / 2 • The shield in this picture is an old version; you will need a LiPo battery for yours!
To test your setup I would recommend setting the sampling time to a lower value like 10s so that you can capture your journey with decent resolution. I would also leave the "turnOffShield" variable commented out so that the shield doesn't go to sleep. This allows it to post data in quick succession.
After uploading the code to your Arduino, either get a battery pack (7-12V) to power the Arduino or simply plug the Arduino in using a car USB adapter. I personally found this method easier :)
Next, open up freeboard somewhere so when you return you can see the results! Once you plug in the Arduino you're good to go! Start driving around, get some coffee, return home, and you should see the data plotted on freeboard. If you really want (I don't recommend this while driving...) you can view the freeboard data on your phone in real time as your friend drives the vehicle. Fun stuff!
Step 6: Freeboard Results
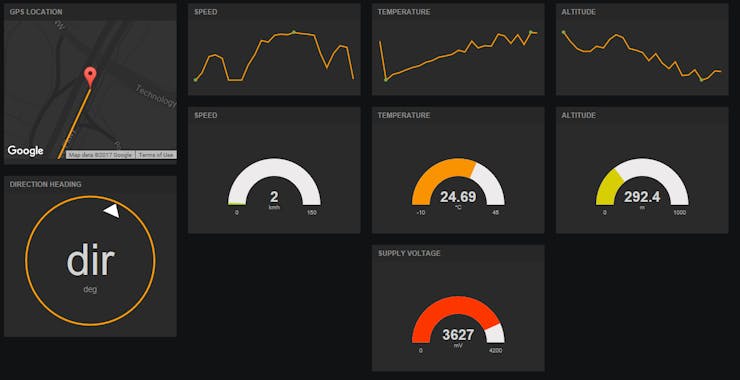
The road test results!
For this test my dad and I went to get some chicken drums at Trader Joe's (onmomnomnom...) and we collected some pretty accurate data. I had the device send data every 10s and the max speed from the trip was about 92khm (around 57mph) which is quite accurate because we kept an eye on the speedometer the whole time. The LTE shield definitely does its job quite well and sends data to the cloud very quickly. So far so good!
However, perhaps the not-so-good news is that the map widget on freeboard isn't as great as I had originally thought. It doesn't allow you to move the location of your mouse and it stays centered on the last location so it's great if all you want is the last location of the car but not if you want to analyze a completed trip with all the historical data, especially if it was a long journey.
The great limitations of Freeboard.io warranted finding a better tool for showing the journey on the map so I set about searching for one and fortunately came across one. You'll see what it is and how to use it in the next section!
Step 7: ThingsBoard Setup
ThingsBoard Account & Device Setup
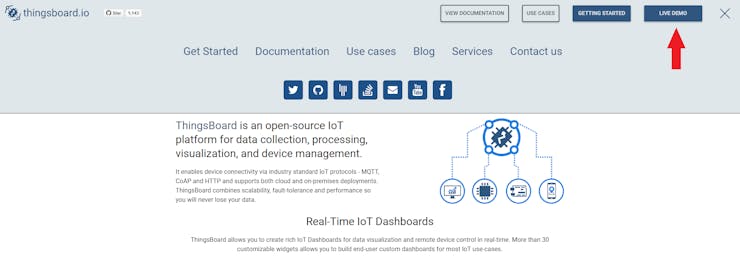
1 / 6 • Click the "Live Demo" button at the top right, create an account, verify, and log in
The first thing you should do is go to the ThingsBoard home page then create an account by clicking the top right menu button and selecting "Live Demo". Create an account, verify your account in an email they send you, then log back in to the Live Demo homescreen. This should bring you to a screen where you can manage all your devices, edit dashboards, etc.
Next, select the "Devices" tab on the left hand side. This should bring up a bunch of demo devices like ESP8266, DHT22, Arduino and Pi demos, etc. Create a new device by clicking the red "+" button at the bottom right and enter a name and choose "default" for device type. After clicking "ADD" you should see your new device in the Devices tab. Click on "Manage Credentials" and you should see a small window pop up showing the device's access token. This is essentially the device ID and is analogous to the device ID used for posting data to dweet.io. You can change this device ID to the IMEI number of your shield if you want, but you can also just use the auto-generated token. Copy this token as you will need it in the Arduino sketch.
Arduino Example Setup
In this tutorial we'll be using the exact same example Arduino sketch as in the first tutorial but this time I've updated the sketch to include code to send data directly to ThingsBoard.io instead of dweet.io in Part 1. As always, you can find the example code here on Github.
The first thing you need to do is comment out the lines that make the shield post to dweet.io:
// GET request
 /*
 // You can adjust the contents of the request if you don't need certain things like speed, altitude, etc.
 sprintf(URL, "http://dweet.io/dweet/for/%s?lat=%s&long=%s&speed=%s&head=%s&alt=%s&temp=%s&batt=%s", imei, latBuff, longBuff,
         speedBuff, headBuff, altBuff, tempBuff, battBuff);
 int counter = 0; // This counts the number of failed attempts tries
 // Try a total of three times if the post was unsuccessful (try additional 2 times)
 while (counter < 3 && !fona.postData("GET", URL, "")) { // Add the quotes "" as third input because for GET request there's no "body"
   Serial.println(F("Failed to post data, retrying..."));
   counter++; // Increment counter
   delay(1000);
 }
 */
Next, un-comment the lines that post to thingsboard.io:
// Let's try a POST request to thingsboard.io
 const char* token = "qFeFpQIC9C69GDFLWdAv"; // From thingsboard.io device
 sprintf(URL, "http://demo.thingsboard.io/api/v1/%s/telemetry", token);
 sprintf(body, "{\"lat\":%s,\"long\":%s,\"speed\":%s,\"head\":%s,\"alt\":%s,\"temp\":%s,\"batt\":%s}", latBuff, longBuff,
         speedBuff, headBuff, altBuff, tempBuff, battBuff);
//  sprintf(body, "{\"lat\":%s,\"long\":%s}", latBuff, longBuff); // If all you want is lat/long
 int counter = 0;
 while (!fona.postData("POST", URL, body)) {
   Serial.println(F("Failed to complete HTTP POST..."));
   counter++;
   delay(1000);
 }
Upload the code to your Arduino, make sure you have the SIM card and antenna attached, and verify that the shield is sending code to the cloud before proceeding!
Step 8: Verify Data Reception

In the "Latest Telemtry" page you should see the latest values being sent by your GPS tracker!
In order to actually verify that data is being sent to ThingsBoard correctly, go to the same device details page (click on the GPS Tracker device tile in the "Devices" page) then click the "Latest Telemetry" tab. If your GPS tracker is sending values to ThingsBoard you should see the latest values here and they will update in real time as they come in.
Now that you've verified that ThingsBoard is actually getting the data it's time to set up the dashboard so we can visualize our data when as we collect it! (Or after the fact)
Step 9: Setting Up Dashboard

1 / 5 • Click the "Dashboards" tab and click your device tile to view its dashboard!
Now it's time for the fun part! Now click the "Dashboards" tab on the left and select your GPS tracker device. This should bring up a new page that asks you to add widgets. Click the bottom right "+" button and "create new widget" to bring up a dropdown menu of widgets to choose from. For now let's add a "digital gauge". Selecting this should load a bunch of previews for all the different types of digital gauges you can choose from. When you click on one it will bring up another screen for you to set up the widget parameters. The first thing you need to add is the datasource (your GPS tracker device which sends the data to ThingsBoard). Press the "+ ADD" button and select your "GPS Tracker" device and select the appropriate variable that you want the widget to display. In this case, let's choose the variable "temp" (temperature).
Now if you want to add things like a title for the widget, go under the "Settings" tab, check "Display title", and enter a title. There are lots of other things you can do under the "Advanced" tab but I will let you investigate those yourself! Have fun changing the value ranges, label text, colors, and more! After adding the widget it will appear at the bottom left of your dashboard (you may have to scroll down if you have multiple widgets filling the screen). You can edit the widget at any time by pressing the button on the widget if you're already in the dashboard edit mode, or enter the edit mode by pressing the pencil button at the bottom right of the entire screen first to allow you to edit the widgets. Pretty straightforward!
Step 10: Adding a Map!
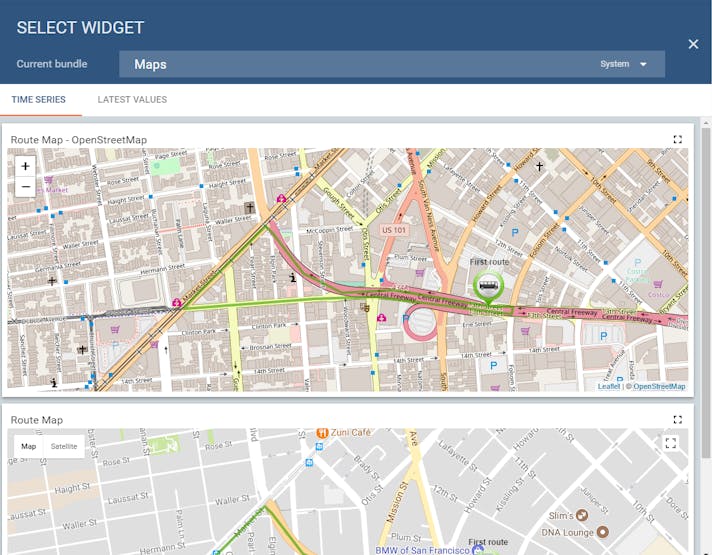
1 / 4 • Cool stuff here!
Now for a GPS tracker a map is a must-have! Let's add one by creating a new widget (bottom right "+" button again) and this time scroll down and select "Maps". Go ahead and click on one and it will bring up the options for it. Add the datasource as usual but this time, select both "lat" and "long" variables since it will need both of these to get the location. Next, go to the "Settings" tab and here you can set the timewindow of the data to display on the map. For example, you may only want the last 2 minutes of data to appear, or you may want all data since yesterday, or maybe you just want a fixed window in time (like 2PM yesterday through 10AM today).
If you want you can then go to the "Advanced" tab and select the map type (roadmap, satellite, hybrid, or terrain). Perhaps the most important part of all this is to check the latitude and longitude key names. Make sure these names correspond exactly to the variable names you're actually sending to ThingsBoard. For example, if your Arduino sketch says it's sending "lat" and "long" variables (which it is by default) then you need to change the key names to "lat" and "long" and using "latitude" and "longitude" won't fetch your data!
Again, after adding the map it will appear at the bottom of the dashboard. Simply drag it to re-position it on the dashboard and click and drag the edges to resize it. If your timewindow was set correctly you should see your current location appear on the map. Super neat huh? Now we're ready for a real test!
Step 11: Another Road Test!
Testing the GPS tracker is super simple! Just plug the Arduino into a car USB adapter to power it, make sure the green LED turns on, and it should start sending data! To change the sampling rate of the GPS tracker make sure you find this line of code in the example sketch:
#define samplingRate 10 // The time in between posts, in seconds
and set it to whatever you want. I found that 10s works quite well for a leisurely road test, but if you're fast and furious maybe you might want an even higher sampling rate!
Step 12: ThingsBoard Results
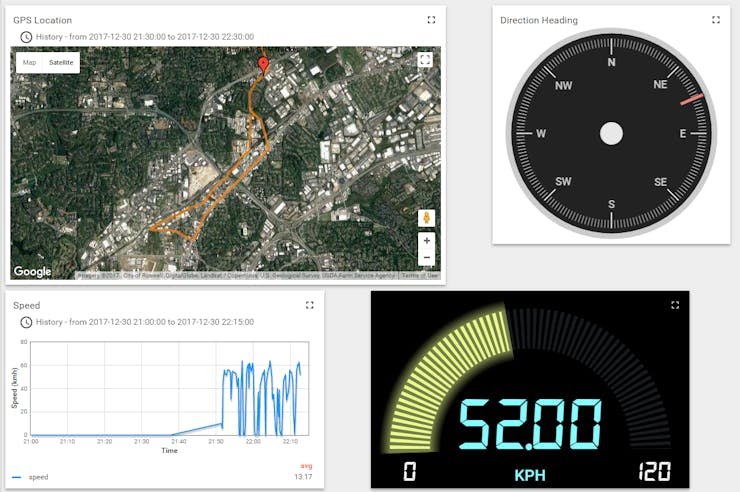
1 / 3 • Wow this is EPIC!
In the pictures above you can see my dashboard setup. I added charts to graph historical data for things like speed, altitude, and temperature, and also included real-time gauges in case I want to see them in real time on another road trip (image this in an RV!).
The map was killer awesome and I managed to collect some really accurate data of a route I took. Also, the speed data was extremely accurate because we never exceeded about 40mph (the graph is in kph) on the city roads. The many fluctuations in speed can be explained by the traffic lights. Overall, great results and just imagine what else we could use this for! You could install this on an RV, motorcycle, car, etc. and have it track all the time and pull up the results on ThingsBoard!
To summarize, in this tutorial we programmed our GPS tracker to send data directly to ThingsBoard via HTTP POST requests and managed the data on a dashboard. You can add multiple devices and dashboards, each containing multiple widgets that look super cool and have lots of customization options! ThingsBoard has proven to be a very powerful (and free!) tool to view IoT data and there are even other features that I haven't even scratched. Feel free to play around with it and see what you find.
- If you liked this tutorial, made your own, or have any questions, please make a comment below!
- Be sure to give this tutorial a thumbs up and check out my YouTube channel for more awesome Arduino-related tutorials and follow me on Twitter for the latest news! If you would like to support what I do, consider picking up your own Botletics SIM7000 shield on Amazon.com!
- ThingsBoard also has some YouTube videos on using the dashboard which you might find interesting
- As of 2/7/18 I've also implemented MQTT for sending data to Adafruit IO, CloudMQTT, or basically any other MQTT broker with or without authentication, so be sure to check out those options as well! With Adafruit IO you can also create real-time dashboards to plot data and track location on a map! Check out this Github tutorial page that covers some of the MQTT topics.
With that, I'll see you next time!


