VMware offers a free version of their vSphere Hypervisor with some limitations like the lack of vCenter support. Another limitation is that APIs are read-only, so it's not possible to use the Data Protection API aka. VADP to make Backups.
Creating backups of Virtual Machines is also important on standalone ESXi hosts. The API limitation makes it impossible to create incremental CBT aided backups, but it's not impossible to create full copies of virtual machines. The post explains the technique to create backups and takes a look at solution that use these techniques.
Poor Man's Backup (The Basics)
All Virtual Machines are just files on datastores. The most unsophisticated backup method would be to simply make a copy of all files. This method works not only with the ESXi Hypervisor, but also with VMware Workstation or older products like GSX or VMware Server. Many years ago, this was my first method of creating backups of running Virtual Machines. But wait - Can you just copy a running Virtual Machine? No! You can't copy the Virtual Disk file while it is mapped to the Virtual Machine mode:
"cp: can't open 'web01-flat.vmdk': Device or resource busy"
The challenge is to make the disk readonly while the Virtual Machine is running, without affecting the operating system running in the Virtual Machine. Here comes another technology in place: Snapshots. A snapshot is a preserved state of the virtual machine where you can return to later. A common misinterpretation is that when you create a snapshot the system copies the defined state to another location. This is not how a VMware snapshot works. When you create a snapshot, the original virtual disk file is transformed into readonly mode. To allow the virtual machine to work while the disk is in read only mode, all write IOs are stored in another file known as "Delta File".
The answer to the problem is: Create a snapshot, copy the virtual disk, delete the snapshot. Here is the full process of making working backups of running Virtual Machines:
- SSH to the ESXi Host
- Copy VM configuration files (.vmx, .nvram, .vmsd, .vmdk). The ".vmdk" is only the virtual disk descriptor file, so it's possible to make a copy. The actual disk is *-flat.vmdk. I'm copying all files to a nfs share mounted as datastore.
cp /vmfs/volumes/datastore/web01/web01.vmx /vmfs/volumes/nfs/web01-backup/web01.vmx
cp /vmfs/volumes/datastore/web01/web01.nvram /vmfs/volumes/nfs/web01-backup/web01.nvram
cp /vmfs/volumes/datastore/web01/web01.vmsd /vmfs/volumes/nfs/web01-backup/web01.vmsd
cp /vmfs/volumes/datastore/web01/web01.vmdk /vmfs/volumes/nfs/web01-backup/web01.vmdk
- Create a Snapshot with the vSphere Client or by command line (locate vmid with "vim-cmd vmsvc/getallvms" and make a snapshot with "vim-cmd vmsvc/snapshot.create [VmId] [snapshotName] [description] [includeMemory] [quiesced]")
vim-cmd vmsvc/getallvms
vim-cmd vmsvc/snapshot.create 2 backup poor-mans-backup 0 0
- Copy the virtual disk
cp /vmfs/volumes/datastore/web01/web01-delta.vmdk /vmfs/volumes/nfs/web01-backup/web01-delta.vmdk
- Delete the Snapshot with the vSphere Client or by command line (vim-cmd vmsvc/snapshot.removeall [VmId])
vim-cmd vmsvc/snapshot.removeall 2
The reason why I copy configuration files prior to make the snapshot is because the snapshot is documented in the configuration file and the Virtual Machine will not power on when the snapshot file is missing. This can be fixed in the configuration, but it's easier to simply copy the correct configuration.
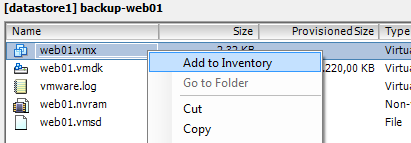
Restore: To restore the Virtual Machine register it on the ESXi Host "Add to inventory" and power it on.
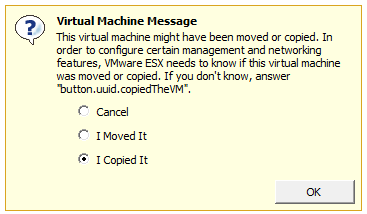
The Virtual Machine notices that it has been moved. If you want to restore the original VM, select "I Moved It" and it will preserve its UUID and MAC addresses. If you want to run both VMs on the same ESXi host, select "I Copied It", and you can run both at the same time.
Poor Man's Backup 2.0 (The viable solution)
The copy process of the above method works everywhere, but it is very slow and can be optimized. The cp command simply copies the entire file, including the unused space of virtual disks which is represented as zeros. ESXi hosts have a tool that understands virtual disks and ignores unused blocks during copy processes. It also allows to change the output format to thin, which is great for backups:
vmkfstools -i [sourceDisk] [targetDisk] -d [diskformat]
The following script is a working example to backup a Virtual Machine on a Free ESXi host:
#!/bin/sh
mkdir -p /vmfs/volumes/datastore1/web01-backup/

cp /vmfs/volumes/datastore1/web01/web01.vmx /vmfs/volumes/datastore1/web01-backup/web01.vmx
cp /vmfs/volumes/datastore1/web01/web01.nvram /vmfs/volumes/datastore1/web01-backup/web01.nvram
cp /vmfs/volumes/datastore1/web01/web01.vmsd /vmfs/volumes/datastore1/web01-backup/web01.vmsd

vmid=$(vim-cmd vmsvc/getallvms | grep web01 | awk '{print $1}')
vim-cmd vmsvc/snapshot.create $vmid backup 'Snapshot created by Backup Script' 0 0

vmkfstools -i /vmfs/volumes/datastore1/web01/web01.vmdk /vmfs/volumes/datastore1/web01-backup/web01.vmdk -d thin

vim-cmd vmsvc/snapshot.removeall $vmid
The scipt is very basic, without error checking and static. It's intended to demonstrate the process.
ghettoVCB by William Lam
ghettoVCB is a long known backup solution that works from ESXi 3.5 until ESXi 6, created by VMware employee William Lam. It's a comprehensive script that runs on the ESXi host and creates backups using the method explained above. It does not use the VMware backup API, so it works with free ESXi.
Download ghettoVCB from GitHub (Press "Raw" to download the File) and install the .vib:
esxcli software vib install -v /vmfs/volumes/datastore1/vghetto-ghettoVCB.vib -f
ghettoVCB can be configured with configuration files. A full documentation can be found here: ghettoVCB Documentation. For this example, I've created a basic configuration and only changed the backup volume:
VM_BACKUP_VOLUME=/vmfs/volumes/datastore1/BACKUP
Start the Backup with the -a parameter, to backup all VMs on the host, and the ghettoVCB.conf:
/opt/ghettovcb/bin/ghettoVCB.sh -a -g ghettoVCB.conf
This will create a backup of all Virtual Machines running on the ESXi host to the backup directory. To restore, you can simply add the .vmx file to the ESXi inventroy.
Pro/Cons
+ Available as VIB package, easy installation
+ Mature solution with a large feature set
+ Good documentation. Easy to make cronjobs that are persistent through a reboot.
- Due to it's large feature set, the deployment is not self-explaining
- Requires basic shell skills
XSIBackup
XSIBackup is another free script that runs on the ESXi host and backups running virtual machines on free ESXi Hosts. Features:
- Performs hot backups
- Does not use VADP
- Supports Cronjobs
- Supports Rsync to mirror backups to a second ESXi
The tool can be downloaded here. Unzip it, make it executable and it its ready to run. No further configuration is required. To backup all VMs running on the ESXi host, just start the script with the following parameters:
./xsibackup --backup-point=/vmfs/volumes/datastore1/BACKUPS --backup-type=running
The full documentation is available here.
Pro/Cons
+ Large Feature Set
+ Very quick to setup (5 minutes to first backup)
- Download requires a (free) key
- Requires basic shell skills
HPE VM Explorer (Trilead VM Explorer)
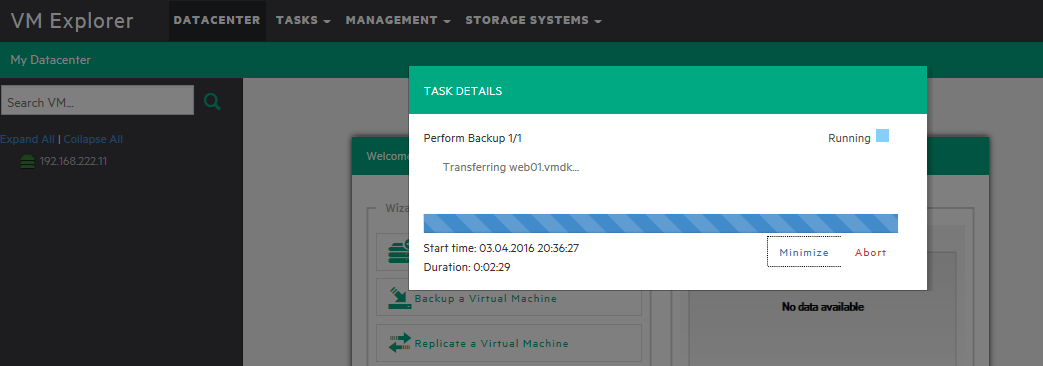
HPE VM Explorer is available as free edition here. The windows based software is configured and managed with a web interface and works with the free ESXi. If you want to create a backup of your standalone ESXi ot your Windows machine, this is your tool of choise. Of course it also supports backups to the local ESXi host.
Pro/Cons
+ Easy installation
+ Also supports vCenter and API based Backups
+ No shell skills required
- Requires an additional server for the application
Other Tools
The following tools are, according to their documentation, also capable of creating backups of Virtual Machines running on Free ESXi:


Tidak ada komentar:
Posting Komentar