https://www.linuxtechi.com/install-freeipa-rhel-rocky-almalinux/
Apakah Anda mencari panduan mudah tentang cara menginstal server FreeIPA di Linux?
Panduan langkah demi langkah di halaman ini akan menunjukkan cara menginstal server FreeIPA di RHEL 8, Rocky Linux 8 dan AlmaLinux 8.
FreeIPA adalah alat manajemen akses dan identitas terpusat yang gratis dan bersumber terbuka untuk sistem berbasis Linux, ini adalah proyek hulu untuk manajer identitas Red Hat. Dengan menggunakan FreeIPA, kita dapat dengan mudah mengelola autentikasi terpusat beserta manajemen akun, kebijakan (kontrol akses berbasis host), dan audit.
FreeIPA didasarkan pada proyek Open Source berikut,
- Server LDAP – berdasarkan proyek 389
- KDC – berdasarkan implementasi MIT Kerberos
- PKI berdasarkan proyek Dogtag
- Pustaka Samba untuk integrasi Direktori Aktif
- Server DNS berbasis BIND dan plugin Bind-DynDB-LDAP
- NTP
Prasyarat
- Pra-Instal RHEL 8 atau Rocky Linux 8 atau AlmaLinux 8
- Pengguna Sudo dengan hak admin
- RAM = 2 GB
- CPU = 2 vCPU
- Disk = 12 GB ruang kosong di /
- Konektivitas internet
Detail Lab untuk FreeIPA
- Alamat IP = 192.168.1.102
- Hostanme = ipa.linuxtechi.lan
- Sistem Operasi: RHEL 8 atau Rocky Linux 8 atau AlmaLinux 8
Tanpa basa-basi lagi, mari kita menyelami langkah-langkah instalasi FreeIPA,
1) Tetapkan Nama Host dan Instal Pembaruan
Buka terminal server Anda dan atur nama host menggunakan perintah hostnamectl ,
$ sudo hostnamectl setel-namahost "ipa.linuxtechi.lan"
$ eksekutif bash
Instal pembaruan menggunakan perintah yum/dnf lalu boot ulang
$ sudo dnf perbarui -y
$ sudo memulai ulang
2) Perbarui file host & Atur SELinux sebagai Permisif
Jalankan perintah tee di bawah ini untuk memperbarui file /etc/hosts, ganti alamat ip dan nama host sesuai pengaturan Anda.
$ echo -e "192.168.1.102\tipa.linuxtechi.lan\t ipa" | sudo tee -a /etc/hostsAtur selinux sebagai permisif, jalankan perintah berikut,
$ sudo setenforce 0
$ sudo sed -i 's/^SELINUX=.*/SELINUX=permissive/g' /etc/selinux/config
]$ dapatkan kekuatan
Permisif
Bahasa Indonesia: $
3) Instal FreeIPA dan Komponennya
Paket FreeIPA dan dependensinya tersedia di repositori paket Appstream. Karena kami berencana untuk menginstal DNS terintegrasi FreeIPA, maka kami juga akan menginstal “ ipa-server-dns & bind-dyndb-ldap ”
Jalankan perintah di bawah ini untuk menginstal FreeIPA dan dependensinya
$ sudo dnf -y instal @idm:DL1
$ sudo dnf instal freeipa-server ipa-server-dns bind-dyndb-ldap -y
4) Mulai Instalasi FreeIPA
Setelah paket FreeIPA dan dependensinya berhasil diinstal, gunakan perintah di bawah ini untuk memulai pengaturan instalasi freeipa,
Ini akan memunculkan beberapa hal seperti mengonfigurasi DNS Terintegrasi, Nama Host, Nama Domain, dan Nama Realm.
$ sudo ipa-server-instalOutput of above command would be something like below
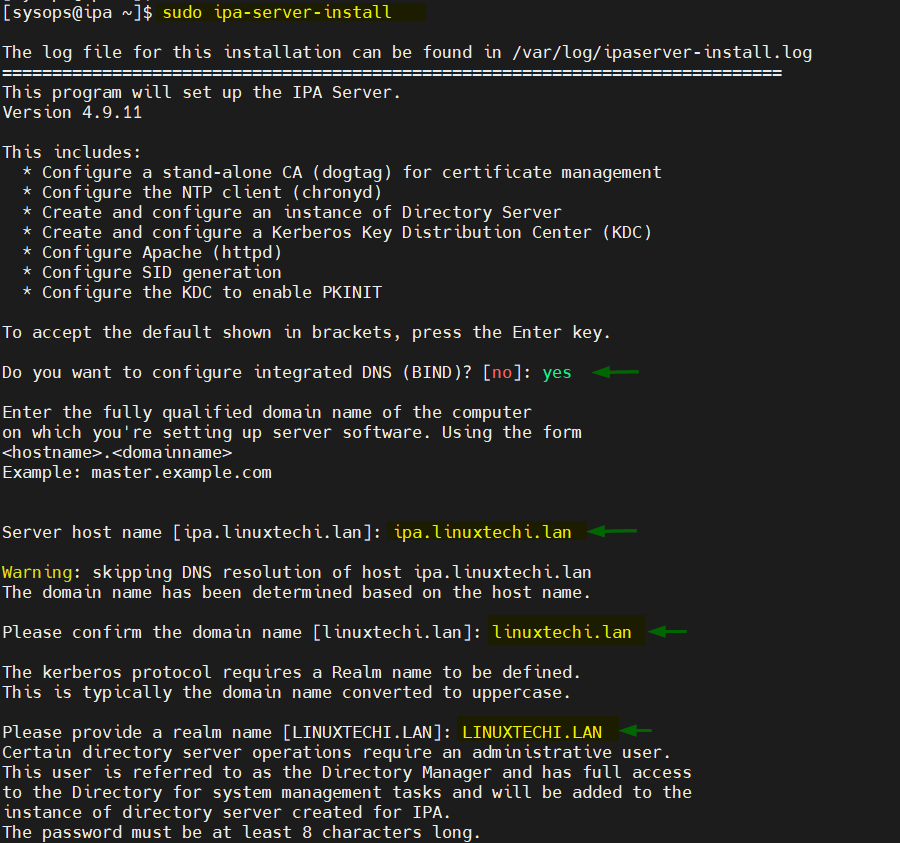

After pressing yes in above window, it will take some time to configure your FreeIPA server and once it has been setup successfully then we will get output something like below,
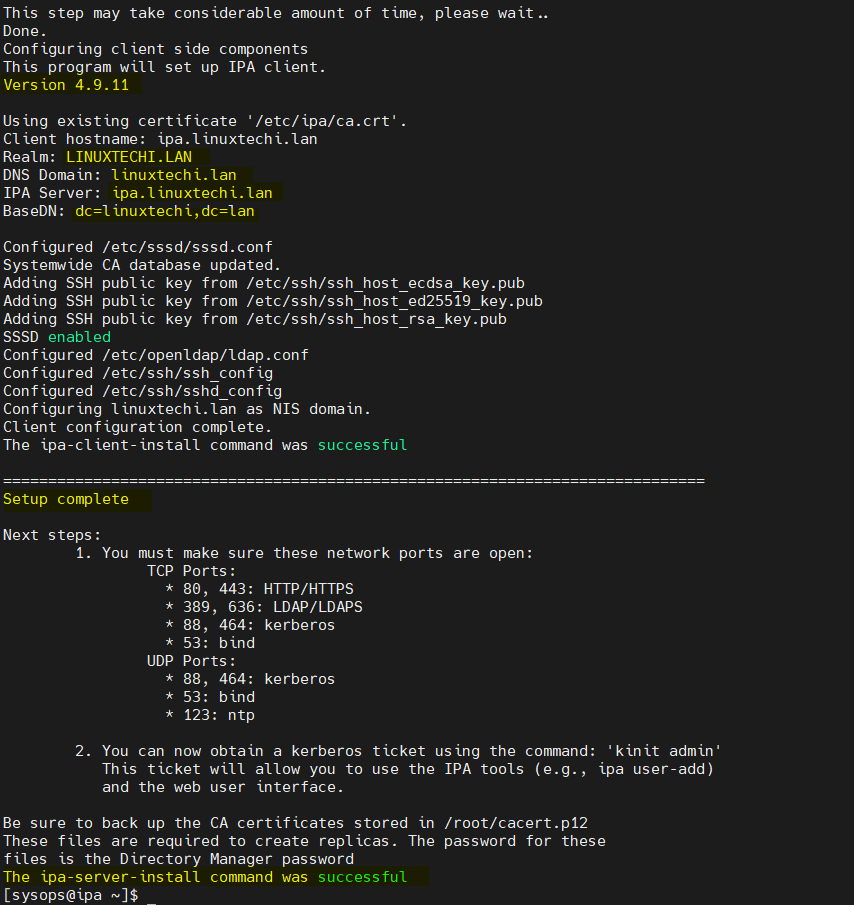
Above output confirms that FreeIPA has been installed successfully.
5) Allow FreeIPA ports in Firewall
In case OS firewall is running on your server then run beneath firewall-cmd commands to allow FreeIPA ports,
$ sudo firewall-cmd --add-service={http,https,dns,ntp,freeipa-ldap,freeipa-ldaps} --permanent
$ sudo firewall-cmd --reload
6) Access FreeIPA admin portal
Execute the below ipactl command to check whether all services of FreeIPA are running or not
[sysops@ipa ~]$ ipactl status
You must be root to run ipactl.
[sysops@ipa ~]$ sudo ipactl status
Directory Service: RUNNING
krb5kdc Service: RUNNING
kadmin Service: RUNNING
named Service: RUNNING
httpd Service: RUNNING
ipa-custodia Service: RUNNING
pki-tomcatd Service: RUNNING
ipa-otpd Service: RUNNING
ipa-dnskeysyncd Service: RUNNING
ipa: INFO: The ipactl command was successful
[sysops@ipa ~]$
Let’s verify whether admin user will get token via Kerberos using the kinit command, use the same password of admin user that we supplied during FreeIPA installation.
$ kinit admin
$ klist
Output of above commands,
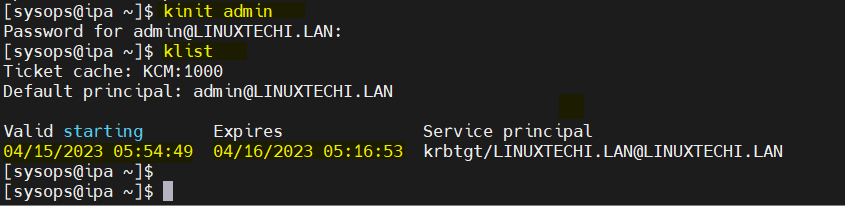
Perfect, output above confirms that admin gets the token. Now, try to access FreeIPA Web Console, type following url on web browser,
https://ipa.linuxtechi.lan/ipa/ui
or
https://<Server-IPAddress>/ipa/ui
Use the user name as admin and the password that we specify during the installation.

For FreeIPA web console, self-signed ssl certificates are used that’s why we got this window, so click on “Accept the Risk and Continue”
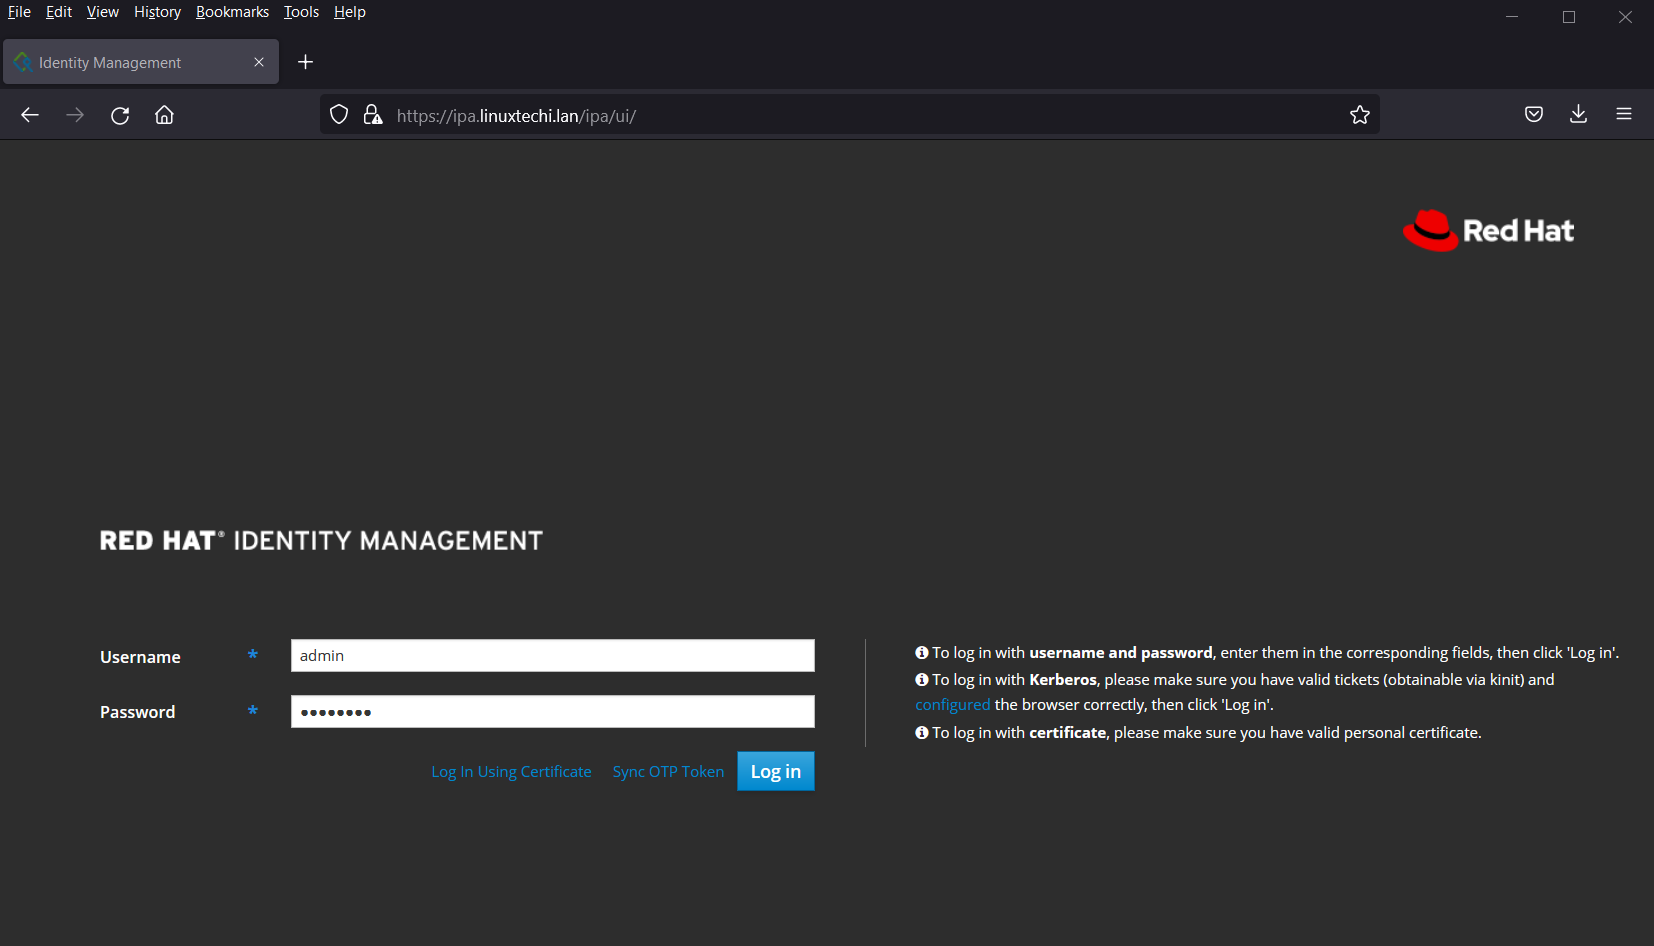
After entering the credentials, click on ‘Log in‘
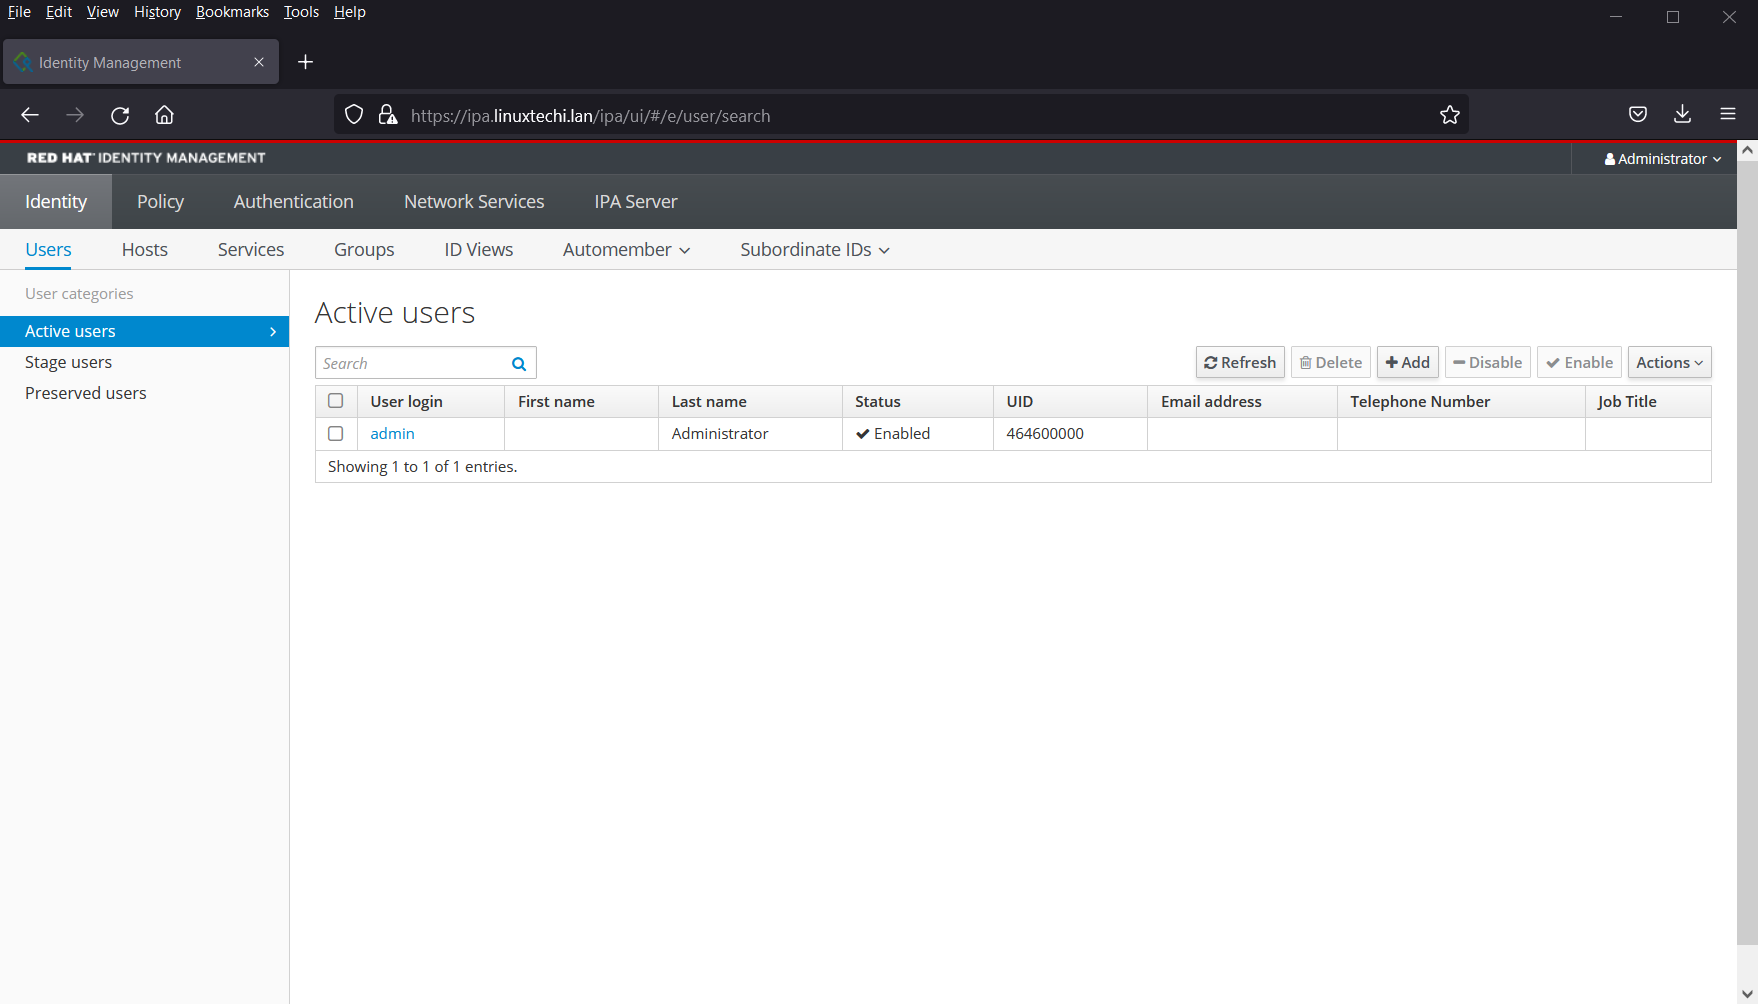
This confirms that we have successfully setup FreeIPA on RHEL 8/Rocky Linux 8 / AlmaLinux8.
That’s all from this, I hope you have found it informative. Kindly do post your queries and feedback in below comments section.
====================================
How to Install FreeIPA Server on RHEL 8 | Rocky Linux 8 | AlmaLinux 8
Are you looking for an easy guide on how to install FreeIPA server on Linux ?
The step-by-step guide on this page will show how to install FreeIPA server on RHEL 8 , Rocky Linux 8 and AlmaLinux 8.
FreeIPA is a free and open source centralized identity and access management tool for Linux-based systems, it is the upstream project for Red Hat identity manager. Using FreeIPA, we can easily manage centralized authentication along with account management, policy (host-based access control) and audit.
FreeIPA is based on the following Open Source projects,
- LDAP Server – based on the 389 project
- KDC – based on MIT Kerberos implementation
- PKI based on Dogtag project
- Samba libraries for Active Directory integration
- DNS Server based on BIND and the Bind-DynDB-LDAP plugin
- NTP
Prerequisites
- Pre Installed RHEL 8 or Rocky Linux 8 or AlmaLinux 8
- Sudo User with admin rights
- RAM = 2 GB
- CPU =2 vCPU
- Disk = 12 GB free space on /
- Internet connectivity
Lab Details for FreeIPA
- IP Address = 192.168.1.102
- Hostanme = ipa.linuxtechi.lan
- OS: RHEL 8 or Rocky Linux 8 or AlmaLinux 8
Without further ado, let’s deep dive into FreeIPA installation steps,
1) Set Hostname and Install Updates
Open the terminal of your server and set the hostname using hostnamectl command,
$ sudo hostnamectl set-hostname "ipa.linuxtechi.lan"
$ exec bash
Install updates using yum/dnf command and then reboot it
$ sudo dnf update -y
$ sudo reboot
2) Update the hosts file & Set SELinux as Permissive
Run the below tee command to update /etc/hosts file, replace the ip address and hostname as per your setup.
$ echo -e "192.168.1.102\tipa.linuxtechi.lan\t ipa" | sudo tee -a /etc/hosts
Set the selinux as permissive, run following commands,
$ sudo setenforce 0
$ sudo sed -i 's/^SELINUX=.*/SELINUX=permissive/g' /etc/selinux/config
]$ getenforce
Permissive
$
3) Install FreeIPA and its Components
FreeIPA packages and its dependencies are available in the Appstream package repositories. As we are planning to install integrated DNS of FreeIPA, so we will also install “ipa-server-dns & bind-dyndb-ldap”
Run the below command to install FreeIPA and its dependencies
$ sudo dnf -y install @idm:DL1
$ sudo dnf install freeipa-server ipa-server-dns bind-dyndb-ldap -y
4) Start FreeIPA Installation
Once FreeIPA package and it’s dependencies are installed successfully then use the below command to start the freeipa installation setup,
It will prompt couple of things like to configure Integrated DNS, Host name, Domain Name and Realm Name.
$ sudo ipa-server-install
Output of above command would be something like below
After pressing yes in above window, it will take some time to configure your FreeIPA server and once it has been setup successfully then we will get output something like below,
Above output confirms that FreeIPA has been installed successfully.
5) Allow FreeIPA ports in Firewall
In case OS firewall is running on your server then run beneath firewall-cmd commands to allow FreeIPA ports,
$ sudo firewall-cmd --add-service={http,https,dns,ntp,freeipa-ldap,freeipa-ldaps} --permanent
$ sudo firewall-cmd --reload
6) Access FreeIPA admin portal
Execute the below ipactl command to check whether all services of FreeIPA are running or not
[sysops@ipa ~]$ ipactl status
You must be root to run ipactl.
[sysops@ipa ~]$ sudo ipactl status
Directory Service: RUNNING
krb5kdc Service: RUNNING
kadmin Service: RUNNING
named Service: RUNNING
httpd Service: RUNNING
ipa-custodia Service: RUNNING
pki-tomcatd Service: RUNNING
ipa-otpd Service: RUNNING
ipa-dnskeysyncd Service: RUNNING
ipa: INFO: The ipactl command was successful
[sysops@ipa ~]$
Let’s verify whether admin user will get token via Kerberos using the kinit command, use the same password of admin user that we supplied during FreeIPA installation.
$ kinit admin
$ klist
Output of above commands,
Perfect, output above confirms that admin gets the token. Now, try to access FreeIPA Web Console, type following url on web browser,
https://ipa.linuxtechi.lan/ipa/ui
or
https://<Server-IPAddress>/ipa/ui
Use the user name as admin and the password that we specify during the installation.
For FreeIPA web console, self-signed ssl certificates are used that’s why we got this window, so click on “Accept the Risk and Continue”
After entering the credentials, click on ‘Log in‘
This confirms that we have successfully setup FreeIPA on RHEL 8/Rocky Linux 8 / AlmaLinux8.
That’s all from this, I hope you have found it informative. Kindly do post your queries and feedback in below comments section.
Tidak ada komentar:
Posting Komentar