How to install Kubernetes on Ubuntu 22.04 Jammy Jellyfish Linux
Kubernetes is leading software in container orchestration. Kubernetes
works by managing clusters, which is simply a set of hosts meant for
running containerized applications. In order to have a Kubernetes
cluster, you need a minimum of two nodes – a master node and a worker node. Of course, you can expand the cluster by adding as many worker nodes as you need.
In this tutorial, we’re going to deploy a Kubernetes cluster consisting of two nodes, both of which are running Ubuntu 22.04
Jammy Jellyfish. Having two nodes in our cluster is the most basic
configuration possible, but you’ll be able to scale that configuration
and add more nodes if you wish.
In this tutorial you will learn:
- How to install Docker
- How to install Kubernetes
- How to configure a master and worker node
- How to join a worker node to a Kubernetes cluster
- How to deploy Nginx (or any containerized app) in a Kubernetes cluster

| Category | Requirements, Conventions or Software Version Used |
|---|---|
| System | Ubuntu 22.04 Jammy Jellyfish |
| Software | Kubernetes |
| Other | Privileged access to your Linux system as root or via the sudo command. |
| Conventions |
# – requires given linux commands to be executed with root privileges either directly as a root user or by use of sudo command$ – requires given linux commands to be executed as a regular non-privileged user |
Scenario
Before we dive in, let’s estabish the particulars of our scenario. As mentioned above, our cluster is going to have two nodes, and both of those nodes are running Ubuntu 22.04 Jammy Jellyfish. One will be the master node and can be easily identified with its hostname of
kubernetes-master. The second node will be our worker node and have a hostname of kubernetes-worker.
The master node will deploy a Kubernetes cluster and the worker node simply joins it. Since Kubernetes clusters are designed to run containerized software, after we get our cluster up and running we are going to deploy a Nginx server container as a proof of concept.
Install Docker
Both of the nodes will need to have Docker installed on them, as Kubernetes relies on it. Open a command line terminal and type the following commands on both the master and the worker node to install Docker:
$ sudo apt update
$ sudo apt install docker.io
Once Docker has finished installing, use the following commmands to start the service and to make sure it starts automatically after each reboot:
$ sudo systemctl start docker
$ sudo systemctl enable docker
Install Kubernetes
Now we are ready to install Kubernetes. Just like all the other
commands up to this point, make sure that you are doing this on both
nodes. On your Kubernetes master and worker, first install the apt-transport-https package, which will allow us to use http and https in Ubuntu’s repositories. Now is also a good time to install curl since we will need it in a moment:
$ sudo apt install apt-transport-https curl
Next, add the Kubernetes signing key to both systems:
$ curl -s https://packages.cloud.google.com/apt/doc/apt-key.gpg | sudo apt-key add
Next, we’ll add the Kubernetes package repository. Note that at the
time of this writing, Ubuntu 16.04 Xenial Xerus is the latest Kubernetes
repository available. This should eventually be superseded by Ubuntu
22.04 Jammy Jellyfish, and the following command can then be updated
from xenial to jammy.
$ sudo apt-add-repository "deb http://apt.kubernetes.io/ kubernetes-xenial main"
Now we can install Kubernetes:
$ sudo apt install kubeadm kubelet kubectl kubernetes-cni
Disable swap memory
Kubernetes will refuse to function if your system is using swap memory. Before proceeding further, make sure that the master and worker node have swap memory disabled with this command:
$ sudo swapoff -a
That command will disable swap memory until your systems reboot, so to make this change persists, use nano or your favorite text editor to open this file:
$ sudo nano /etc/fstab
Inside this file, comment out the /swapfile line by preceeding it with a # symbol, as seen below. Then, close this file and save the changes.

Set hostnames
Next, ensure that all of your nodes have a unique hostname. In our scenario, we’re using the hostnames kubernetes-master and kubernetes-worker to easily differentiate our hosts and identify their roles. Use the following command if you need to change your hostnames:
$ sudo hostnamectl set-hostname kubernetes-master
And on the worker node:
$ sudo hostnamectl set-hostname kubernetes-worker
You won’t notice the hostname changes in the terminal until you open a new one. Lastly, make sure that all of your nodes have an accurate time and date, otherwise you will run into trouble with invalid TLS certificates.
Initialize Kubernetes master server
Now we’re ready to initialize the Kubernetes master node. To do so, enter the following command on your master node:
kubernetes-master:~$ sudo kubeadm init

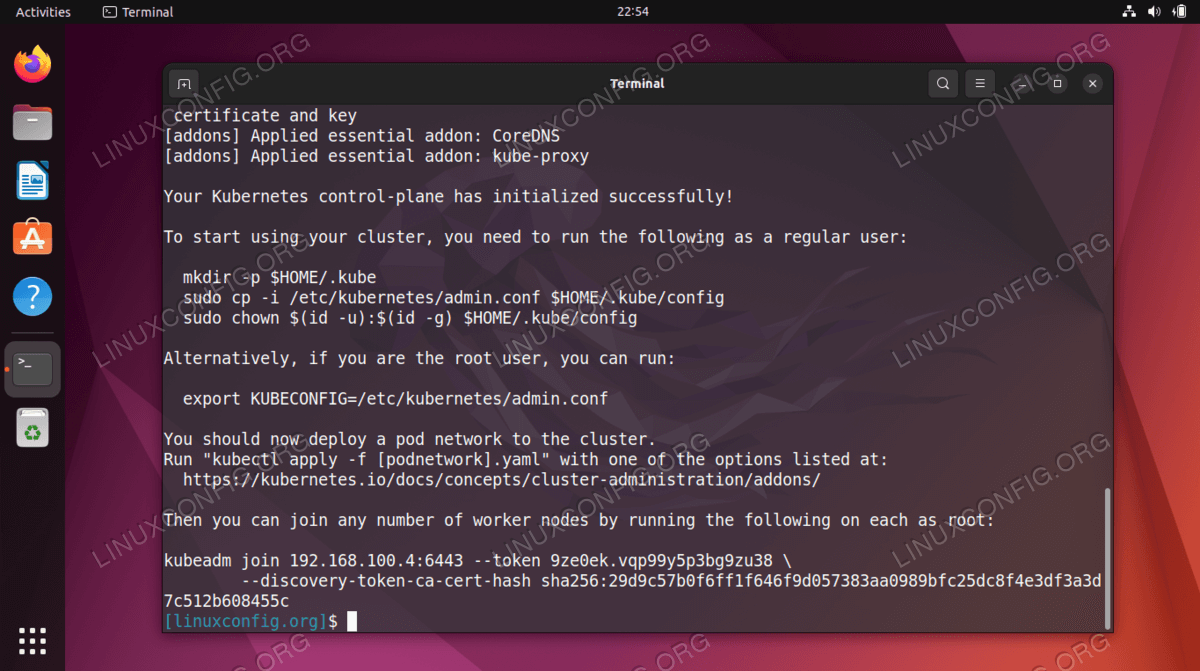
The Kubernetes master node has now been initialized. The output gives us a kubeadm join command that we will need to use later to join our worker node(s) to the master node. So, take note of this command for later.
The output from above also advises us to run several commands as a regular user to start using the Kubernetes cluster. Run those three commands on the master node:
kubernetes-master:~$ mkdir -p $HOME/.kube
kubernetes-master:~$ sudo cp -i /etc/kubernetes/admin.conf $HOME/.kube/config
kubernetes-master:~$ sudo chown $(id -u):$(id -g) $HOME/.kube/config
Deploy a pod network
Next step is to deploy a pod network. The pod network is used for communication between hosts and is necessary for the Kubernetes cluster to function properly. For this we will use the Flannel pod network. Issue the following two commands on the master node:
kubernetes-master:~$ kubectl apply -f https://raw.githubusercontent.com/coreos/flannel/master/Documentation/kube-flannel.yml
kubernetes-master:~$ kubectl apply -f https://raw.githubusercontent.com/coreos/flannel/master/Documentation/k8s-manifests/kube-flannel-rbac.yml
Depending on your environment, it may take just a few seconds or a
minute to bring the entire flannel network up. You can use the kubectl command to confirm that everything is up and ready:
kubernetes-master:~$ kubectl get pods --all-namespaces

When all of the STATUS column shows ‘Running,’ it’s an indication that everything is finished deploying and good to go.
Join the Kubernetes cluster
Now our cluster is ready to have the worker nodes join. Use the kubeadm join command retrieved earlier from the Kubernetes master node initialization output to join your Kubernetes cluster:
kubernetes-worker:~$ sudo kubeadm join 192.168.1.220:6443 --token 1exb8s.2t4k3b5syfc3jfmo --discovery-token-ca-cert-hash sha256:72ad481cee4918cf2314738419356c9a402fb609263adad48c13797d0cba2341

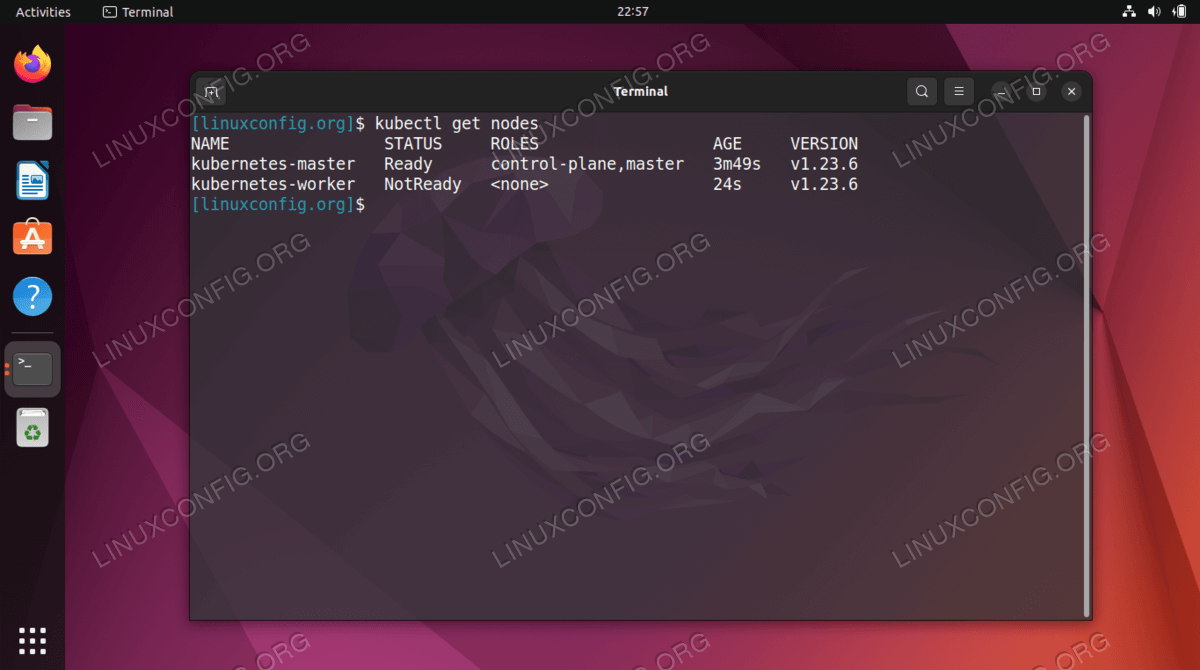
Back on your Kubernetes master node, confirm that kubernetes-worker is now part of our Kubernetes cluster with this command:
kubernetes-master:~$ kubectl get nodes

Deploying a service on Kubernetes cluster
Now we are ready to deploy a service into the Kubernetes cluster. In our example, we will deploy a Nginx server into our new cluster as a proof of concept. Run the following two commands on your master node:
kubernetes-master:~$ kubectl apply -f https://k8s.io/examples/controllers/nginx-deployment.yaml
kubernetes-master:~$ kubectl run --image=nginx nginx-server --port=80 --env="DOMAIN=cluster"
kubernetes-master:~$ kubectl expose deployment nginx-deployment --port=80 --name=nginx-http
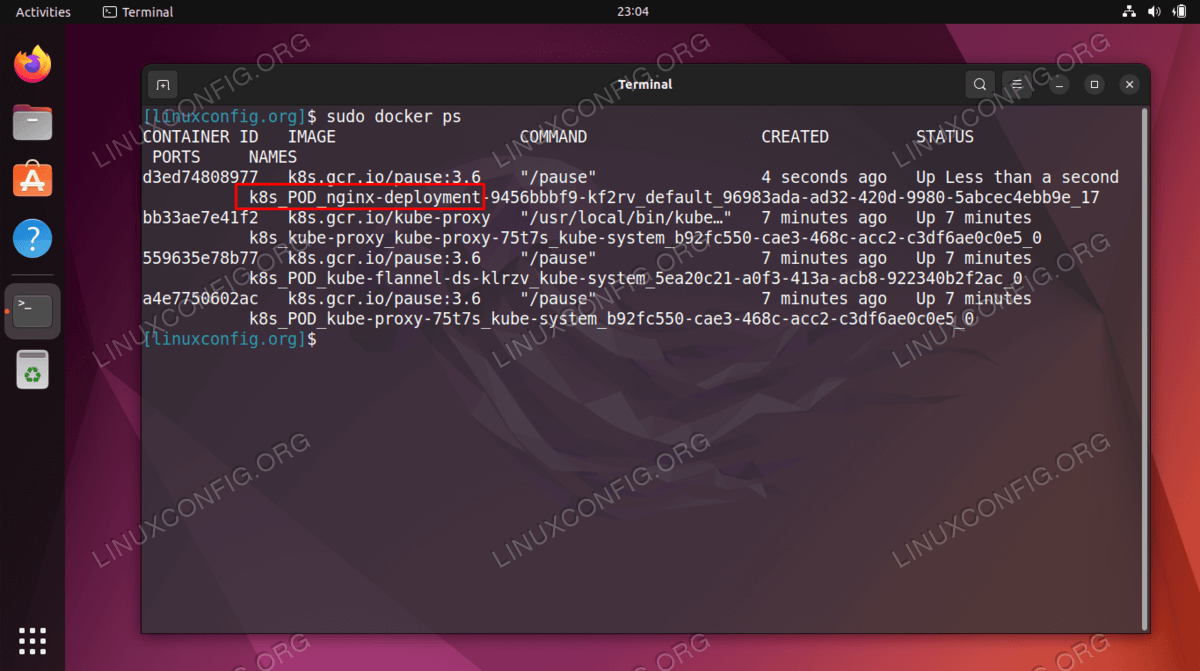
You should now see a new nginx docker container deployed on your worker node:
kubernetes-worker:~$ sudo docker ps

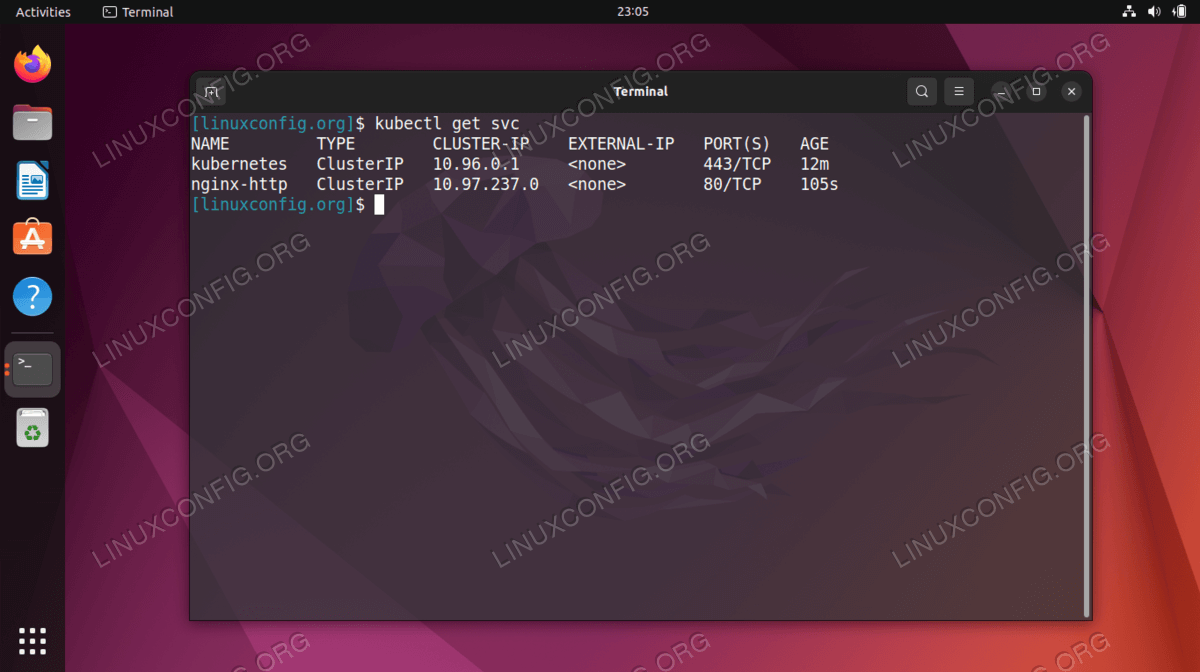
You can see a running list of all available services running in your
cluster with the following command, issued from the Kubernetes maser
node:
kubernetes-master:~$ kubectl get svc

Closing Thoughts
In this tutorial, we learned how to setup Kubernetes to deploy containerized applications on Ubuntu 22.04 Jammy Jellyfish. We setup a basic cluster consisting of two hosts, a master and a worker, though this can be scaled to many more worker nodes if necessary.
We saw how to configure Docker and other pre-requisites, as well as deploy an Nginx server in our new cluster as a proof of concept. Of course, this same configuration can be used to deploy any number of containerized applications.
Tidak ada komentar:
Posting Komentar