https://www.ubackup.com/enterprise-backup/vmware-esxi-clone-vm.html
if you want a secure test environment which is exactly the same to the original VM, VM cloning can be a really convenient way to go.
Rather than laboriously exporting and importing the VM, VM cloning allows you to create an instant usable copy of the original VM, or change some of the settings according to your need. For example, you can also choose to clone a VM to template.
The built-in VM clone feature provided by vCenter Server allows you to complete the process on a wizard. However, if you don't have vCenter Server Services, this feature is not available. With the VMware Desktop client, you can also implement VM cloning, unfortunately it requires more complicated steps.
Besides these two methods, you can also use effective backup software to clone VMware ESXi VM easily. I'll cover all the 3 approaches in the following article.
How to clone VM on VMware ESXi
In this section, I will introduce both how to clone VMware ESXi VM using vCenter Server, and without vCenter. Before you begin, please commit all snapshots and power off the VM you want to clone to create a consistent copy. If you want to perform hot clone, you can refer to How to Hot Backup VMware Virtual Machine While Running
How to clone VMware ESXi VM without vCenter Server
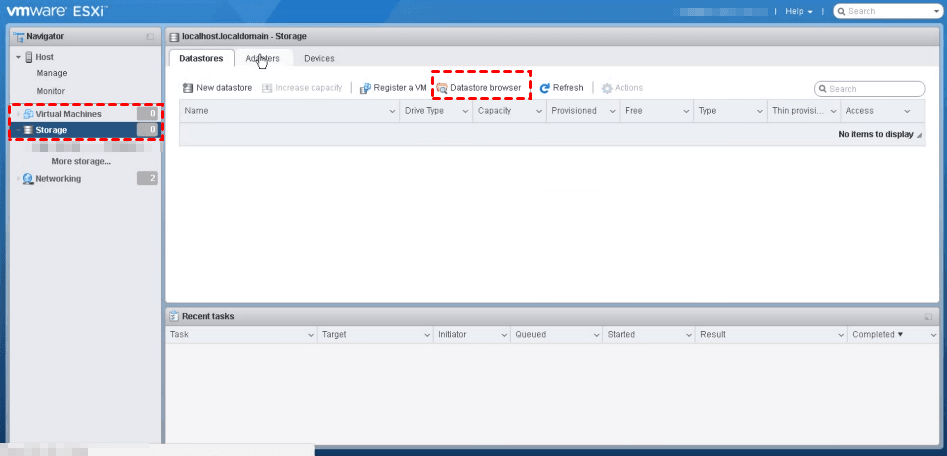
1. Access to vSphere Web Client, click Storage in the left inventory, and then click Datastore browser on toolbar.
2. In the pop-up window, click Create directory, and provide a Name for new VM.
3. Confirm and back to the Datastore browser window. Go to the folder where stores the disk files of the original VM. You can find where they are by right-clicking on the VM name and select Edit settings.
Select the .vmx file and .vmdk file, then click Copy on toolbar to copy them separately to the folder you just created.
Close Datastore browser window, and you can see the progress in Recent tasks.
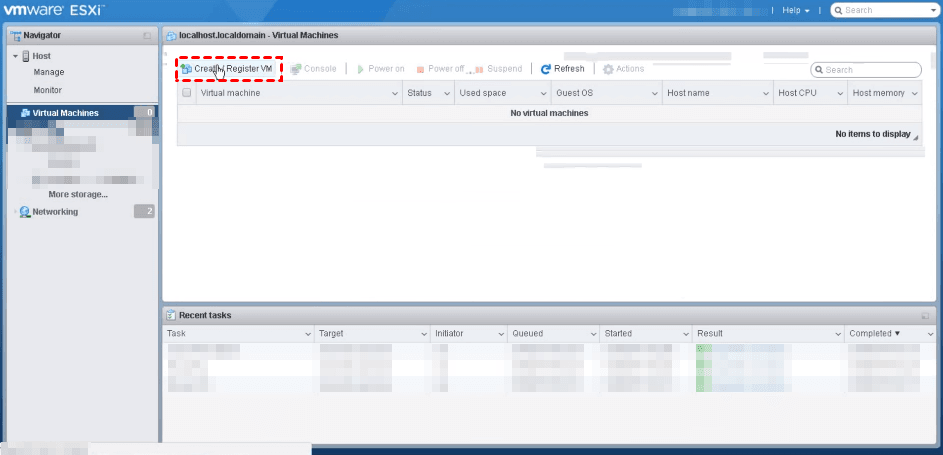
4. Click Virtual Machines in the left inventory, and click Create/ Register VM on toolbar to open the wizard.
5. On Select creation type page, select Register an existing virtual machine, and click Next.
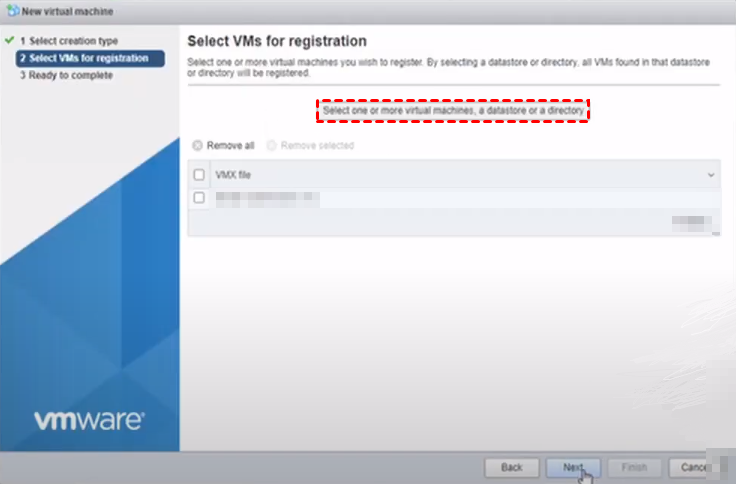
6. On Select VMs for registration page, click Select one or more virtual machines, a datastore or a directory, and select the newly created folder. Click Next.
7. On Ready to complete page, click Finish to close the wizard.
8. Back to Virtual Machines, now you can see there is one newly copied VM with the same name as the old one. That’s because the name comes from the .vmx file. You can right-click the VM and Rename it.
9. Select and Power on the newly created virtual machine. There will be pop-up window, select I copied it and click Answer.
How to clone VMware ESXi VM using vCenter
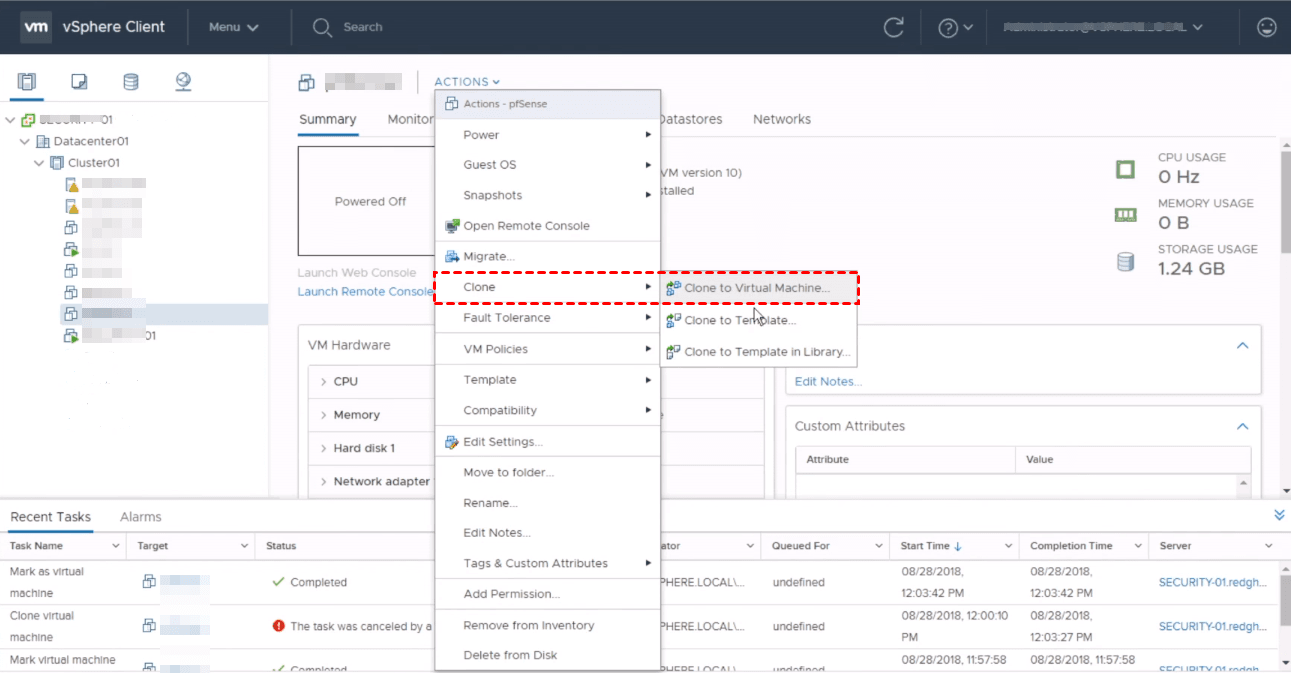
1. Access to vCenter Client, right-click on the VM name and select Clone > Clone to Virtual Machine to open the wizard.
Except for this option, you can also select Clone to Template… or Clone to Template in Library.
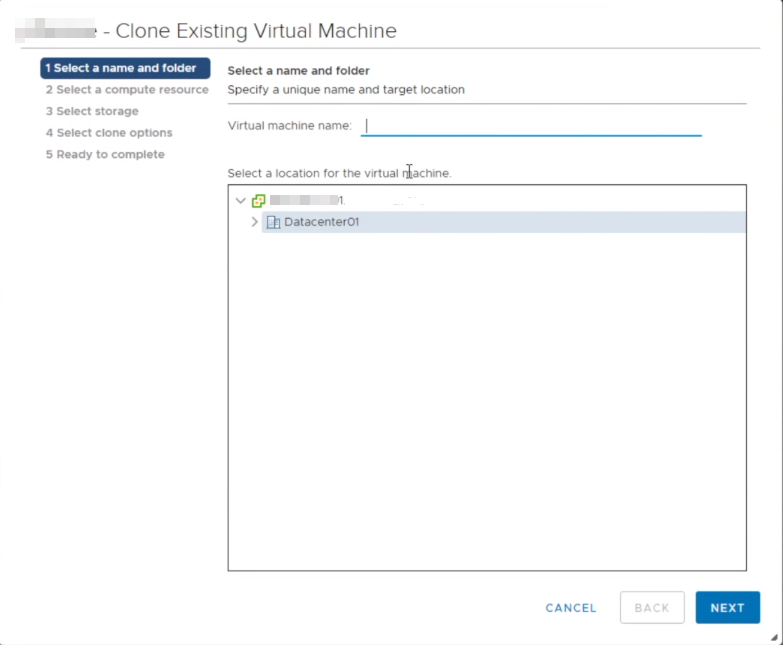
2. Provide a Name and select a destination datastore folder location for the new VM. Then click Next.
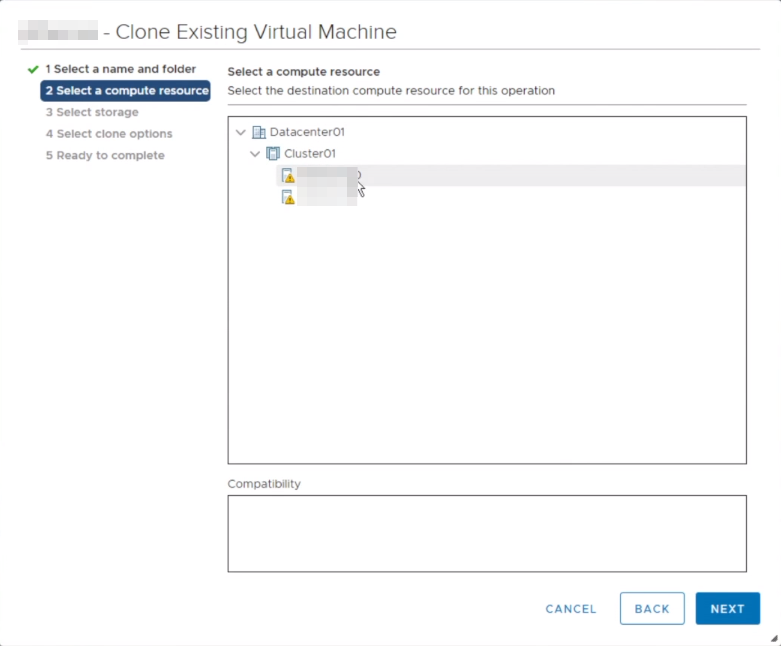
3. Select a destination host for the new VM, click Next.
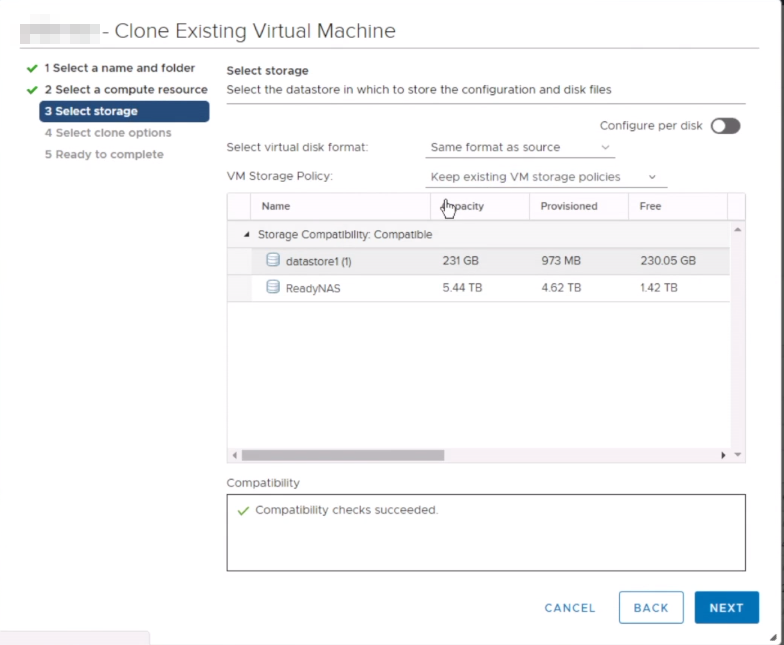
4. On select storage page, Select virtual disk format as Same format as source, and VM Storage Policy as Keep existing VM storage policies. And then select a datastore location to store the VM files. Click Next to continue.
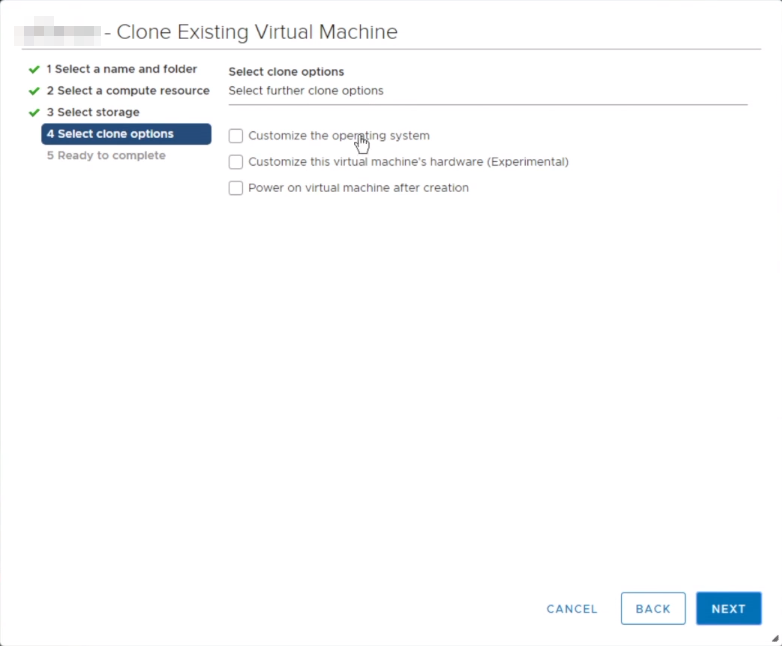
5. Select further clone options, you can customize the operating system, the VM’s hardware, or select whether to power on the VM after creation. Click Next.
6. Review your selections and click Finish to start. You can see the progress in Recent Tasks.
How to clone VM with secure and easy-to-use tool
AOMEI Cyber Backup is an efficient third-party tool to back up virtual machines. It supports VMware ESXi 6.0-7.0 and Hyper-V of Windows Server 2012 and above. It provides a simple and efficient way to back up and restore virtual machines. Compared to mentioned methods of cloning, it owns a wide range of advantages as below.
- Easy to use: With the user-friendly interface, connect, create task, and protect will be completed with a few clicks.
- Agentless backup: It can hot back up multiple VMs in transit or at rest all at once.
- Schedule backup tasks: It can automatically back up the whole VM by setting up a scheduled task.
- Onsite/Offsite restore: You can backup a VM and restore it to the same or another datastore/host.
You can download and install the free trial to experience these features and get the exclusive upgrade discount:
Steps to clone ESXi VM via AOMEI Cyber Backup
1. Launch AOMEI Cyber Backup, navigate to Source Devices >> Add VMware ESXi and enter the required information about device and user. Then click Confirm.
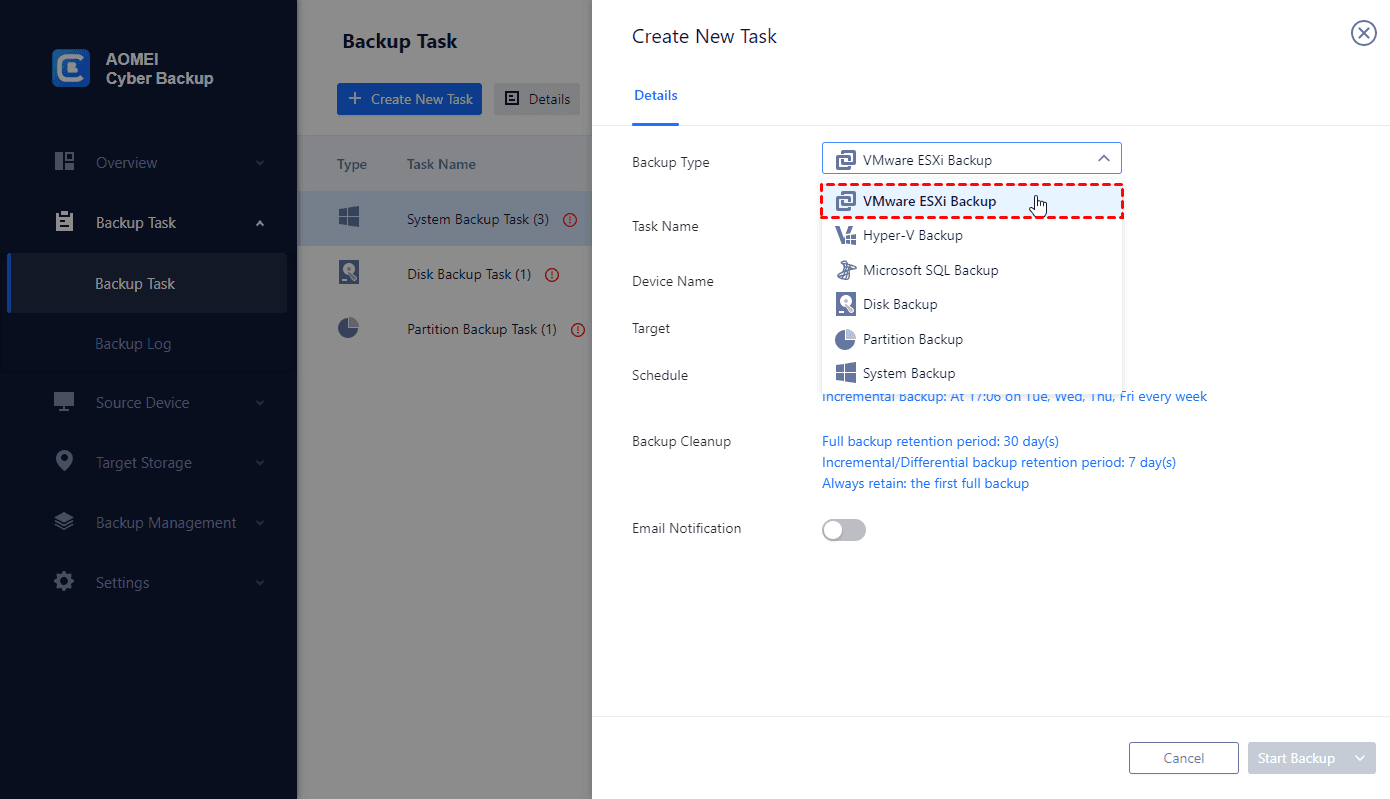
2. Click Create New Task in backup task page, and do as following:
☞ Task Name: enter a backup task name.
☞ Backup Type: choose VMware ESXi Backup or Hyper-V Backup accordingly.
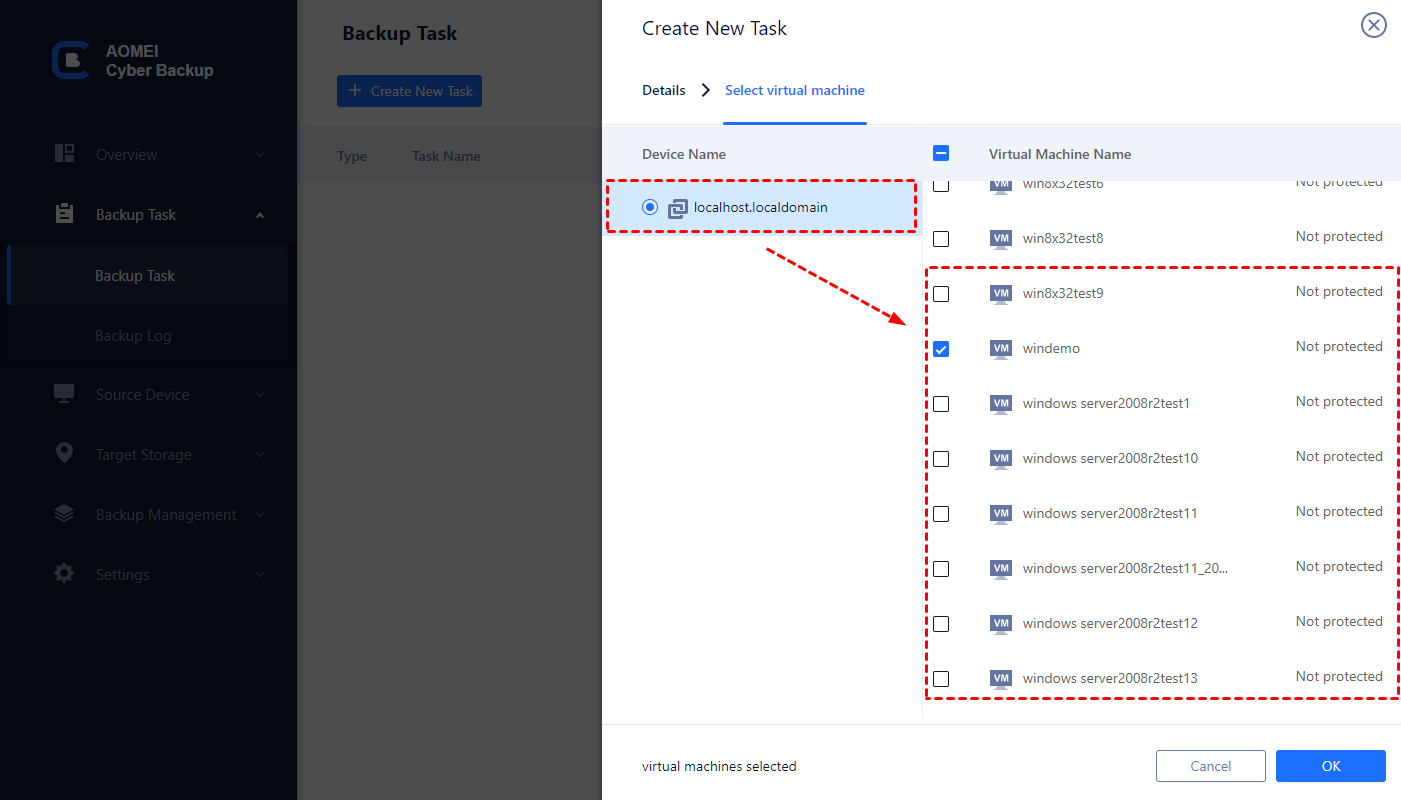
☞ Device Name: select the device and virtual machines you want to back up. Click OK. It allows you to select unlimited virtual machines for backup.
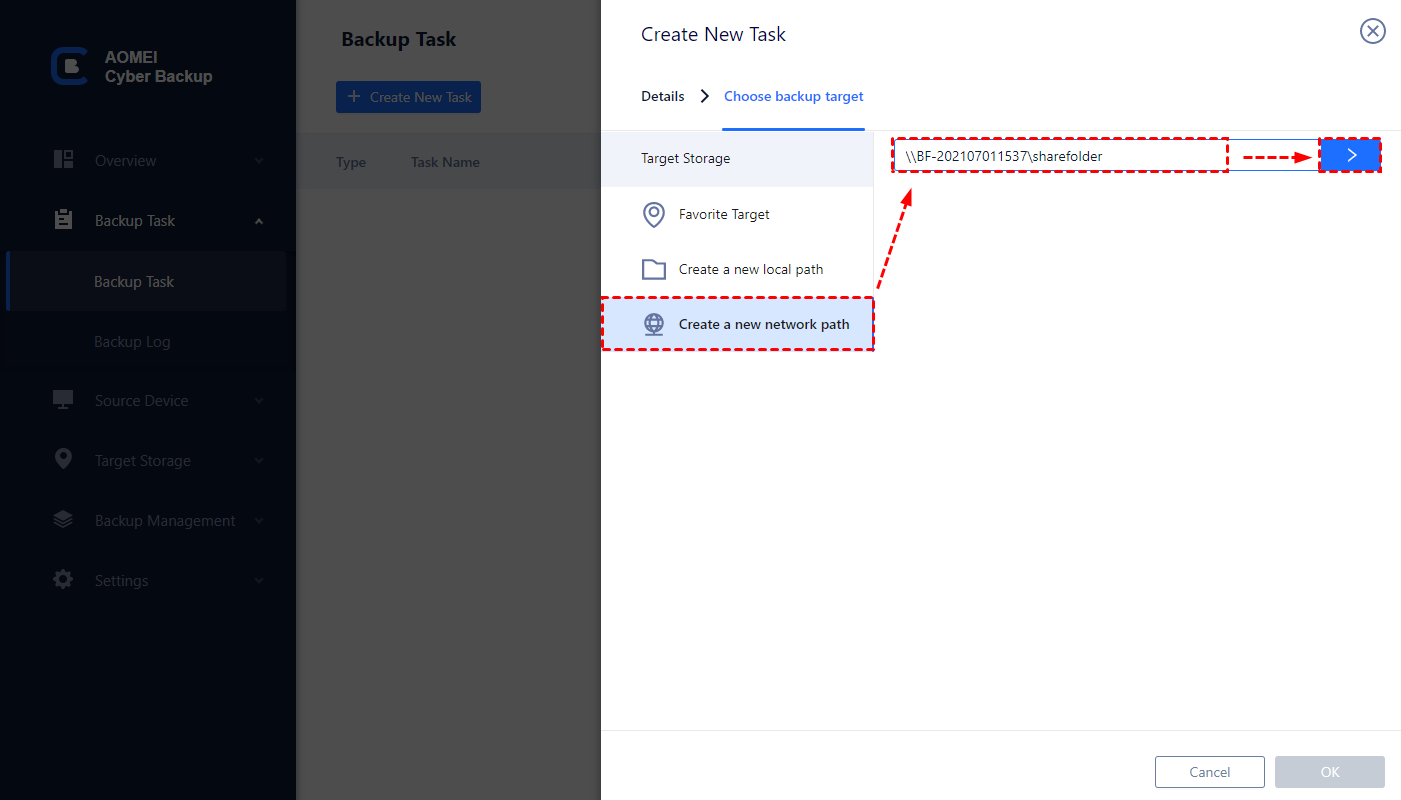
☞ Target: choose a location to store the backup files such as local or network. Click OK.
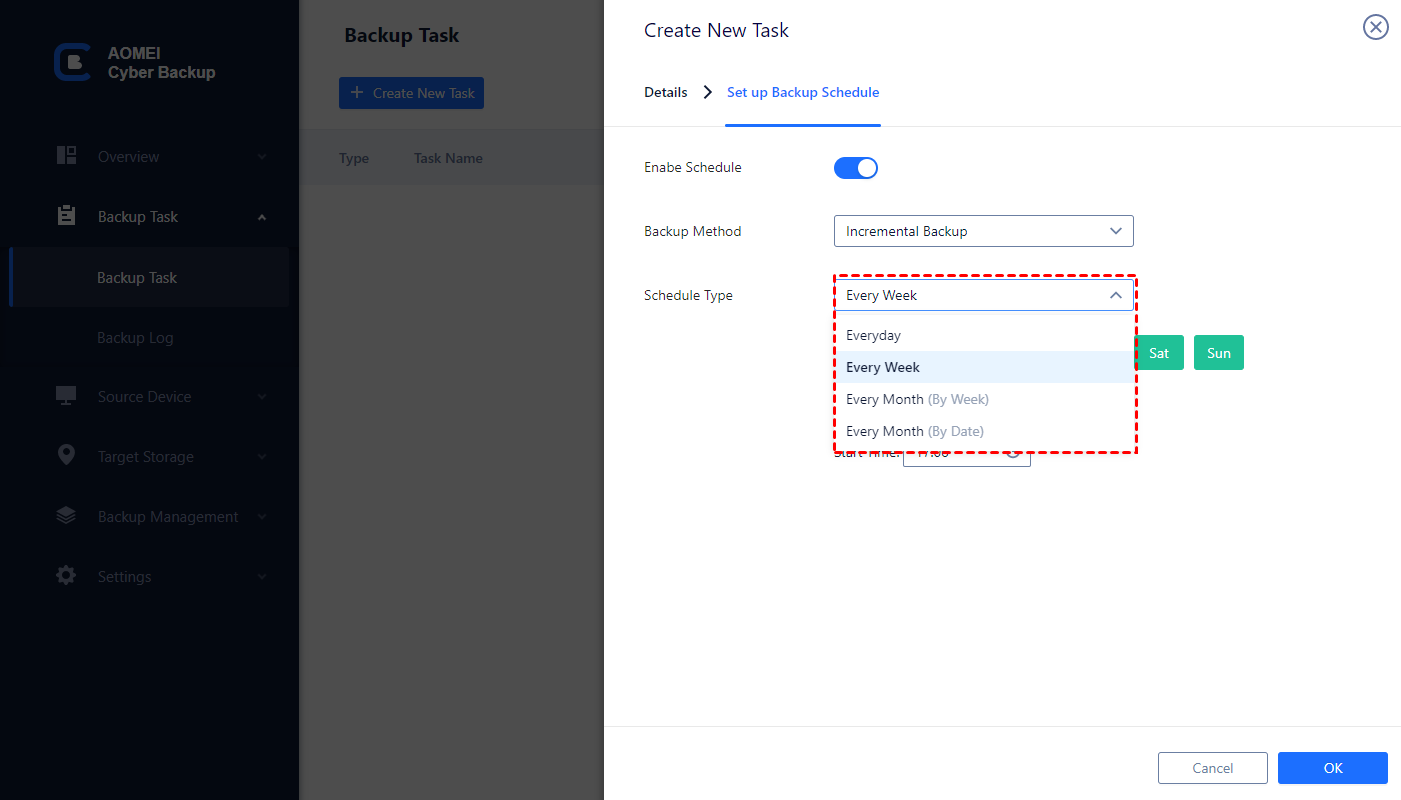
3 (optional). On Schedule window, you can set up different backup strategies and time.
- Full backup: It is used to create a complete backup of your data.
- Incremental backup: It compares to the last backup, and only backs up the changed data. So, incremental backup saves the storage than full backup.
- Differential backup: It is always related to the full backup, and it backs up all data that has been added or changed since the last full backup.
It also offers daily, weekly, monthly (by date), and monthly (by week) for backup period. You can combine these features to create a comprehensive backup task according to your need.
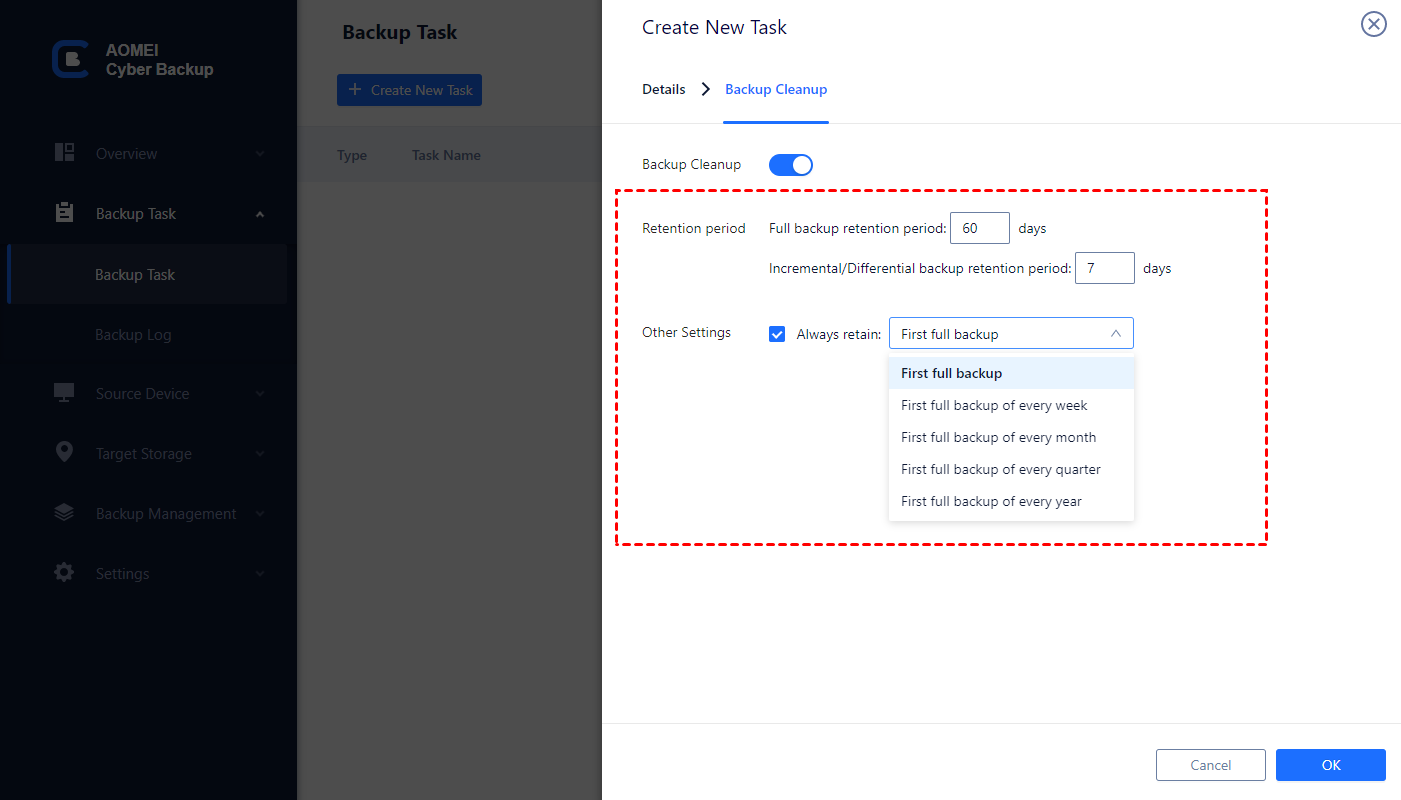
On Backup Cleanup window, enable it and set up the retention policy. It benefits to saving storage and reduces your workload since it will delete the old and unwanted files automatically.
4. Click Start Backup.
You can monitor the status in the Backup Task section and edit the settings by clicking the button on the right side of task.
After finishing backup, you can use the backup files to achieve fast recovery from any point.
5. Click “…” right on the task and select Restore to configure the basic information.
☞Select the backup content you want to restore, and click OK.
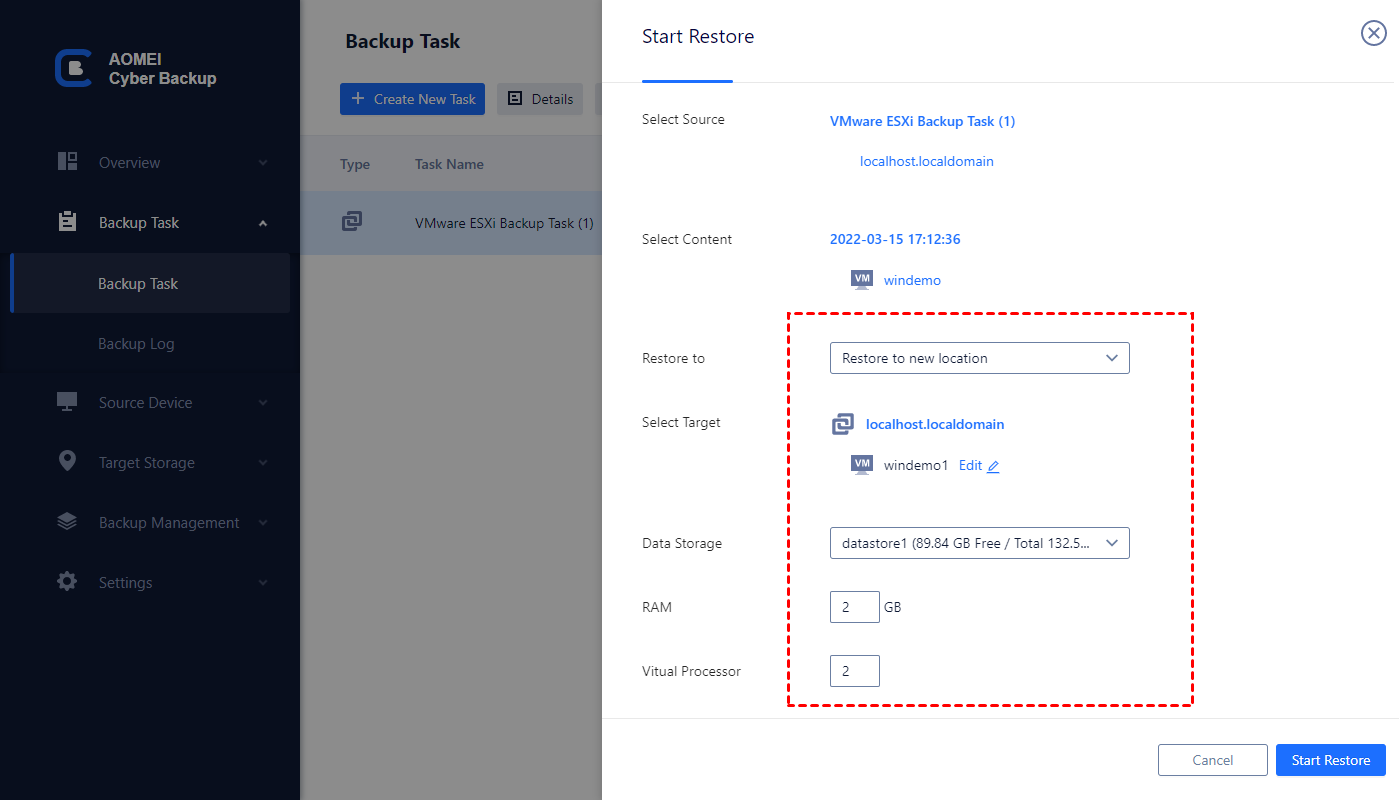
☞ Select the location to which the virtual machine should be restored.
Restore to original location: It will restore the VM to the original location and replace the original VM.
Restore to new location: it will create a new VM as same as the original one, and migrate to another host with ease.
If you choose Restore to new location, you should select the host and type a name for the new virtual machine. Specify the datastore with sufficient storage and configure the number of RAM space and virtual processors.
6. Click Start Restore, and wait for the restoration to complete.
When it's done, you've clone your VMware ESXi VM succesfully. You can run the target VM to see if all your data stay intact.
Summary
Clone is to create an exact copy of the VM. If you want to back up multiple virtual machines at the same time, performing clone manually is not suitable which only allows you to back up one virtual machine once. So, a professional software is necessary and high-efficient.
In this article, I introduced how to clone ESXi VM with or without vCenter Server. Besides clone, you can also back up VM to another datastore for data protection.


Tidak ada komentar:
Posting Komentar