Jumat, 21 Juni 2024

VSPHERE REPLIKASI-setup dari awal


vSphere Replication 8.x: deployment - pt.1


vmware-vsphere-replication-deployment-01

VMware vSphere Replication 8.x is the VMware solution for replicating production VMs in order to implement a DR site or a migration strategy to avoid services disruption.

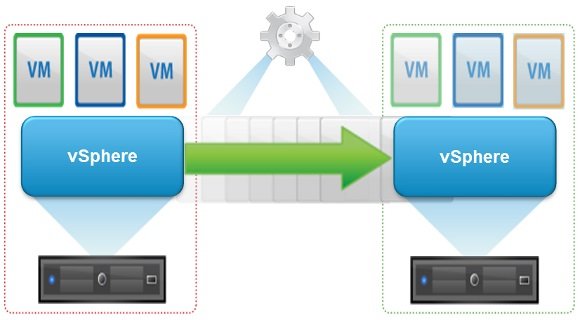
vSphere Replication can perform replication of virtual machines in the vSphere environment from production site to another site or to the same site. It is a component deployed as appliance and it is included in the vSphere solution with no need to purchase any additional license.


Blog series

vSphere Replication 8.x deployment - pt.1
vSphere Replication 8.x failover - pt.2
vSphere Replication 8.x traffic isolation - pt.3
vSphere Replication 8.x seeding - pt.4


vSphere Replication 8.x

vSphere Replication is a free product completely integrated with vCenter Server and allows the replication of virtual machines protecting such VMs from production site failure.

With this solution you can replicate VMs from the following sites:

  • From production site to another site (DR site).
  • In the same site from one cluster to a different cluster.

The last one is a typical use case when you need to migrate VMs from an old infrastructure to a new one.
vmware-vsphere-replication-deployment-02


vSphere Replication 8.2

Although the procedure described in this article refers to version 8.1.2, the newest vSphere Replication 8.2 has been released providing some new features:

  • Support for VMware vSphere 6.7 Update 2.
  • Support for VM encryption - using vSphere 6.7 U1 or later encrypted virtual machines can be replicated.
  • Enable network encryption - using VMware vSphere 6.0 or later transferred replication data can be encrypted.
  • Enhancements to the Site Recovery UI - target datastores can be monitored in the Site Recovery UI replication details.
  • vRealize Operations Management Pack - RPO violations and a better visibility of the vSphere Replication status are additional info provided with new version 8.2.
  • vRealize Orchestrator Plug-In for vSphere Replication 8.2.

vSphere Replication 8.2 supports the following versions:

  • vCenter - 6.0 Update 3 or later
  • ESXi - 6.0 Udate 3 or later
  • vSAN - 6.5 or later

Although version 8.1.2 has been used during the deployment, the installation and configuration procedures are the same also for version 8.2.


Deploy vSphere Replication 8.x in vSphere 6.7

To deploy vSphere Replication, you need to download the ISO file from VMware website.

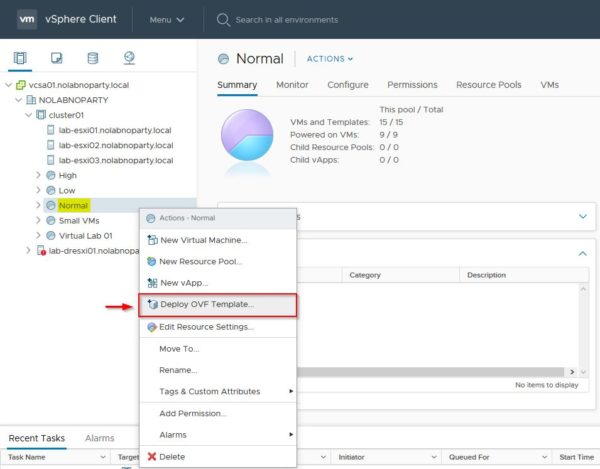
From vSphere Client, right click the inventory object where to deploy the appliance and select Deploy OVF Template option.
vmware-vsphere-replication-deployment-03

Click Browse to select the installation files then click Next.

vmware-vsphere-replication-deployment-04

These are the correct files to use for deployment.

vmware-vsphere-replication-deployment-05

Specify the Virtual machine name and the location then click Next.

vmware-vsphere-replication-deployment-06

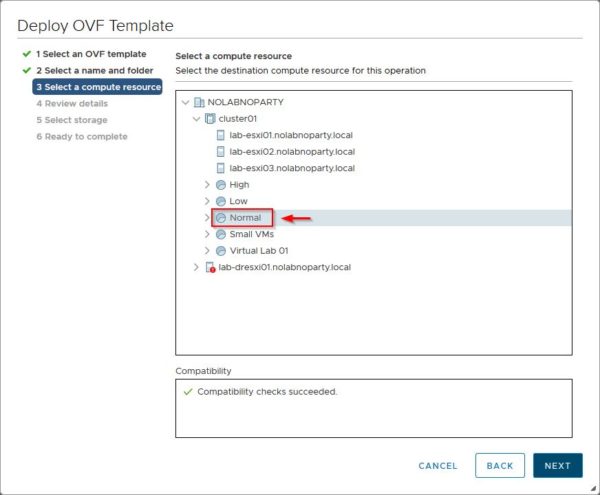
Select the compute resource to use and click Next.
vmware-vsphere-replication-deployment-07

Click Next.

vmware-vsphere-replication-deployment-08

Accept the EULA and click Next.

vmware-vsphere-replication-deployment-09

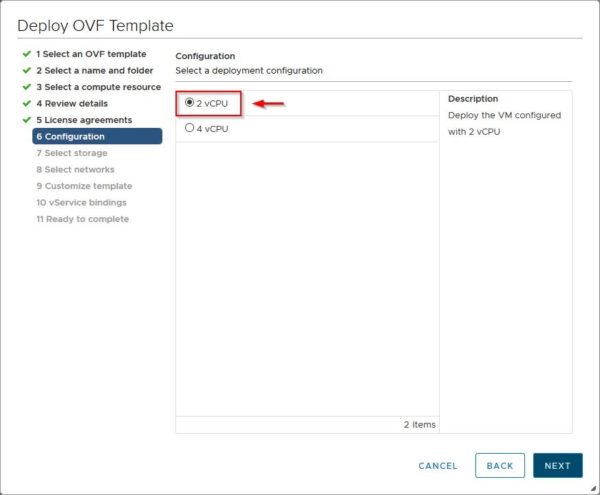
Specify the required number of vCPUs to use (2 or 4) and click Next. Depending on the number of VMs to replicate, vSphere Replication can be deployed in two ways:

  • 2 vCPU, 8 Gb RAM
  • 4 vCPU, 16Gb RAM

Keep in mind that during the replication process, CPU and RAM of the source host are consumed.
vmware-vsphere-replication-deployment-10

Select the virtual disk format and the datastore to use. Click Next.

vmware-vsphere-replication-deployment-11

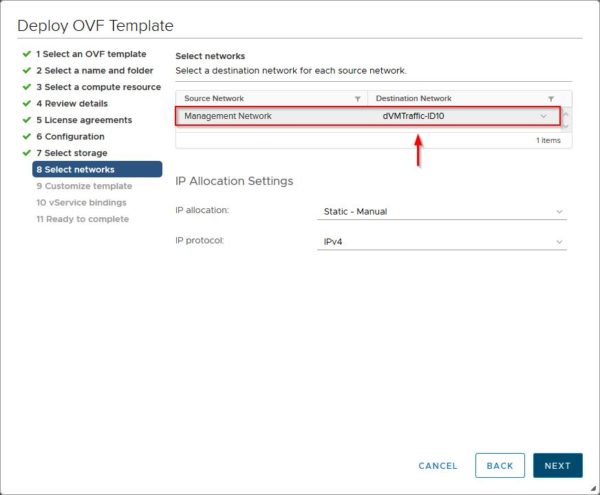
Select the Destination Network (by default vSphere Replication uses the management network for its traffic) and click Next.
vmware-vsphere-replication-deployment-12

Specify the appliance's parameters by entering Password, NTP Servers and Hostname.

vmware-vsphere-replication-deployment-13

Specify the Network Properties.

vmware-vsphere-replication-deployment-14

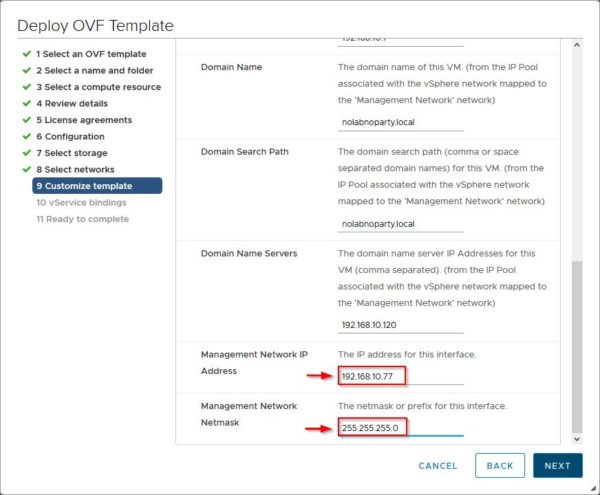
Last two options to specify are the Management Network IP Address of the appliance and the Management Network Netmask. Click Next to continue.
vmware-vsphere-replication-deployment-15

Specify the vService bindings then click Next. Previous versions required to specify this parameter through the flex version of vSphere Web Client but now this issue has been fixed.

vmware-vsphere-replication-deployment-16

Click Finish to proceed with appliance deployment.

vmware-vsphere-replication-deployment-17


Link the vSphere Replication to the vCenter

Once the appliance has been deployed successfully, right click the vSphere Replication appliance and select Power > Power On.

vmware-vsphere-replication-deployment-18

Access the appliance's console to check the IP address to use to connect.

vmware-vsphere-replication-deployment-19

While attempting to connect the appliance management console via browser you may receive an error. You just need to wait a little bit to allow services to properly start, then try again.

vmware-vsphere-replication-deployment-20

Enter root as User name and the Password specified during the configuration of the installer. Click Login.

vmware-vsphere-replication-deployment-21

Specify the LookupService Address by entering the vCSA address for a PSC embedded topology or the PSC address if an external PSC topology is used instead. Make sure to enter the correct SSO Administrator and Password then click on Save and Restart Service button.

vmware-vsphere-replication-deployment-22

Accept the SSL self-signed certificate by clicking Accept.

vmware-vsphere-replication-deployment-23

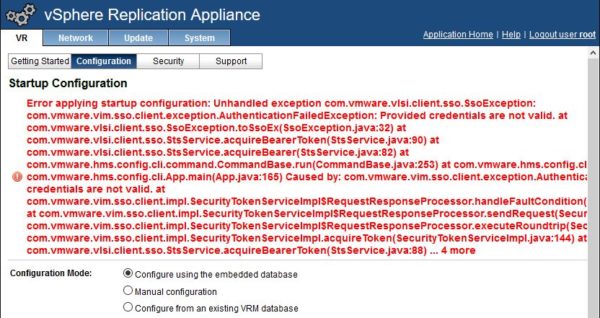
If a wrong PSC, SSO Administrator or Password has been entered, you may receive a similar error. Just double check entered parameters and try again.
vmware-vsphere-replication-deployment-24

The green message confirms the appliance is now connected to the vCSA/PSC and the Service Status area reports services are running.

vmware-vsphere-replication-deployment-25


Configure vSphere Replication

From the vSphere Client click Menu > Site Recovery to access the appliance configuration.

vmware-vsphere-replication-deployment-26

In the Site Recovery area, click OPEN Site Recovery.

vmware-vsphere-replication-deployment-27

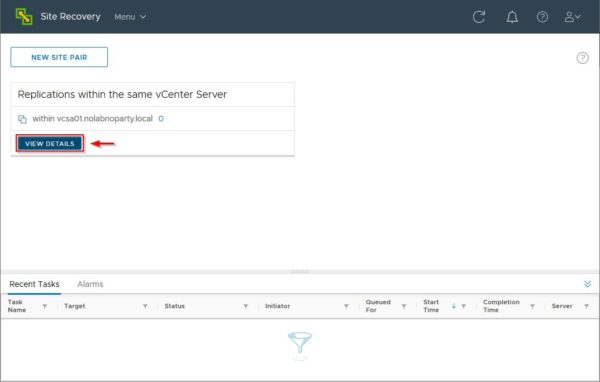
Click View Details. Notice that this configuration uses a single vCenter topology and replications occur within the same vCenter.
vmware-vsphere-replication-deployment-28

In the Summary tab you can check the connected vCenter Server.

vmware-vsphere-replication-deployment-29

In the Replication Servers tab you can see the replication servers in use.

vmware-vsphere-replication-deployment-30


Configure a replication job

To configure a replication job, select one or more VMs then right click the selection and choose All Site Recovery actions > Configure Replication option.

vmware-vsphere-replication-deployment-31

Click Yes to open the replication wizard for the selected VMs.
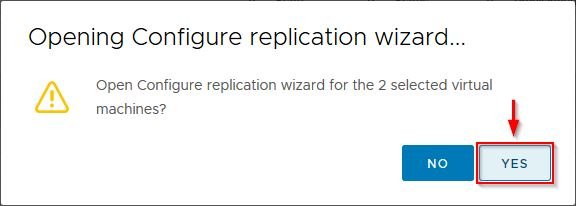
vmware-vsphere-replication-deployment-32

Click Next to proceed with replica configuration.

vmware-vsphere-replication-deployment-33

Select the Target Site (the configured vCenter in this example) and the replication server to use (Auto-assign or Manual) if multiple replication servers are deployed. Click Next.

vmware-vsphere-replication-deployment-34

Specify the Disk format and the Target datastore. Additional options available in this configuration page allow to assign different datastores to the VM's disks and to specify if the replica should use seeds.
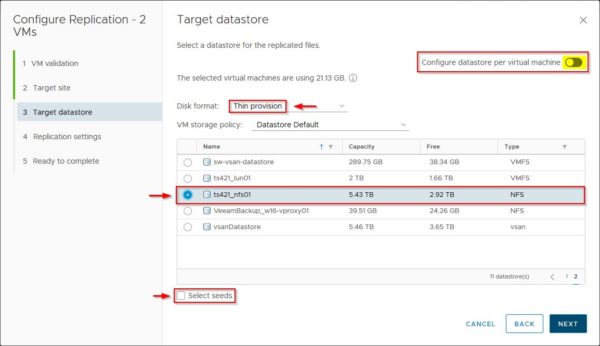
vmware-vsphere-replication-deployment-35

By default VM's disks are located to same datastore but VMDK disks can also be assigned to different datastores. Click on Change link to specify a different datastore for a specific Hard disk.

vmware-vsphere-replication-deployment-36

Select the datastore to use for the selected Hard disk then click OK.

vmware-vsphere-replication-deployment-37

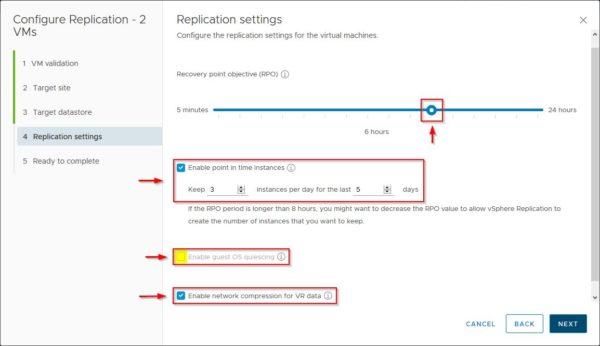
Specify the required RPO for the replica as well as the retention to adopt by flagging the Enable point in time instances. To optimize replica consistency and network performance, Enable guest OS quiescing and Enable network compression for VR data options to provide additional capabilities to the replica. Click Next.
vmware-vsphere-replication-deployment-38

Click Finish to save the configuration.

vmware-vsphere-replication-deployment-39

To execute the replication job, it is mandatory the virtual machine is powered on otherwise the replication wizard will display a warning.

vmware-vsphere-replication-deployment-40

Click Replications to check the replication status of selected virtual machines.

vmware-vsphere-replication-deployment-41

Depending on the VM size and available bandwidth, after some minutes the replication is completed successfully.

vmware-vsphere-replication-deployment-42

The replicated VMs are now ready to be fired up in case of need. Part 2 will explain how to perform a failover to quickly restore services provided if the source VM fails for any reason.

Kamis, 20 Juni 2024

WINDOWS-cek keaslian


2 Cara Cek Windows 10 Asli atau Tidak yang Terbukti Akurat

Pada artikel ini kami akan membahas tentang bagaimana cara cek Windows 10 asli atau tidak. Windows 10 merupakan sistem operasi terbaru keluaran Microsoft yang diperkenalkan pada 29 Juli 2015.

Sistem operasi buatan Microsoft memang menjadi salah satu yang terbaik karena mudah digunakan. Selain itu, kemudahan di dalam menginstal sistem operasi yang satu ini juga membuat orang-orang lebih memilihnya dibandingkan sistem operasi yang lain.

Secara umum, ada dua pembagian Windows 10 berdasarkan keasliannya, yakni Windows 10 original dan Windows 10 bajakan. Orang Indonesia mungkin memakai Windows 10 bajakan karena alasan tertentu. Salah satunya adalah harganya yang mahal atau memang karena faktor yang lain. Padahal dengan menggunakan Windows 10 asli, ada beberapa keuntungan yang akan anda dapatkan.

Cara Cek Windows 10 Asli atau Tidak

Ada beberapa cara yang bisa kita terapkan untuk mengecek Windows 10 anda asli atau tidak, yang pertama menggunakan Windows Script Host dan yang kedua melalui menu Activation Settings. Berikut ini cara mengetahui Windows 10 asli atau tidak yang bisa anda simak:

[ez-toc]

1. Menggunakan Windows Script Host

Dengan bantuan Windows Script Host, kita bisa mengecek apakah Windows 10 yang kita gunakan asli atau tidak. Oh ya bagi anda pengguna Smadav seperti saya, terlebih dahulu anda harus melakukan sedikit pengaturan pada Smadav anda. Klik ikon segitiga terbalik yang terletak di pojok kanan bawah layar. Silakan anda klik kanan ikon Smadav.

Cek Windows 10 Asli atau Tidak 1

2. Kemudian anda pilih Exit. Disini kita mematikan sementara antivirus Smadav kita.

Cara Mengetahui Windows 10 Asli atau Tidak

3. Akan muncul warning seperti gambar dibawah ini, tinggal pilih OK. Dengan begini, kita sudah mematikan sementara Smadav kita.

Cek Windows 10 Asli atau Tidak 3

4. Setelah itu anda tekan tombol Windows + R lalu ketikkan slmgr.vbs /dli kemudian tekan Enter.

Cara Mengetahui Windows 10 Asli atau Tidak

5. Jika muncul notifikasi yang seperti ini. Terdapat tulisan Volume activation expiration atau terdapat kata KMSCLIENT, itu menunjukkan bahwa Windows 10 anda diaktivasi menggunakan activator, jadi bukan Windows 10 original / asli.

Cek Windows 10 Asli atau Tidak 6

6. Sedangkan jika notfikasi seperti ini, maka itu berarti bahwa Windows 10 anda memang asli dan bukan dari aktivasi dengan tool activator.

Cek Windows 10 Asli atau Tidak 5

2. Melalui Activation settings

1. Masuk ke menu Windows Settings dengan menekan tombol Windows + I.

Cara Cek Windows 10 Asli atau Tidak

2. Scroll kebawah kemudian pilih Update & Security.

Cek Windows 10 Asli atau Tidak 8

3. Setelah itu pindah ke tab Activation. Jika tertulis Windows is activated with a digital license, itu menandakan bahwa Windows 10 memang asli dan original.

Cara Cek Windows 10 Original atau Bajakan

Keuntungan Menginstal Windows 10 Original

Ada beberapa kelebihan yang dimiliki oleh Windows 10 asli dibandingkan ketika anda menginstal yang bajakan. Apa saja kelebihannya? Simak penjelasan di bawah ini:

1. Aktivasi mudah dan permanen

Kelebihan menginstal Windows 10 asli adalah anda bisa mendapatkan aktivasi secara permanen. Itu artinya, lisensi yang anda dapatkan berlangsung selamanya tanpa perlu lagu melakukan aktivitas kembali. Caranya bagaimana? Cukup masukkan serial number yang anda dapatkan ketika membeli OS tersebut. Berbeda halnya ketika anda memakai Windows 10 bajakan dimana anda diminta untuk melakukan aktivasi berulang-ulang, minimal 3 bulan sekali.

2. Dapat dipindah perangkat

Dikarenakan lisensi yang anda beli merupakan lisensi retail, maka anda bisa memindahkannya ke perangkat yang lain. Namun dengan catatan hanya ada satu perangkat yang memakai lisensi tersebut. Berbeda dengan Windows 10 bajakan dimana aktivasi yang anda miliki bisa digunakan untuk semua sistem operasi Windows 10.

3. Mendapat dukungan penuh Microsoft

Kelebihan menggunakan Windows 10 original adalah anda bisa mendapatkan dukungan penuh dari sang pemilik, yakni Microsoft. Jika sistem operasi yang anda gunakan bermasalah, maka anda jangan ragu untuk bertanya kepada Microsoft. Dengan begitu, lisensi anda aman tanpa perlu khawatir mengalami masalah. Berbeda halnya pada saat anda memakai Windows 10 bajakan, kemungkinan anda ragu untuk bertanya langsung kepada Microsoft.

Jika anda lakukan, kemungkinan Windows 10 anda akan terdeteksi sebagai Windows 10 bajakan. Bukan tidak mungkin sistem operasi anda tersebut malah akan mengalami masalah. Jadi, lebih baik anda menggunakan Windows 10 original dan dapatkan semua dukungan dari Microsoft yang sangat bermanfaat untuk anda.

4. Tidak perlu khawatir dengan Windows Update

Beberapa orang yang menggunakan Windows 10 bajakan tidak ingin melakukan update terhadap Window-nya. Mengapa? Karena mereka khawatir lisensi bajakan yang mereka gunakan malah hilang. Namun bagi anda yang menggunakan sistem operasi Windows 10 original. Anda tidak perlu khawatir akan hal tersebut.

Anda bisa langsung mengklik Windows Update kapan saja dan dimana saja. Terlebih lagi tujuan Windows Update juga baik karena untuk memperbarui sistem operasi anda agar dapat bekerja secara lebih optimal. Selain itu, anda juga bisa mendapatkan versi terbaru dari Windows 10 anda tersebut. Maka dari itu, jangan lupa untuk selalu mengecek pembaruan agar anda tidak ketinggalan informasi.

5. Lebih aman dan nyaman

Kelebihan menggunakan Windows 10 original juga bisa membuat anda merasa lebih aman dan nyaman. Ketika anda menggunakan Windows 10 bajakan, bisa jadi crack yang anda gunakan di dalamnya malah terdapat malware yang bisa menyebabkan kerusakan file.

Bahkan malware tersebut berpotensi mencuri data-data pribadi anda yang tentunya semua orang tidak menginginkan hal tersebut. Selain itu, terkadang beberapa program yang seharusnya dapat berjalan normal, malah mengalami gangguan karena Windows 10 bajakan yang anda miliki.

Seperti itulah cara cek Windows 10 asli atau tidak. Dengan memastikan Windows 10 yang kita gunakan benar-benar original, maka kita semakin mantap menggunakan komputer atau laptop kita, tidak takut terjadi apa-apa.