Bitwarden adalah salah satu password manager yang dari awal dikembangkan secara open source dari informasi yang bisa kita baca langsung di websitenya. Meski dikembangkan dengan cara open source, bukan berarti software ini benar-benar tidak ada yang mengelola.
Bitwarden sendiri mempunyai versi gratis dan premium. 100% gratis tanpa harus mengeluarkan uang satu rupiahpun. Menurut saya secara pribadi, tampilan dari password manager Bitwarden cukup baik, meski sangat sederhana.
Meski sederhana tapi cukup mudah dipahami dan digunakan oleh yang sudah pro maupun pemula. Kalau saya di tanya tampilan mana yang lebih suka LastPass apa Bitwarden maka saya akan jawab, saya suka keduanya. Saya suka, karena saya menggunakan keduanya. Memang, password manager utama yang saya gunakan adalah LastPass, sedangkan Bitwarden hanya sebagai cadangan saja.
=================================================
Request Hosting Installation Id & Key
Use the form below to request your private installation Id and Installation Key for self-hosting Bitwarden.
The Installation Id and Key are applied during installation of your Bitwarden instance and stored here:
./bwdata/env/global.override.env
You should use a unique id and key for each Bitwarden installation.
Select the data region that corresponds to your existing Bitwarden account.
For organizations accessing vault.bitwarden.com, select the US region
For organizations accessing vault.bitwarden.eu, select the EU region
Your account and self-hosted installation must be in the same region
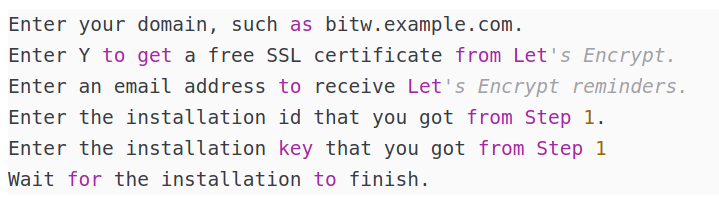
Installation ID:
5347bbee-8455-4ebf-910b-b26d0015fddc
Installation Key:
DiTkct6j0xRIh1svDccY
We will use this email to let you know about out-of-date server versions and when you need to upgrade. Please ensure this is a valid or active email address.
Bitwarden is a great open source self-hosted password manager. It comes as Bitwarden or Vault Warden. Vault Warden is a lighter weight version. Bitwarden is the official release.
I have run Bitwarden both in a standard install and in a Docker install. My preference is to install Bitwarden inside of a LXD container where docker is nested inside of LXD. Bitwarden uses 11 Docker containers.
Create an LXD container with at least 4GB as the upper end memory limit. This requirement is for the SQL Server database that is one of the containers.
To install docker:
sudo apt install curl
curl -sSL https://get.docker.com | sh
Your Bitwarden Server instance needs to be directly exposed to the Internet for ports 80 & 443 for the duration of the installation for the script to properly complete. Afterwards, you can point to the Bitwarden server through NginX Reverse Proxy Manager.
Download the Bitwarden script and install the Bitwarden Server.
Note: Some Bitwarden features are not configured by the bitwarden.sh installer, and must be configured in the environment file, located at ./bwdata/env/global.override.env. At a minimum, you should configure:
The “adminSettings__admins” allows you to specify one or more email addresses to be admins. You can enter the admin Interface access screen on a running bitwarden server by appending “/admin” at the end of your Bitwarden URL. The admin interface is only required to see your user accounts and if an upgrade is available for Bitwarden.
Visit your domain in a web browser, then click the button Create Account to register an account on your server.
Install Bitwarden Client on your devices. Set the server address to your domain by clicking the Setting button in the login page’s upper left corner.
If you need to make additional configuration changes, you can modify the settings in ./bwdata/config.yml and then run: `
./bitwarden.sh rebuild or ./bitwarden.sh update
To update Bitwarden to a new version:
cd  /opt/bitwarden
./bitwarden.sh updateself
./bitwarden.sh update
To Disable New User Registration, if desired:
Login to the server.
sudo su - bitwarden
cd bwdata/env
nano global.override.env
globalSettings__disableUserRegistration=true
./bitwarden.sh rebuild
Tidak ada komentar:
Posting Komentar