Rabu, 28 Januari 2015

Install Owncloud di CentOS 6

Install Owncloud (Dropbox OpenSource) di CentOS 6

sumber:https://agungsep.wordpress.com/2013/07/
Anda sangat ingin menginstall Dropbox tapi datanya ada di DataCenter kantor. Maka OwnCloud lah solusinya.
Beginilah cara menginstallnya:

Install CentOS 6 dengan Perfect Server

Cara Instalasi bisa dilihat di
Install Centos 6 Perfect Server part 1
Install Centos 6 Perfect Server part 2
Install dengan beberapa parameter
nama domain server OwnCloud ini owncloud.agungsep.co.id

Install Owncloud

1
2
3
cd /etc/yum.repos.d/
wget http://download.opensuse.org/repositories/isv:ownCloud:community/CentOS_CentOS-6/isv:ownCloud:community.repo
yum install owncloud php-ldap
Buat file owncloud.conf di dalam folder /etc/httpd/conf/
1
nano /etc/httpd/conf/owncloud.conf
Isi dengan setingan berikut
1
2
3
4
5
6
7
8
9
10
11
12
13
14
15
<IfModule mod_alias.c>
Alias /owncloud /var/www/owncloud/
</IfModule>
<Directory /var/www/owncloud/>
   Options None
   Order allow,deny
   allow from all
</Directory>
<VirtualHost *:80>
    ServerAdmin agungsep@agungsep.co.id
    DocumentRoot /var/www/html/owncloud
    ServerName owncloud.agungsep.co.id
    ErrorLog /var/log/owncloud.berkas.info-error_log
    CustomLog /var/log/owncloud.berkas.info-access_log common
</VirtualHost>
Edit file /etc/httpd/conf/httpd.conf
1
nano /etc/httpd/conf/httpd.conf
Tambahkan di bagian bawahnya
1
Include /etc/httpd/conf/owncloud.conf
Restart Apache
1
/etc/init.d/httpd restart
Seharusnya jika dipanggil ke owncloud.agungsep.co.id sudah mengarah ke owncloudnya tanpa memepengaruhi situs agungsep.co.id nya.

Setting MySQL

Install MySQL lalu tambahkan databases khusus untuk OwnCloud dan berikan privilege khusus bagi OwnCloud untuk database tersebut
akses root dengan password root1234
akses owncloud dengan password owncloud1234 mengakses database db_owncloud

Paska Instalasi

Konfigurasikan Owncloud agar terintegrasi dengan setingan mysql owncloud di atas

Setting Secure SSL Connection

Agar Pertukaran data antara client dan server terenkripsi dengan ssl, maka konfigurasi berikut dibutuhkan
Terlebih dahulu diinstall beberapa prerequsite
1
yum install mod_ssl openssl
Buat X.509 auto-signed certificate
1
openssl genrsa -out owncloud.key 2048
Langkah berikutnya adalah generate CSR (Certification Signing Request) dari key 2048 bis di atas. Pada bagian ini, isi sesuai data “organisasi”
1
openssl req -new -key owncloud.key -out owncloud.csr
Lalu kita auto-signate sertifikatnya
1
openssl x509 -req -days 365 -in owncloud.csr -signkey owncloud.key -out owncloud.crt
Pindahkan files nya sesuai dengan tempatnya
1
2
3
mv owncloud.crt /etc/pki/tls/certs
mv owncloud.key /etc/pki/tls/private/
mv owncloud.csr /etc/pki/tls/private/
Edit file owncloud.conf untuk menambahkan SSL virtualhost
1
vim /etc/httpd/conf.d/owncloud.conf
Tambahkan bagian ini di bawah.
1
2
3
4
5
6
7
<VirtualHost *:443>
DocumentRoot /var/www/html/owncloud
SSLEngine On
SSLOptions +FakeBasicAuth +ExportCertData +StrictRequire
SSLCertificateFile /etc/pki/tls/certs/owncloud.crt
SSLCertificateKeyFile /etc/pki/tls/private/owncloud.key
</VirtualHost>
Kita paksa owncloud untuk menggunakan https dengan mengedit file conf nya owncloud
1
vim /var/www/html/owncloud/config/config.php
Tambahkan bagian ini
1
2
// Ajouter le paramètre :
‘forcessl’ => true
Terakhir, restart service apache
1
service httpd restart
Sekarang akses http ke owncloud akan di-redirect ke https.

Artikel ini diambil dari

doc[dot]owncloud[dot]com/server/2012.4.5/admin_manual/installation.html#centos-5-6
software[dot]opensuse[dot]org/download.html?project=isv:ownCloud:community&package=owncloud
en[dot]alexnogard[dot]com/secure-ssl-https-owncloud-centos/

Cara Mengganti Hostname di CentOS 6

Kadang-kadang kita perlu mengubah hostname dari server kita. Beginilah caranya

Edit file /etc/sysconfig/network

Buka file /etc/sysconfig/network dengan file editor favorit anda
1
nano /etc/sysconfig/network
Ubah bagian HOSTNAME
1
2
3
NETWORKING=yes
HOSTNAME=hostnamebaru.agungsep.co.id
GATEWAY=10.10.180.254

Edit file /etc/hosts

Buka file /etc/hosts dengan file editor favorit anda
1
nano /etc/hosts
Edit tulisan hostname baru anda sehingga menjadi seperti ini
1
2
3
127.0.0.1   localhost localhost.localdomain localhost4 localhost4.localdomain4
::1         localhost localhost.localdomain localhost6 localhost6.localdomain6
10.10.180.212 hostnamebaru.agungsep.co.id hostnamebaru

Restart Syslog

Jika server merupakan server production yang tidak boleh di-reboot, maka lakukan langkah berikut
1
/etc/init.d/rsyslog restart
Silakan logout terlebih dahulu. Setelah logout, hostname baru sudah bisa terlihat di prompt
Namun jika server bukan production sih, silakan di-reboot saja :)

Cek dengan tools hostname

1
2
hostname
hostname -f
Artikel ini sebagian besar diambil dari www[dot]electrictoolbox[dot]com/changing-hostname-centos/

Selasa, 27 Januari 2015

Web Server di Ubuntu 12.04

Membangun Web Server di Ubuntu 12.04 64bit (Apache, PHP, MySQL, phpMyAdmin)

Membuat webserver dengan menggunakan ubuntu 12.04
PERSIAPAN AWAL
Update dulu Ubuntu 12.04
apt-get update
INSTALLASI
apt-get install apache2 php5 php5-mysql mysql-server mysql-client
KONFIGURASI Apache2
Secara default file konfigurasi Apache2 di /etc/apache2/Apache2.conf
Tambahkan scipt
 Include /etc/apache2/site-enabled/*
KONFIGURASI MySQL
Ketika anda menginstall MySQL, anda diminta utuk memasukan password root. Maka ketika menjalankannya harus memasukan password tersebut.
mysql -u root -p
password
Buat user mysql, agar dapat dibedakan, ketika menggunakan root dengan user biasa.
CREATE USER 'user'@'localhost' IDENTIFIED BY 'passworduser';
FLUSH PRIVELEGES;
INSTALL phpMyAdmin
Secara default, di repository Ubuntu12.04 sudah disediakan package phpMyAdmin, tanpa update repo dahulu. Maka sudah langsung bisa diinstall.
apt-get install phpMyAdmin
MEMBUAT Apache2 DENGAN VIRTUALHOST
Buat user dan berikan hak akses untuk user tersebut
adduser namauser
chmod 755 /home/namauser
Buat public_html dan file php-nya
mkdir public_html
vi public_html/info.php
isikan pada file info.php
<? echo "Ini Untuk domain virtualhost"; ?>
kemudian keluar dan simpan.
Aktifkan module userdir
cd /etc/apache2/mods-enabled
ln -s /etc/apache2/mods-available userdir.conf userdir.conf
ln-s /exc/apache2/mods-available userdir.load userdir.load
Buat file vhost-nya di /etc/apache2/sites-available/vhost
<VirtualHost no_ip:80>
ServerName example.com
ServerAlias www.example.com
DocumentRoot /home/namauser/public_html
</VirtualHost>
Buat link file di /etc/apache2/sites-enabled
cd /etc/apache2/sites-enabled
ln -s /etc/apache2/sites-available/vhost vhost
Restart service
service Apache2 restart
service mysql restart
MENJALANKAN WEB SERVER
buka di browser anda http://example.com
dan untuk phpMyAdmin http://example.com/phpmyadmin

Install Ubuntu 14.04 Sebagai Webserver

Cara Install Ubuntu 14.04 Sebagai Webserver (Apache2, PHP5, MySQL) + phpMyAdmin Secara Offline Bag. 5

Cara Install Ubuntu 14.04 Sebagai Webserver (Apache2, PHP5, MySQL) + phpMyAdmin Secara Offline Bag. 5

17. Instalasi phpMyAdmin

Sumber: Gufron Rajo Kaciak: Cara Install Ubuntu 14.04 Sebagai Webserver (Apache2, PHP5, MySQL) + phpMyAdmin Secara Offline Bag. 5: http://dosen.gufron.com/tutorial/cara-install-ubuntu-1404-sebagai-webserver-apache2/35/
Untuk memudahkan pengelolaan database pada Ubuntu 14.04 Trusty Tahr versi server yang baru di install, kita dapat menggunakan aplikasi phpMyAdmin. phpMyAdmin adalah software yang berguna dalam pengelolaan database menggunakan interface web. Download terlebih dahulu aplikasi phpMyAdmin di alamat http://www.phpmyadmin.net/
Sumber: Gufron Rajo Kaciak: Cara Install Ubuntu 14.04 Sebagai Webserver (Apache2, PHP5, MySQL) + phpMyAdmin Secara Offline Bag. 5: http://dosen.gufron.com/tutorial/cara-install-ubuntu-1404-sebagai-webserver-apache2/35/
Dikarenakan komputer kita tidak terhubung ke jaringan global (Internet), maka kita harus melakukan proses instalasi phpMyAdmin secara manual, dengan cara mengupload source code phpMyAdmin ke server. Upload source code phpMyAdmin dilakukan dengan software FTP (File Transfer Protocol), seperti WinSCP 5.53 (Windows Secure Copy Protocol).
Sumber: Gufron Rajo Kaciak: Cara Install Ubuntu 14.04 Sebagai Webserver (Apache2, PHP5, MySQL) + phpMyAdmin Secara Offline Bag. 5: http://dosen.gufron.com/tutorial/cara-install-ubuntu-1404-sebagai-webserver-apache2/35/
Untuk kebutuhan tersebut, yang harus kita lakukan adalah mengaktifkan account root, agar kita dapat mengupload file ke server. Hal ini disebabkan account yang dibuat pada saat instalasi memiliki kewenangan terbatas.
Sumber: Gufron Rajo Kaciak: Cara Install Ubuntu 14.04 Sebagai Webserver (Apache2, PHP5, MySQL) + phpMyAdmin Secara Offline Bag. 5: http://dosen.gufron.com/tutorial/cara-install-ubuntu-1404-sebagai-webserver-apache2/35/
Langkah pertama adalah login ke konsol Ubuntu 14.04 Trusty Tahr menggunakan account yang dibuat pada saat instalasi. Konsol (console) adalah sebuah menu yang dapat digunakan untuk menjalankan perintah-perintah pada sistem Linux dalam modus teks (Command Line Interface). Untuk lingkungan sistem operasi Windows biasanya disebut dengan MS-DOS prompt atau command prompt.
Sumber: Gufron Rajo Kaciak: Cara Install Ubuntu 14.04 Sebagai Webserver (Apache2, PHP5, MySQL) + phpMyAdmin Secara Offline Bag. 5: http://dosen.gufron.com/tutorial/cara-install-ubuntu-1404-sebagai-webserver-apache2/35/
Gufron Rajo Kaciak

Jika berhasil, maka kita akan masuk ke dalam konsol Ubuntu 14.04 Trusty Tahr.
Sumber: Gufron Rajo Kaciak: Cara Install Ubuntu 14.04 Sebagai Webserver (Apache2, PHP5, MySQL) + phpMyAdmin Secara Offline Bag. 5: http://dosen.gufron.com/tutorial/cara-install-ubuntu-1404-sebagai-webserver-apache2/35/
Gufron Rajo Kaciak

Untuk mengaktifkan account root, account yang digunakan harus memiliki kewenangan sebagai root dengan memberikan perintah sudo sebelum perintah password (passwd root). Setelah itu, sistem akan meminta password account yang sedang digunakan. Baru kemudian, kita dapat memberikan password untuk account root.
Sumber: Gufron Rajo Kaciak: Cara Install Ubuntu 14.04 Sebagai Webserver (Apache2, PHP5, MySQL) + phpMyAdmin Secara Offline Bag. 5: http://dosen.gufron.com/tutorial/cara-install-ubuntu-1404-sebagai-webserver-apache2/35/
gufron@djamboe:~$ sudo passwd root
[sudo] password for gufron:
Enter new UNIX password:
Retype new UNIX password:
passwd: password updated successfully
gufron@djamboe:~$
Sumber: Gufron Rajo Kaciak: Cara Install Ubuntu 14.04 Sebagai Webserver (Apache2, PHP5, MySQL) + phpMyAdmin Secara Offline Bag. 5: http://dosen.gufron.com/tutorial/cara-install-ubuntu-1404-sebagai-webserver-apache2/35/
Selanjutnya, edit pengaturan SSH dengan teks editor nano agar account root dapat login dengan software FTP (File Transfer Protocol).
Sumber: Gufron Rajo Kaciak: Cara Install Ubuntu 14.04 Sebagai Webserver (Apache2, PHP5, MySQL) + phpMyAdmin Secara Offline Bag. 5: http://dosen.gufron.com/tutorial/cara-install-ubuntu-1404-sebagai-webserver-apache2/35/
gufron@djamboe:~$ sudo nano /etc/ssh/sshd_config
[sudo] password for gufron:
Sumber: Gufron Rajo Kaciak: Cara Install Ubuntu 14.04 Sebagai Webserver (Apache2, PHP5, MySQL) + phpMyAdmin Secara Offline Bag. 5: http://dosen.gufron.com/tutorial/cara-install-ubuntu-1404-sebagai-webserver-apache2/35/
Cari dan ganti teks PermitRootLogin without-password dengan PermitRootLogin yes.
Sumber: Gufron Rajo Kaciak: Cara Install Ubuntu 14.04 Sebagai Webserver (Apache2, PHP5, MySQL) + phpMyAdmin Secara Offline Bag. 5: http://dosen.gufron.com/tutorial/cara-install-ubuntu-1404-sebagai-webserver-apache2/35/
Gufron Rajo Kaciak

Kemudian tekan tombol CTRL-X dan tombol Y pada keyboard. Kemudian tombol Enter untuk menyimpan perubahan yang dilakukan dan keluar dari teks editor nano.
Sumber: Gufron Rajo Kaciak: Cara Install Ubuntu 14.04 Sebagai Webserver (Apache2, PHP5, MySQL) + phpMyAdmin Secara Offline Bag. 5: http://dosen.gufron.com/tutorial/cara-install-ubuntu-1404-sebagai-webserver-apache2/35/
Gufron Rajo Kaciak

Selanjutnya restart kembali service SSH agar pengaturan yang dilakukan aktif pada sistem.
Sumber: Gufron Rajo Kaciak: Cara Install Ubuntu 14.04 Sebagai Webserver (Apache2, PHP5, MySQL) + phpMyAdmin Secara Offline Bag. 5: http://dosen.gufron.com/tutorial/cara-install-ubuntu-1404-sebagai-webserver-apache2/35/
gufron@djamboe:~$ sudo service ssh restart
[sudo] password for gufron:
ssh stop/waiting
ssh start/running, process 1488
Sumber: Gufron Rajo Kaciak: Cara Install Ubuntu 14.04 Sebagai Webserver (Apache2, PHP5, MySQL) + phpMyAdmin Secara Offline Bag. 5: http://dosen.gufron.com/tutorial/cara-install-ubuntu-1404-sebagai-webserver-apache2/35/
Setelah itu, barulah kita dapat login dengan software FTP (File Transfer Protocol) seperti WinSCP 5.53 (Windows Secure Copy Protocol) menggunakan account root untuk login ke server. Isian untuk File Protocol adalah SFTP, Host Name adalah 192.168.158.158 dan Port number 22. Account yang digunakan root dengan password yang ditentukan sebelumnya.
Sumber: Gufron Rajo Kaciak: Cara Install Ubuntu 14.04 Sebagai Webserver (Apache2, PHP5, MySQL) + phpMyAdmin Secara Offline Bag. 5: http://dosen.gufron.com/tutorial/cara-install-ubuntu-1404-sebagai-webserver-apache2/35/
Gufron Rajo Kaciak

Klik Login untuk masuk ke dalam server Ubuntu 14.04 Trusty Tahr yang sudah diinstall.
Sumber: Gufron Rajo Kaciak: Cara Install Ubuntu 14.04 Sebagai Webserver (Apache2, PHP5, MySQL) + phpMyAdmin Secara Offline Bag. 5: http://dosen.gufron.com/tutorial/cara-install-ubuntu-1404-sebagai-webserver-apache2/35/
Gufron Rajo Kaciak

Upload source code phpMyAdmin (dalam tutorial ini, source code phpMyAdmin yang didownload adalah phpMyAdmin-4.2.8-all-languages.tar.gz) dengan cara drag-and-drop.
Sumber: Gufron Rajo Kaciak: Cara Install Ubuntu 14.04 Sebagai Webserver (Apache2, PHP5, MySQL) + phpMyAdmin Secara Offline Bag. 5: http://dosen.gufron.com/tutorial/cara-install-ubuntu-1404-sebagai-webserver-apache2/35/
Gufron Rajo Kaciak

Setelah file source code phpMyAdmin diupload (dalam tutorial ini diupload ke folder /var/www/html), selanjutnya ekstrak source code phpMyAdmin pada console server Ubuntu 14.04 Trusty Tahr dengan perintah:
Sumber: Gufron Rajo Kaciak: Cara Install Ubuntu 14.04 Sebagai Webserver (Apache2, PHP5, MySQL) + phpMyAdmin Secara Offline Bag. 5: http://dosen.gufron.com/tutorial/cara-install-ubuntu-1404-sebagai-webserver-apache2/35/
gufron@djamboe:~$ cd /var/www/html
gufron@djamboe:/var/www/html$ sudo tar -xzvf phpMyAdmin-4.2.8-all-languages.tar.gz
gufron@djamboe:/var/www/html$ sudo mv phpMyAdmin-4.2.8-all-languages phpmyadmin
Sumber: Gufron Rajo Kaciak: Cara Install Ubuntu 14.04 Sebagai Webserver (Apache2, PHP5, MySQL) + phpMyAdmin Secara Offline Bag. 5: http://dosen.gufron.com/tutorial/cara-install-ubuntu-1404-sebagai-webserver-apache2/35/
Sekarang kita sudah dapat mengelola database server menggunakan phpMyAdmin melalui browser dengan alamat http://192.168.158.158/phpmyadmin
Sumber: Gufron Rajo Kaciak: Cara Install Ubuntu 14.04 Sebagai Webserver (Apache2, PHP5, MySQL) + phpMyAdmin Secara Offline Bag. 5: http://dosen.gufron.com/tutorial/cara-install-ubuntu-1404-sebagai-webserver-apache2/35/
Gufron Rajo Kaciak

Untuk login ke dalam phpMyAdmin, gunakan account root dengan password yang ditentukan saat instalasi MySQL server.
Sumber: Gufron Rajo Kaciak: Cara Install Ubuntu 14.04 Sebagai Webserver (Apache2, PHP5, MySQL) + phpMyAdmin Secara Offline Bag. 5: http://dosen.gufron.com/tutorial/cara-install-ubuntu-1404-sebagai-webserver-apache2/35/
Gufron Rajo Kaciak

Dengan phpmyadmin, kita dapat membuat atau mengelola database MySQL menggunakan interface web.
Sumber: Gufron Rajo Kaciak: Cara Install Ubuntu 14.04 Sebagai Webserver (Apache2, PHP5, MySQL) + phpMyAdmin Secara Offline Bag. 5: http://dosen.gufron.com/tutorial/cara-install-ubuntu-1404-sebagai-webserver-apache2/35/
Untuk melihat konfigurasi php server, buatlah sebuah file info.php menggunakan aplikasi teks editor nano dengan perintah:
Sumber: Gufron Rajo Kaciak: Cara Install Ubuntu 14.04 Sebagai Webserver (Apache2, PHP5, MySQL) + phpMyAdmin Secara Offline Bag. 5: http://dosen.gufron.com/tutorial/cara-install-ubuntu-1404-sebagai-webserver-apache2/35/
gufron@djamboe:~$ sudo nano /var/www/html/info.php

Gufron Rajo Kaciak

Setelah terbuka layar teks editor nano, selanjutnya salin perintah berikut:
Sumber: Gufron Rajo Kaciak: Cara Install Ubuntu 14.04 Sebagai Webserver (Apache2, PHP5, MySQL) + phpMyAdmin Secara Offline Bag. 5: http://dosen.gufron.com/tutorial/cara-install-ubuntu-1404-sebagai-webserver-apache2/35/
<?php
phpinfo
(); ?>

Gufron Rajo Kaciak

Kemudian tekan tombol CTRL-X dan tombol Y pada keyboard. Kemudian tombol Enter untuk menyimpan perubahan yang dilakukan dan keluar dari teks editor nano.
Sumber: Gufron Rajo Kaciak: Cara Install Ubuntu 14.04 Sebagai Webserver (Apache2, PHP5, MySQL) + phpMyAdmin Secara Offline Bag. 5: http://dosen.gufron.com/tutorial/cara-install-ubuntu-1404-sebagai-webserver-apache2/35/
Selanjutnya, akses di browser dengan alamat http://192.168.158.158/info.php
Sumber: Gufron Rajo Kaciak: Cara Install Ubuntu 14.04 Sebagai Webserver (Apache2, PHP5, MySQL) + phpMyAdmin Secara Offline Bag. 5: http://dosen.gufron.com/tutorial/cara-install-ubuntu-1404-sebagai-webserver-apache2/35/
Gufron Rajo Kaciak

Proses instalasi Ubuntu 14.04 Trusty Tahr versi server untuk kebutuhan webserver (Apache2, PHP dan MySQL) serta phpMyAdmin 4.2.8 secara offline sudah selesai dilakukan.

Install phpmyadmin UbuntuServer 10.04

Cara Install phpmyadmin di Ubuntu LTS Server 10.04


–phpmyadmin adalah Interface web untuk database MySQL… Itu membuat mengelola, menciptakan dan mengkonfigurasi MySQL database mudah. Ini adalah alat yang sangat umum dan sering diinstal secara default oleh banyak web host. Anda harus sudah memiliki LAMP diinstal untuk langkah-langkah untuk bekerja.
–Untuk alasan keamanan saya sarankan membatasi akses ke phpmyadmin dari alamat IP tertentu internal:
sudo apt-get install phpmyadmin
–Masukkan sandi Anda:
–Pilih apache dengan menekan space bar ketika apache disorot:
–Pilih Ya untuk mengkonfigurasi database phpmyadmin:
–Masukkan sandi MySQL:
–Buat password phpmyadmin db atau Anda dapat membiarkannya kosong untuk memiliki satu diciptakan untuk Anda. I have always created one myself. Saya selalu membuat satu sendiri:
–Jika Anda memutuskan untuk membuat database password phpmyadmin memasukkannya kembali:
–Kita perlu tahu alamat IP dari mesin Anda hanya menginstal phpmyadmin di. Setelah kita mengetahui ini kita dapat mengakses alat dari web browser pada komputer di jaringan anda. Ini adalah ide yang baik untuk mengatur alamat IP statis pada server Anda sehingga tidak akan berubah:
–Ketikkan berikut untuk mencari alamat IP:
ifconfig
–Anda dapat melihat satu perangkat memiliki alamat IP 127.0.0.1. Kita bisa mengabaikan alamat ini karena ini adalah alamat loopback.Saya dapat melihat bahwa alamat IP saya eth0 adalah perangkat 192.168.1.114
–Jadi sekarang kita tahu alamat IP dari mesin dengan phpmyadmin terpasang. Mari kita menavigasi ke halaman login phpmyadmin.
http://IPaddressServer/phpmyadmin
Nama pengguna akan menjadi root
Password akan password root ketika anda menginstal MySQL.
__SELAMAT MENCOBA__

Install ownCloud 7 On Ubuntu 14.04

How To Install ownCloud 7 On Ubuntu 14.04


Last edited 24/July/2014

This document describes how to install and configure ownCloud 7 on Ubuntu 14.04. I will also connect to the ownCloud Server's data with another Ubuntu 14.04 Desktop and a Windows 7 machine. ownCloud provides access to your data through a web interface or WebDAV while providing a platform to easily view, sync and share across devices—all under your control. ownCloud’s open architecture is extensible via a simple but powerful API for applications and plugins and works with any storage.

1 Preliminary Note

This tutorial is based on Ubuntu 14.04 server, so you should set up a basic Ubuntu 14.04 server installation before you continue with this tutorial. The system should have a static IP address. I use 192.168.0.100 as my IP address in this tutorial and server1.example.com as the hostname. Again I have  192.168.0.101 as IP address of second Ubuntu 14.04 server and server2.example.com as the hostname. I will be using the user=srijan for the installation and configuration. I will also show the ownCloud sharing options with windows machine, so I have working Windows 7 machine too.
 

2 Installation of ownCloud 7

OwnCloud is a web application that can store and serve content from a centralized location, much like Dropbox. The difference is that ownCloud 7 allows you to host the serving software on your own machines, taking the trust issues out of putting your personal data someone else's server.
We will first download the release key associated with the ownCloud software:
cd /tmp
wget http://download.opensuse.org/repositories/isv:ownCloud:community/xUbuntu_14.04/Release.key
sudo apt-key add - < Release.key
Then we can add the ownCloud 7 repository as follows:
sudo sh -c "echo 'deb http://download.opensuse.org/repositories/isv:/ownCloud:/community/xUbuntu_14.04/ /' >> /etc/apt/sources.list.d/owncloud.list"
Finally, update the package database and install ownCloud:
sudo apt-get update
sudo apt-get install owncloud

3 ownCloud 7 configuration on Ubuntu 14.04

Further we need to install Mariadb(Mysql) to get the configurations as follows:
sudo apt-get install mariadb-server
It will ask for password input, just enter your desired password there.
We will be configuring our ownCloud server to take advantage of the more robust MySQL database instead of the SQLite default implementation. To do so, we must configure MySQL first as:
sudo mysql -u root -p
Put the mariadb password which you selected before, & create a database for ownCloud in Mariadb prompt:
CREATE DATABASE owncloud;
Assign privileges to a new MySQL user to handle database operations for ownCloud:
GRANT ALL ON owncloud.* to 'owncloud'@'localhost' IDENTIFIED BY 'database_password';
exit
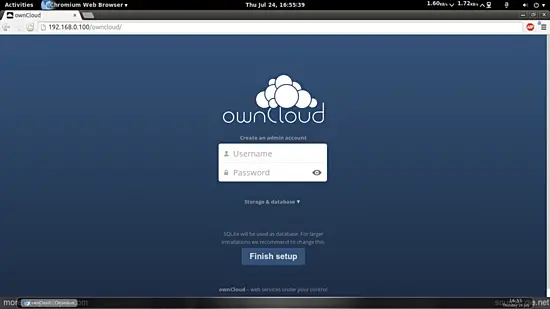
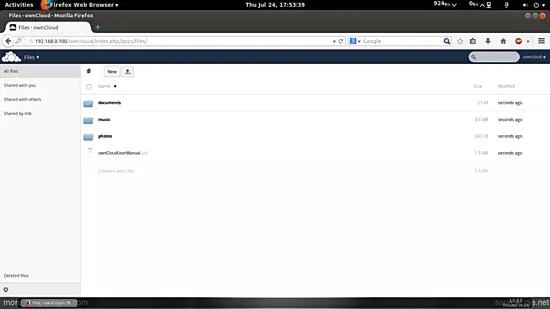
Now, if you go to your IP address or domain name followed by "/owncloud" in your browser, you will see a page that looks like this:

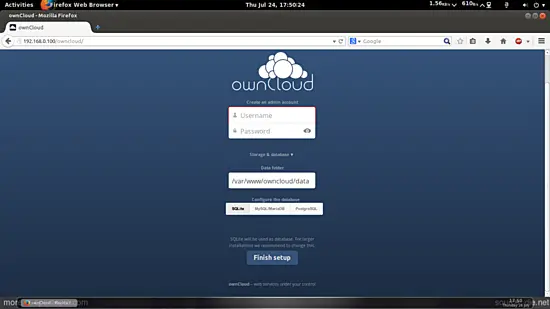
Click on Storage & database:


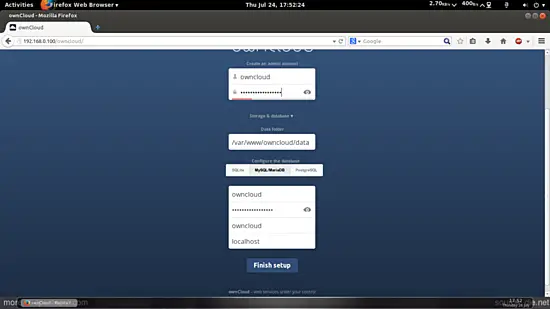
Now select MySQL/MariaDB and create an admin account as in my case I have choosen owncloud as my admin account and a desired password for that user:


In the lower tab below the MySQL/MariaDB give the entry of the username=owncloud password=database_password databasename=owncloud.
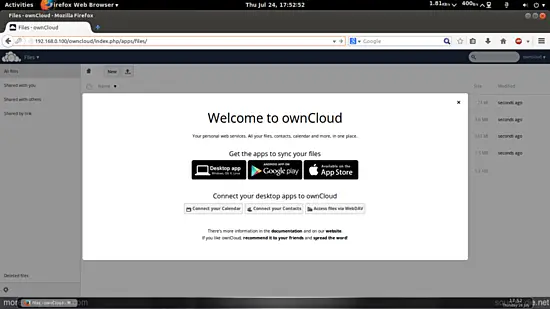
Then press Finish setup.


4 Mounting the ownCloud 7 share on Ubuntu 14.04

We can mount the shared point with the other machines, here I will show you the way to process to moint it through WebDAV tools in another Ubuntu machine. I am running the command on my second machine server2.example.com:
sudo apt-get update
sudo apt-get install davfs2
We will allow non-root users to mount and unmount the WebDAV shares by typing:
sudo dpkg-reconfigure davfs2
Should unprivileged users be allowed to mount WebDAV resources? <--Yes
Moving ahead I will be adding my username=srijan to WebDAV group:
 sudo usermod -aG davfs2 srijan
We want to make the permanent mount point in server2.example.com, so I will give the following entries in the /etc/fstab:
sudo vi /etc/fstab

[...]
192.168.0.100/owncloud/remote.php/webdav /home/srijan/owncloud davfs user,rw,noauto 0 0
Now in user=srijan's home drive I will create directories, one to mount the share point and another to hold the configurations details:
mkdir ~/owncloud
 mkdir ~/.davfs2
Further create a file as:
vi ~/.davfs2/secrets
192.168.0.100/owncloud/remote.php/webdav owncloud database_password
Ensure that the file is writable by only you by using the file manager or by issuing the following command:
chmod 600 ~/.davfs2/secrets
Now we will mount it as follows:
sudo mount owncloud/
srijan@server2:~$ sudo mount owncloud/
Please enter the username to authenticate with server
192.168.0.100/owncloud/remote.php/webdav/ or hit enter for none.
  Username: owncloud
Please enter the password to authenticate user owncloud with server
192.168.0.100/owncloud/remote.php/webdav/ or hit enter for none.
  Password:  database_password
srijan@server2:~$

Note: The given credentials will be used further, so please take a note of it:
Username: owncloudPassword:  database_password

Further there could be have permissions error in the folder, so we will change the folder permission as owner of the user:
chown -R srijan:srijan owncloud/
To automatically mount the folder on login at server2.example.com, add the mount ~/owncloud command to the ~/.bashrc file.
vi ~/.bashrc
[...]
mount ~/owncloud
After mounting successfully you can get some error Resource temporarily unavailable and Certificate warnings then it can be removed as follows:
  • For Resource temporarily unavailable:
vi /etc/davfs2/davfs2.conf
[...]
use_locks 0
  • For Certificate warnings:
If you use a self-signed certificate, you will get a warning. If you are willing to take the risk of a man in the middle attack, run this command instead:
echo "y" | mount ~/owncloud > /dev/null 2>&1

5 Mounting the ownCloud 7 share on Windows 7

We can access the data from ownCloud 7 server on a window machine also. There are many methods to this, you can check this link for them. I will explain two of them: Directory synchronisation with the ownCloud client and mounting the webdav share with Cyberduck.

5.1 Sync a local Directory with the ownCloud Windows client

  1. I will be using the ownCloud clients for that. Open link and download the windows client from here
Simply install the client and it will work for you.
Enter the details http://192.168.0.100/owncloud:


Again give your credentials(  user=owncloud and password=database_password) which we have settup while installing the ownCloud 7 and the window will appear:


You can open the local folder to access the files locally

Minggu, 25 Januari 2015

setting BHT


Download a file using a USB cable.


The following BHTs can be used..
BHT
BHT-900 series


What You Need

Hardware
  • PC (Windows XP SP2 or later)
  • BHT
  • USB cable (supporting USB2.0, mini-B type)
Software and Manual


Install Required Software

Installing a driver
When connecting the BHT with a USB cable, you need to install a driver to use the USB as a virtual serial port.
  1. Download the Active USB-COM port driver.
  2. Decompress the downloaded file.
  3. Install the driver by referring to the Installation Guide.
Installing BHT-BASIC4.0 Transfer Utility
You need to install a tool for transmitting the program files.
  1. Download the BHT-BASIC4.0 Transfer Utility.
  2. Decompress the downloaded file and install the Transfer Utility.

Download a File

Establishing download environments
Preparation of BHT
  1. Turn on the BHT while keeping the [SF] key and the [1] key pressed together to get the system menu started.
    Select [DEVICE] -> [USB].
    The USB communication setting menu is displayed.
    Select [COM] for the USB connection mode.

    Note: The menu and the item number depend on the BHT.
  2. Select [SET SYSTEM] -> [COMMUNICATION] -> [COM PORT] from the system menu.
    The communication port setting menu is displayed.
    Select [Connector] for the communication port.
Preparation of PC
  1. Turn on the device manager and check the COM port number the BHT is connected to.
    Setting is switched between “Connected” and “Disconnected” every time the BHT is plugged in and out of the PC.

  2. Turn on the Transfer Utility.
  3. Select [Select Protocol…Ctrl+P] from the [Option (O)] menu. Ensure that the communication protocol is set to “YMODEM(Batch)”.
    Ymodem is used for the communication protocol in this case. If anything other than Ymodem is used, you need to change it.
  4. Select [Option…Ctrl+O] from the [Option (O)] menu.
  5. The communication option setting menu is displayed.
    Set the communication port and communication speed most appropriate for your operating environments. Use the COM port number confirmed by the device manager for a communication port.

    [Communication Option Setting when YMODEM(Batch) selected]
Downloading
  1. Start the system menu by turning on the BHT while keeping the [SF] key and the [1] key pressed together and then select [DOWNLOAD].
    The download menu is displayed after that.
    Ymodem is used for the communication protocol in this case. If anything other than Ymodem is used, you need to change it.

  2. Select [FILE].
    The BHT is set to the wait state while a download is in progress, which is indicated by "** Waiting **" on the screen.
  3. Select [Send…Ctrl+S] from the [File (F)] menu on the BHT-BASIC4.0 Transfer Utility to view the [Send File] dialog box.
  4. Select the user program you have created and click [Open (O)].
  5. Download starts. The progress of download is shown on the screen.
  6. The screen below is displayed on completion of the download.
    [Download completed (BHT side)]


    [Download completed (BHT-BASIC4.0 Transfer Utility side)]

Disable Iptables CentOS

Cara Disable Iptables Linux CentOS

Cara Disable Iptables Linux CentOS. Iptables adalah suatu tools dalam sistem operasi linux yang berfungsi sebagai alat untuk melakukan filter (penyaringan) terhadap (trafic) lalulintas data. Secara sederhana digambarkan sebagai pengatur lalulintas data. Dengan iptables inilah kita akan mengatur semua lalulintas dalam komputer kita, baik yang masuk ke komputer, keluar dari komputer, ataupun traffic yang sekedar melewati komputer kita.

Sebenarnya bila kita sudah mengerti iptables dalam lingkup security sangat bagus untuk digunakan, tetapi terkadang untuk para pengguna linux pemula sangat menyulitkan dan menggangu proses pembelajaran, seperti ketika instal lampp web server maka harus dibukakan beberapa port yg dibutuhkan. Oleh karena itu saya ingin memaparkan sedikit tips dan trik yaitu Cara Disable Iptables Linux CentOS.
  1. Buka terminal anda dan login menggunakan root.
  2. Cek terlebih dahulu kondisi saat ini apakah services iptables dalam keadaan Enable atau Disable dengan cara ketikkan perintah seperti dibawah ini :
    service iptables status
    Jika ketika anda menuliskan "service iptables status" tampilannya sama dengan gambar yang diatas berarti service iptables anda masih enable atau dapat dikatakan masih aktif.
  3. Setelah kita lakukan pengecekan dan ternyata service iptables masih aktif tahapan selanjutnya adalah menyimpan dan mendisable service iptablesnya dengan cara menuliskan perintah seperti dibawah ini :
    /etc/init.d/iptables save
    /etc/init.d/iptables stop
  4. Setelah kita disable atau matikan servicenya pastikan cek kembali status servicenya dengan cara menuliskan kembali perintah "service iptables status".
  5. Untuk tahapan terakhir yaitu mendisable iptables agar tidak kembali aktif ketika booting / restart dengan cara menuliskan perintah seperti dibawah ini :
    chkconfig iptables off
Semoga artikel